Coconut Cacao Raw Energy Bars

Coconut Cacao Raw Food Bar

I will be the first to tell you that I luv a Mounds bar. Sweet coconut dipped in rich dark chocolate- sign me up for that.

But ever since I have been in on what I like to call a “cleaner” eating plan, the truth is that I am constantly on a quest to find chocolate options I can eat more than every time my eyes wander longingly at a vending machine. You know, as the saying goes, some chocolate a day keeps the doctor away. Well, something like that.

I have also recently discovered raw cashews and am a bit obsessed. Raw nuts are amazing in their ability to gently blend into whatever you might need them to be. Need a non-dairy cheese option? Throw some raw, soaked cashews in a blender with nutritional yeast (queso recipe coming soon that I promise is going to knock your socks off). Milk substitute? Soak raw almonds, then run them through a blender with water. Need a bar to satisfy your constantly nagging/slightly annoying sweet tooth? Enter coconut cacao heaven.

Coconut and Cacao Raw Bars

These bars are uber simple to make, and unlike most raw food bars, don’t use an over abundance of dates.

By the way, can we all be real for a second? Dates are not my favorite. They remind me a bit of the smell of my grandmother’s (loved her!) closet drawer.

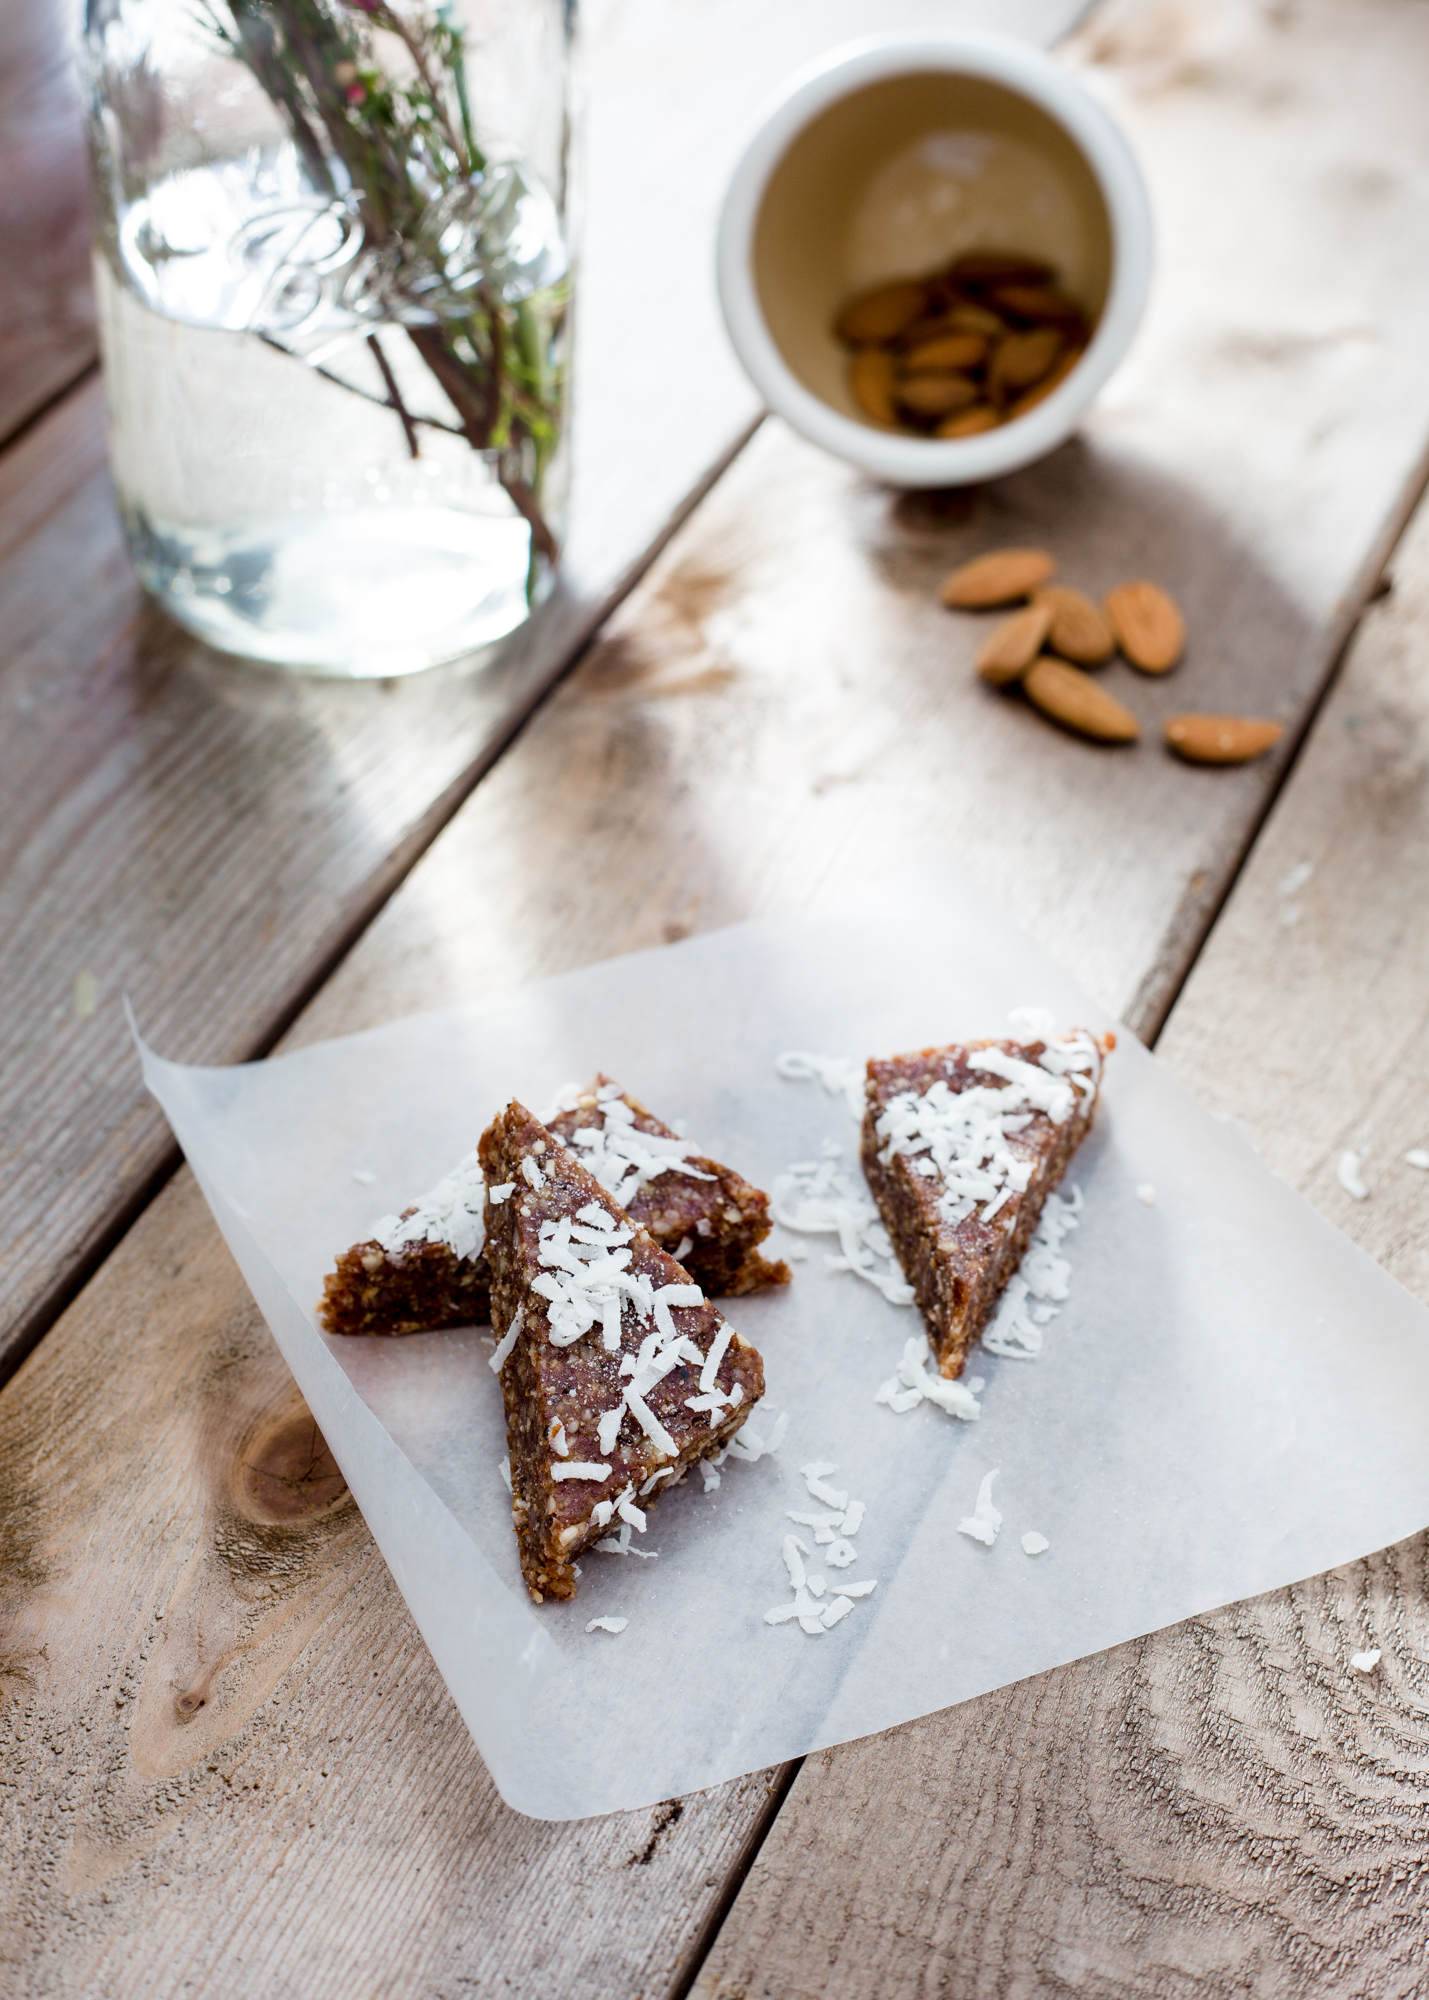
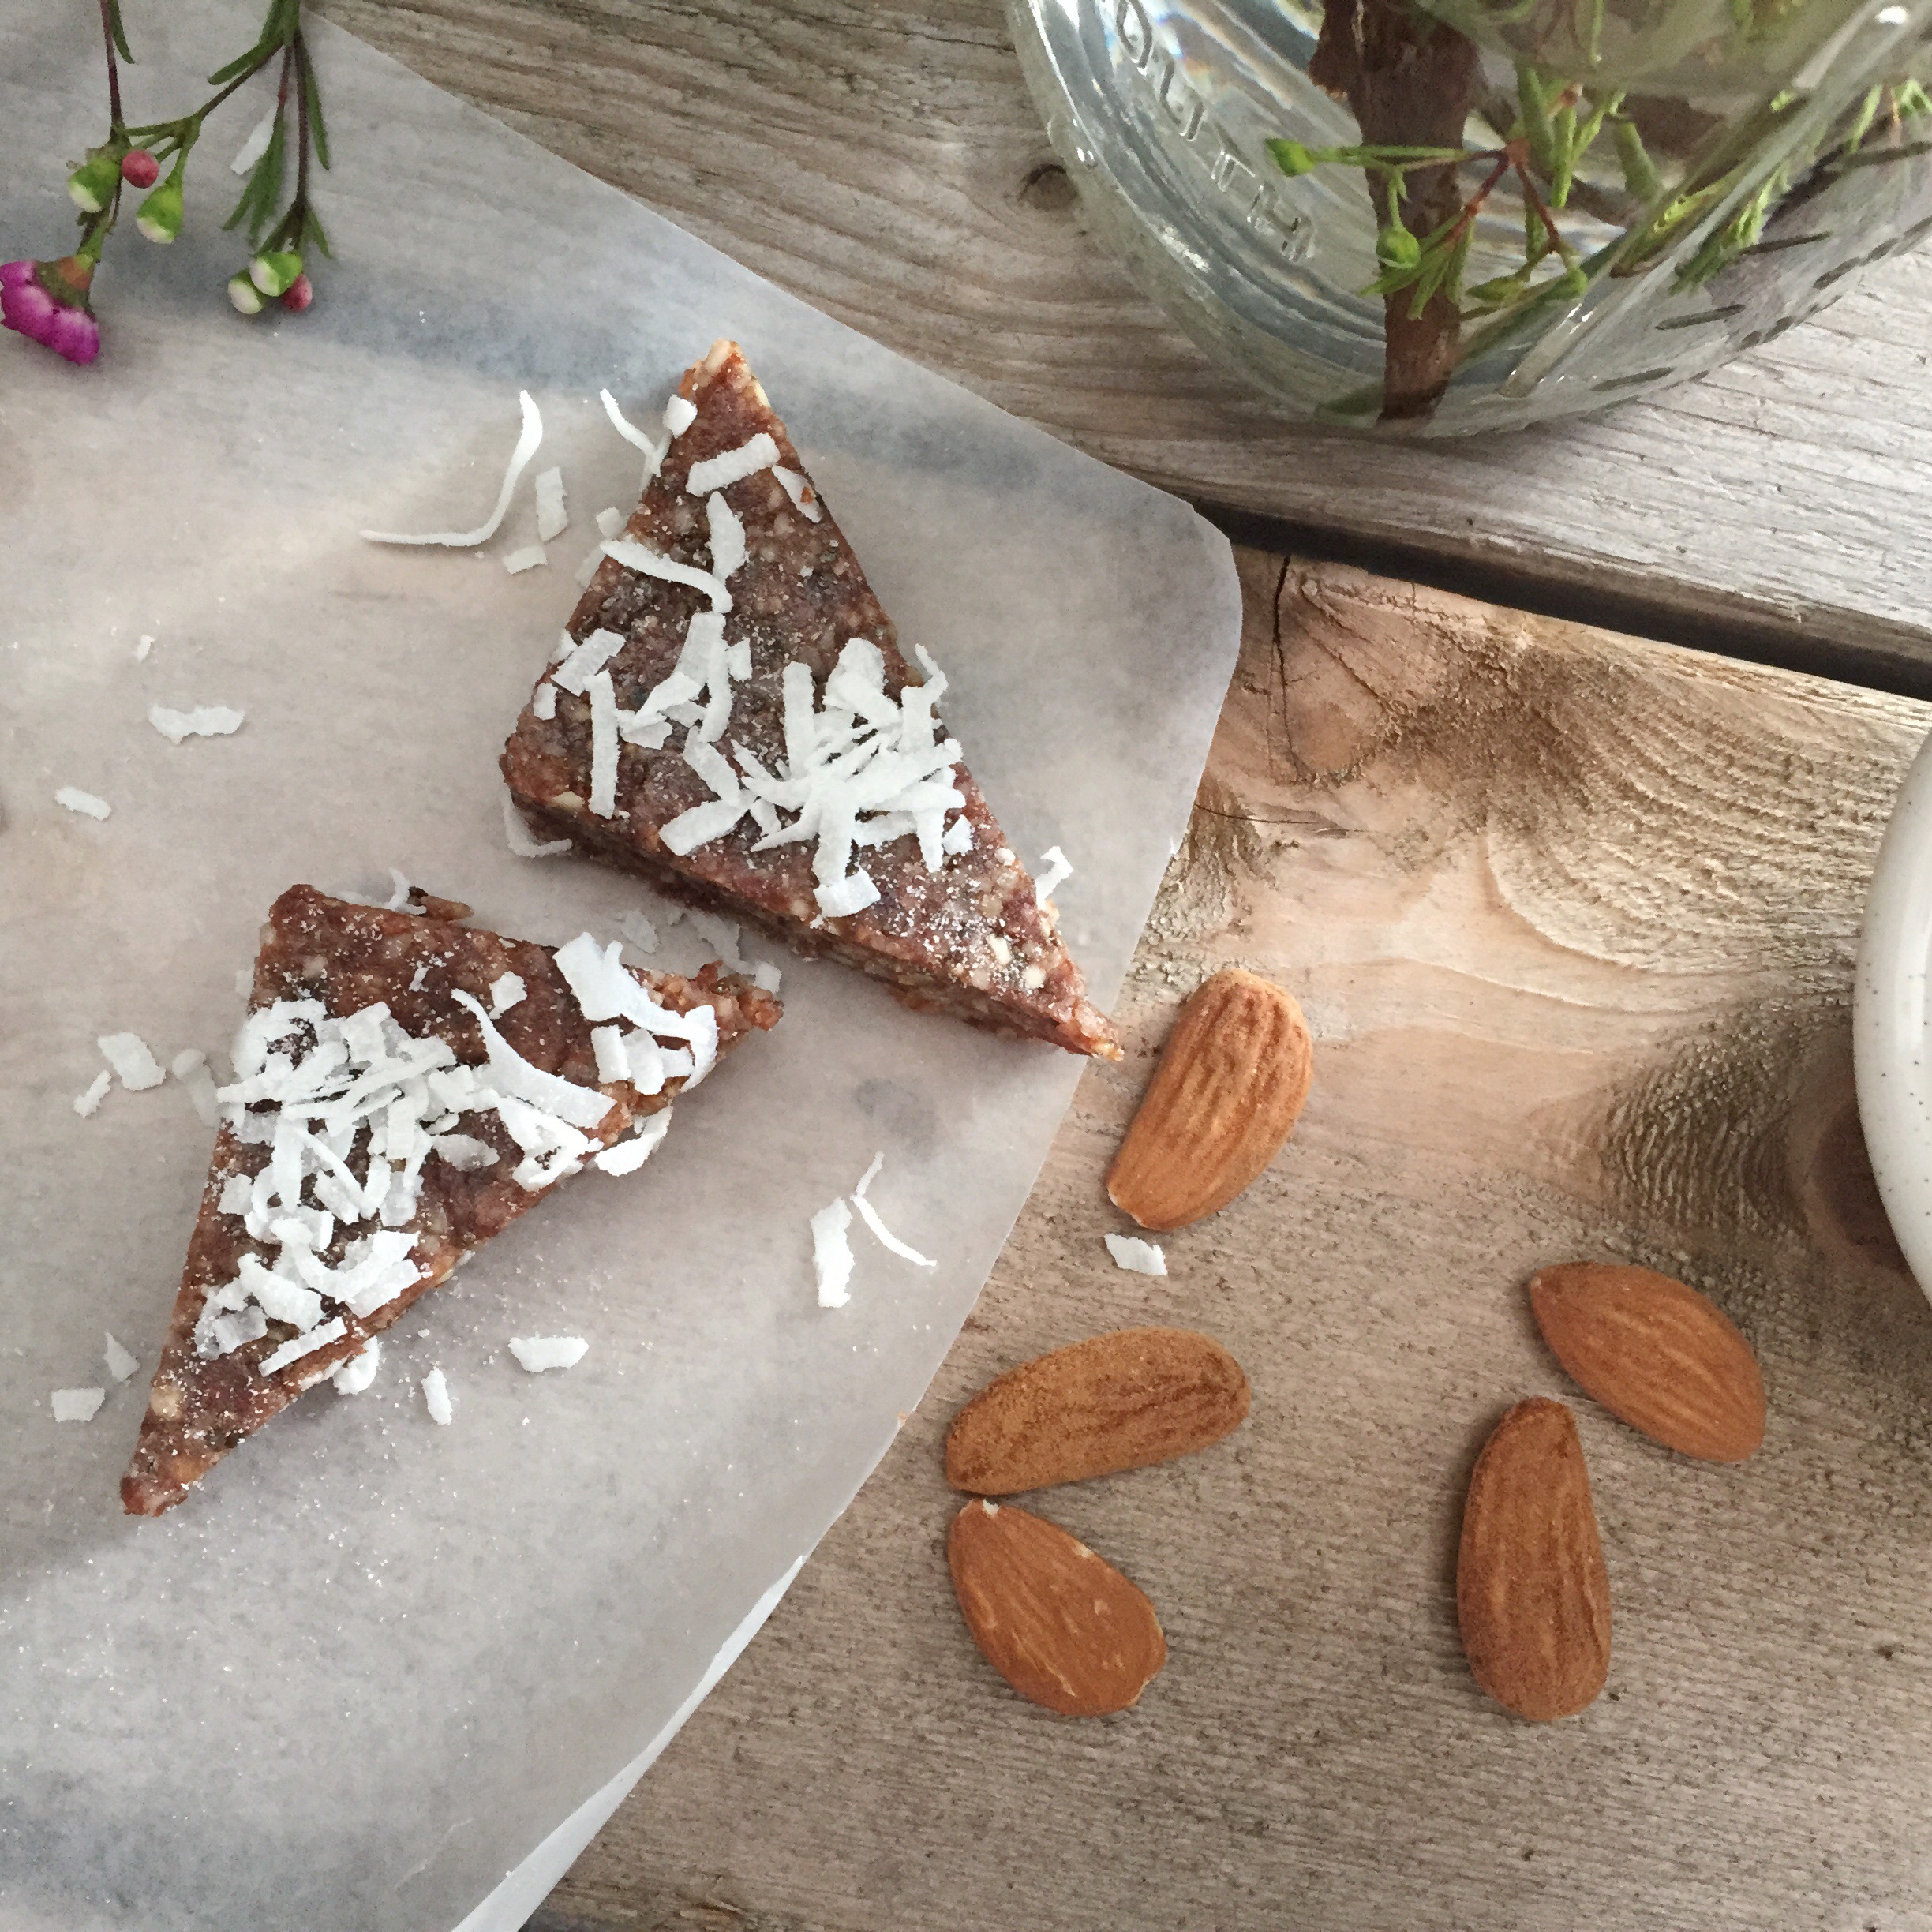
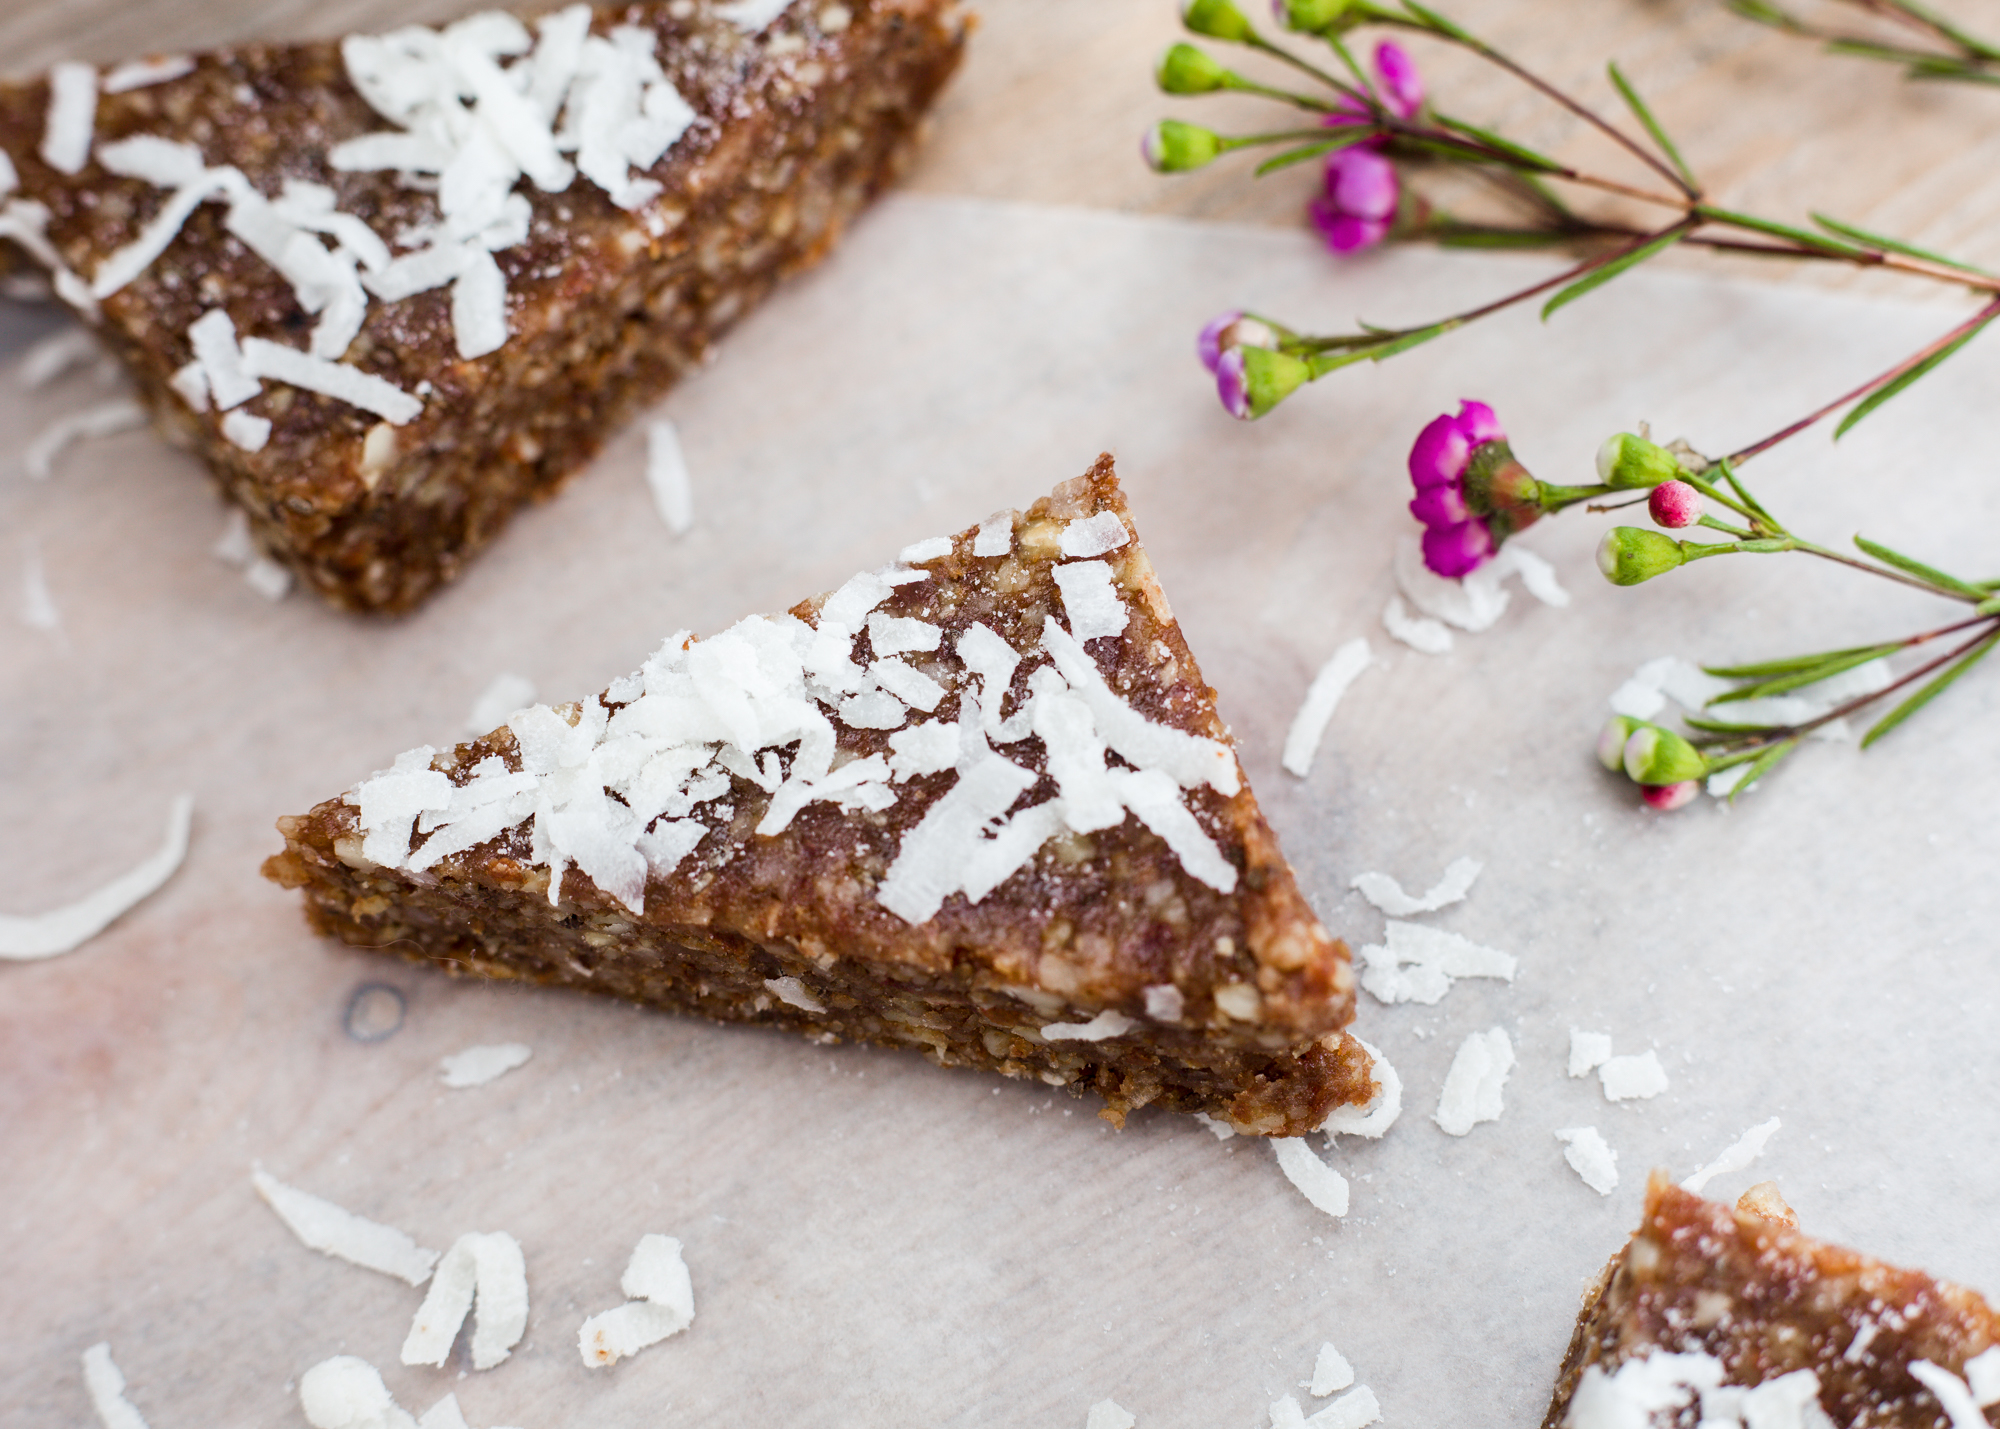
Instead, these bars are chocked full of raw almonds, cashews, cacao powder, and coconut. They hold together beautifully, and are so easy to assemble. Plus, they have lots of healthy fats, which will hopefully fuel you on your journey past the vending machine. Plus, my husband, his friends, and everyone I handed one of these to thought it was delicious.

Chocolate Coconut Raw Food Bars-252

So, Mounds world watch out- there’s a new bar in town.

Coconut Cacao bars (Inspired by About.com, recipe adjusted by me)

What You Will Need

  • 2 cups raw cashews
  • 1 cup raw almonds, soaked (this is one cup measured before you soak the almonds)*
  • 1 cup dates, pitted and chopped
  • 2 tablespoons chia seed
  • 2 tablespoons cacao powder
  • 1 teaspoon vanilla extract
  • 1/4 teaspoon salt
  • 1/2 cup sweetened (or unsweetened if you prefer) coconut, plus more for sprinkling
  • 1 tablespoon water
  • wax paper

What You Will Do

  1. Line an 8 by 8 inch square pan with wax paper.**
  2. Blend the cashews, almonds, dates, chia seed, cacao powder, vanilla extract, and salt in a food processor until the pieces are about the size of fine gravel.
  3. Add 1 tablespoon water and coconut to the processor.
  4. Pulse the mixture until it begins to form a large “dough” ball in the processor, or until the motor sounds like it’s whistling angrily (maybe this was just me.)
  5. Use a spatula or your hands to press the “dough” into an 8 by 8 inch baking pan.
  6. To get the top of the bars super smooth, use one more strip of parchment paper (cut as wide as the baking pan), and press it into the top of the bars. Use your spatula to gently press the mixture down, starting at the top of the pan and working downward, then side to side, until it is evenly smooth on the top.
  7. Peel off the wax paper, then sprinkle with as much coconut as desired.
  8. Cover and chill the mixture for at least an hour.
  9. Cut into squares and enjoy!

*Soaking nuts is a whole new world to me, but all you have to do is pour them into a bowl, then add enough water to cover them. Sit them out at room temp for at least eight hours, and up to 12.

**The easiest way I have found to line baking pans is this: Begin to stretch the paper off the roll and across the width of your pan. Cut the paper right before it reaches the edge of the pan. Turn the pan counterclockwise, and do the same thing for the other side. Spray the bottom of the pan with cooking spray, then insert one strip of paper. Spray cooking spray on the first strip, then top with the final one. Viola!

Low Sugar Banana Blueberry Baby Smash Cake

Baby Banana Blueberry Smash Cake


In my book, babies are absolutely precious. In fact some are so cute I actually feel like my heart might explode with joy and undeniable mushiness. Full of life, cooing at every glittery object dangled across their tiny little faces; arms outstretched to the object’s owner, inviting them to cuddle. My absolute favorite baby is one with what I like to call “Michelin” arms- a.k.a. the chubby rolls of skin that fold over their tiny elbows, waiting on the little one to grow a bit more before they unfold.

Now, I don’t actually have a baby, so I realize that my view of them is probably a bit romantic. Maybe they aren’t always cooing, maybe sometimes they cry. But in my mind, until this situation changes and reality hits, I will cling to the dreamy, giggly Gerber moments I see on Publix commercials.

Precious Pace eating cake!

That being said, I was over-the-moon thrilled when my friend Celine asked me to make a low sugar baby smash cake for precious Pace’s first birthday. Pace has yet to eat sugar, and being new to the realm of whole foods nutrition, it was a challenge to find a recipe I felt good about. Some were so far left I had trouble, in my newbie mind, recalibrating the ratios to resemble something that might delight a little one. Others seemed more towards center, but their appearance resembled something close to play dough. (Which, by the way, who didn’t love play dough as a kid? I think I loved it so much I ate it.)

But this recipe, sent to me by Celine and found on Fit Mama Real Food was a blessing. I loved Heather’s take on real food for kids. Her recipes are right on target, nutritious, and I was pumped to find out about her site. Knowing Pace’s love for all things fruit, I thought blueberries would be a nice tie-in for him, since blue appears to be a good color for boys’ birthday parties and all.

Below is my spin on her awesome recipe. I hope you have time to make this for the precious, giggly munchkins in your life; I think they’ll love it. Bon appetit and happy smashing!


Baby-Smash-Cake-with-Blueberries-


Low Sugar Banana Blueberry Smash Cake

 What You Need 

For the cake

  • 5 ripe, medium sized bananas
  • 3/4 cups whole wheat flour
  • 3/4 cup oat flour (just grind rolled oats in a blender, then measure)
  • 1 teaspoon cinnamon
  • 1 teaspoon baking soda
  • 1/2 teaspoon salt
  • 1/2 cup natural no sugar added applesauce
  • 3 tbsp coconut oil (melted), plus more for greasing cake pans
  • 3 teaspoons vanilla extract
  • 1/2 cup thawed frozen blueberries

For the frosting

  • 8 ounces organic heavy cream
  • 1/4 teaspoon vanilla extract
  • Additional fresh blueberries for topping

What You Will Do

1. Preheat your oven to 375, and use coconut oil to grease two 9-inch cake pans.

2. Mash bananas! This is somewhat tedious if you do it with a fork, but hey, gotta show the babies some luv!

3. Combine both flours, cinnamon, baking soda, and salt in a large bowl.

4. Add mashed bananas, applesauce, coconut oil, vanilla extract and mix until just combined.

5. Gently stir in blueberries, trying not to break the skins (this has the potential to turn the inside of your cake purple).

6. Making sure to distribute the batter evenly, pour it into each cake pan. My recipe took about 1 1/3 cup batter per pan.

7. Spread the batter into the edges of the pan. Use a butter knife to even out the top of the batter. This will help your cake layers lie flat when you stack them.

8. Bake at 375 for about 15 minutes, or until the cake is golden on the edges and a toothpick inserted in the center comes out clean.

9. Let the cake cool.

10. Once cooled, flip the cake out of the pans onto a cutting board. To make the cake baby size, I used the rim of a small bowl and cut two circles out of each layer. Save the scraps for an adult snack later on! It’s delicious. Now get ready to get your frost on!

For the frosting

1. Pour cream and vanilla extract into a chilled mixing bowl. Whip on high speed until stiff peaks form.

To frost the cake

1. Find a pretty platter, and put the base cake layer on the plate.

2. Using an offset spatula or butter knife, spread a generous amount of whipped cream onto the top of the base cake layer. Put next cake circle on top. Repeat the process until you reach the top of the cake.

3. Pile whipped cream on the top layer, then use your spatula to spread it downwards, covering the sides of the cake. Use extra whipped cream to cover any cake left uncovered.

4. Top with fresh blueberries, and voila! Enjoy!


Vegan Cranberry Breakfast Cookies

Vegan Breakfast Cookies

Have you made any New Years resolutions?

Typically this question unnerves me. Should I have made a resolution? When was the last time I actually kept one of these? What exactly does “resolve” mean anyway? It seems like a softer way to say “pledge”, which both remind me of household cleaners that smell funny.

Once again my new years resolutions this year seem to be hanging in mid-air, frozen in a sea of procrastination and intimidation. Labeling something as a “resolution” feels so final and committal. And restrictive. Like all of the options for daily life have suddenly been zapped into a to-do list, which makes me want to flee for the exits. #freespiritproblems

Honestly though, I really do like to start a new year by pairing down what is in my pantry and getting back to the basics of eating- fruits, vegetables, slow-simmered soups and warm tea. And of all the eating styles I have studied, vegans seem to have this plan down. Like, all natural, no dairy, no meat- a stick-to-the-basics kind of thing. But like a resolution, when I first started researching these vegetarian recipes they felt so limiting. You are telling me I can’t have cheese? Or a steak? What?!! But what I have found is that yes, there are the obvious elemental constraints- but as every creative knows, it’s the constraints that allow creativity to flourish. The more lovers of food I meet, the more I realize that a good cook knows that the best home chefs are the ones who can take what is in their pantry and make it taste great.

Yummy Breakfast Cookie

So this January, instead of a constrictive resolution, I’ve landed on a push to get out of my comfort zone and make something unfamiliar in a genre of eating I am not accustomed to. Also, for heaven’s sake, I have so many compiled ingredients over a season of holiday cooking that it makes me feel like Pioneer Woman to rally the troops, use my brain and make something out of it all!

And these cookies, inspired by Kumquat blog, are a fantastic way to begin a year of healthy breakfasts. They are gluten free and packed with peanut butter protein and punchy dried fruit. The extra hit of salt takes the flavor up a notch, and before you know it, these cookies will most likely become a staple of cleaning out your pantry, wooing your neighbors, and all around impressing anyone craving a cookie, vegan or otherwise.

Here’s to a year of adventures in the kitchen, fresh starts in your life, and showing luv to anyone- regardless of their eating style- who comes across your kitchen.

Vegan Breakfast Cookie

Vegan Breakfast Cookies (Inspired by Kumquat Blog’s Dried Fruit and Peanut Butter Breakfast Cookies)

What You Will Need:

  • ½ cup crunchy peanut butter
  • ¼ cup warm coconut oil
  • 1 large egg (or chia seed egg substitute, which I used. Great recipe here)
  • 3 tablespoons maple syrup
  • 1 teaspoon vanilla paste or extract
  • 2 cups gluten-free rolled oats
  • 1 cup raisins
  • 1 cup dried cranberries
  • 1 teaspoon ground cinnamon
  • ¼ scant teaspoon ground nutmeg (you could add 1/8 if you like less nutmeg)
  • ¼ teaspoon salt

What You Will Do

  1. Preheat your oven to 350°, and line a baking sheet with parchment or wax paper.
  2. If using, assemble chia seed egg substitute (mix together 1 tablespoon ground chia seeds, 3 tablespoons water) and let sit for 5 minutes.
  3. Combine first 5 ingredients in a large bowl and stir thoroughly.
  4. Add remaining ingredients to peanut butter mixture; stir until well combined.
  5. Press 2 heaping tablespoons of mixture into a 2½-inch round biscuit or cookie cutter onto your baking sheet. (I just scooped the mixture into the cookie cutter, then used the back of my tablespoon to press it into a somewhat flat circle.) Continue with remaining mixture.
  6. Bake at 350° for 14-16 minutes, or until fragrant and golden. Let the cookies cool on the pan.* *Be patient here; I got hungry and tried to move mine too soon and they crumbled a bit. I promise it is worth the wait to let them set!