Rainbow Lucky Charm bark by Aww.Sam! Her site is THE CUTEST.
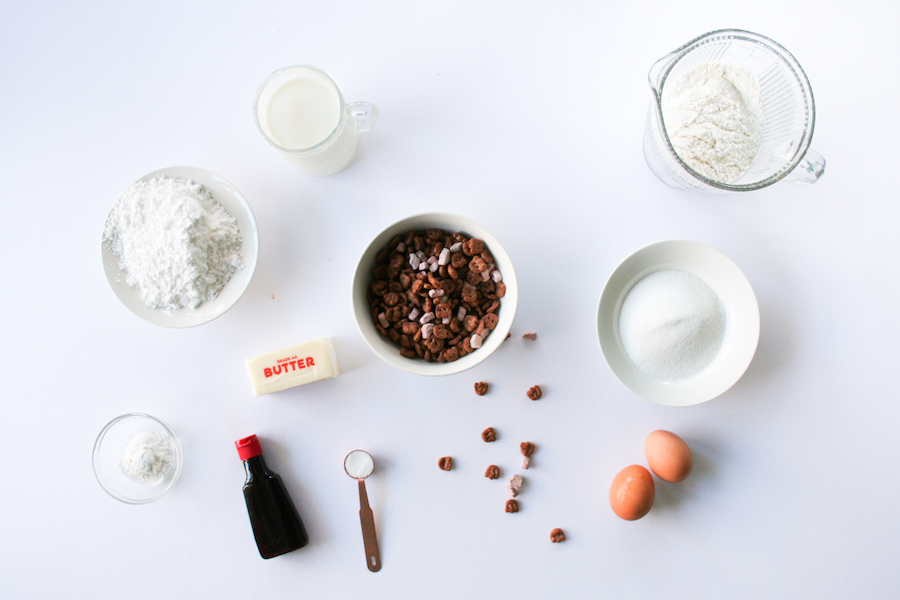
We have eaten a lot of vegetables on the blog this month and for that I am SO grateful! But I do have a confession to make.
Some days, at the end of a long photo shoot, or just creative day in general where my brain is spent- all I really want is a bowl of crunchy goodness doused in ice-cold milk. Or MYLK, as all of the fancy nut-based milk companies are starting to spell it.
Salty Canary’s Count Chocula donut prep. FAB.
So this week, I decided it was time to take a break from cooking, and celebrate cereal. Pure and simple- just deliciousness in a bowl. And in honor of that, check out this week’s YouTube video of Jake and I taste-testing an item a bit out of our comfort zone- protein cereal.
Also celebrating sweet and tasty flakes in a bowl, here are my top five favorite cereals and accompanying inspirational photos from other bloggers who actually made things with these cereals:
My FAVE 5 Cereals To-Date:
Count Chocula: Forget only at Halloween, WHY CANT WE EAT THIS YEAR-ROUND?!
Aldi Simply Nature Coconut And Chia granola: Y’all, not only is this cereal a bargain, it’s also delicious with yogurt. Oh my gosh, so good with yogurt.
Nature’s Path Organic Heritage Flakes: Ok, I know, when I first tasted this cereal years ago I was like, “How could someone choose this over Frosted Flakes?” But now, y’all, I’m hooked!! It’s slightly sweet flavor and crunchy texture- soooo tasty.
Cocoa Puffs: I grew up eating this cereal every day. Seriously, my mom was AWESOME.
Califa Farms Toasted Coconut Almond Milk: OH. My. GEEZ. This carton is gone in a flash in our household. It’s so good on it’s on, with cereal, with everything..
Trader Joe’s Almond Milk Unsweetened Vanilla
Eden Foods Soy Milk: I totally dig Eden Food’s soy milk because it has SO much protein!! It has like 12 grams a serving, which totally helps make cereal a meal.
Silk Original Almond and Coconut Milk: This is perfect for cereal AND smoothies.
Blueberry and Banana Ice cream from Health– made with almond milk!
5.Califa Farms Black and White Cold Brew Coffee: I know this one involves coffee but helloooo this is so slammin’ delicious and perfect for warmer weather. And I totally wouldn’t judge you if you ate this with Cocoa Puffs for breakfast.
This weekend, I encourage you to sit back, relax, and pour yourself a cold bowl of cereal. With marshmallows.
Imagine this: you are in an exotic market in India. Color fills your vision as you scan the crowd; eager vendors call to you, and the smell of pungent spice quickly hits your breath. It’s exciting, and you eagerly anticipate tasting, seeing, and experiencing the flavor and energy that is all around you.
You walk towards an enthusiastic vendor, eyeing the mountains of brightly hued powders displayed in woven baskets in front of her. A bright orange one catches your eye, and you bend over to smell. It’s pungent and sweet, a bit peppery with a hint of citrus. You scoop a heaping spoonful into your bag, hand the salesman a few coins and head home to uncover it.
As much as I want that story about India and an exotic spice market to be part of my actual life experience, for now we’ll chalk that up to food fantasy! But the appeal of turmeric is real. Ever since I first discovered the spice a few years ago while trying out a vegan queso dip recipe, I wanted to learn more- and figure out what was up with ALL the articles filling my news feed about it’s benefits.
As you can see in the video, while the pronunciation of turmeric- and circumin-threw me for a bit of a loop, the health benefits of turmeric really are AWESOME. It’s great for your brain, anti-free radical, and can be a preventative measure in your diet against diseases. But I needed help figuring out what to put it in. So….Let’s discuss what to cook with turmeric:
*Golden Milk! Just click here for Wellness Mama’s recipe:)
Also, one last fun fact: PEPPER activates turmeric! I learned to add about 1/2 teaspoon ground black pepper to 1/4 cup ground turmeric. The pepper adds a bit of spice to the turmeric as well- YUM! Huge shout out to this article from the Kitchn about turmeric that helped make that list!
This week’s recipe features turmeric in a super fun way– cheesy whole wheat turmeric crackers!! I don’t know about y’all, but there are days when this thought- “Oh my gosh, CHEEZ-ITS!!” consumes my brain. Especially with a Coca-cola- yessssss, please.
But this recipe is EVEN tastier than a processed cheese cracker and has healthy turmeric, paprika and parmesan cheese, which we all know is a winning flavor combo in a baked cracker. Healthy snacking=WIN WIN WIN.
Alright! Let’s stir up that turmeric, and eat those health benefits my friends! Loving people with food and nutrition, yessss pleeeaseee!
Cheesy Turmeric Whole Wheat Crackers (Recipe from food52 with the substitution of whole wheat flour by me)
This easy, baked cracker is addictive (my husband and I downed a few bags of them all on our own!) Healthier than a traditional processed cheese cracker, these guys are not hard to make and bake up a bunch of squares! Plus you can add more cayenne if you are feeding a spice-friendly crowd.
Time: Probably about an hour!
Yield: LOTS of crackers! Enough to feed a small party of 8-10.
What You Will Need
1 1/3 cups whole wheat flour
2 teaspoons baking powder
2 teaspoons white sugar
1 teaspoon salt
3/4 teaspoon ground turmeric
1/4 teaspoon cayenne (you can add more here for more kick!)
2 tablespoons nutritional yeast (you can buy this in bulk online or at your local healthy foods store)
3/4 teaspoon ground paprika
1/2 teaspoon garlic powder
1/2 cup grated Parmesan cheese
1 cup heavy cream
1 egg
2 tablespoons water
Coarse salt, for sprinkling
What You Will Do
Preheat your oven to 375°F (190°C).
In the bowl of a food processor, pulse together the flour, baking powder, sugar, salt, turmeric, cayenne, paprika, nutritional yeast, and garlic powder. Add the parmesan and pulse to combine.
With the machine running, add the cream in a steady stream, then pulse until the dough comes together in a ball.
Transfer to a lightly floured surface, then divide in half. Keep one half in the refrigerator while you work.
Roll the first half into a rectangle, about 1/4-inch thick. You can make the crackers thicker or thinner, depending on how crispy you want them. You’ll just need to keep an eye on the baking time and take them out as soon as they start to brown.
Using a pastry wheel or pizza cutter or sharp knife, slice the dough into small 1-inch squares. Transfer them to a parchment-lined baking sheet (you can transfer the dough first then cut them if that’s easier).
Whisk together the egg and water and lightly brush the egg wash over the tops of the crackers.
Poke holes in each cracker with a fork if you are feeling motivated; sprinkle with coarse salt, and bake for about 15 minutes, or until they start to brown around the edges. Remove from the oven and let cool—they’ll crisp as they sit. Repeat with the second half of dough.
Imagine you are on a really expensive yacht. Waves crash into the side of the perfectly white exterior as the sun shines down on your face. A breeze blows through your hair, and, a bit parched from the warmth, you reach for a glass of icy cold Champagne. A waiter passes by with a tray of shiny black caviar on a crispy crostini, topped with bright green herbs.**
**It should be noted, as part of this fantasy, you are all perfectly tan, just worked out with your personal trainer and your mascara is TOTALLY still on your face.
“I’ve never been a huge fan of caviar,” you think to yourself, “But I’ll give it a try.” The moment the crunch hits your lips you realize- this gleaming substance isn’t caviar at all! It has a much subtler flavor with a hit of spice and an olive oil richness. No pungent fish flavor-no gumminess- it’s just, well, nice.
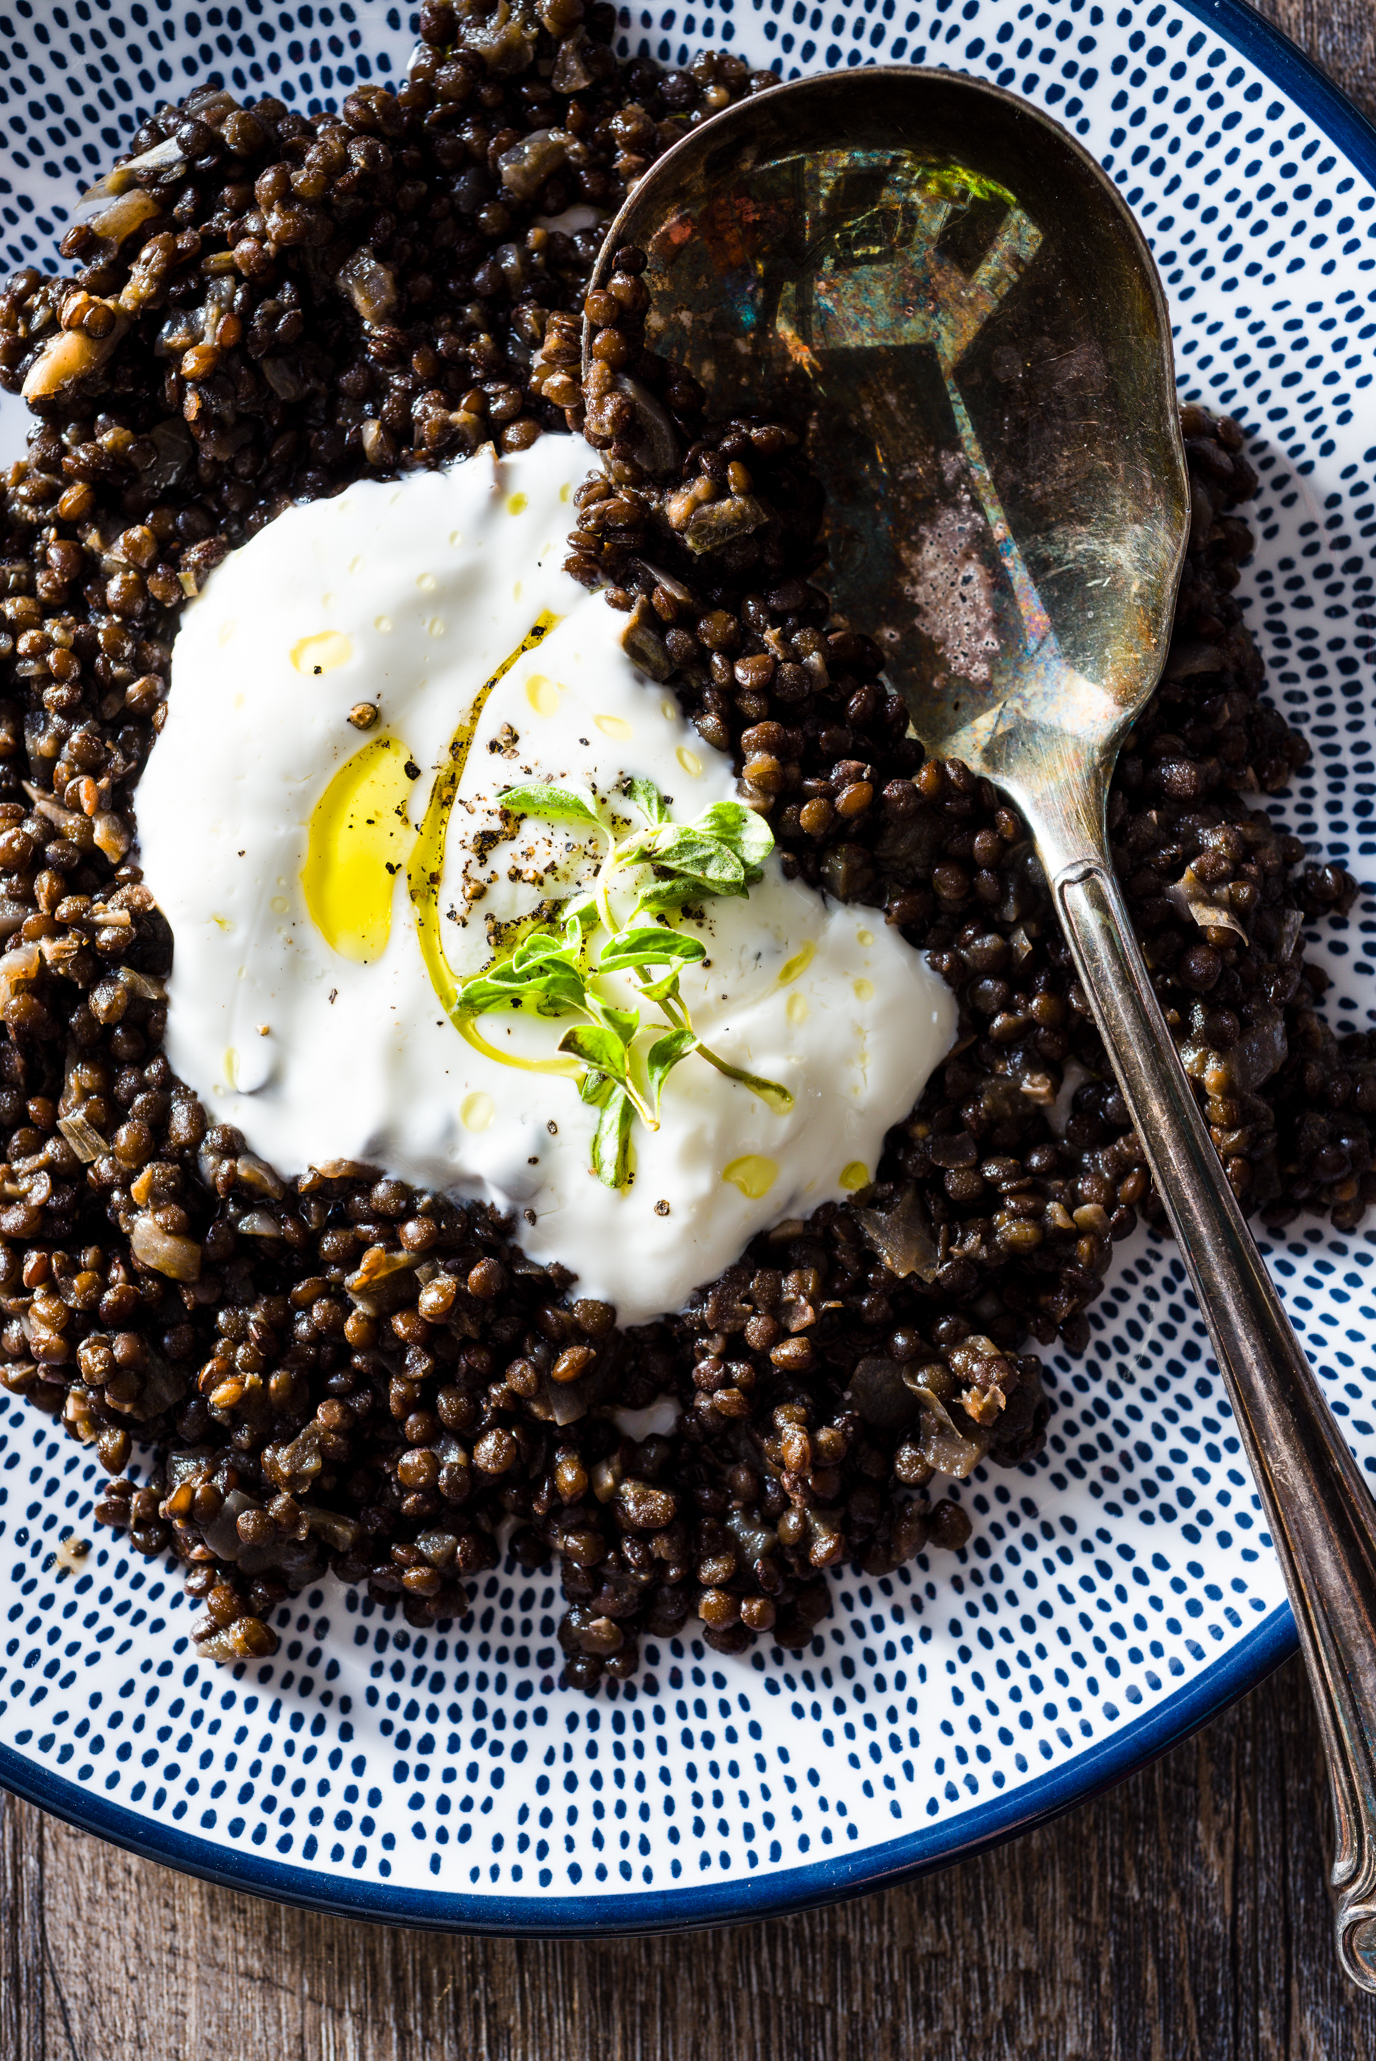
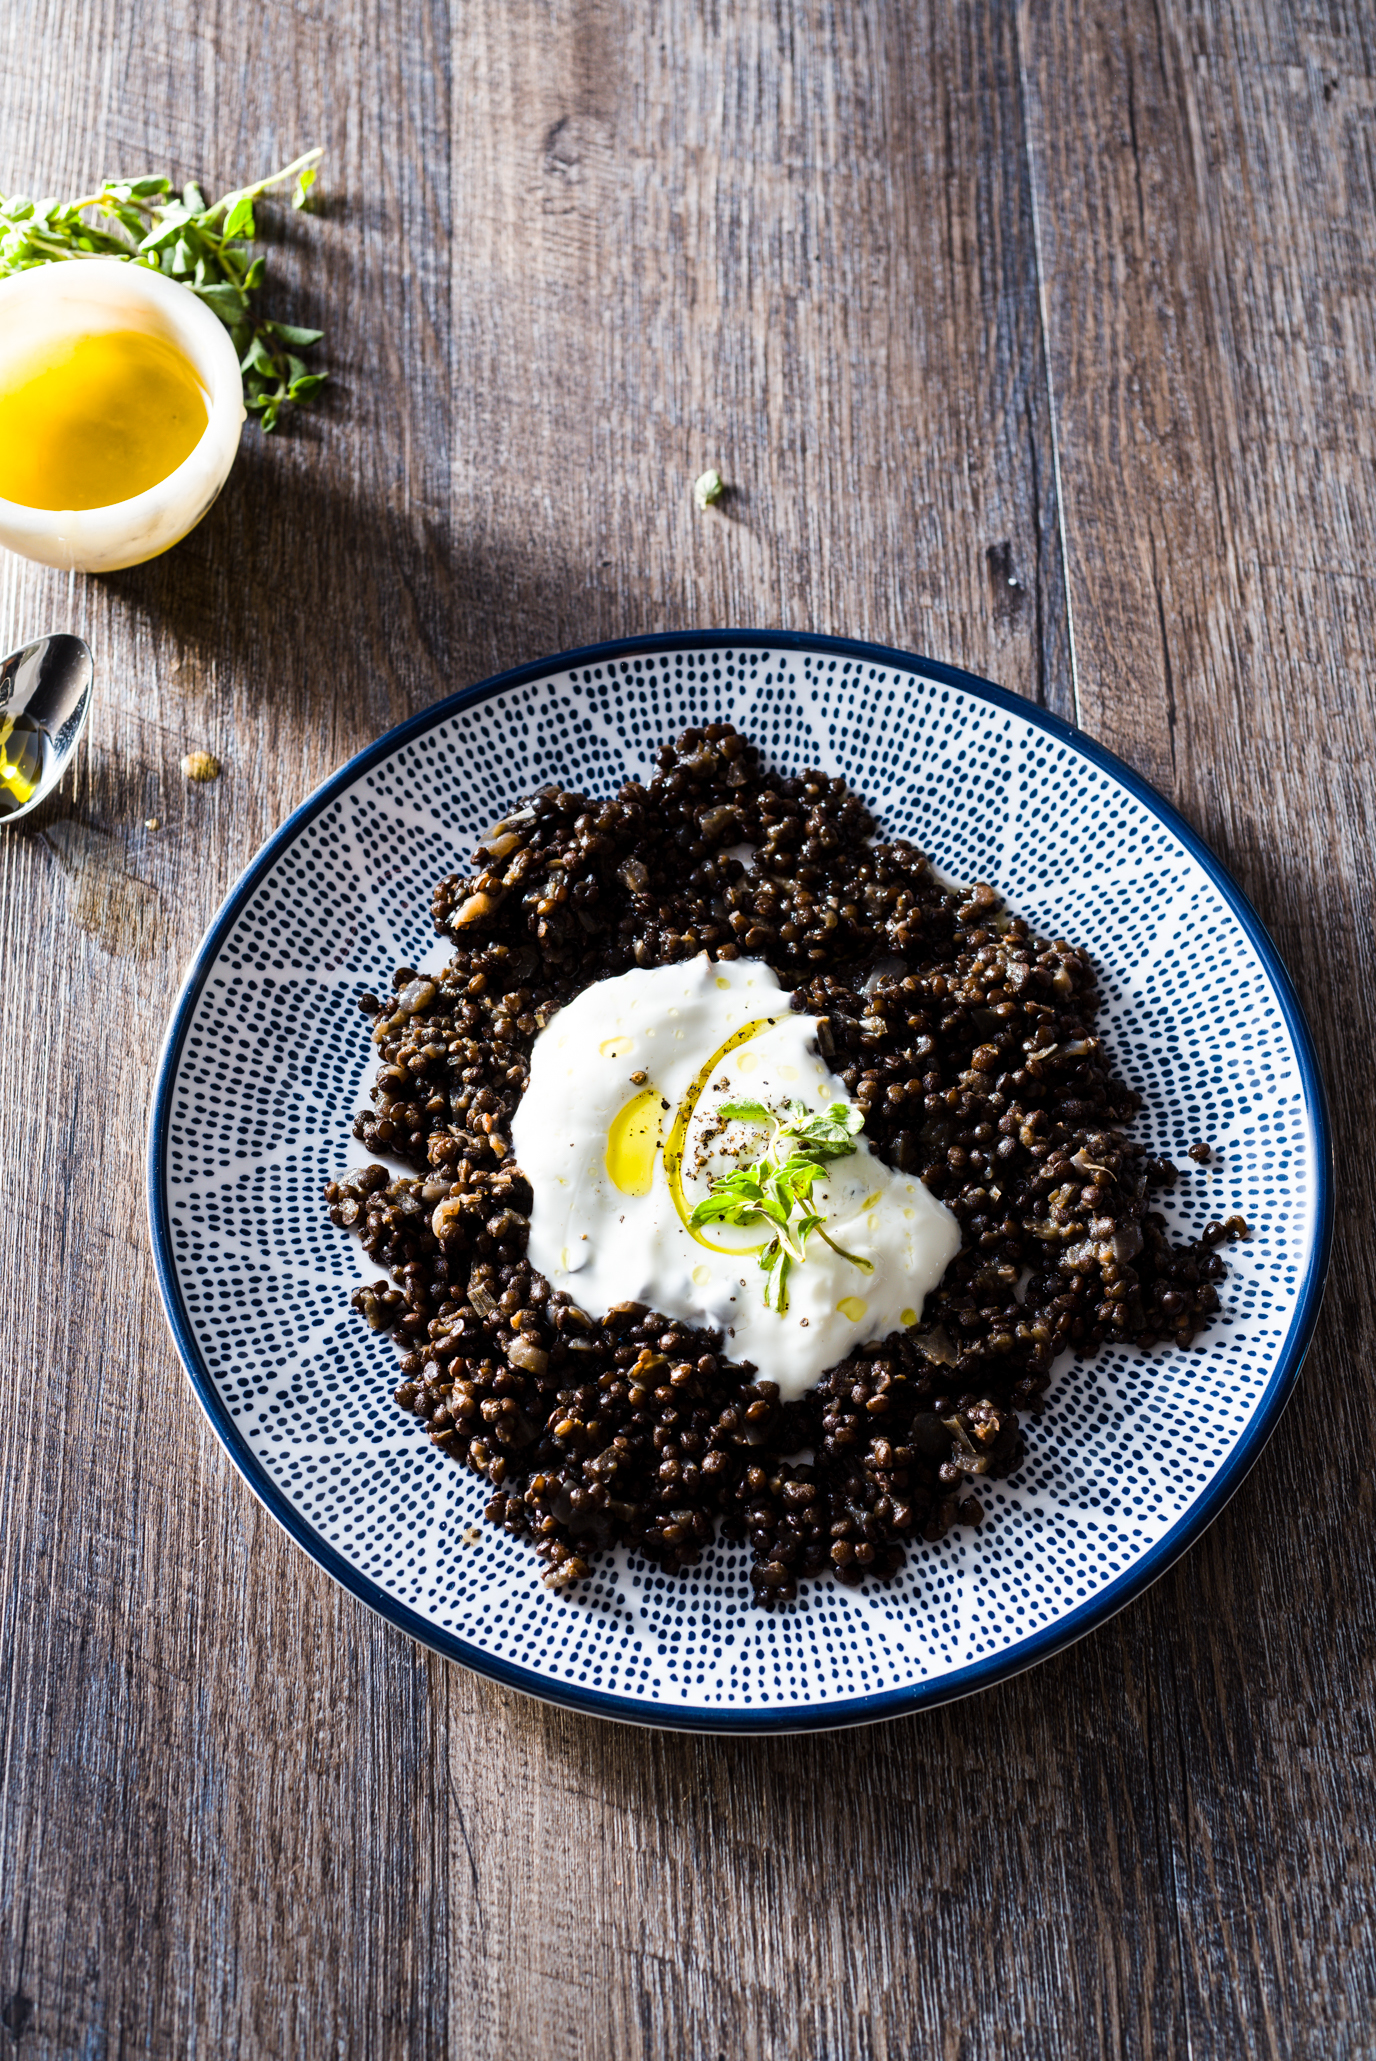
Welcome to the world of beluga (as in caviar-esque) lentils! Known for their texture (as opposed to the creamier mouth feel of other lentils), these black lentils are perfect for appetizers and salads because of their heft. They also, when cooked correctly, have a shiny gleam to their exteriors, much the same as caviar (but for a whole lot less money).
That’s why this week we are all about some lentils!!
Fun Beluga Facts!
The best cooking ratio is 1/2 cup lentils (rinsed) to 2 cups filtered water.
Prep yo’ lentils! Rinse the lentils thoroughly (remove any weird looking bits that may have congregated bag), combine them with water, add salt, and bring to a boil. Simmer for 30-40 minutes covered, with the top slightly askew to release steam.
Flavor these legumes in all kinds of ways! Try adding Asian spices, kombu (seaweed), salt + pepper at the beginning of the cooking process.
Keep tasting!! Once you reach the 30 minute mark, check to see if the lentils are done. They should have a bite but not leave a starchy aftertaste in your mouth. If they need more time, keep them simmering!
Finish the lentils by topping with yogurt (like our recipe), olive oil, herbs, etc.
Belugas also go great with fish! (Speaking of caviar…)
So, this week let’s break out our most luxurious of circumstances (for me, it’s my plastic pool in the back yard with our dog Bigsby) and umbrella cocktail, and enjoy the luxury that is belugas!
This recipe blew me away with it’s deliciousness! The amazing flavor you get from toasting the powdered spices and mustard seeds brings these flavors to life. I was so addicted to these lentils that I drove around eating them out of a plastic tub in my Prius.
Serves: 4-6 as a side
Time: 50-ish minutes
What You Will Need:
½ teaspoon ground coriander
½ teaspoon ground cumin
½ teaspoon whole mustard seeds
2 tablespoons olive oil plus more
1 small onion, finely chopped
2 cloves garlic, finely chopped
1 cup black beluga lentils
3 cups (or more) low-sodium vegetable broth*
1 teaspoon red wine vinegar
Kosher salt, freshly ground black pepper
1 cup plain Greek yogurt
fresh oregano, for topping
Heat rimmed saute pan on medium heat. Add olive oil and spices; stir frequently, toasting for about one minute. This should smell pretty tasty!
Add onion and garlic and cook until just softened, stirring frequently again!
Add lentils and broth; bring to a boil, cover slightly, then reduce to low heat. Cook for 30 minutes, and taste to see how they are doing. Mine took about 50 minutes to reach the texture I liked.
Once done, add in the vinegar, salt and pepper to taste.
Serve warm, topped with Greek yogurt, a drizzle of olive oil, and fresh oregano leaves. YUM!!!
*I realized that I labeled this recipe as vegetarian, but when I cooked these I used Trader Joe’s chicken stock. So you can do whatever you feel here!
Y’all! Let me tell you about a new favorite pantry discovery: brown rice flakes.
Soups, smoothies, stews- these fabulous flakes add a nutty, creamy texture to almost anything! There are a BRILLIANT way to add a new flavor profile to your favorite foods, and have lots of vitamins and minerals (shout out to NIACIN!! This B vitamin helps lower cholesterol). Plus, speaking of lowering unhealthy cholesterol (this thought always awakens memories for me of Quaker oatmeal commercials while watching the Today show) you can ALSO make brown rice overnight “oats.”
That’s right, everyone out there who is stuck in a oatmeal rut now has NO excuse not to try these. I for one am vehemently raising my hand for seconds and sending a huge shout out to The Greedy Vegan for her beautiful overnight brown rice flakes with blueberries recipe!! Also, her discovery (that I share in my YouTube video below) about the ratio for those perfect overnight “oats” came at a great time:
But back to this week’s recipe! How did I discover my newfound love for these flakes? Cleaning out my pantry; and realizing that I had a brown rice flakes bag from Eden Foods with an awesome broccoli soup recipe on the back of the bag.
I love recipe development; it is one of my favorite types of work I do with food and food styling. Last year I was honored to do a bit of recipe development for a blog that featured their products, and had an extra bag. YES!
And in the spirit of all things informational and adhering to the Luv Cooks formula (Fun=Food), here are our FUN FLAKE FACTS!!!
Brown rice flakes***:
Are made from dehusking rice, which is flattened into flakes.
Can be fire-roasted (which our flakes are)
Can be eaten raw or cooked b/c it’s super digestible!
Are popular in India, Bangladesh, and Nepal (we are so exotic!!)
Adds creaminess to soups, stews, smoothies
Can be used in a 1:1 liquid to flakes ratio for overnight oats
Has Niacin (for lowering cholesterol) and magnesium (great for everyone!)
So get your easy, healthy, curry soup pot on and let’s get roasting!
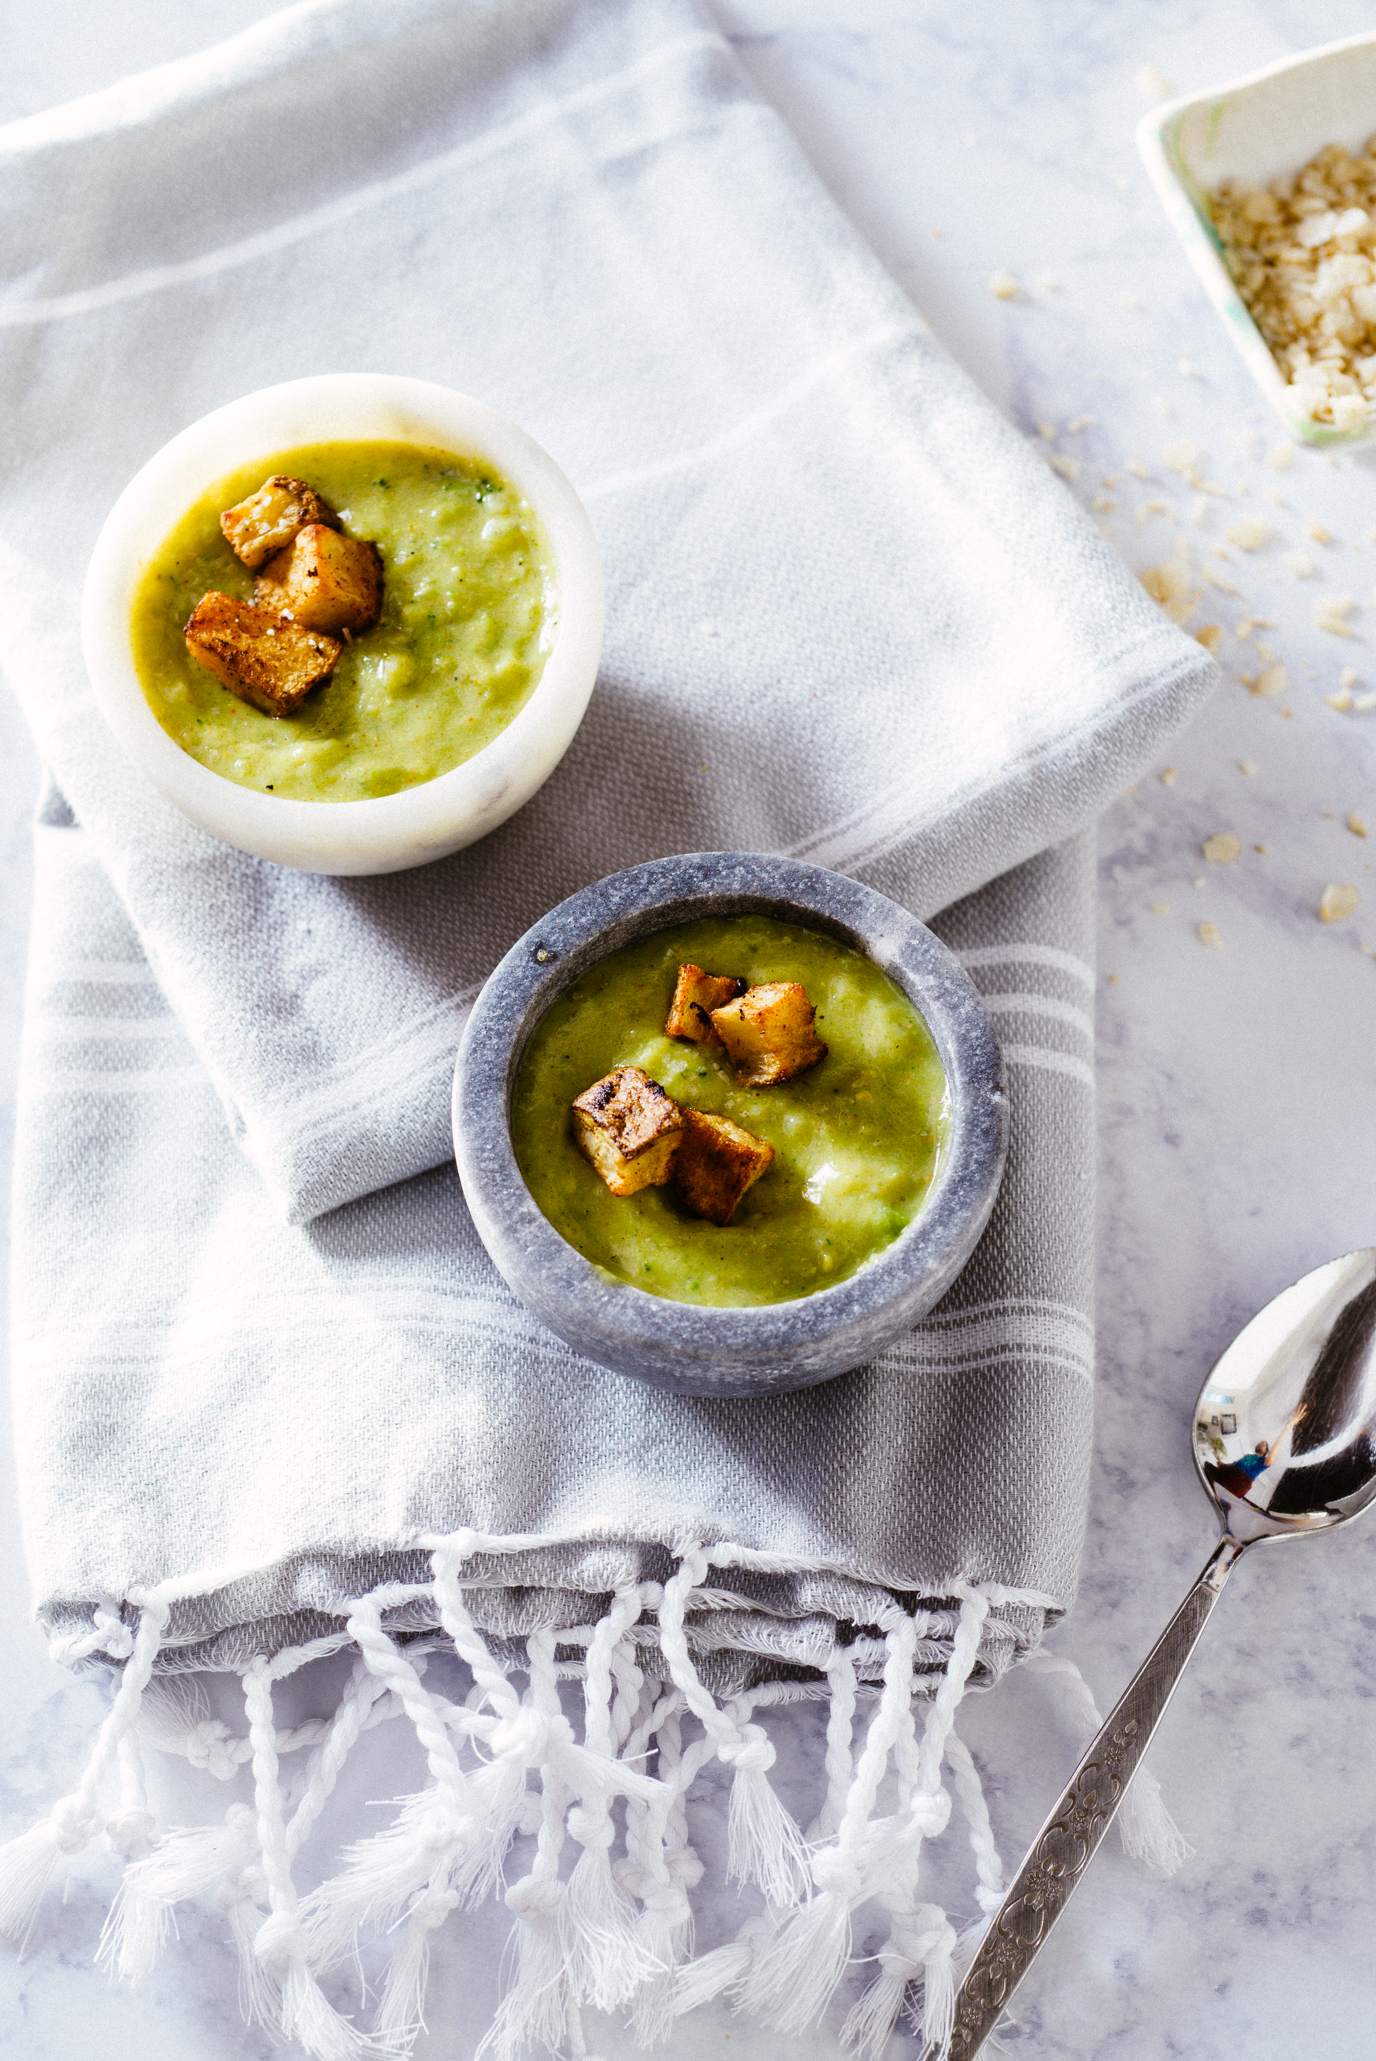
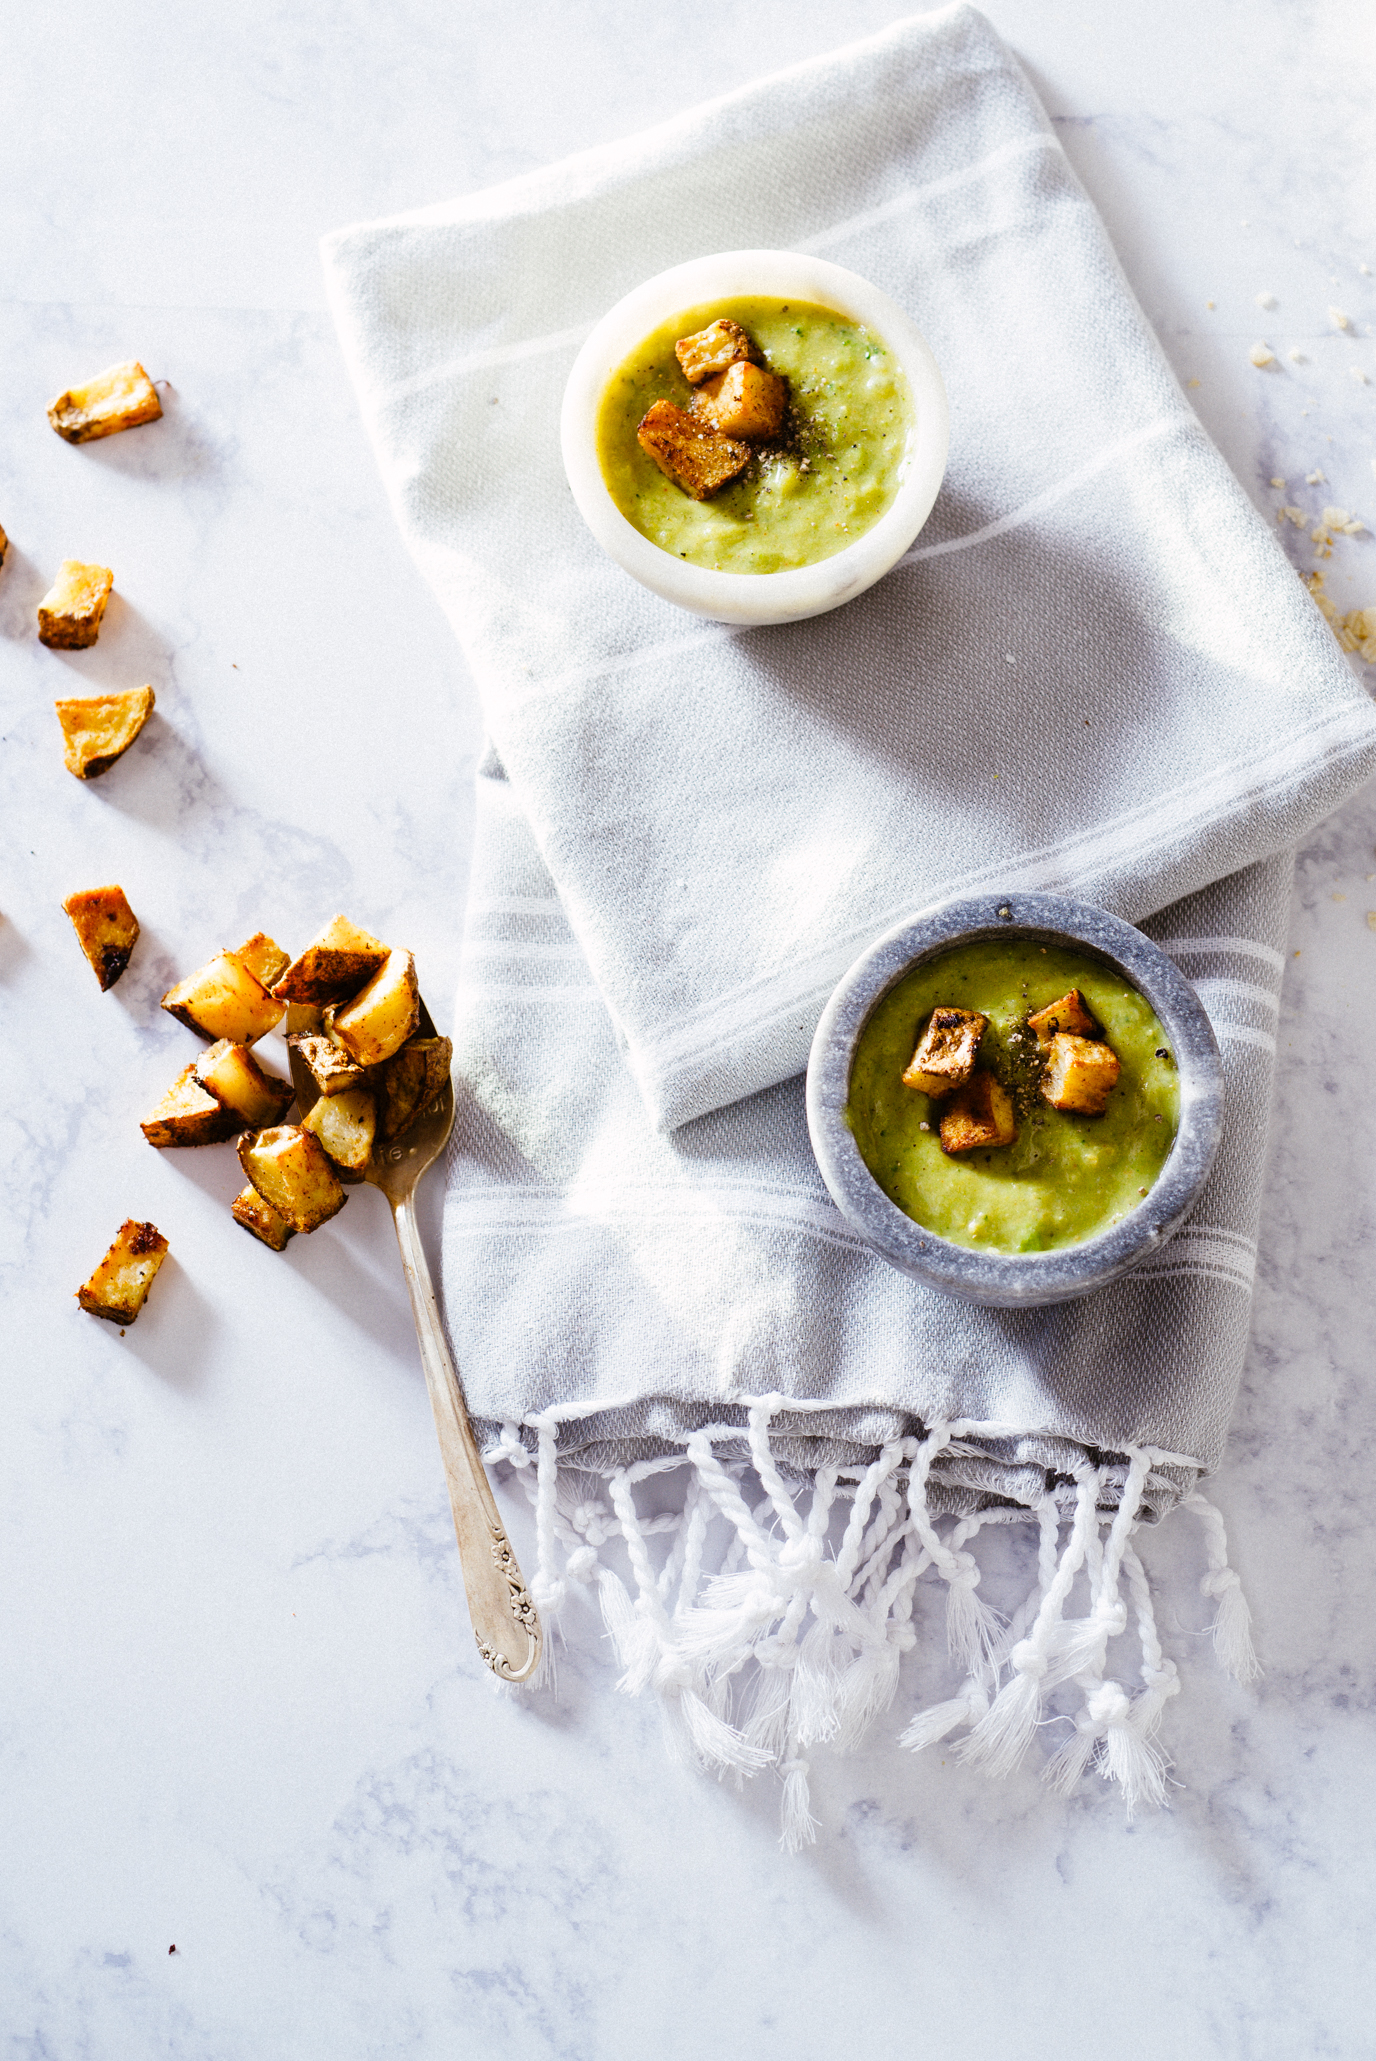
Creamy Curried Broccoli Soup (inspired by the Eden Foods brown rice flakes bag!) with Spicy Potato Croutons
Serves 6
Cooking Time: About 35 minutes
Break out of your broccoli soup rut with this week’s recipe! It only takes about 30 minutes for the whole meal (plus leftovers) if you throw the potatoes in the oven BEFORE you start the soup! Fast, healthy, and featuring my new favorite ingredient, brown rice flakes. GET YOUR SPICE ON!!
For the soup:
What You Will Need:
1 tablespoon olive oil
1 small sweet onion, diced
1 tablespoon roasted hatch chiles (if you don’t have hatch chilis, roasted jalapeños would work great)
2 cloves garlic, sliced
1 teaspoon curry powder
12 ounces frozen broccoli
3 cups filtered water
1 cup unsweetened soy milk
3/4 cup brown rice flakes
3/4 teaspoon sea salt
1/8 teaspoon ground black pepper
What You Will Do:
Heat oil over medium heat; sauté sweet onion and hatch chilis for about 4 minutes, or until softened. Add sliced garlic and curry powder; cook for about 1 minute more.
Add broccoli, water, soy milk, brown rice flakes, salt and pepper.
Bring to a boil, then reduce to a low simmer for about 15-20 minutes, or until the broccoli is tender and the soup has come together a bit.
You can either puree the soup in two batches in a blender to make it extra smooth; I like my soup a bit chunkier, so I followed Eden’s method and blended half of it, then stirred the blended half into the chunkier soup.
Taste and season with additional salt and pepper if needed. ENJOY!!
For the Roasted Potato Croutons:
What You Will Need:
1 russet potato, washed and diced
1 teaspoon chili powder
1 tablespoon olive oil
Salt and pepper, to taste
What You Will Do:
Preheat oven to 425.
Line baking sheet with aluminum foil and spray with cooking spray.
Toss potatoes in olive oil, chili powder, and at least 1/4 teaspoon salt and a few pinches pepper. Spread evenly onto baking sheet.
Bake for 10 minutes; stir; bake for 15 minutes more, or until nice and crispy.