Sweet Potato Waffles with Cinnamon Whipped Cream

Sweet-Potato-Waffles-020Happy Good Friday my loves!!

I hope you you are enjoying such a restful and peace-filled start to your Easter weekend (and that you have already eaten a few chocolate-malt Easter eggs):)

Sweet-Potato-Waffles-016

When I think long weekend, my mind automatically goes to breakfast. Yes, I know you are more than likely planning to attend a fabulous Easter dinner, but really, what’s better than sleeping in, drinking coffee and making homemade waffles?

Yep, not much, so this week I wanted to share with you these delicious sweet potato waffles I developed for Birmingham magazine. My goal with this recipe was to make them super easy, healthy, and satisfying for everyone in your “love-your-peeps” circle! In fact, you don’t even have to cook the sweet potatoes on the stove top- we microwave them instead. *You know I love you when I suggest a microwave!*

Sweet-Potato-Waffles-012

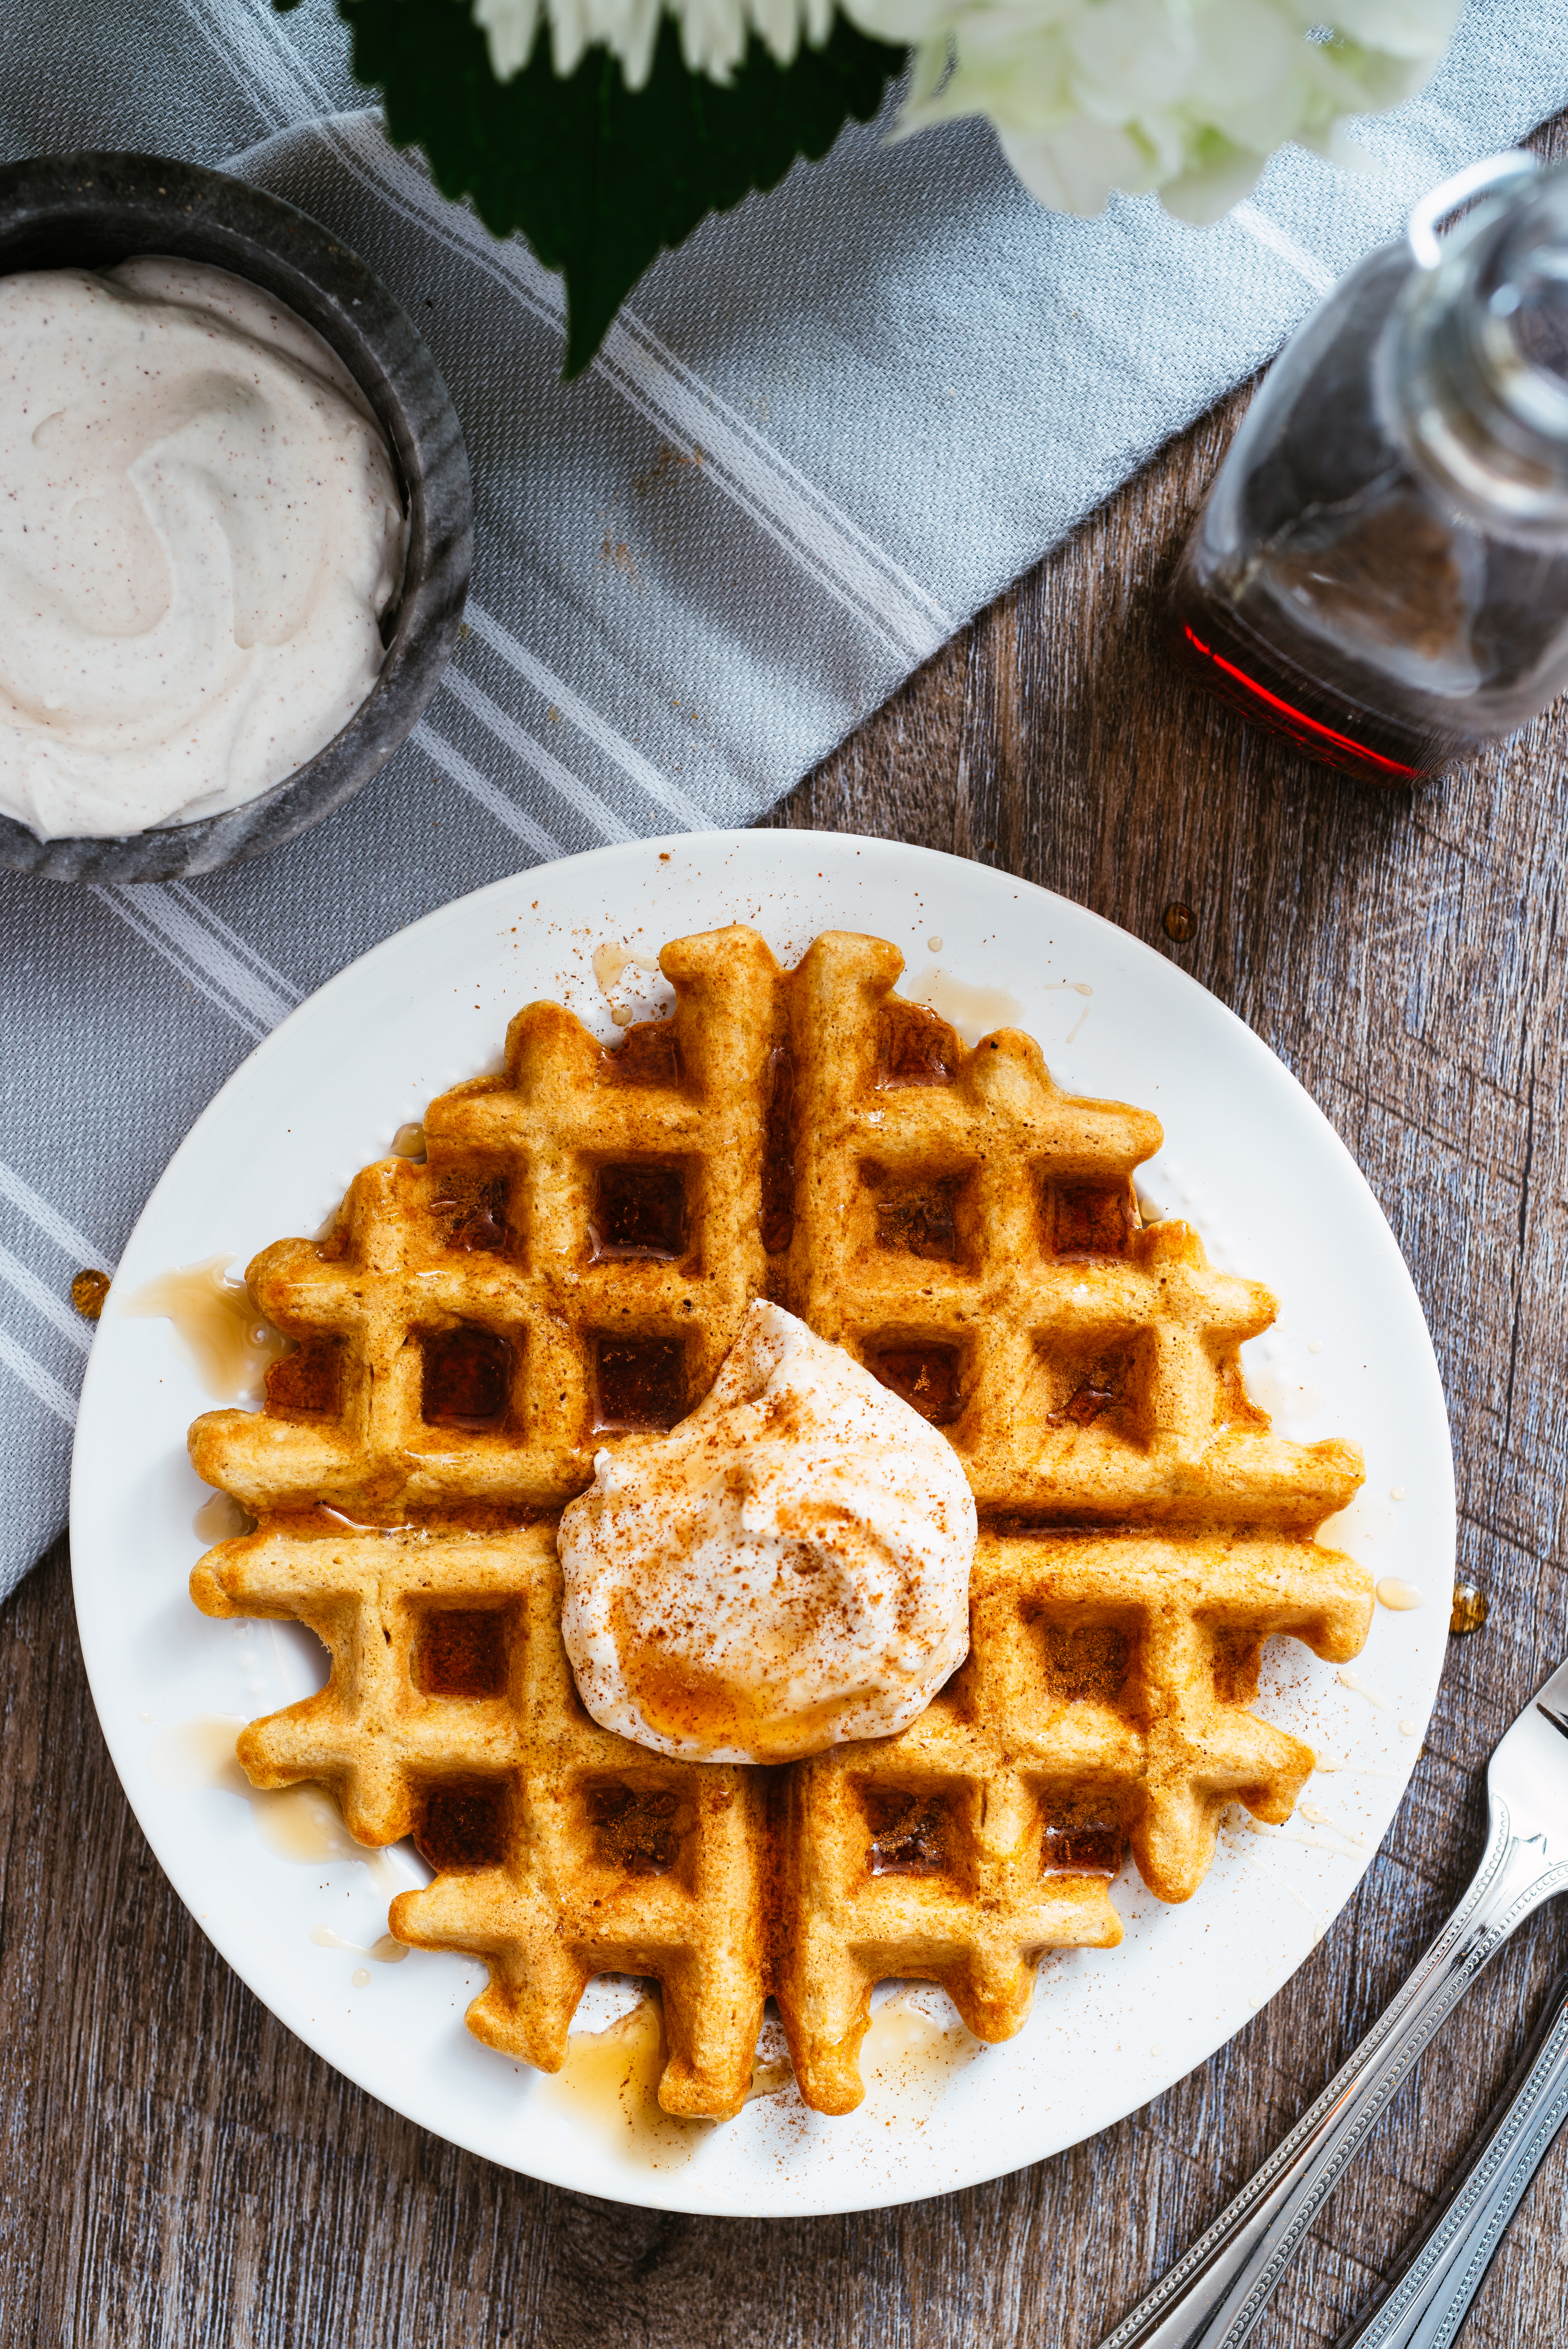
So, my fantastic Easter bunnies, without further ado, sweet potato waffles with cinnamon whipped cream. Top with maple syrup at your leisure :)

Sweet-Potato-Waffles-021

Sweet Potato Waffles with Cinnamon Whipped Cream

Sweet potato puree adds moisture and sweetness to these hearty, satisfying waffles. A perfect homemade breakfast for the ones you love to cook for on Easter weekend,  top them with fresh cinnamon whipped cream and maple syrup for a springtime treat.

Yield: 7 waffles

What You Will Need:

  • 1 cup peeled, diced sweet potato
  • 3 cups water
  • 2 egg whites
  • 2 egg yolks
  • 1 cup unsweetened almond milk
  • 3 tablespoons coconut oil, melted
  • 2 teaspoons vanilla
  • 1 cup all-purpose flour
  • 2 tablespoons dark brown sugar, packed
  • 2 teaspoons baking powder
  • 2 teaspoons ground cinnamon
  • 1/2 teaspoon salt
  • 1/2 teaspoon pumpkin pie spice
  • Cooking spray, for waffle iron
  • Cinnamon Whipped Cream (recipe follows)
  • Maple syrup (for drizzling)

What You Will Do:

  1. Put diced sweet potato in a large microwave-safe bowl. Pour water over. Cover; microwave for 10 minutes.
  2. While potato is cooking, preheat waffle iron to medium-high heat.
  3. Let bowl with sweet potato in it cool for a few minutes; carefully remove from microwave with oven mitts.
  4. Uncover and drain sweet potatoes. Mash with a fork in a large bowl until smooth.
  5. Beat egg whites in separate, medium bowl with a whisk until fluffy, white, and forming soft peaks, about 3-4 minutes.
  6. Add egg yolks, almond milk, melted coconut oil, and vanilla extract to sweet potatoes. Stir with a fork until smooth and combined.
  7. In another large bowl, stir together flour, sugar, baking powder, salt, and spices.
  8. Pour sweet potato mixture into dry ingredients and stir until just combined and flour disappears (don’t over stir). Fold in egg whites until combined and evenly moistened.
  9. Pour batter by cups into preheated waffle iron sprayed with cooking spray. Smooth evenly in iron. Cook for about 5 minutes, or until darkened and crispy.
  10. Serve immediately with cinnamon whipped cream and maple syrup, if desired.

Cinnamon Whipped Cream

*YUMMY!

What You Will Need:

  • 1 cup cold heavy whipping cream
  • 2 tablespoons powdered sugar
  • 1/2 teaspoon cinnamon

What You Will Do:

  1. Whip all ingredients on low in a cold mixing bowl.
  2. Once ingredients are combined, switch to high and beat until stiff peaks form.

Food is ART + Lemon Blueberry Chia Smoothie Bowl

Lemon-Smoothie-Bowl-009

As snow falls softly outside my window, I’m reminded of one of my favorite things about January. The fresh white powder is a clean slate. It’s reflecting in nature the simple principle that life can start fresh at any moment, that each day is a new beginning.

The whiteness also reminds me of what a stark contrast the colors of my breakfast plate are to the world around me. Deep, orangey yellow eggs, amber bacon, lightly golden toast with deep purple jam. Black coffee with a creamy coffee bomb.

The snow continues to swirl, the wind leading it up and away, or cascading down, perching softly on the worn wooden rails of our porch.

These patterns, these colors, these textures- it’s bliss. For those of you who read this blog, you are no stranger to the fact that I LOVE beauty. I even tried my hand at a few posts about the things that were inspiring to me visually, at that moment. For my heart, the visual world is just as real and riveting as any adventure I’ve had. It’s key to my peace of mind, my happiness, my creative expression, to be deeply aware of this reality.

Lemon-Smoothie-Bowl-012

Which brings us to the love I have for the beauty of food.  The depth and layer of color to a strawberry; the way rainbow chard blooms from green into orange into purple-red; the gleam on a rinsed, ripe blueberry.

Lemon-Smoothie-Bowl-013

There is an exquisiteness to this world- this visual world of food- that is inspiring, challenging- and I think can even lead us to new flavor combinations and levels of creativity in our own cooking.

Lemon-Smoothie-Bowl-005

And this is the reason number two why I want you to fall in love with food in January. If you missed last week’s post, the amazing Kristen Shoates joined us to introduce herself, and her own story with falling for food. She’s leading the charge this month as we discuss four reasons (and there are SO many!) to fall for food. Here is Kristen’s reason number two to expound so beautifully on the topic:

Food as art. Have you ever walked through the produce section of the grocery store and really paid attention to the creativity of food? The richness of color, the variety of texture and the diversity of flavors are all part of nature and ready for us to explore. When we constantly eat the same thing or eat food that only comes out of a box, we lose the artistic nature of eating and cooking. For me, eating has become an almost spiritual experience, one that makes me feel connected to my Creator, the way my body was designed to work and the creativity displayed throughout nature.

YES!! And here is this week’s video about that exact fact- along with a  challenge to you guys this week to engage that cooking creativity!

And to me, this weeks’ recipe could not be more fitting to the topic of beauty and food. There is nothing like a smoothie bowl to stir the senses and ignite creativity, solely based on the visual of the thing you are creating.

So this weekend, let’s celebrate the beatify, the mystery, the abundant color of food. And enjoy every spoonful.

Lemon-Smoothie-Bowl-021

Lemon Blueberry Chia Smoothie Bowl with Fresh Mint and Chocolate

Lemon juice amplifies and balances the sweetness of blueberries and banana in this smoothie bowl. Don’t worry if your mixture is super thick in the blender; that means you are doing it right! Top with mint-flavored dark chocolate for an even sweeter, minty flavor. You can also find this recipe in the January issue of Birmingham magazine.

Yield: 1 smoothie bowl

What You Will Need:

●  1/2 cup unsweetened nut milk plus 1 tablespoon filtered water

●  1 scoop plant-based protein powder (23 grams), chocolate or vanilla flavor

●  1 cup frozen blueberries

●  1 tablespoon cold chia seeds, plus more for topping

●  1/2 frozen banana, broken into two pieces

●  1 teaspoon fresh lemon juice

●  1 tablespoon cocoa powder

●  1/4 of an avocado

●  5 fresh mint leaves, plus more for topping

●  80% cacao dark chocolate, shaved (or mint dark chocolate)

What You Will Do:

  1. Blend all ingredients (except for additional mint for topping and dark chocolate) on low speed in a blender for about a minute. Move to medium speed for about one minute more.
  2. Stop blending and remove top from blender. Use a large spoon (or tamper) to push any remaining unblended ingredients towards bottom of mixture.
  3. Continue to blend; if blender gets stuck, simply stop blending, push ingredients down into blender, and blend again until smooth and creamy.
  4. Pour into a bowl, top with chocolate and mint, and enjoy!

*If using unsweetened protein powder, add 1-2 teaspoons of maple syrup or honey to taste.


Whiskey Vanilla Gold Fleck Marshmallows + Candy Cane Fudge

Bham-Mag-Christmas-2017-02-042

Marshmallows!!

I can’t get enough of marshmallows. Growing up, I ate the kind that came in a giant puffed bag- and did not miss a beat topping my hot chocolate and/or hot fudge sundaes with them.

But marshmallows were elevated to an art form the first time my then-boyfriend, now-husband Jake sent me homemade marshmallows in the mail. From Seattle. WOAH. Mind completely blown!

Bham-Mag-Christmas-2017-02-099

Bham-Mag-Christmas-2017-02-037

And until I had the opportunity to work on recipe development for Birmingham magazine, I forgot a bit how much I loved eating them- and now, making them. In fact, I have full confidence that as long as you have a working thermometer, YOU HAVE GOT THIS MARSHMALLOW RECIPE! Go you pastry chef, GO!

Bham-Mag-Christmas-2017-046

And speaking of easy, rounding out our 12 Days of December recipes, I give you- FIVE ingredient candy cane crunch fudge!

Bham-Mag-Christmas-2017-052

This recipe is super simple, a fantastic way to use your leftover candy canes, and did I mention it had FIVE ingredients?

As we end 2017, I want to tell you how incredibly grateful I am for YOU. For your support, for reading these recipes (and hopefully making them!), for allowing me to share a part of my heart for the kitchen and food with you. 2018 is going to be an incredible year, and I can’t wait to begin a fresh creative journey with you all.

LOVE LOVE! XOXOX – Callie

Bham-Mag-Christmas-2017-02-112

Whiskey Vanilla Gold Fleck Marshmallows

Once you try homemade marshmallows, you may never go back to the prepackaged versions! This recipe does require setting overnight, but it’s an easy one to follow. The gold flecked sprinkles and chocolate dip make the candy a visual stunner for party guests; add them to hot chocolate for a perfect New Year’s Eve treat. You can also find most of these holiday recipes in the December issue of Birmingham magazine!

What You Will Need:

  • 3 packets unflavored gelatin
  • 6 tablespoons cold, filtered water
  • 1 cup maple syrup
  • 2 1/2 tablespoons Tennessee honey whiskey
  • 2 teaspoons vanilla extract
  • 1 teaspoon maple extract
  • 1 cup semisweet chocolate chips
  • Gold sparkle sprinkles, for topping

What You Will Do:

  1. Pour cold water over gelatin in the bowl of a large stand mixer fitted with a whisk attachment.
  2. Prepare a 9 by 9 square baking pan. Spray pan thoroughly with cooking spray, then line with two layers of parchment paper. One layer should be horizontal and the other vertical. Parchment should be overhanging a bit on the sides of the pan.
  3. Bring maple syrup and bourbon to a boil. Use a candy thermometer to make sure the liquid is at 230 degrees.
  4. Take hot syrup off heat.
  5. Turn mixer on medium low to blend gelatin/water mixture for 30 seconds. Slowly add hot syrup. Once all syrup is poured into mixer, put a towel over mixer to prevent hot sugar from flying out of the mixer!
  6. Turn mixer to high for about 8 to 10 minutes, or until mixture is shiny and silky.
  7. Add extracts and whip for one minute more.
  8. Using a rubber spatula, pour marshmallow mixture into parchment-lined pan. Use spatula to smooth the top of marshmallow mixture, pressing it into the corners of the pan.
  9. Sprinkle marshmallows with gold sprinkles.
  10. Spray plastic wrap with cooking spray and press the sprayed side firmly onto marshmallow mixture to seal. Set at room temperature overnight.
  11. Lift marshmallow mixture out of the baking dish. Remove plastic wrap and roll down the sides of parchment paper away from candy.
  12. Spray knife with cooking spray and cut into inch squares.
  13.  Line a baking sheet with parchment paper.
  14. Melt semi sweet chocolate chips in a glass bowl in the microwave in 30 second intervals, stirring after each interval, until smooth.
  15. Dip one side of cut marshmallows in chocolate. Place on parchment paper and put in fridge for at least 10 minutes to set chocolate.

Tip: Spray your knife! Spraying your knife with cooking spray makes it easy to slice through the soft candy without sticking.
Tip: Double-layering your parchment paper makes lifting the marshmallows out of the pan much easier.

Bham-Mag-Christmas-2017-066

Candy Cane Crunch Fudge

This fudge is delightfully creamy and bright, just like the way even the tiniest bit of snow feels on a cold day. Crushing peppermints releases their fragrance and flavor into the fudge, and with only five ingredients, this treat is also wonderfully simple.

Yield: 28 to 36 pieces

What You Will Need:

  • 1 3/4 cups white chocolate chips
  • 5 ounces sweetened condensed milk, warmed in the microwave for 20 seconds
  • 1 tsp peppermint extract
  • 1 tsp vanilla extract
  • 1/2 cup crushed peppermints or candy canes, plus 5 peppermints, crushed, for topping
  • Sparkle red icing

What You Will Do:

  1. Prepare an 8 by 8 inch glass baking pan by lining it both horizontally and vertically with waxed paper.
  2. Heat chocolate chips and condensed milk in a glass bowl for 30 seconds in the microwave. Stir with a rubber spatula. Repeat this process until the mixture is smooth, stirring thoroughly, for about five rounds of 30 seconds.
  3. Stir in crushed peppermints and extracts until combined.
  4. Carefully pour into lined glass baking pan. Smooth mixture into corners of pan and smooth top with rubber spatula. Drizzle with sparkle icing, then use a flat toothpick to create swirls. Top with additional crushed peppermints.
  5. Freeze for three hours, cut into squares and serve!

Simple Butter Cookies with 4 Ingredient Cardamom Icing

Bham-Mag-Christmas-2017-02-030

AHHHH butter cookies!

Since I was a child, I was a bit obsessed with any food that came in a tin.

Bham-Mag-Christmas-2017-02-031

Ground coffee in a tin? Felt like a special treat reserved only for those adults brave enough to drink the black stuff. Cheese popcorn organized between three paper dividers in a giant Christmas tin that I could hug and/or physically protect from my siblings? It felt like Santa came early. And COOKIES in a tin? Oh my geez, hold the phone, I’m running toward that one like someone broke out the Hanson Tour (circa early 2000’s) DVD.

Bham-Mag-Christmas-2017-02-035

Needless to say, this recipe makes my mouth water because these butter cookies were developed to be similar to the ones you find in the blue tins, at the store, that also come with paper dividers inside the packaging. Soooo classy.

This recipe differs, however, in the icing. The four-ingredient cardamom frosting makes the cookie flavor your own! Unlike the cookies that come in a tin, these guys are topped with homemade goodness (made with powdered sugar and cream) that is wonderfully, slightly spiced, with cardamom.

So, if buying cookies in a tin for your friends and fam is part of your tradition, maybe break the mold this year. Bake up some butter cookies instead. Whip up an easy homemade frosting. And ship them off to your fab loved ones- paper dividers optional.

Bham-Mag-Christmas-2017-02-037

Butter Cookies with Four Ingredient Cardamom Vanilla Icing

These butter cookies bring back memories of the nostalgic variety found in holiday blue cans during December. Make a fresher version at home with a savory twist of cardamom and sweet spread of creamy vanilla icing. Top with silver sprinkles to ring in the New Year! You can find this and many of Luv Cooks December recipes in the December issue of Birmingham magazine.

Yield: 33 cookies (depending on cookie cutter shape)

What You Will Need:

  •  1 cup unsalted butter, room temperature
  •  1 cup powdered sugar
  •   2 teaspoons vanilla extract
  •  1 large egg, room temperature
  •  2  1/4 cups all purpose flour
  •  1 teaspoon baking powder
  •  1/2 teaspoon salt
  • 1/2 teaspoon ground cinnamon
  • 1/4 tsp ground cardamom
  1. Preheat oven to 350. Line a baking sheet with parchment paper.
  2. In the bowl of a stand mixer, beat butter, sugar and vanilla on medium high for two to three minutes, or until light and fluffy.
  3. Add egg, stir until combined.
  4. Whisk together flour, baking powder, salt, cinnamon and cardamom until combined.
  5. Add flour mixture to butter/sugar in one large batch; stir just until combined.
  6. Roll dough onto floured surface with floured rolling pin until 1/4 inch thick. Cut out with a holiday cookie cutter and use a spatula to transfer cookies to parchment-lined baking sheet.
  7. Bake for 10 minutes. Cool for two minutes, then transfer cookies to cool completely on a wire rack.
  8. Once cooled, frost with vanilla cardamom icing and top with sprinkles!

Four Ingredient Vanilla Cardamom Icing

What You Will Need:

  • 1 cup powdered sugar
  • 2 tablespoons heavy cream
  • 1 tsp vanilla
  • 1/8 tsp ground cardamom
  • Silver sprinkles, optional

1. Whisk all ingredients (except for sprinkles) together until smooth. Frost cookies once cooled and top with sprinkles. Enjoy!


Mini Fruitcake Cinnamon Rolls with Orange Cream Cheese Frosting

Bham-Mag-Christmas-2017-02-004AHHHH fruitcake.

Ok right, I know, who ever says “Ahh, fruitcake! That’s just what I am craving on a Tuesday, fruitcake.”

Ok, I have never actually said that, but you know what? I think the idea of fruitcake– a sweet loaf of cake stuffed with nuts, dried and/or candied fruits, baked with lots of butter and soaked in liquor (I think namely rum and/or brandy?) sounds pretty fantastic.

So in theory, this idea sounds tasty, right? I think so. And what BETTER a vehicle for the idea of rum-soaked, buttered, dried fruit-and-nut delicacy than a cinnamon roll? Exactly.

Bham-Mag-Christmas-2017-02-010

So today I am sharing with you recipe number EIGHT in our Twelve Recipes of Christmas- and another awesome one to share with those people who won’t get out of their Christmas onesies long enough to help you in the kitchen. (I hear onesies can be quite flammable near an open flame. ;))

Alright my loves! Let’s get to making those delicious holiday fruitcake rolls!

Bham-Mag-Christmas-2017-02-015

Mini Fruitcake Cinnamon Rolls with Orange Zest Cream Cheese Frosting

Here we update a wintertime staple! A classic cinnamon roll is filled with fruit and a bit of Tennessee honey whiskey to keep our version in line with the spirit-centric tradition of the original dessert. Serve it warm on a cold morning to rouse even the sleepiest of friends or family members. You can also find the recipe in the December issue of Birmingham magazine!

Yield: 16-20 mini rolls

For the rolls: What You Will Need

  • 1 12.4 ounce package cinnamon roll dough (such as Pillsbury cinnamon roll Original)
  • 2 tablespoons melted butter
  • 1 tablespoon Tennessee honey whiskey
  • 1 teaspoon cinnamon
  • 1/4 tsp ground cloves
  • 1/4 cup dark brown sugar
  • 1/2 cup of mixed dried fruit (such as golden raisins, dried cherries, cranberries, and/or apricots) *
  • 1/2 cup of mixed nuts (such as slivered almonds and/or finely chopped pistachios and pecans)

*You can also soak the dried fruit in hot apple cider for five minutes, then drain, for even more holiday flavor! You could also add some rum to that apple cider if your house guests are of the over-21 variety:)

What You Will Do:

  1. Preheat oven to 350. Spray 9 inch metal pie pan with a generous amount of cooking spray, making sure to thoroughly coat the bottom and sides of the pan to prevent sticking.
  2. Stir together melted butter, whiskey, spices and brown sugar.
  3. Separate individual cinnamon rolls.
  4. On a well-floured surface, press the seams of four rolls together. Use your hands to really get in there and warm up the dough so the main seam in the middle is pressed together, as are the sides- so you create a rounded, about 4 to 5 inch square of flat dough with no gaps between rolls. You can use a rolling pin to help flatten it too, but I like using my hands!
  5. Spread 1/2 bourbon sugar mixture onto dough, spreading to almost the edges of the square.
  6. Top with dried fruit and nuts, using about 1⁄4 total mixture. Don’t overload the rolls or you can’t roll them up, hah!
  7. Roll into a log, using your fingers to continue to press the seams of the rolls together if needed. Then use a SHARP knife to cut it into 8-10 small rolls. A sharp knife makes slicing so much easier!
  8. Repeat entire process with remaining 4 rolls.
  9. Gently put mini rolls with edges touching in sprayed pie pan.
  10. Bake for 20 minutes, or until tops are beginning to turn golden brown.
  11. Once cooked through, top with cream cheese frosting and serve warm.

Orange Zest Cream Cheese Frosting

What You Will Need:

  • 4 ounces cream cheese, room temperature
  • 3/4 cup powdered sugar
  • 2 ounces heavy cream
  • 1 tsp vanilla extract
  • 1/2 tsp orange zest (about the zest of one medium orange) plus additional zest for sprinkling

What You Will Do:

1. In the bowl of a stand mixer fitted with a paddle attachment, beat cream cheese, powdered sugar, heavy cream, and vanilla extract on medium speed for one to two minutes, or until smooth and creamy.

2. Stir in orange zest. Spread with a butter knife or offset spatula on rolls while still warm. Enjoy!!


Mint Chocolate Truffles with Oreo + Coffee Almond Bark

Bham-Mag-Christmas-2017-026

Tis the season of edible holiday treats, and on Luv Cooks, we have GOT YOU.

I mean, to me, there is no better way to show love to those that you love than to give something handmade, chocolate, and coffee-centric.

Bham-Mag-Christmas-2017-013

Let me begin with these truffles. I like truffles that are decidedly dark. Rich, yes- but not too sweet, just dark enough to satisfy a chocolate craving without sending me into a sugar headache. We use a 90% dark chocolate bar here, add in semi sweet chocolate to balance the flavor, and a bit of a dark chocolate mint bar and mint extract. Topping them with crushed Oreo Mint thins keeps the truffles fun and holiday-esque! They do take a bit of extra time for the truffle to set, but I promise they are worth it!

Also, PRO TIP alert: Use a toothpick around the base of the truffles to prevent the chocolate from pooling. (I know, I know, every truffle maker’s nemesis, those pesky chocolate pools.)

Ohhh, and this coffee almond bark. It reminds me a bit of my wedding day ice cream- dark chocolate, Heath bar, and flaky sea salt. Divine. The addition of espresso powder deepens the chocolate flavor and you will be LUCKY if you can keep this stuff around for longer than it takes to set on the kitchen counter.

Both of these recipes are PERFECT to make ahead (you could start the truffles, toast the almonds, make the almond bark, then come back to dipping the truffles) and put in bags to hand out to people that you deem worthy.

CHRISTMAS TREATS HERE WE COME!

Bham-Mag-Christmas-2017-041

Coffee Toffee Dark Chocolate Almond Bark

The addition of espresso powder to the dark chocolate in this bar makes for a rich, satisfying treat. Paired with crumbled toffee pieces and toasted sliced almonds, good luck keeping this around for more than the time it takes to set on the kitchen counter!* (I apologize for using this joke twice for those who read our full post, hah!) 

Yield: Varies depending on preferred piece size

What You Will Need:

  • 1/2 cup sliced almonds
  • 5 ounces semisweet chocolate
  • 3 ounces dark chocolate morsels
  • 3 ounces Heath bar crumbles plus 1 ounce crumbled Heath bar for topping
  • 1/2 to 1 tsp espresso powder, depending on coffee preference
  • Flaked or coarse sea salt, for sprinkling

What You Will Do:

  1. Prepare a baking sheet with a baking mat, like a Silpat, or wax paper.
  2. Roast nuts in skillet on medium heat until toasty. Remove to plate to cool.
  3. Melt chocolate (except Heath bar) for 30 seconds in glass bowl in the microwave.
  4. Stir with rubber spatula.
  5. Microwave 30 more seconds; add 3 ounces Heath bar. Microwave 15 seconds; stir. Microwave 15 seconds more. Stir until smooth with only toffee chunks remaining.
  6. Stir in espresso powder until dissolved.
  7. Using a rubber spatula, spread chocolate mixture evenly onto baking mat (or wax paper) on baking sheet.
  8. Top with almonds and additional 1 ounce Heath bar.
  9.  Sprinkle lightly with sea salt and allow to cool at room temperature. Once cooled, break into pieces and enjoy!

Bham-Mag-Christmas-2017-026

Mint Chocolate Truffles with Oreo Cookie Crunch

If there ever was a time to indulge in a truffle, it is the holidays. This version is decidedly darker, more chocolatey and less sweet than a premade version, but gets a childlike nod with a topping of mint-flavored Oreo cookie. These are also perfect for wrapping in bags and gifting to the ones you love. ***Make sure you set aside time for this mixture to cool in the fridge since it is a vital step!

Yield : 44 truffles

What You Will Need:

  • 8 ounces 90% dark chocolate chocolate
  • 7 ounces semisweet chocolate
  • 1 ounce mint dark chocolate bar, broken into pieces
  • 1 14 oz can sweetened condensed milk
  • 1/2 to 1 tsp peppermint extract, depending on preference
  • 12 ounces dark chocolate melting wafers, melted
  • 1⁄2 cup Oreo Thin cookies, mint flavor, crushed

What You Will Do:

  1. Melt all chocolate (except for melting wafers) in a large glass bowl over simmering water.
  2. Once chocolate is about halfway melted, add condensed milk. Stir until all chocolate melts and the mixture resembles the texture of marshmallow.
  3. Carefully take the bowl off heat and stir in mint extract.
  4. Cover bowl with plastic wrap and refrigerate for at least two hours.
  5. Line a large baking sheet with parchment paper.
  6. Take truffle from fridge and allow to come to room temperature. The texture is perfect when you can easily scoop it into balls. If needed, you can reheat it at 15 second intervals in the microwave until softened.
  7. Once rolled into balls, put truffles on parchment-lined baking sheet. Place sheet in freezer for about 10-15 minutes to firm up.
  8. Melt dark chocolate in a glass bowl in the microwave for 30 second intervals, stirring after each session, until smooth.
  9. Once ready, use a slotted spoon to dip truffles into melted chocolate. Move to baking sheet, then sprinkle with Oreos while the chocolate is still melty so the Oreos will stick.
  10. Allow to cool on parchment lined baking sheet.


Eggnog Cupcakes with Vanilla Nutmeg Frosting

Bham-Mag-Christmas-2017-02-093

My husband and I decided that this year we are going to do one thing VERY right for Christmas. It wasn’t going to be giving each other a Slayer espresso machine (a girl can DREAM) or training our dog to actually catch treats in his mouth. Nope, instead we attempted to make George Washington’s eggnog recipe.

As in, the same one from around around the time of the British tradition’s transport to America. The same time that George and Martha Washington entertained at Mount Vernon. That same one.

To say that the process was tedious is a bit of an understatement. In fact, my sweet husband was so concerned that he over-whipped the egg whites that we had multiple discussions on whether shaking the gallon container with the egg nog already in it would correct or make the problem worse.

Bham-Mag-Christmas-2017-02-053

The jury is still out on whether or not all of this effort will be worth it; right now it smells (and tastes) about as strong as what my best friend’s dad loosely calls “Eggnog” at our family Christmas party, but what everyone else knows is more like whisky with a hit of vanilla ice cream and dash of nutmeg.

But these cupcakes! Hold the phone. Even the eggnog averse will most likely fall for this cupcake. The recipe doesn’t even actually have eggnog in it- just a blend of almond and rum extracts that highlight a fluffy almond cake topped with delicious vanilla nutmeg frosting.

PLUS, unlike our eggnog, there is no need to let this sit in your fridge for three weeks! Or wait for raw eggs to be “sterilized” by copious amounts of liquor! Just pure, delicious cake topped with fluffy frosting.

Happy baking!

Bham-Mag-Christmas-2017-02-050

Eggnog Cupcakes with Vanilla Nutmeg Frosting

Cupcakes are the perfect holiday party food, and this version gets a subtle eggnog flavor from both rum and almond extracts. These cupcakes aren’t exclusive, though- even the eggnog-averse among party goers will be lured in by the soft, lightly almond cake and whipped vanilla nutmeg frosting. You can also find this recipe in the December issue of Birmingham magazine!

Yield: 12 cupcakes

What You Will Need:

  • 1 cup cake flour
  • 1/2 cup all purpose flour
  • 1 teaspoon baking powder
  • 1/4 teaspoon salt
  • 1/2 cup unsalted butter, room temperature
  • 1 cup light brown sugar, packed
  • 1 egg, room temperature
  • 1 egg yolk, room temperature
  • 1/2 cup unsweetened almond coconut milk
  • 1 teaspoon almond extract
  • 1 teaspoon rum extract
  • 1/2 teaspoon nutmeg
  • 1/2 teaspoon cinnamon

What You Will Do:

  1. Preheat oven to 350 and line a 12-cup muffin tin with liners. Place baking rack in middle rack of oven.
  2. Whisk together flours, baking powder, salt, nutmeg and cinnamon.
  3. In the bowl of a stand mixer, cream butter and brown sugar with the paddle attachment for about 2 to 3 minutes, or until lightened in color and fluffy.
  4. Beat in egg, then egg yolk, until combined, scraping down sides of the bowl as needed.
  5. Add extracts and almond milk and stir to combine.
  6. Add flour in slowly, beating on low until just evenly combined, wiping down the sides and bottom of the bowl as necessary. Don’t beat too long or the cake can become dense!
  7. Pour batter in scant 1/4 cups into muffin tin and bake for 20 minutes, or until a knife inserted in the cake comes out clean.
  8. Remove muffins from tin after 3 minutes and place on wire rack to cool.
  9. Let cool completely then ice with vanilla nutmeg frosting.

Vanilla Nutmeg Frosting

What You Will Need:

  • 16 ounces powdered sugar
  • 1 cup vegetable shortening
  • 4 teaspoons vanilla extract
  • 2 teaspoon almond extract
  • 1/4 teaspoon freshly grated nutmeg plus additional for topping
  • Pinch of salt

What You Will Do:

  1. In the bowl of a stand mixer fitted with a whisk attachment, beat sugar, vegetable shortening and extracts on medium high for one minute, or until incorporated. Scrape down sides of bowl to incorporate all of the ingredients at the bottom of the mixing bowl.
  2. Beat on high two minutes. Scrape down sides again. Beat on high one more minute; frosting should be almost white in color and fluffy.  
  3. Whip in ¼ teaspoon freshly grated nutmeg and pinch of salt.
  4. Pipe frosting onto cupcakes using a piping bag and chosen icing tip.
  5. Top with a dusting of freshly grated nutmeg.

Black and White Chocolate Gingerbread Cookies with Orange Zest White Chocolate

Dec-2017-Chocolate-Orange-Ginger-Cookies-010

COOKIES!

To me, no holiday season is complete without the ingestion of at least umm, 100 cookies a piece.

That may be an understatement.

But I thought it appropriate to make recipe #2 of our Twelve Recipes of December, one of my favorite gingerbread cookie recipes I’ve developed.

Dec-2017-Chocolate-Orange-Ginger-Cookies-007

Working as a recipe developer is fun, but can also be uber frustrating. Especially when you think you have a brilliant flavor combination idea- cabbage and BASIL anyone?! I promise it smells like pizza in the oven!- that doesn’t turn out to be so brilliant (umm, yes, I did once attempt a creative homemade kettle corn that nearly caught my pan and/or stove top on fire).

This recipe, though, was inspired by lots of gingerbread cookies I saw on Pinterest that I wanted to keep the soft texture from, but also add some depth to the flavor. I love standard gingerbread SO much, but it takes TIME to make. This dough requires that extra step of making it ahead of time and allowing it to rest in the fridge. And heaven knows during this season time ITSELF is a gift. BUT if you are going to take the time and monetary effort to bake these cookies, then by golly let’s make them special!

Dec-2017-Chocolate-Orange-Ginger-Cookies-003

I also thought that adding a few special tweaks could take your bring-gingerbread-to-your-in-laws/coworkers/Friendsgiving game up a notch. Plus, the addition of the pretty orange zest on top is so fun and adds that special sparkle to your Christmas cookie!

Alright my loves, let’s GET TO BAKING!

Dec-2017-Chocolate-Orange-Ginger-Cookies-019

Black and white dark chocolate gingerbread cookies with orange zest white chocolate

Gingerbread cookies are a December staple, but this version is soft and chewy, with a hit of dark chocolate and molasses that makes them irresistible! Whole wheat flour adds a great texture and the white chocolate dip is a perfect vehicle for more orange zest flavor. Also, the cookies taste even better if you let them sit in the fridge for 3 hours! You can also check this full recipe out in the December issue of Birmingham magazine!

Yield: 24 cookies

What You Will Need:

  • 3/4 cup unsalted butter, room temperature
  • 1/2 cup molasses
  • 1/2 cup dark brown sugar
  • 1 large egg, room temperature
  • 2 cups white whole wheat flour
  • 1 teaspoon baking soda
  • 1/2 tablespoon ground ginger
  • 1 teaspoon ground cinnamon
  • 1/4 tsp ground allspice
  • 1/4 tsp ground nutmeg
  • 1/4 tsp ground cloves
  • 1/4 cup cocoa powder
  • 1/2 teaspoon salt
  • 1/4 plus 1 tsp orange zest
  • 1 tsp vanilla extract
  • 3/4 cup white chocolate melting chips

What You Will Do:

  1. Whisk together flour, baking soda, spices, cocoa powder, salt. Set aside.
  2. Beat butter, molasses, and dark brown sugar in a stand mixer on high for three minutes, or until light and fluffy. Scrape down sides of bowl.
  3. Add egg, mix to combine.
  4. Add vanilla and 1/4 tsp orange zest. Scrape down sides of bowl as needed to incorporate all ingredients.
  5. Add in dry ingredients in two batches, stirring until fully combined.
  6. Put dough in fridge, covered, for at least three hours to set.
  7. Preheat oven to 375. Line a metal baking sheet with parchment paper.
  8. Scoop cookies in one to two tablespoon scoops. Roll into small balls with your hands. Place dough on baking sheet.
  9. Bake for 12 minutes; let cool for two minutes, then remove cookies to cooling rack to cool completely. Line additional cooling rack with parchment paper.
  10. Melt white chocolate chips in 30 second increments, stirring after each round, until melted and smooth.
  11. Dip cooled cookies halfway in white chocolate mixture, place on parchment lined cooling rack. Sprinkle with orange zest.
  12. Let cookies rest at room temperature for at least 15 minutes to set.


Holiday arugula salad with candied almonds and orange vinaigrette

Dec-2017-Orange-Salad-016

It’s that time of the year for……12 Recipes of DECEMBER!

That’s right, I am about to hit your inbox UP with some fantastic recipes to help you feed all of the fabulous people in your life this December holiday season!

And today, on our favorite posting day of the week (ahem, Friday), let’s talk holiday potluck sides. I think a great side dish has several elements- no need for an oven once you arrive at the party (this is precious real estate for your hostess, try not to encroach on that real estate if at all possible!), simple ingredients, and a beautiful presentation (we eat with our eyes first, people!). Oh, and the dish requires absolute deliciousness and for the holidays, that special, sparkly quality. ***cue fake snow here**

Dec-2017-Orange-Salad-006

Enter the orange and arugula salad! Honestly, the hardest step of this recipe is making the candied almond brittle! But realistically you could do that a day ahead of time and then throw everything together before you walk out of the door. The bright green of the arugula with the beautiful crimson hue of the cranberries and the light, milky ricotta make a beautiful color contrast too.

I dig this recipe for so many reasons that I made it for a holiday potluck we went to a few days ago, and it got a thumbs up at the party, praise!

So without further ado my loves, let’s get to making that salad and on to the party! (I hope you are wearing your jingle bells…)

Dec-2017-Orange-Salad-013

Arugula and cranberry salad with candied almonds, ricotta, fresh orange and citrus vinaigrette

This zesty citrus salad is sure to brighten up even the most traditional holiday table. The combination of peppery salad greens, orange vinaigrette, creamy ricotta and buttery rich candied almonds is divine! The recipe for candied almonds makes more than enough for the salad, and can also double as almond brittle, a handmade gift in itself.

You can also find this recipe in the December issue of Birmingham magazine!

Yield: 6 servings

For the candied almond brittle:

What You Will Need:

  • 1 1/2 cup raw almonds
  • 1 egg white
  • 1 tsp vanilla
  • 1/2 cup dark brown sugar, packed
  • 1/4 cup honey
  • 1 tsp cinnamon
  • 1/2 tsp salt

What You Will Do:

  1. Line two baking sheets with parchment paper and spray with cooking spray. Preheat oven to 300 degrees.
  2. In the bowl of a stand mixer, whisk egg white and vanilla until frothy.
  3. Stir together brown sugar, honey, cinnamon, and salt in a bowl until combined.
  4. Add sweet mixture back to mixer; mix for about 30 seconds more, or until combined.
  5. Remove bowl from mixer and pour in almonds, stir with a rubber spatula to coat.
  6. Pour covered almonds on parchment-lined sheet.
  7. Bake for 45 minutes, stirring every 15 minutes with a rubber spatula to redistribute sugar mixture over almonds.
  8. Once baked and out of the oven, stir almonds once more to distribute sugar coating. Put baking sheet on cooling rack. Let cool completely.
  9. Once cooled, chop almond brittle into bite-size pieces for salad.

For the citrus vinaigrette:

What You Will Need:

  • 3 tablespoons vegetable oil
  • 1 tablespoon fresh orange juice
  • 1/2 tsp dijon mustard
  • 1/2 tsp light brown sugar
  • ¼ to 1/2 tsp salt, to taste
  • Fresh ground pepper, to taste

What You Will Do:

  1. Whisk together orange juice, mustard, brown sugar, salt and pepper.
  2. In a slow stream, whisk in vegetable oil until combined.
  3. Add additional salt and pepper to taste.

For the salad:

What You Will Need:

  • 5 oz baby arugula
  • 2 to 4 tablespoons ricotta, crumbled
  • 1 naval orange, peeled and sliced (Cara Cara and Blood Oranges would be delicious also)
  • 1/3 cup candied almond brittle, chopped
  • 1/4 cup dried cranberries
  • Citrus vinaigrette, for dressing

What You Will Do:

  1. Toss all ingredients together except dressing.
  2. Right before serving, toss with citrus vinaigrette.

Dec-2017-Orange-Salad-011


Salted Caramel Apple Almond Bars & My Fave Cookie Swap Recipes


Almonds-Bham-Mag-Oct-2017-11

LOVES!!

Ahhh, it’s finally that time of the year. Time for warm snuggles while watching holiday movies, white snow, knit hats and most importantly…HOLIDAY BAKING.

Almonds-Bham-Mag-Oct-2017-6

That’s why during the month of December we are ALL about some holiday baking recipes. From gluten free coconut flour bread (the most delicious I’ve ever had) to some FAB holiday appetizer inspiration, get ready for a month full of holiday surprises!


I also want to give y’all the chance to subscribe to the Luv Cooks YouTube channel. This is the BEST source for all of the fun holiday tips and tricks, plus pumpkin spice reviews, what to do with leftovers- lots of foodie life hacks!


And since we’ve also been highlighting parties and party tips on YouTube I thought I’d share my three favorite recipes to bring to a cookie swap party. These recipes are awesome because you can make them up to days in advance, the steps are simple, and they allow for easy customization to your personality in the kitchen.

Almonds-Bham-Mag-Oct-2017-7

Salted Caramel Apple Almond Bars: I love this recipe for so many reasons! It’s healthy (full of great fats from the coconut chips and chia seeds), gluten-free, doesn’t require and oven, and gets topped with drizzled caramel and chunky salt. Need we say more?!

Dark Cocoa Cookies

Dark Chocolate Christmas Sugar Cookies: This recipe makes sooo many tasty cookies! I love to make this one in a myriad of ways. You can substitute whole wheat pastry flour for all purpose flour, sprinkle the cookies with cayenne before baking for a spicy flair, or dunk them in a simple glaze (1 cup powdered sugar + 1 1/2 to 2 tablespoons almond milk) and top with more chocolate. Gorgeous!

Chocolate Chip Cookies 2

Brown Butter Chocolate Chip Cookies: The ingredient that makes these cookies extra special is browning the butter. It’s not a hard step, and takes the flavor notch up a TON! Plus, these cookies taste better if you let the dough sit in the fridge for 24 hours. And the smell of these baking- heavenly!!

And of course, we can’t leave out the pups!! Here is a link to the almond butter dog treats I made!

Almonds-Bham-Mag-Oct-2017-10

To top it all off, a cookie swap party is simple. Simply bake enough cookies for everyone at the party to share, along with a printed copy of the recipe. You can even allow each guest to share why they chose their cookie recipe. Then, here’s the fun part- provide pretty bags, ribbon, candy canes, etc. and allow each guest to package their favorite cookies to go. I’ve even been to some parties where you vote on your favorite cookie, and the winner gets a prize!

The cookie swap party is one of my favorite holiday celebration ideas. One- well, you get to eat all the cookies your heart desires- but two, because you get to know your friends even better, and maybe even connect with someone you don’t know. Someone’s favorite cookie recipe says a lot about them: where they are from, what flavors they like, why this cookie in particular is so special. I love getting to know the heart of someone through food!

Happy holiday baking!! XOXO- Callie