I am CELEBRATING the launch of the new show I’m hosting, “Do It for the Gram.” If you’ve ever wondered how on earth people’s food photos look so flipping tasty and ahhhmazing on Instagram, then THIS is the show for you:
https://youtu.be/xRDMeATtIvA
SUBSCRIBE and check out all of the fun future episodes we have in store for you (**hint hint Christmas is gonna be FUN***)
AND we have a fantastic Paleo graham cracker, up on the Luv Cooks YouTube channel, in honor of the show’s launch, ready for you!!
I hope you have the happiest first week of December and stay tuned for more FAB holiday content coming your way this month my lovelies!
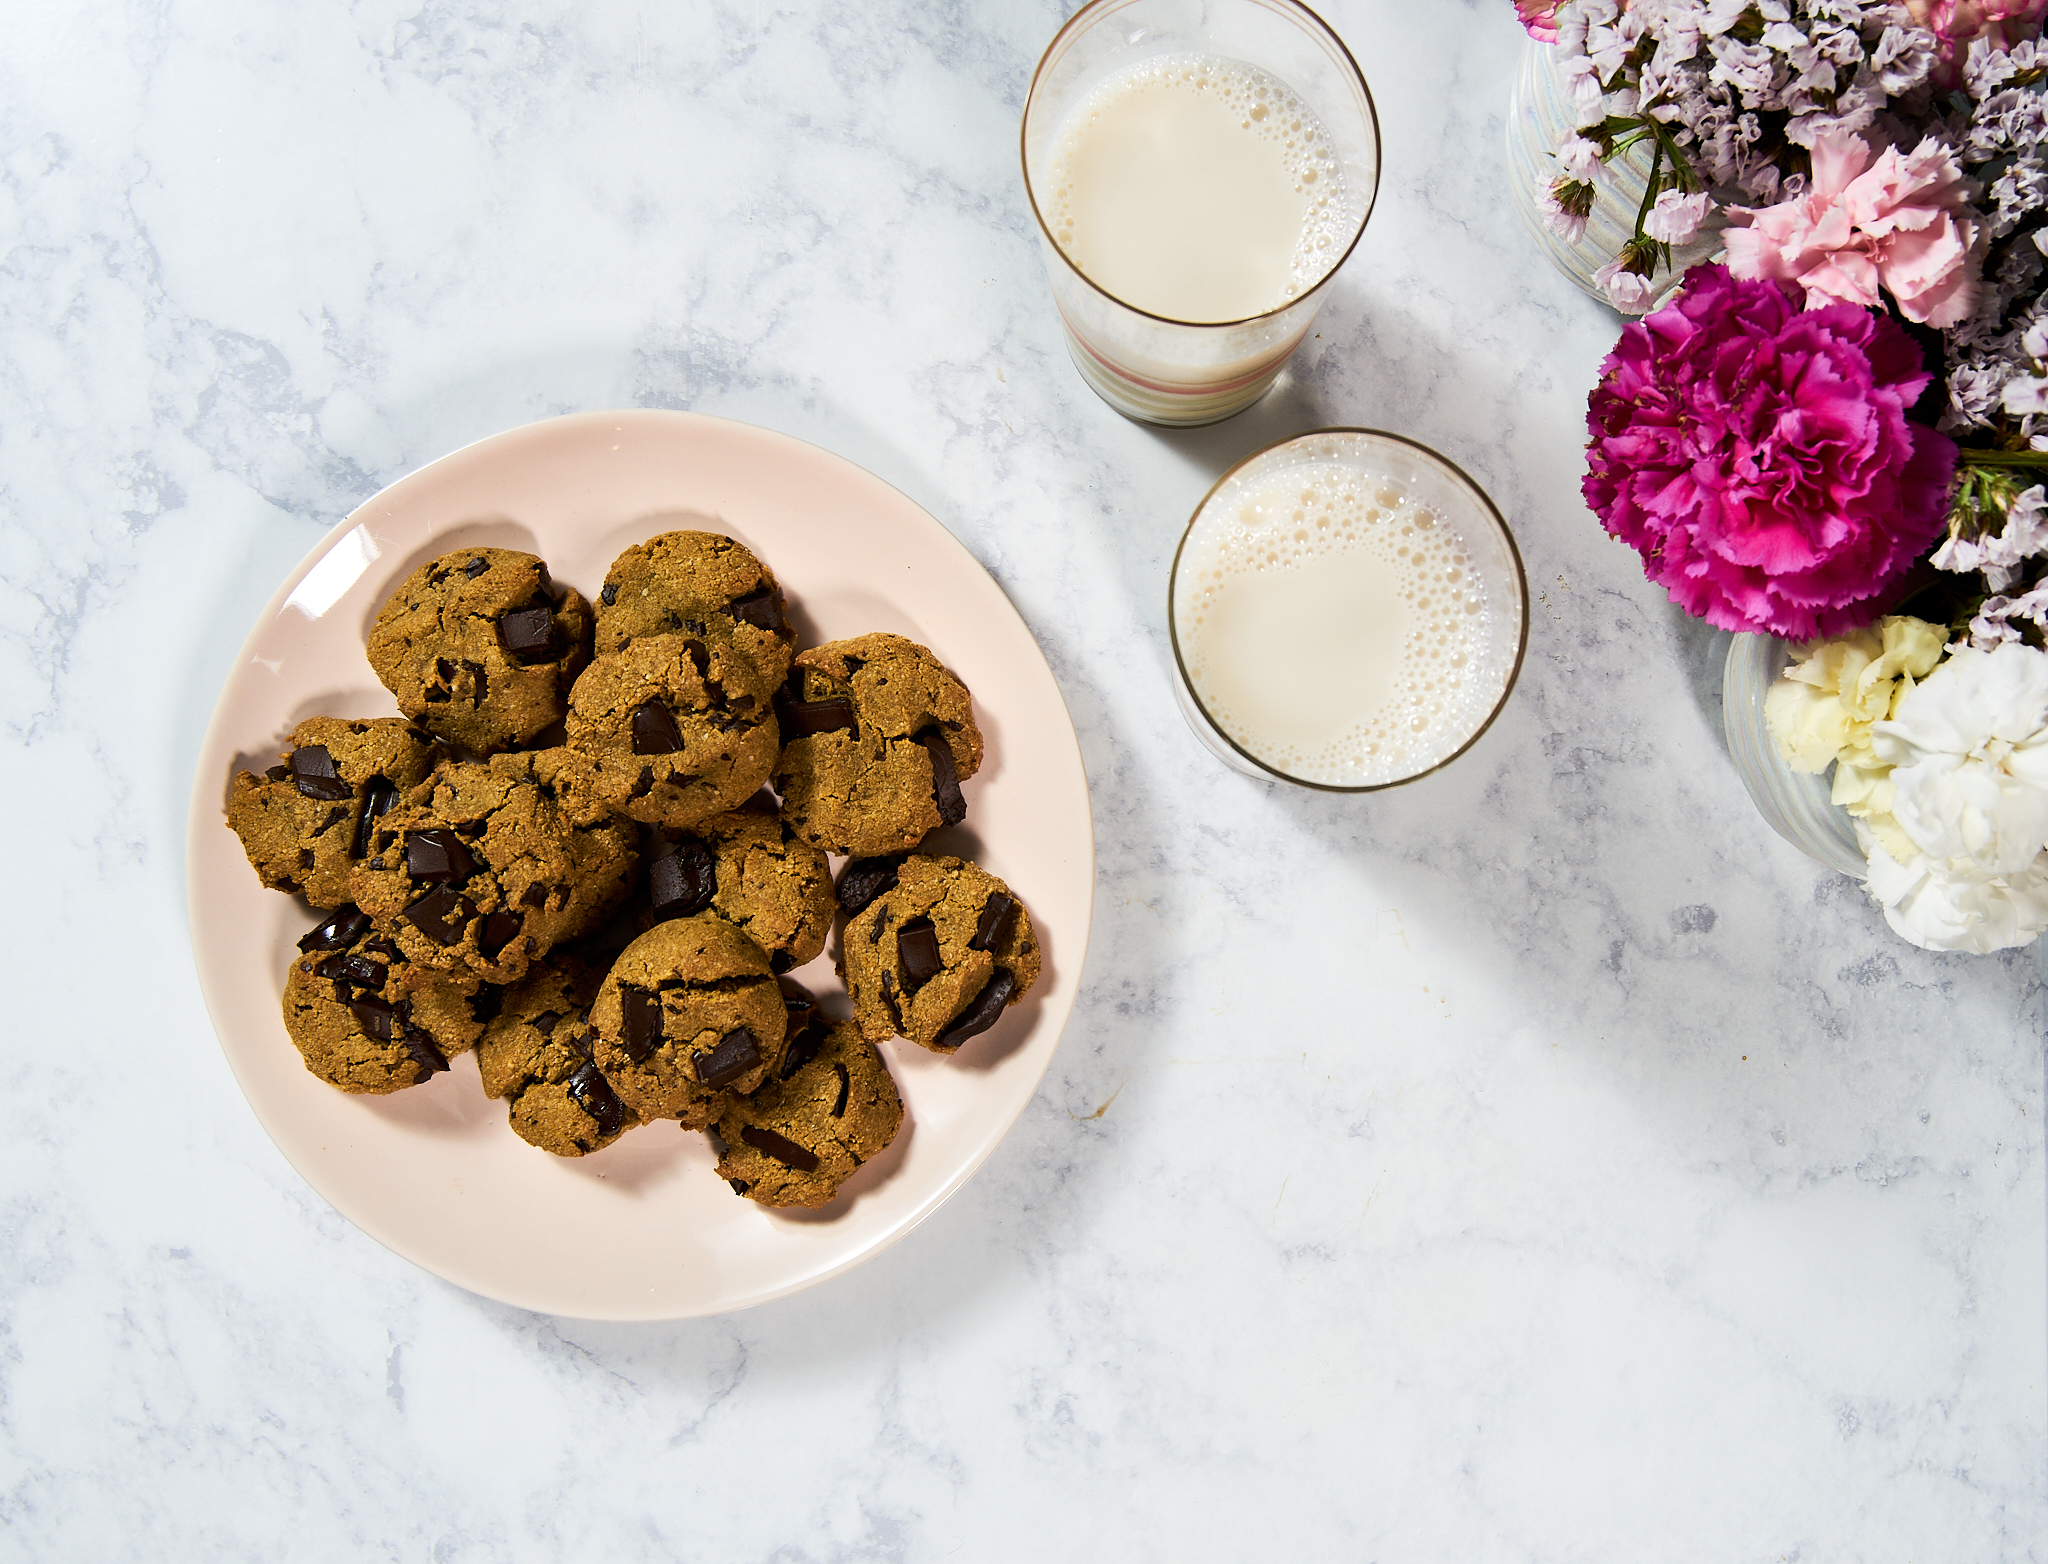
For those of you new to Luv Cooks, there are three foods I will almost always choose. Peanut butter, coffee and COOKIES. This week’s recipe combines two of my faves in a Paleo chocolate chip cookie full of caffeinated goodness! Welcome to the flair espresso paleo chocolate chip cookie!
flair Espresso Paleo Chocolate Chip Cookies (HUGE shoutout to Fooduzzi for her inspiration for this recipe!)
What You Will Need:
1.5 cups almond flour
3 tablespoons coconut flour
3/4 teaspoon baking soda
1/4 teaspoon salt
1/4 cup melted coconut oil
1 shot flair espresso (or about 35 grams strong coffee) made in a flair espresso maker
1/4 cup maple syrup
2.5 ounces chopped Paleo chocolate or dairy-free chocolate of your choice
What You Will Do:
Whisk flours, baking soda and salt together until evenly combined.
Whisk coconut oil, fresh shot espresso (or strong coffee) and maple syrup until somewhat combined (the oil will separate a bit).
Pour wet ingredients into dry, stirring with a rubber spatula until combined.
Add chocolate to wet dough and stir until combined.
Roll dough, a generous tablespoon at a time, out into small balls.
Place on a parchment-lined baking sheet; use hands to lightly flatten each dough ball.
Preheat oven to 350.
Put dough into freezer to set for 15 minutes. Remove from freezer to oven to bake for 12 minutes.
Move to rack to cool for about 5 minutes, and enjoy!
You guys! How are you this week? In particular- how is your energy?
To be honest- since the beginning of the year, mine has been lagging. For those of you who follow the blog, you know how much I LOVE to encourage people. In fact- it’s why I started this blog, to share the love and passion I have for food. And really that love is a love for people, to make them happy and excited about life through the things THEY can make.
But to be real, I haven’t been able to do much of that this year. I felt like my impact was getting buried in the day-to-day tasks of running a food styling/photography/recipe development business. So, my friend Sarah Deshaw and I started talking- why were we both feeling drained? Like we were out of sync, a bit burnt out and distracted? Why did I feel like I wasn’t making the financial and spiritual impact that I wanted to create?
And then, a light bulb moment. If we were feeling this way, surely other people were too. I mean, how many of us have gotten to the end of the week (or weeks, or months) and wondered what we actually accomplished? I mean, crossing of to-do lists are great, but did those things make us feel like we were coming alive? Is our life now better than it was a month ago?
We decided to do something about it, and have now spent months developing a course called The Resilient Entrepreneur. This course has been life-changing for me as a businessperson. It has become Sarah and I’s way to help us all to THRIVE despite what our businesses look like today- to actually love our lives as entrepreneurs again, to make impact on the things that matter to us, to feel better than we ever have.
Over the course of the next few weeks I’ll be sharing more details, but for now, I’d LOVE to for you to check out an Instagram Live teaching Sarah and I did last night on the Top 4 Energy Drains for Entreprenuers and How to Solve Them. This teaching is ahhhmazing, and hints and some of the content our course will center around. You can find it HERE on her story, and also download NOTES from the teaching HERE . AND because you made it all the way to the end of this post- a link to our EARLY BIRD sign up rate for the course, $35. I promise it will be worth every single penny (and I know how precious your pennies are, because mine are too!)
Alright my loves- enjoy this fantastic content, and I pray that this weekend, you get to REST. That you take a full 24 hours to simply enjoy your life and do NO work. Because you are fabulous and I want to see you succeed for the long haul.
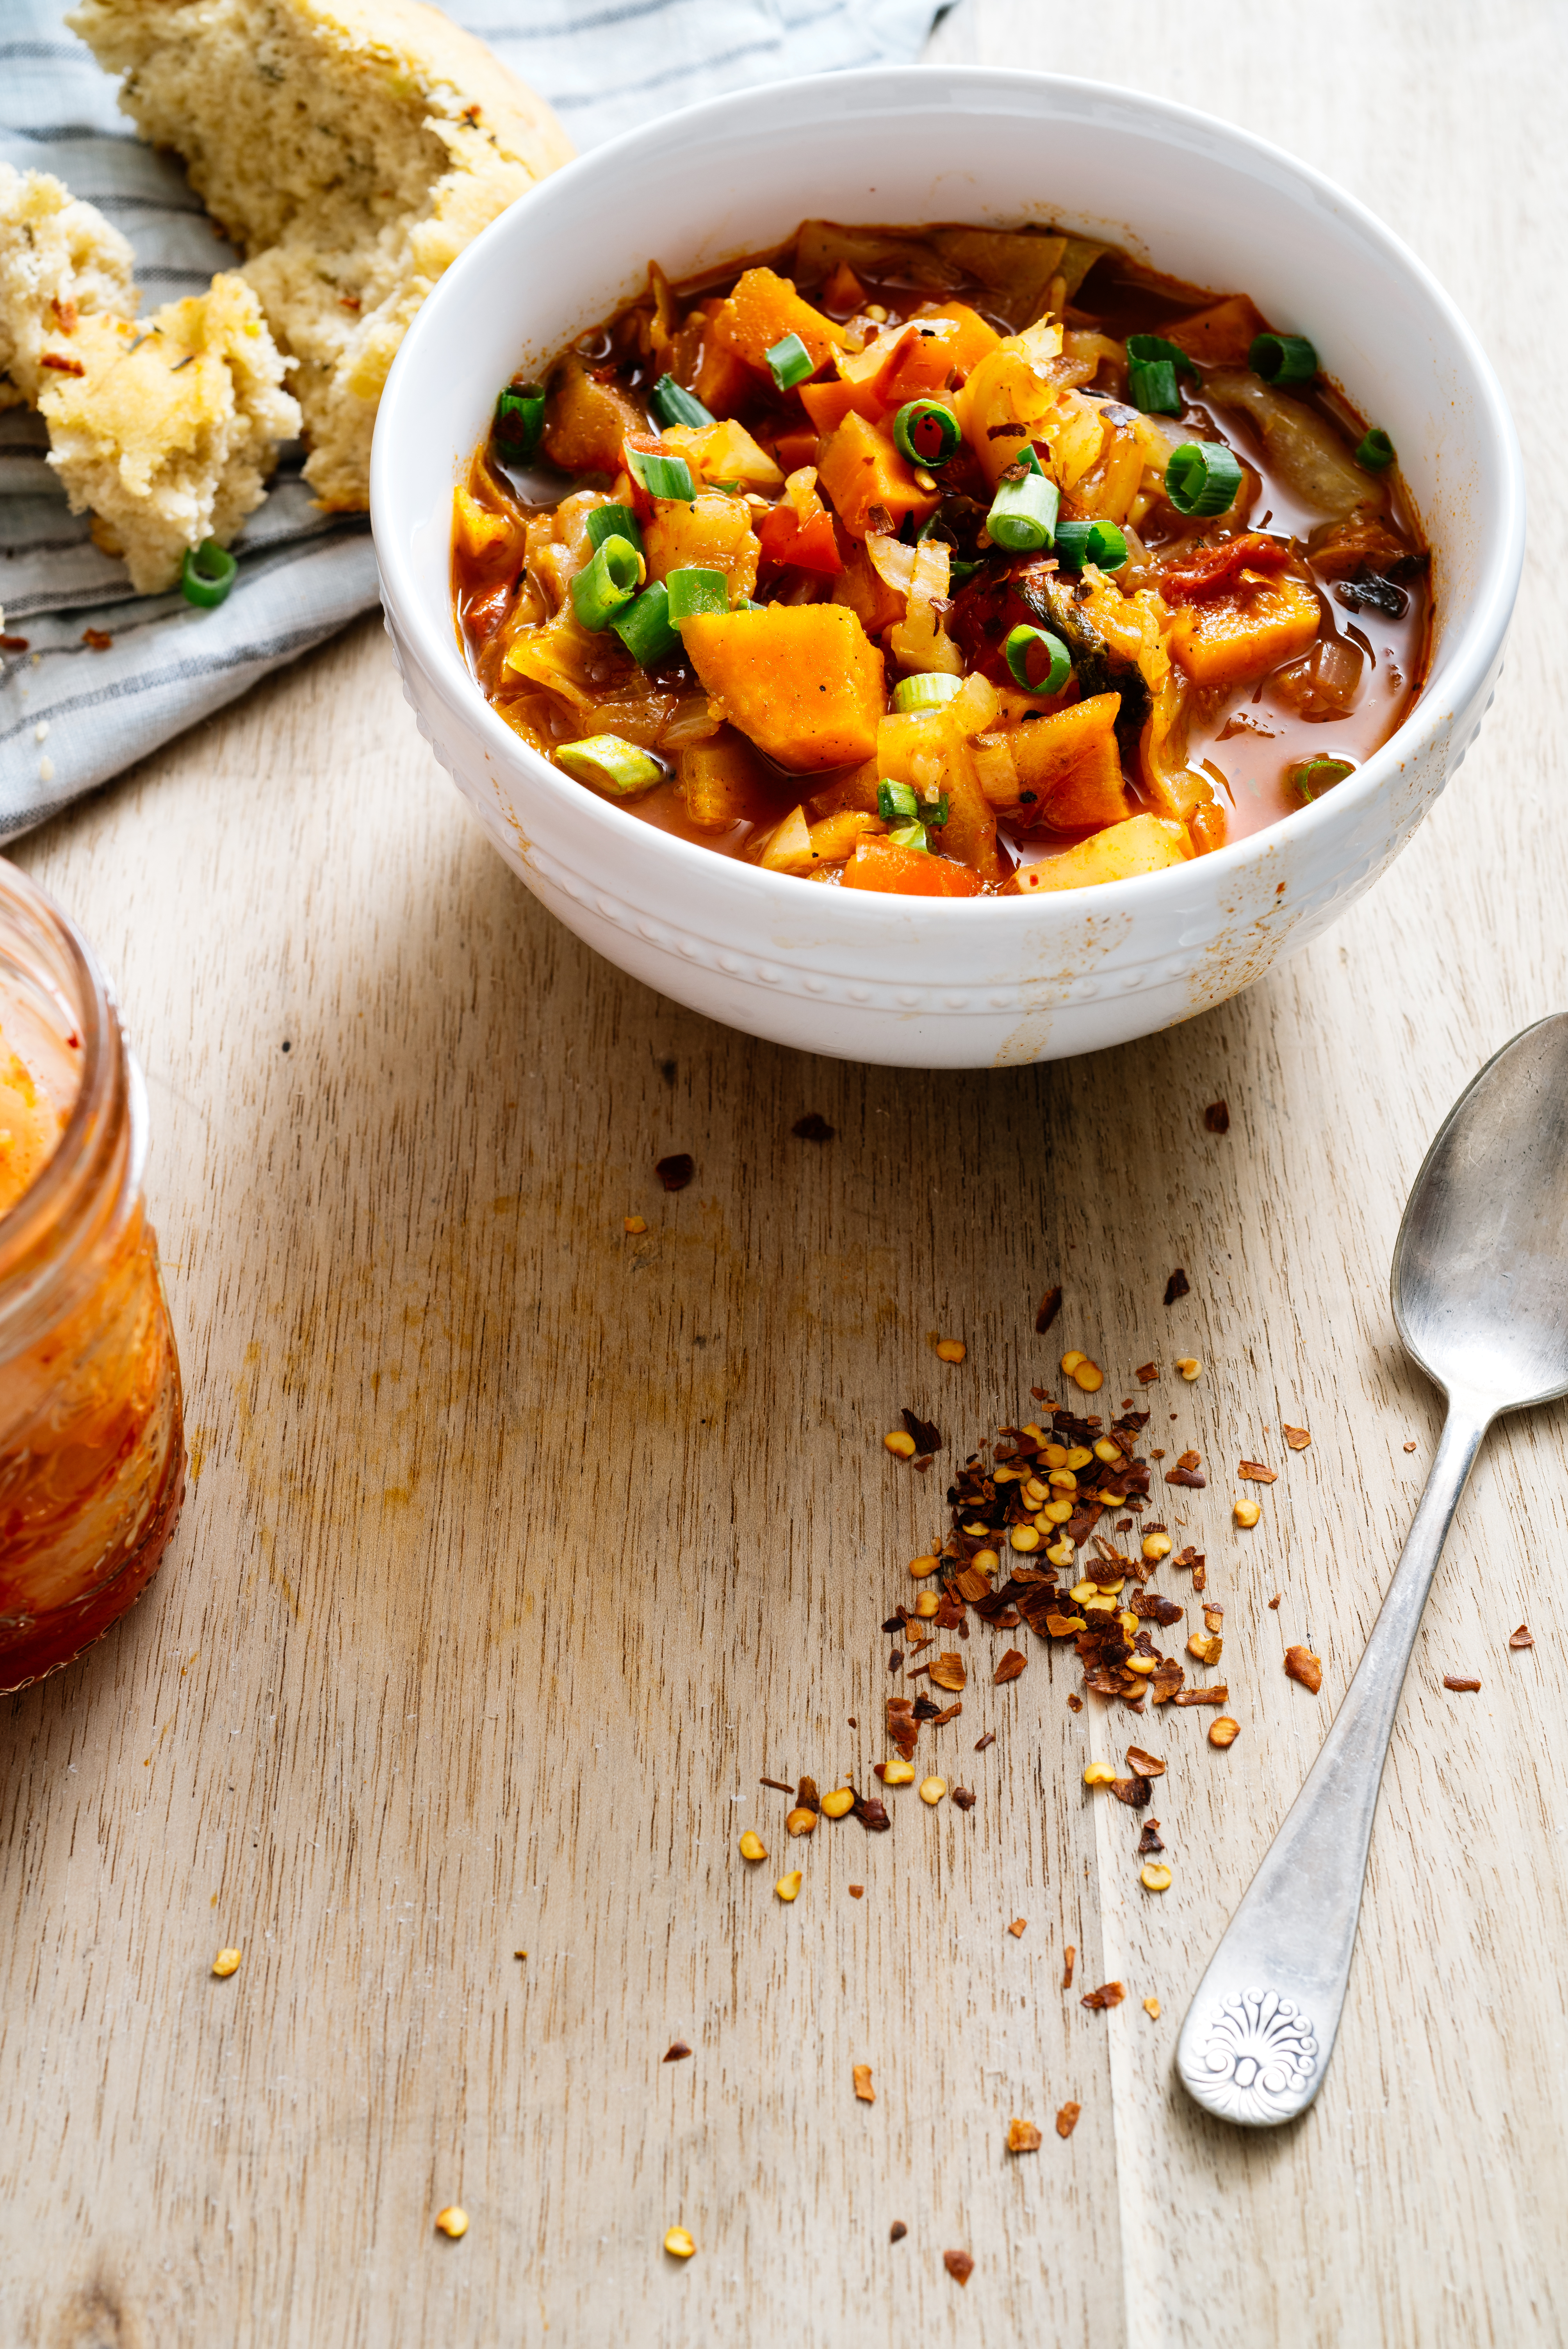
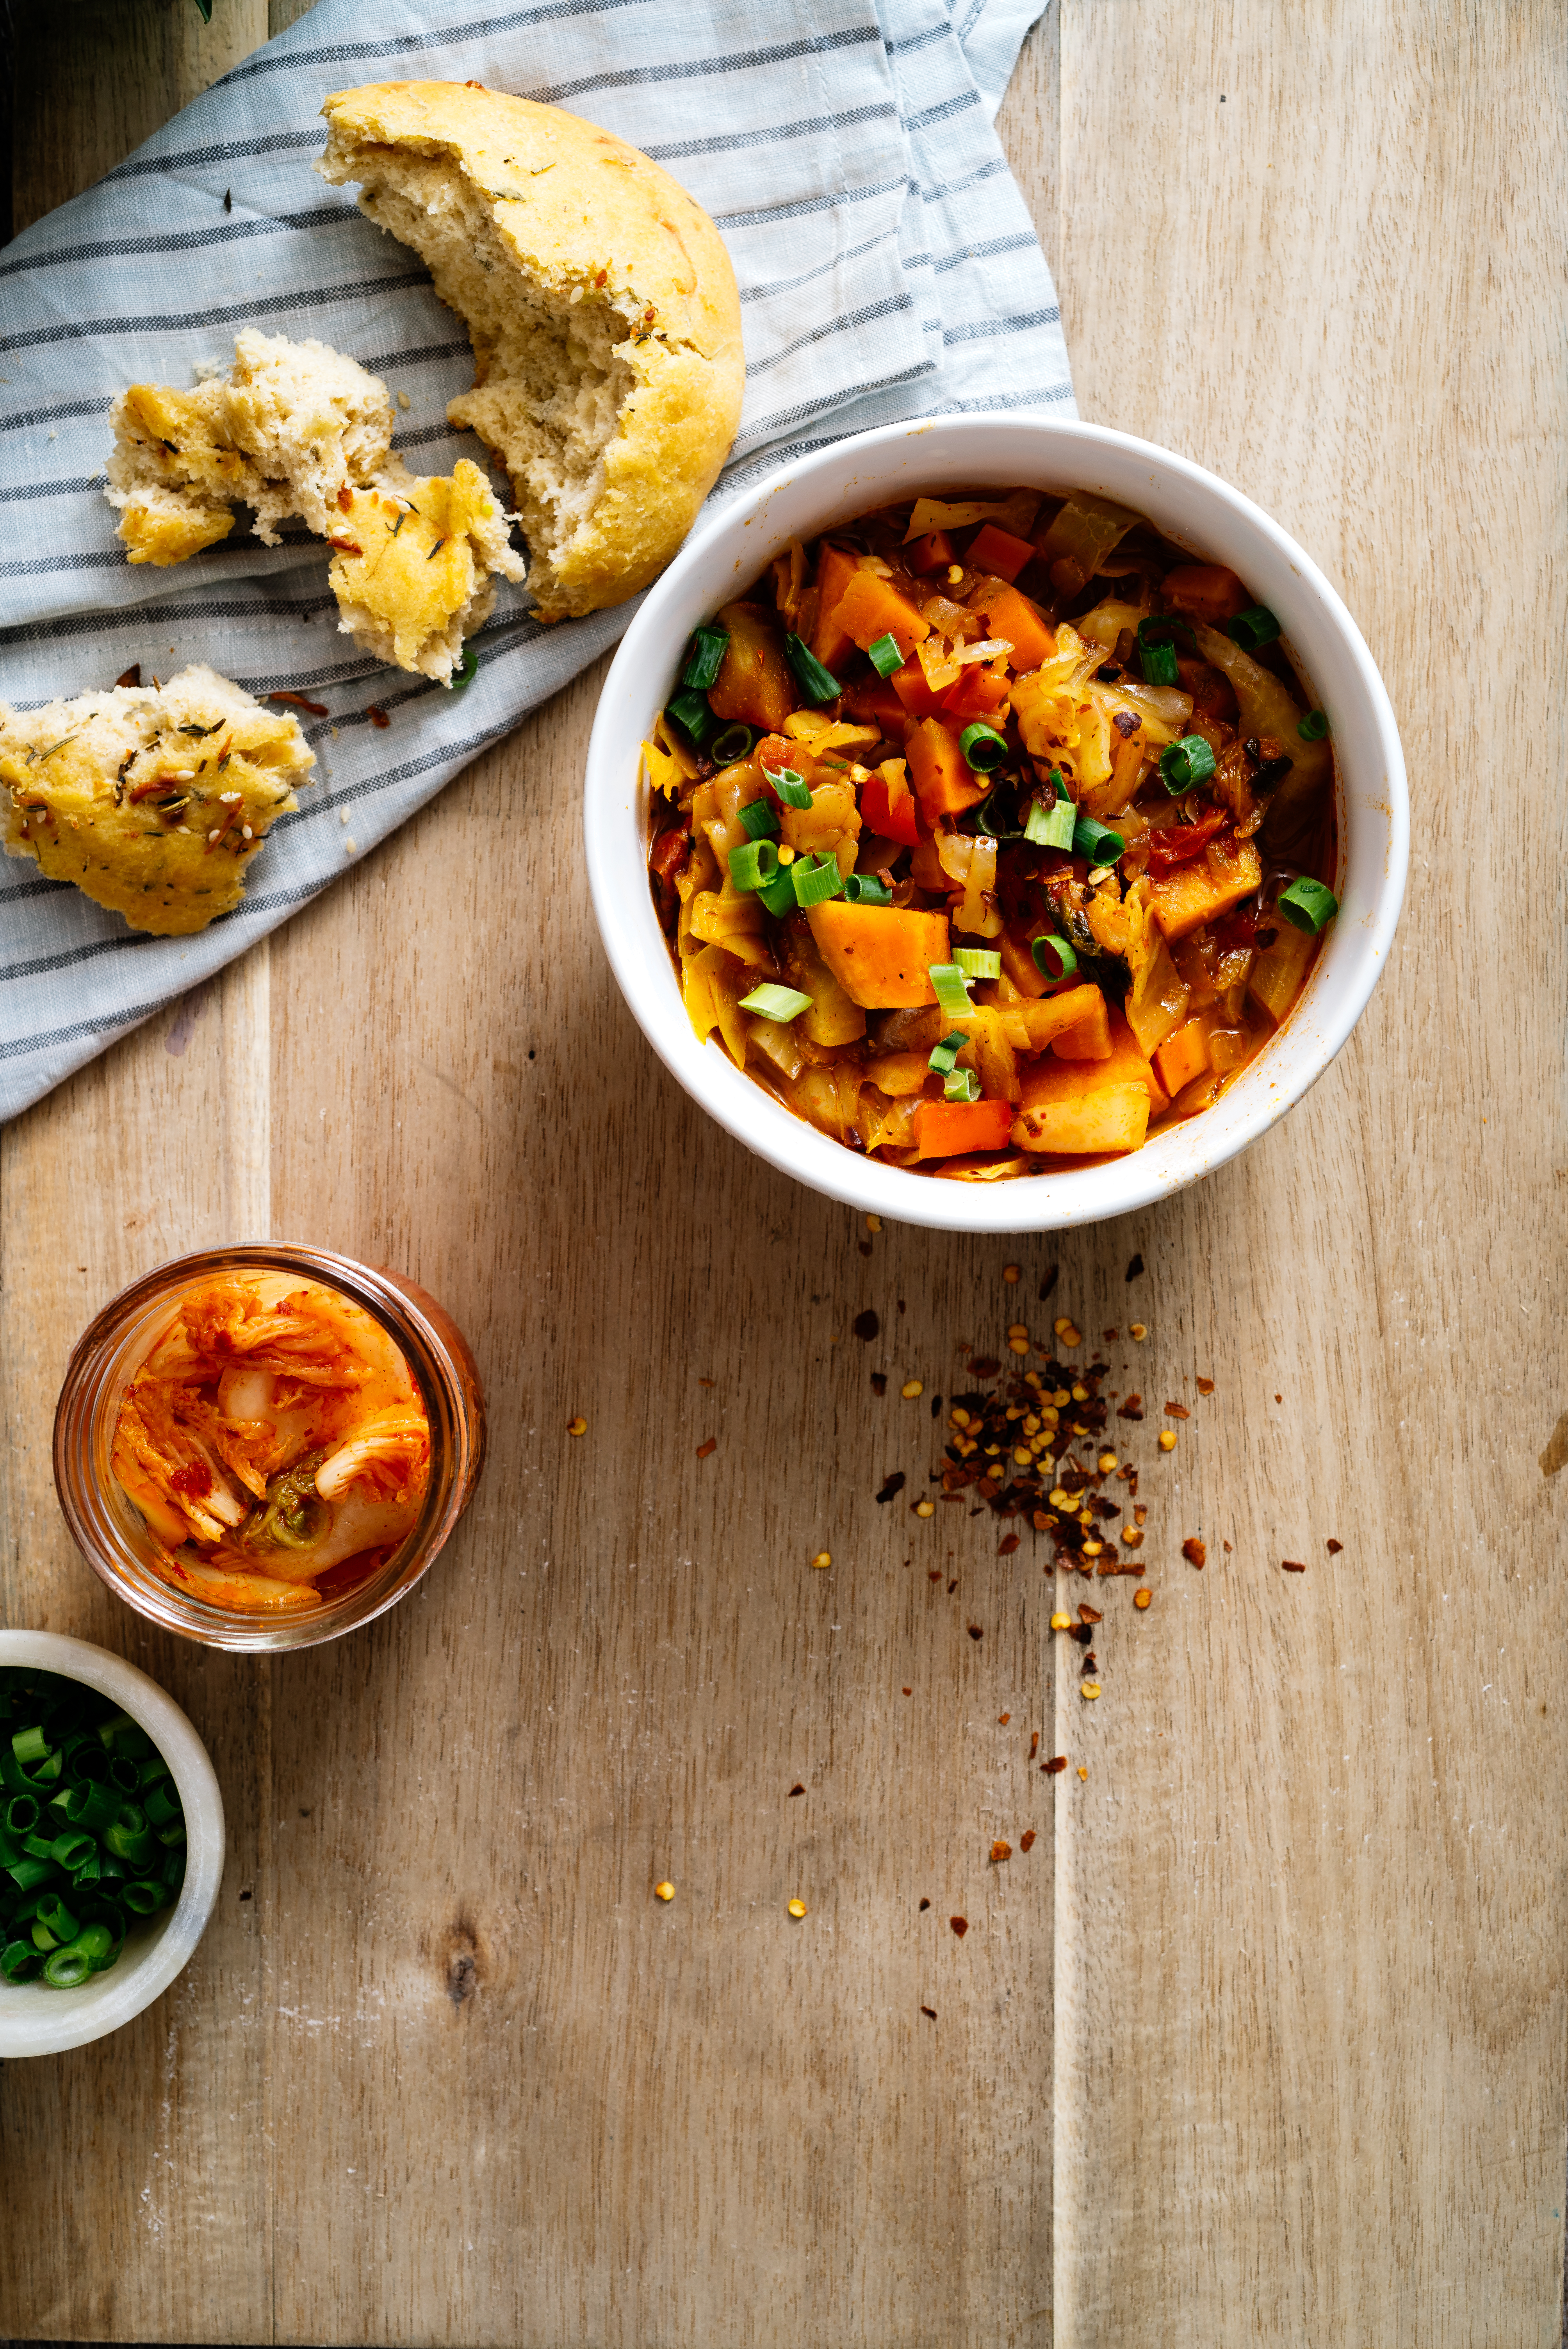
This spicy-sweet, Chile-infused Korean nectar of the gods is sooo ahhmazingly delicious (especially when purchased from your local international foods store). In fact, Jake and I have a Korean market down the street from where we live who makes DIVINE kimchi.
Everyone who reads this blog also knows about my deep love and affection for sweet potatoes. Giiirrrlll can I throw down on some sweet potatoes! In fact, when I was a kid I actually turned orange from eating so many sweet potatoes (just call my mom, Nurse Julie, she can tell you alll about it:)
And of course, as a somewhat obsessed food philanthropist, I want all of y’all to enjoy sweet potatoes and kimchi as much as me. So, here we have our spicy sweet potato kimchi stew. Honestly, it’s delicious hot and cold (perfect for this crazy Nashville weather we are having) and 100% amazing on all fronts.
So hang at your house in your PJS and make some soup people! Love y’all!
Spicy Sweet Potato and Cabbage Stew (you can also see the full recipe on Bham mag’s site!) This veggie-centric stew is perfect for cool April nights, and warm April days. The softened sweet potato adds texture to the rich base of sauteed bell pepper, carrot, onion, and garlic. A bit of kimchi cooked through the stew gives a hit of spice; serve with more alongside for a spicier red chili flavor.
Yield: 8 servings
What You Will Need:
2 tablespoons olive oil
1 1/2 cups diced sweet onion
1 1/3 cups diced red bell pepper
2 cups chopped carrot
3 cloves garlic, minced
2 teaspoons paprika
1 tablespoon chili powder
1 teaspoon dried oregano
1 teaspoon brown sugar
1/2 teaspoon dried basil
6 cups diced sweet potato
7 cups sliced green cabbage
1/2 cup spicy kimchi (or mild, if you like less heat)
6 cups chicken stock (or veggie stock if you are vegan or vegetarian)
1 (14.5-ounce) can fire roasted tomatoes
3 ounces tomato sauce
1 tablespoon Worcestershire sauce
1 teaspoon salt
Green onions, sliced, for topping
Crushed red pepper, for topping
What You Will Do:
Heat olive oil over medium heat in large Dutch oven.
Once hot, add onion, bell pepper, and carrot. Saute until softened, about 5 minutes.
Add garlic; stir frequently for 1 minute.
Add next five ingredients; saute 30 seconds, or until fragrant.
Add sweet potato, cabbage, kimchi, chicken stock, tomatoes, and tomato sauce. Bring to a boil.
Once boiling, reduce heat to low, cover, and cook for 20 minutes, or until potatoes are softened.
Add Worcestershire sauce and salt. Stir until combined.
Serve warm, topped with sliced green onions and red pepper, if desired. Try adding additional kimchi to each bowl for a spicy kick!
One of my favorite things about food, honestly, is the way it makes us feel. Food is so healing, so special, such a gift- that it has the ability to literally make us feel better, and more in tune to, the world around us.
That’s why this week’s recipe is so tied into Kristen’s final two points about food. That, like we have talked about food is medicine, and art. But it’s also fuel and connection.
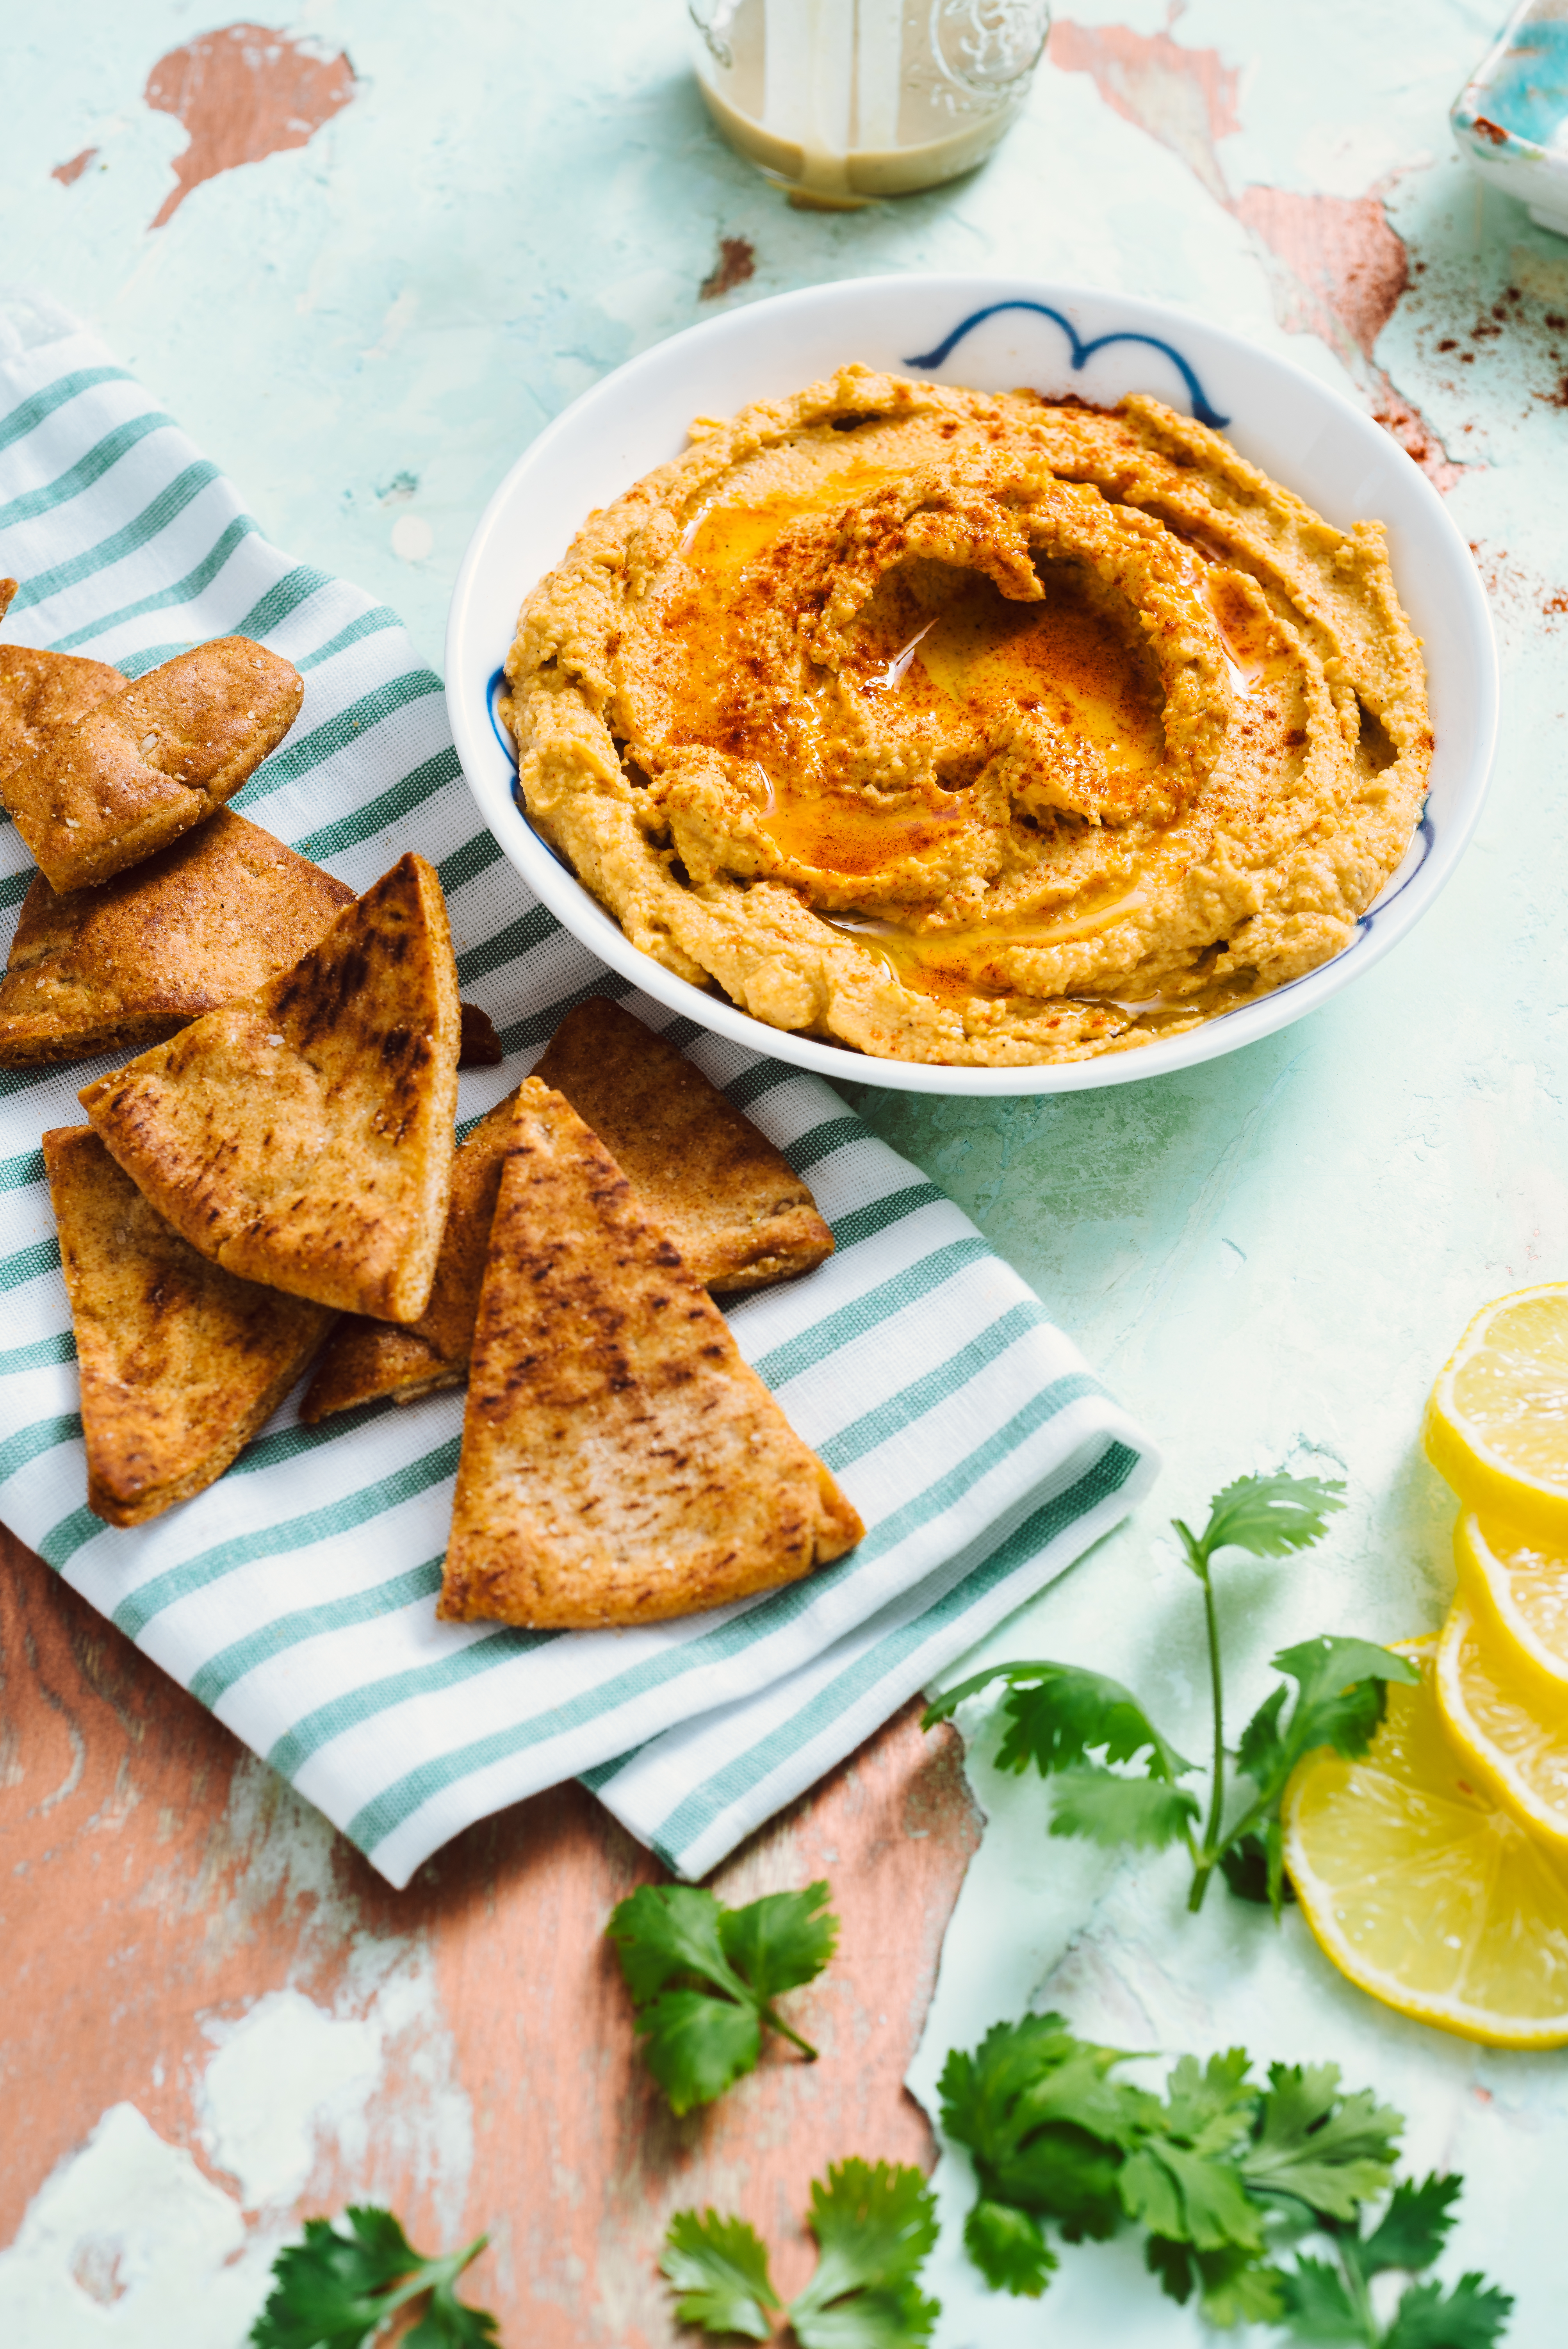
Hummus has become, in our household, a comfort food. Scooped up with a pita chip, or carrot, or even stray chunk of chicken, it adds a protein-packed, and rich, flavor to most anything it’s dunked in. I’m constantly adding it as a side item to weeknight dinner, or most recently, the beef soup I had to stretch to feed Jake and I for about 8 meals. It’s filling, its delicious, and now we both know that when I bust out the hummus, it’s officially time to chow down.
But the problem with a lot of store-bought hummus is that it has a tinge of the vinegary (instead of the creamy) to it. Some I’ve tried are chocked full of all kinds of chemicals that there is no way my great-grandmother would have ever known about. Or, they have an odd texture akin to that of a cotton ball blended with lemon in a Vitamix.
So, I’ve started making my own. Confession- there is one brand at Costco I love and buy on the regular. But if I’m in the mood for the good stuff- the type of stuff you only make for the people you realllyyy want to love on- then I make this recipe. I take the time to buy the beans, and roast the garlic, and use an actual food processor. I promise y’all it’s worth the effort.
And without further ado, Kristen Shoates ladies and gentlemen!!
“Food as fuel. Most of us, especially women, have an unhealthy belief that low calorie automatically means good and high calorie automatically means bad. But calories are not the enemy – in fact, they’re your friend. They’re the very reason we eat, the fuel that allows us to think, move, work and do the things we love. Yes, we live in a society where the amount of calories in our food is often off-balance, and it takes some work to make sure we’re consuming them wisely, but we have to stop fearing the calorie and instead love our food for the way it fills us with energy and life.
Food as connection. Throughout history, eating has been as much a social activity as a necessity. Though the reasons why are still mysterious, humans have always connected around food, from ancient rituals to celebratory feasts to the modern dinner date. Sometimes, it’s less about what we’re eating and instead how we eat and who we’re eating with. Enjoying a decadent meal and the company of those you love fills your heart as well as your stomach, and sometimes just being in the moment is far more important than what is on your plate.
While I am a huge advocate for being conscious of what we put in our bodies, I think we need a broader definition of health – one that is rooted in love instead of fear of our food. What if we treated food as an adventure, exploring the different flavors available to us in nature? What if we defined nourishment as the things that build up both our bodies and souls? What if we actually connected with our food, asking where it comes from and how it’s made – or actually making it ourselves? And what if we connected with each other, seeing eating not just as utilitarian, but a chance to share a moment – or even love?
For me, falling in love with my food has made everything else fall into place. I am motivated eat foods that heal instead hurt, to listen to my body and give it what it needs and to know when to treat myself without guilt. This New Year, as you make resolutions, I encourage you to focus less on a number on the scale or what food group you’ll restrict and instead resolve to eat real, whole, nourishing foods – and enjoy eating them. Not only will this help you achieve your health goals, but it could also be the start of a fun, artistic, spiritual, love-filled affair.
And as my Italian family would say, “that’s amore”.
Isn’t Kristen ahhhmazing?!! Preach, sister!
And here is a bit more of my take on what Kristen is saying:
In summary, my amazing readers, food is fuel, it is connection, it is love. Not only does it connect us to ourselves, and taking care of the bodies we have been given, but it also connects us to the world around us and to the Creator of all things good and wonderful and food-related.
As we round out the month of January, be encouraged. Be inspired. Go get in the kitchen and make some hummus if that makes you feel good! I love you dearly and believe that the best, in food and life, is yet to come in 2018.
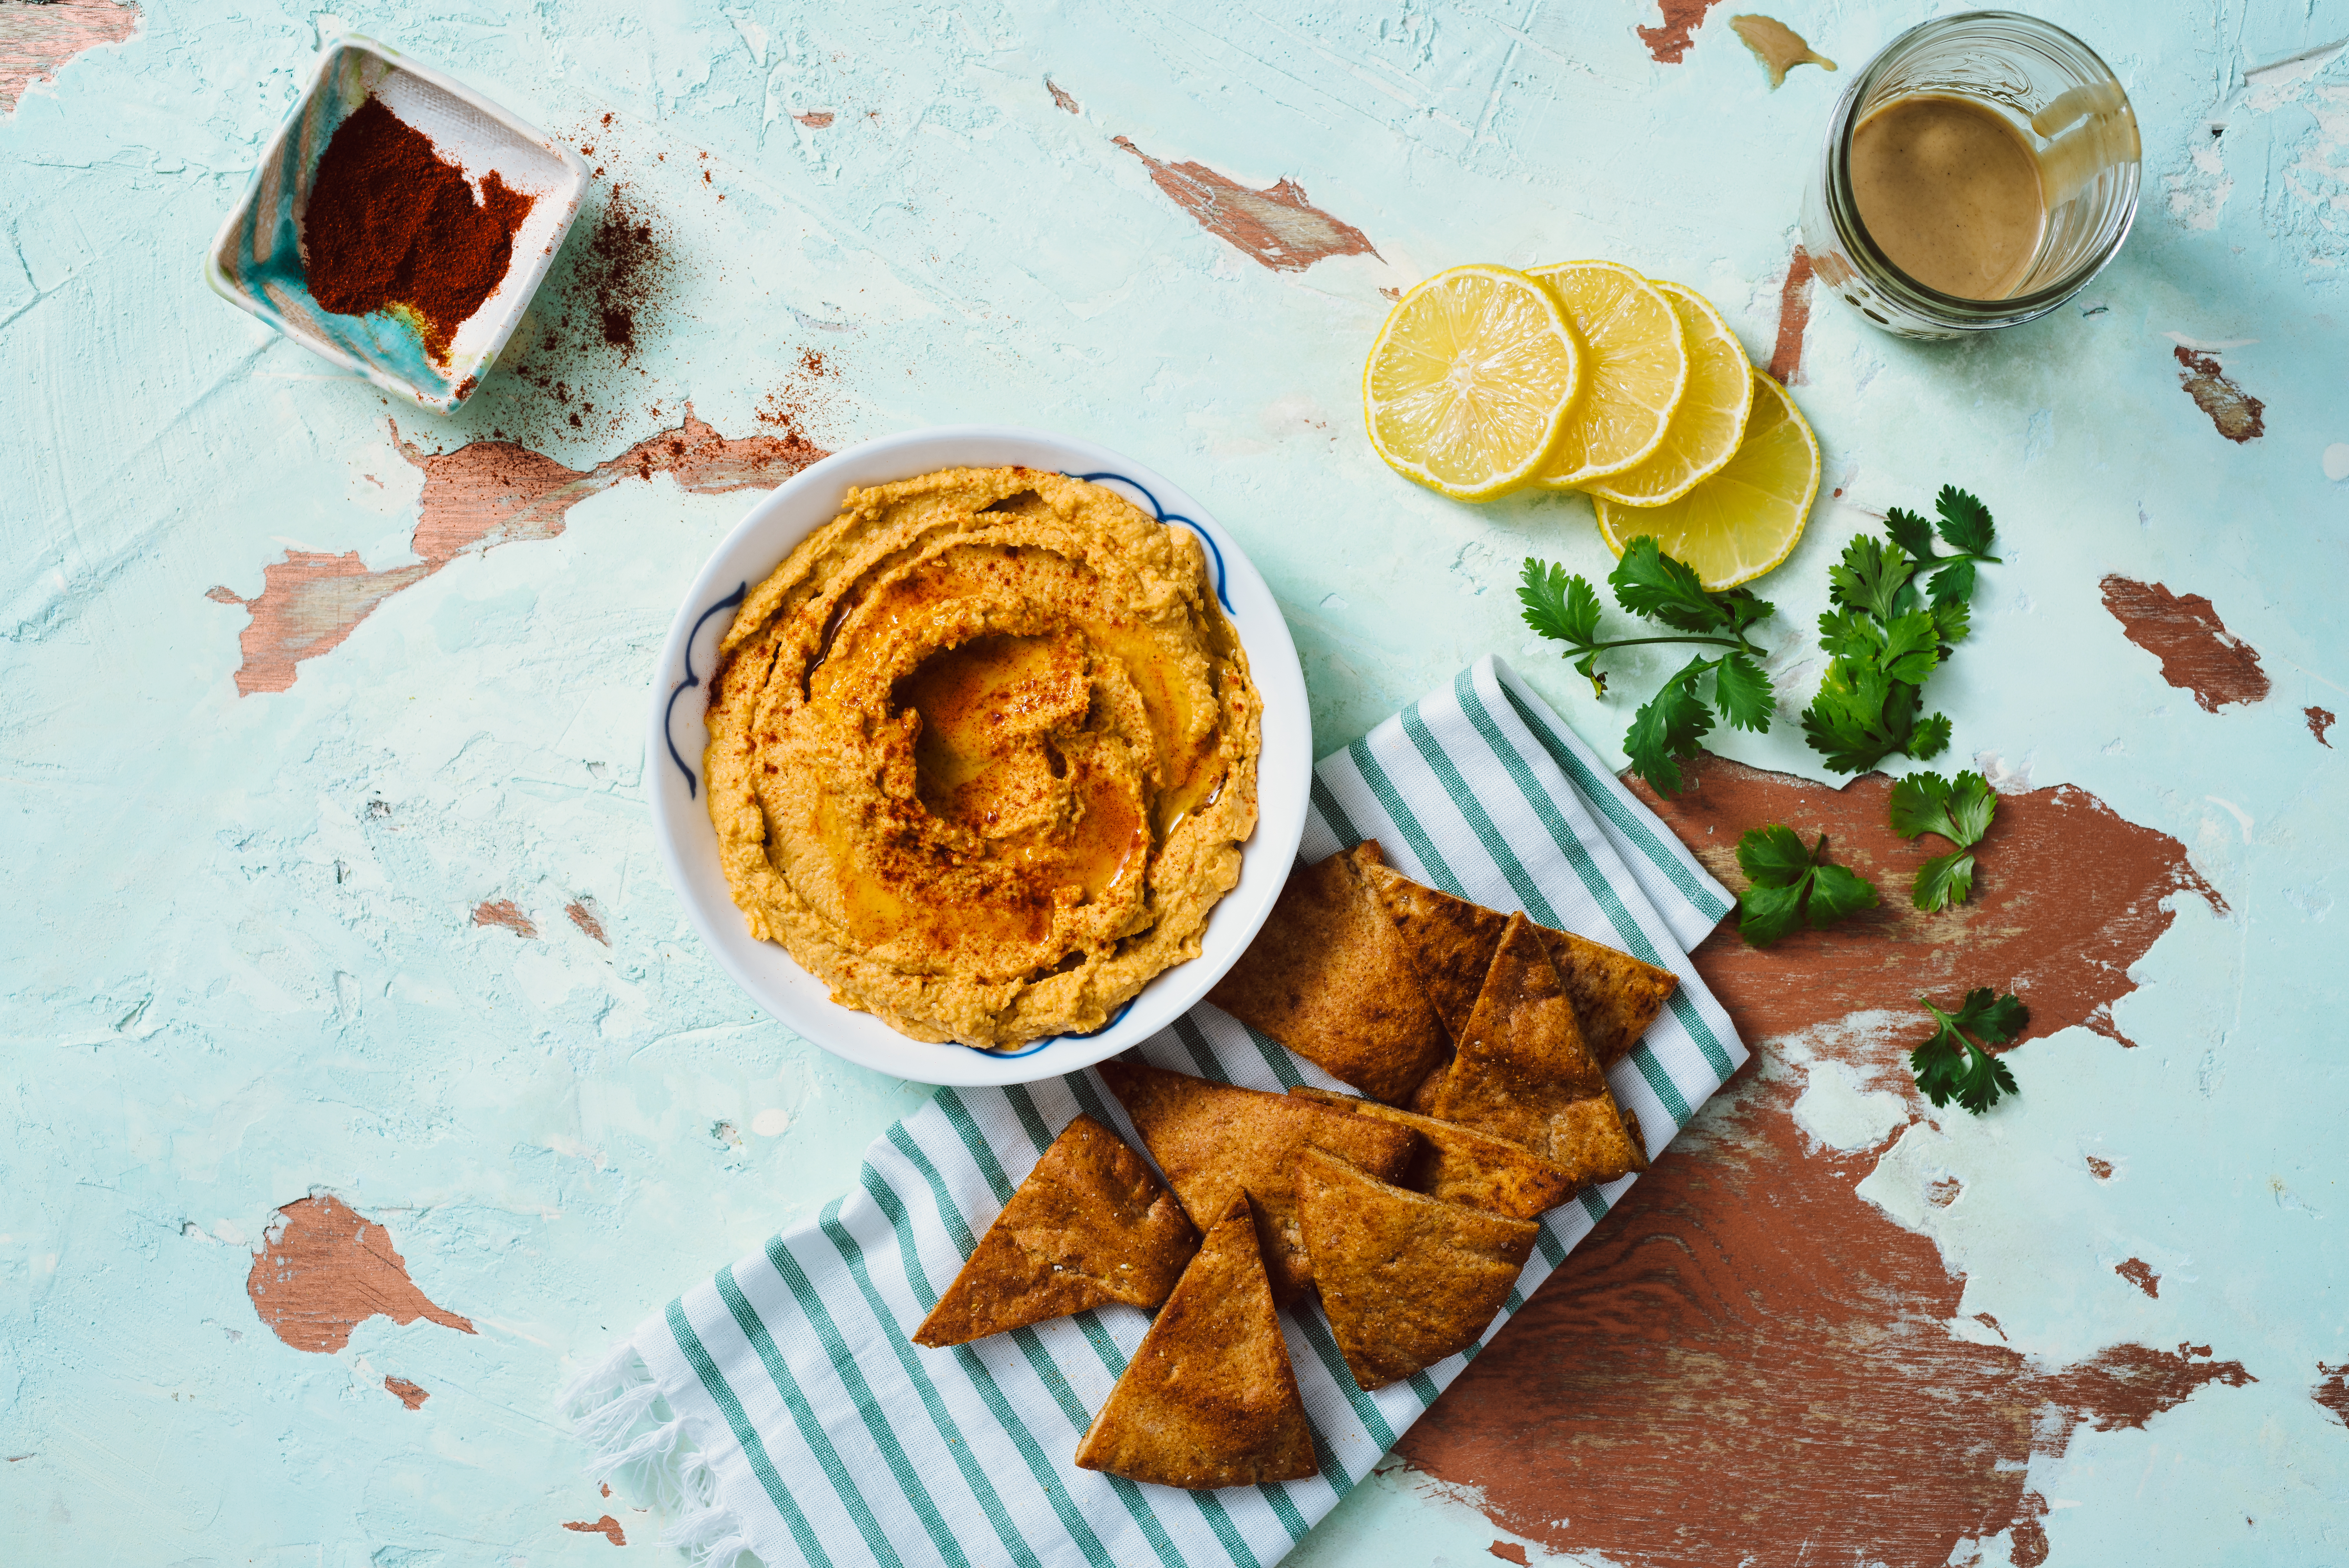
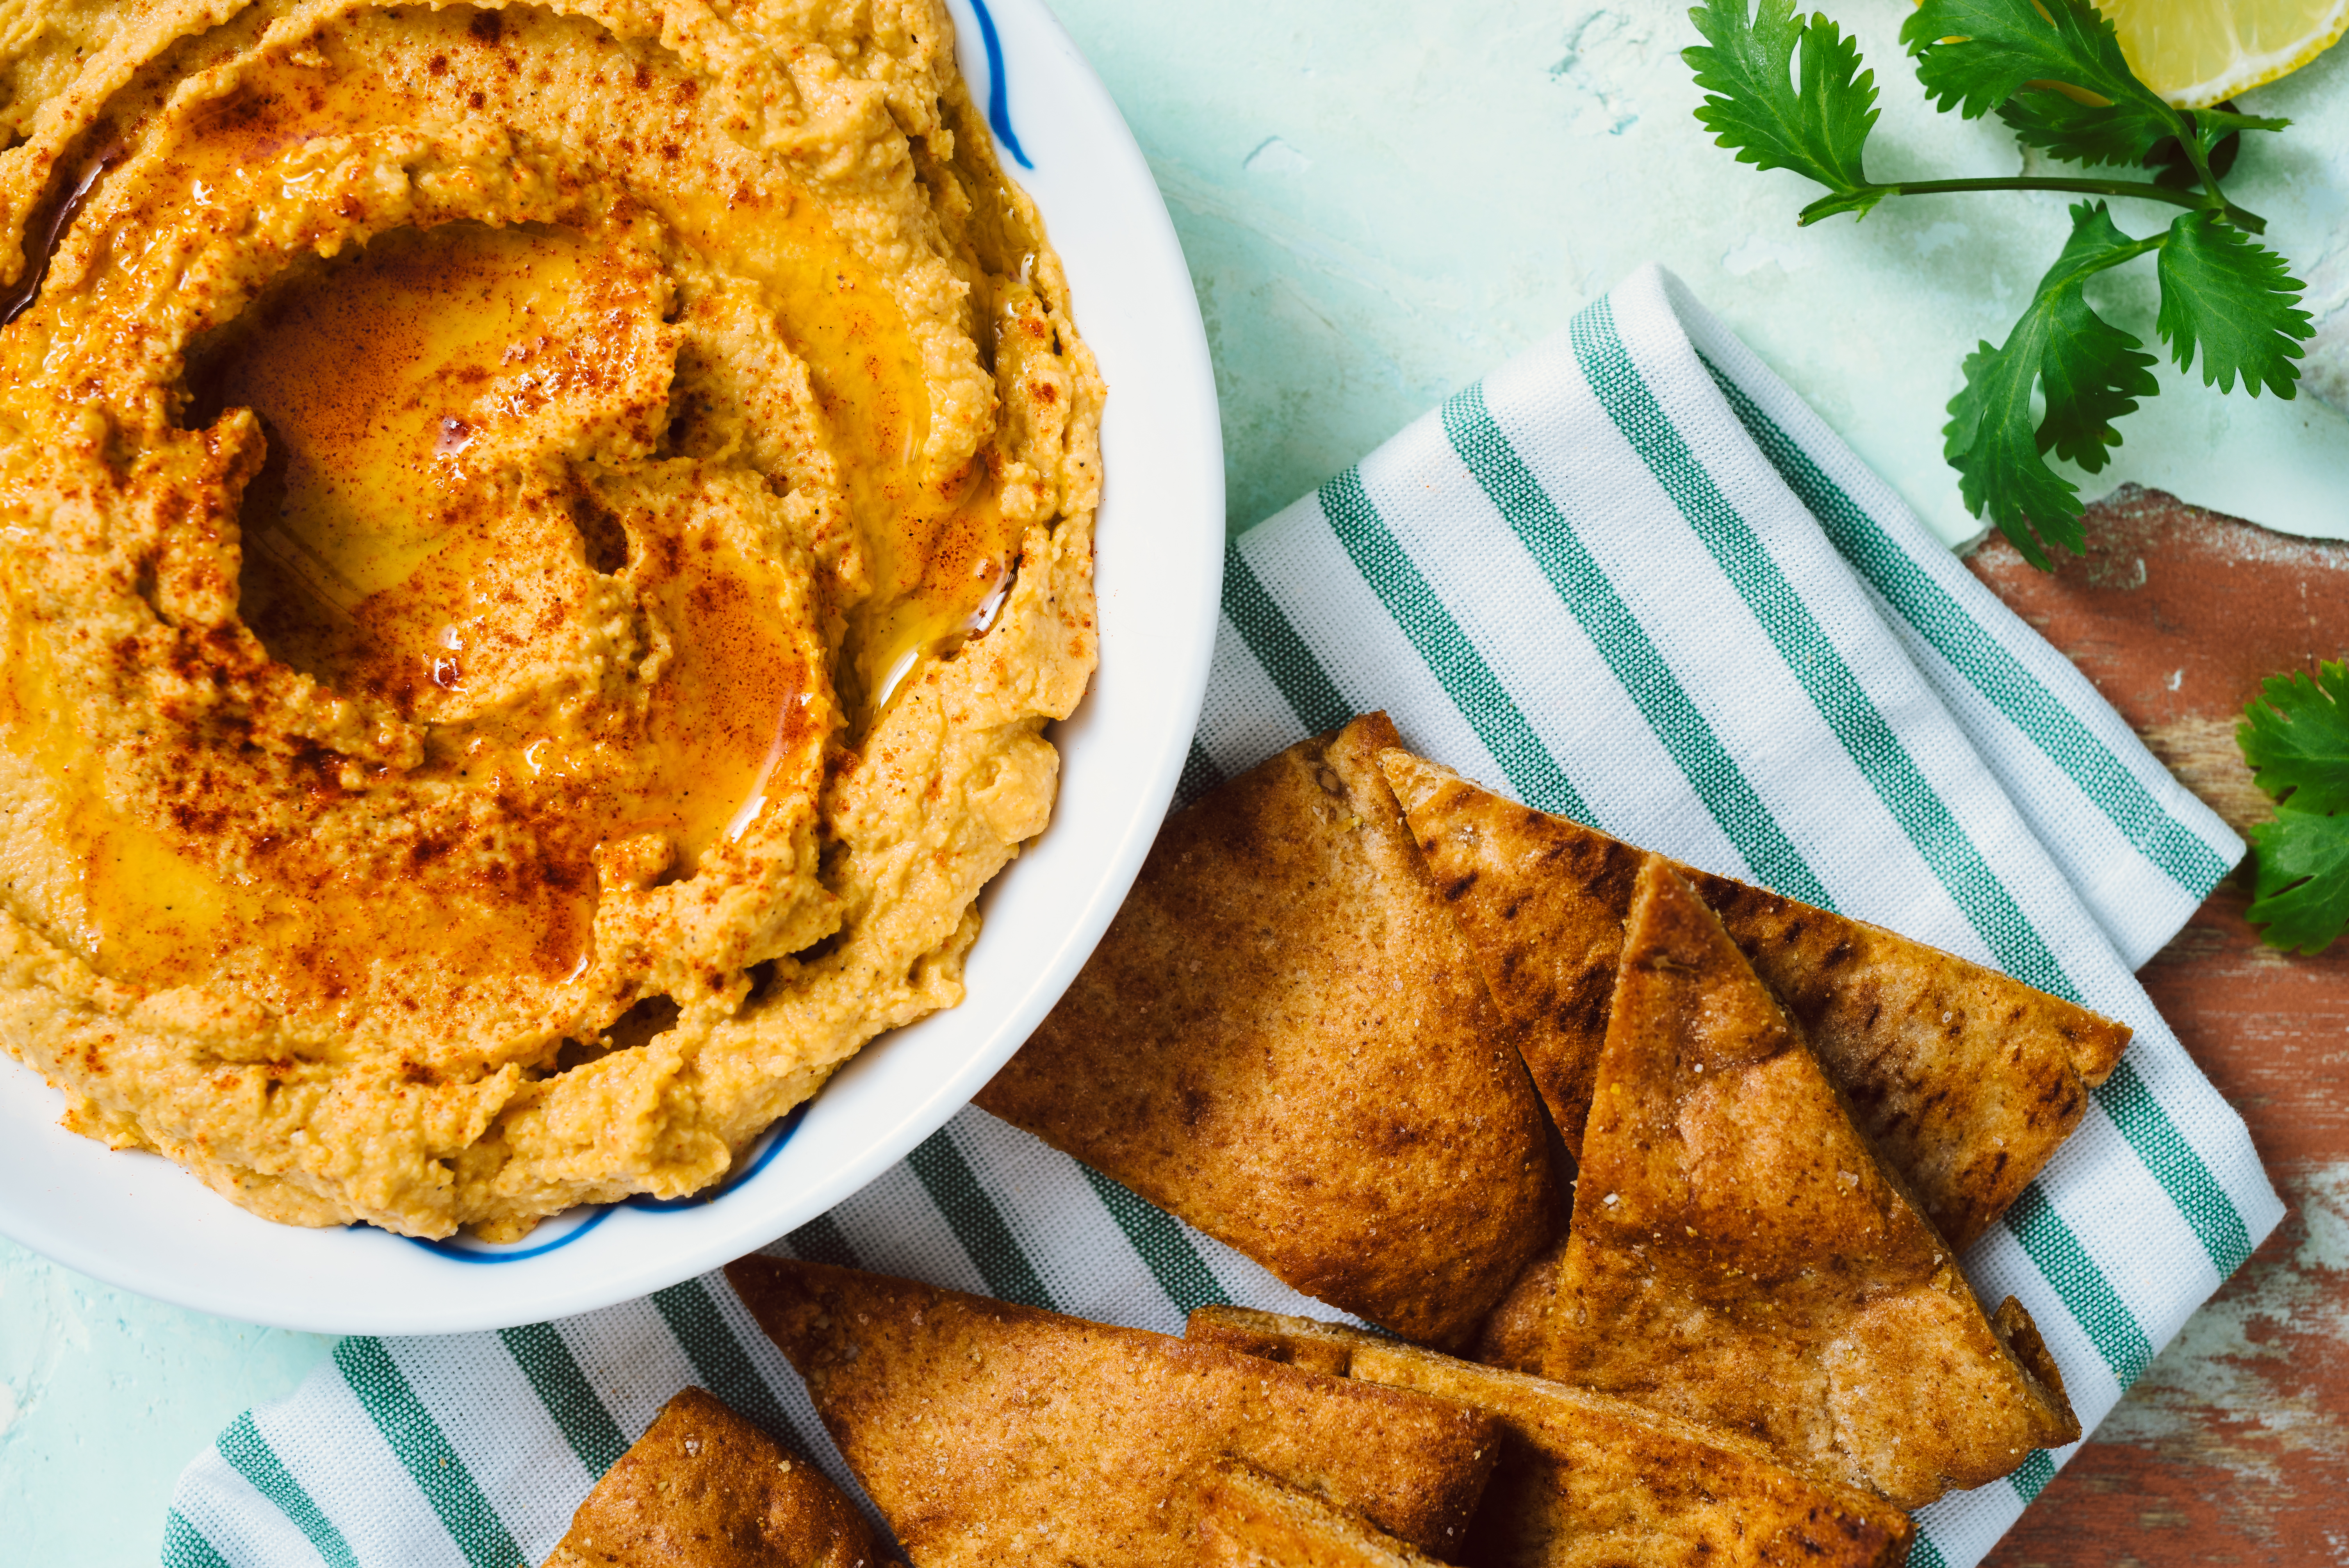
Roasted Garlic Lemon Hummus with Golden Pita Chips
Roasted garlic gives a slight sweetness to a rich hummus brightened by fresh lemon juice and smoked paprika. Perfect for a party or holiday football game, this hummus is tastier than the store bought version, and can be adjusted in a myriad of ways to taste. Try adding chopped jalepenos or pimento for even more kick! You can also find this recipe in the January issue of Birmingham magazine.
Yield : 4-6 servings
What You Will Need:
6 cloves garlic, roasted
1 can chickpeas, drained and rinsed, bean liquid reserved
1 tablespoon tahini
2 tablespoons chickpea liquid
1 tablespoon filtered water
3 teaspoons lemon juice
1/2 teaspoon salt
1/2 teaspoon chili powder
1/4 teaspoon smoked paprika , plus additional for topping
1 tablespoon olive oil
What You Will Do:
Blend all ingredients except oil in the bowl of a food processor until a thick paste forms, scraping down sides of bowl as needed, about three minutes.
Drizzle in one tablespoon olive oil and blend until smooth.
Enjoy topped with paprika!
*To roast garlic: Preheat oven to 400. Peel most of the skin off of the garlic. Cut top 1/4 off of garlic head; drizzle with 1 teaspoon olive oil. Wrap in aluminum foil, roast at 400 degrees for 40 minutes.Remove from oven to cool.
Golden Pita Chips
Yield: 40 chips
What You Will Need:
5 soft multigrain or white pitas, cut into wedges
2 tablespoons olive oil
1/2 teaspoon cumin
1/2 teaspoon salt
What You Will Do:
1. Preheat oven to 350.
2. Toss cut pita in large bowl with spices and olive oil.
3. Place pita chips on aluminum foil-lined baking sheet.
4. Roast for 10 minutes; flip over, then roast 10 more minutes.
As snow falls softly outside my window, I’m reminded of one of my favorite things about January. The fresh white powder is a clean slate. It’s reflecting in nature the simple principle that life can start fresh at any moment, that each day is a new beginning.
The whiteness also reminds me of what a stark contrast the colors of my breakfast plate are to the world around me. Deep, orangey yellow eggs, amber bacon, lightly golden toast with deep purple jam. Black coffee with a creamy coffee bomb.
The snow continues to swirl, the wind leading it up and away, or cascading down, perching softly on the worn wooden rails of our porch.
These patterns, these colors, these textures- it’s bliss. For those of you who read this blog, you are no stranger to the fact that I LOVE beauty. I even tried my hand at a few posts about the things that were inspiring to me visually, at that moment. For my heart, the visual world is just as real and riveting as any adventure I’ve had. It’s key to my peace of mind, my happiness, my creative expression, to be deeply aware of this reality.
Which brings us to the love I have for the beauty of food. The depth and layer of color to a strawberry; the way rainbow chard blooms from green into orange into purple-red; the gleam on a rinsed, ripe blueberry.
There is an exquisiteness to this world- this visual world of food- that is inspiring, challenging- and I think can even lead us to new flavor combinations and levels of creativity in our own cooking.
And this is the reason number two why I want you to fall in love with food in January. If you missed last week’s post, the amazing Kristen Shoates joined us to introduce herself, and her own story with falling for food. She’s leading the charge this month as we discuss four reasons (and there are SO many!) to fall for food. Here is Kristen’s reason number two to expound so beautifully on the topic:
Food as art.Have you ever walked through the produce section of the grocery store and really paid attention to the creativity of food? The richness of color, the variety of texture and the diversity of flavors are all part of nature and ready for us to explore. When we constantly eat the same thing or eat food that only comes out of a box, we lose the artistic nature of eating and cooking. For me, eating has become an almost spiritual experience, one that makes me feel connected to my Creator, the way my body was designed to work and the creativity displayed throughout nature.
YES!! And here is this week’s video about that exact fact- along with a challenge to you guys this week to engage that cooking creativity!
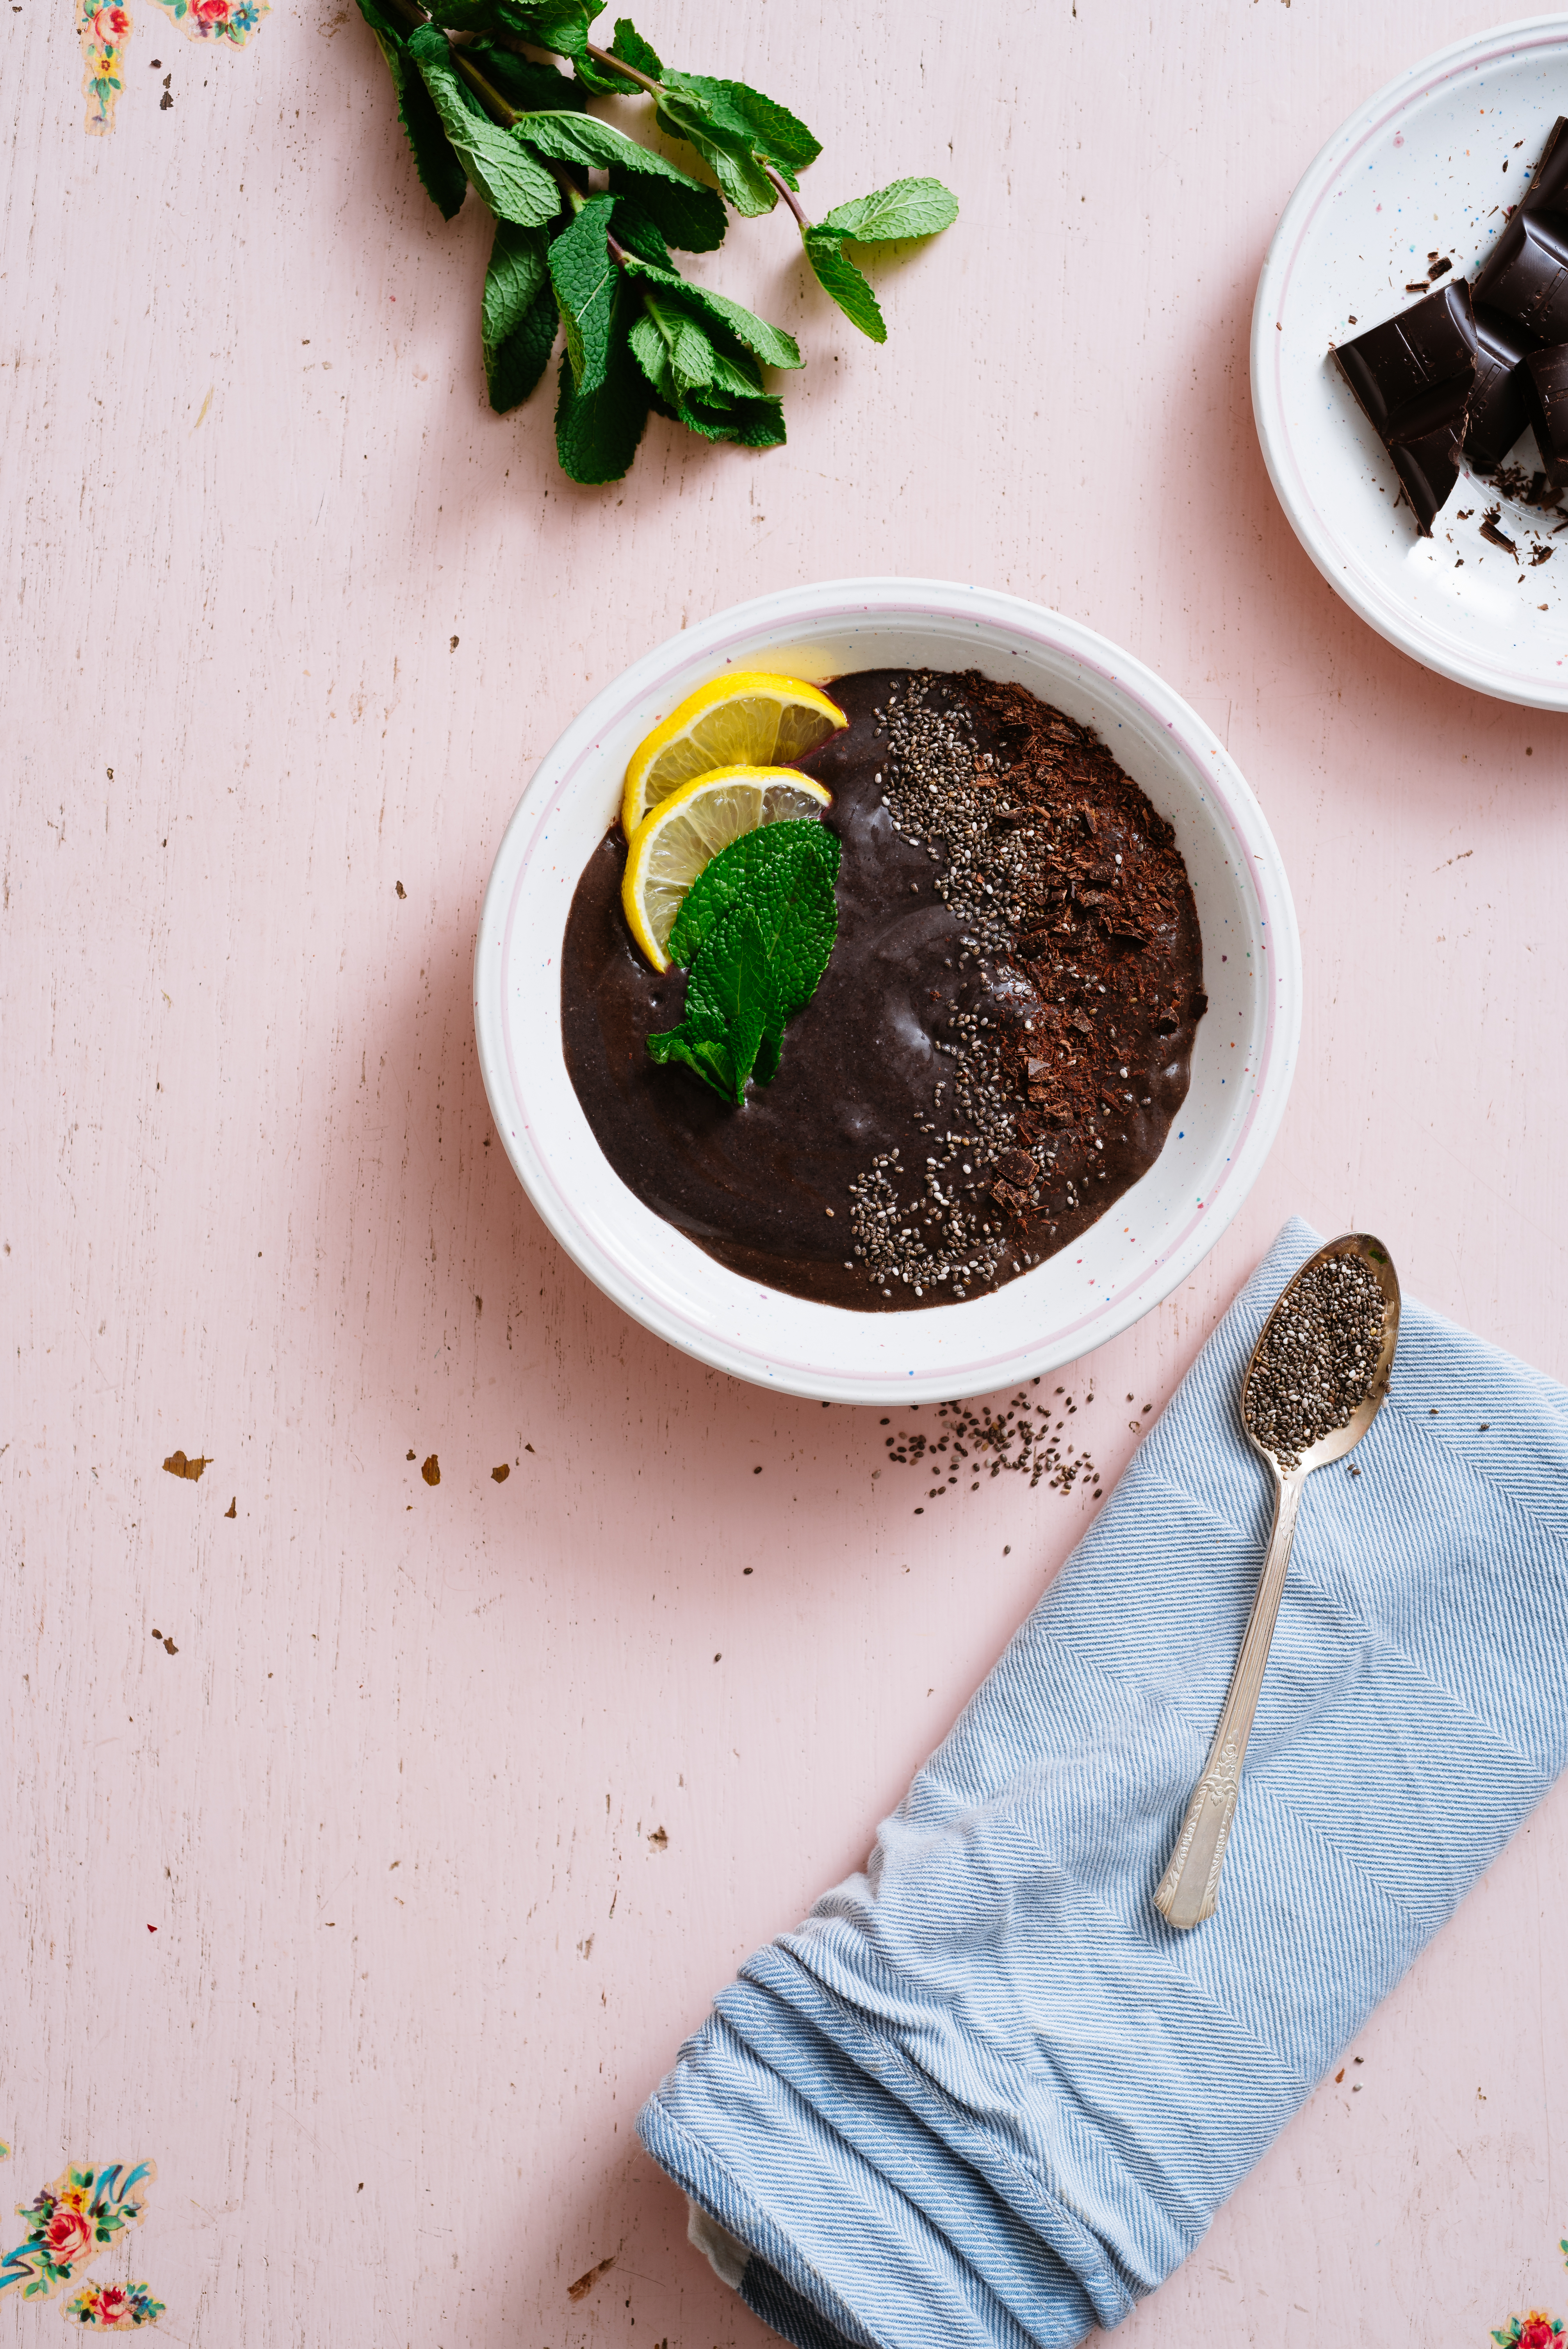
And to me, this weeks’ recipe could not be more fitting to the topic of beauty and food. There is nothing like a smoothie bowl to stir the senses and ignite creativity, solely based on the visual of the thing you are creating.
So this weekend, let’s celebrate the beatify, the mystery, the abundant color of food. And enjoy every spoonful.
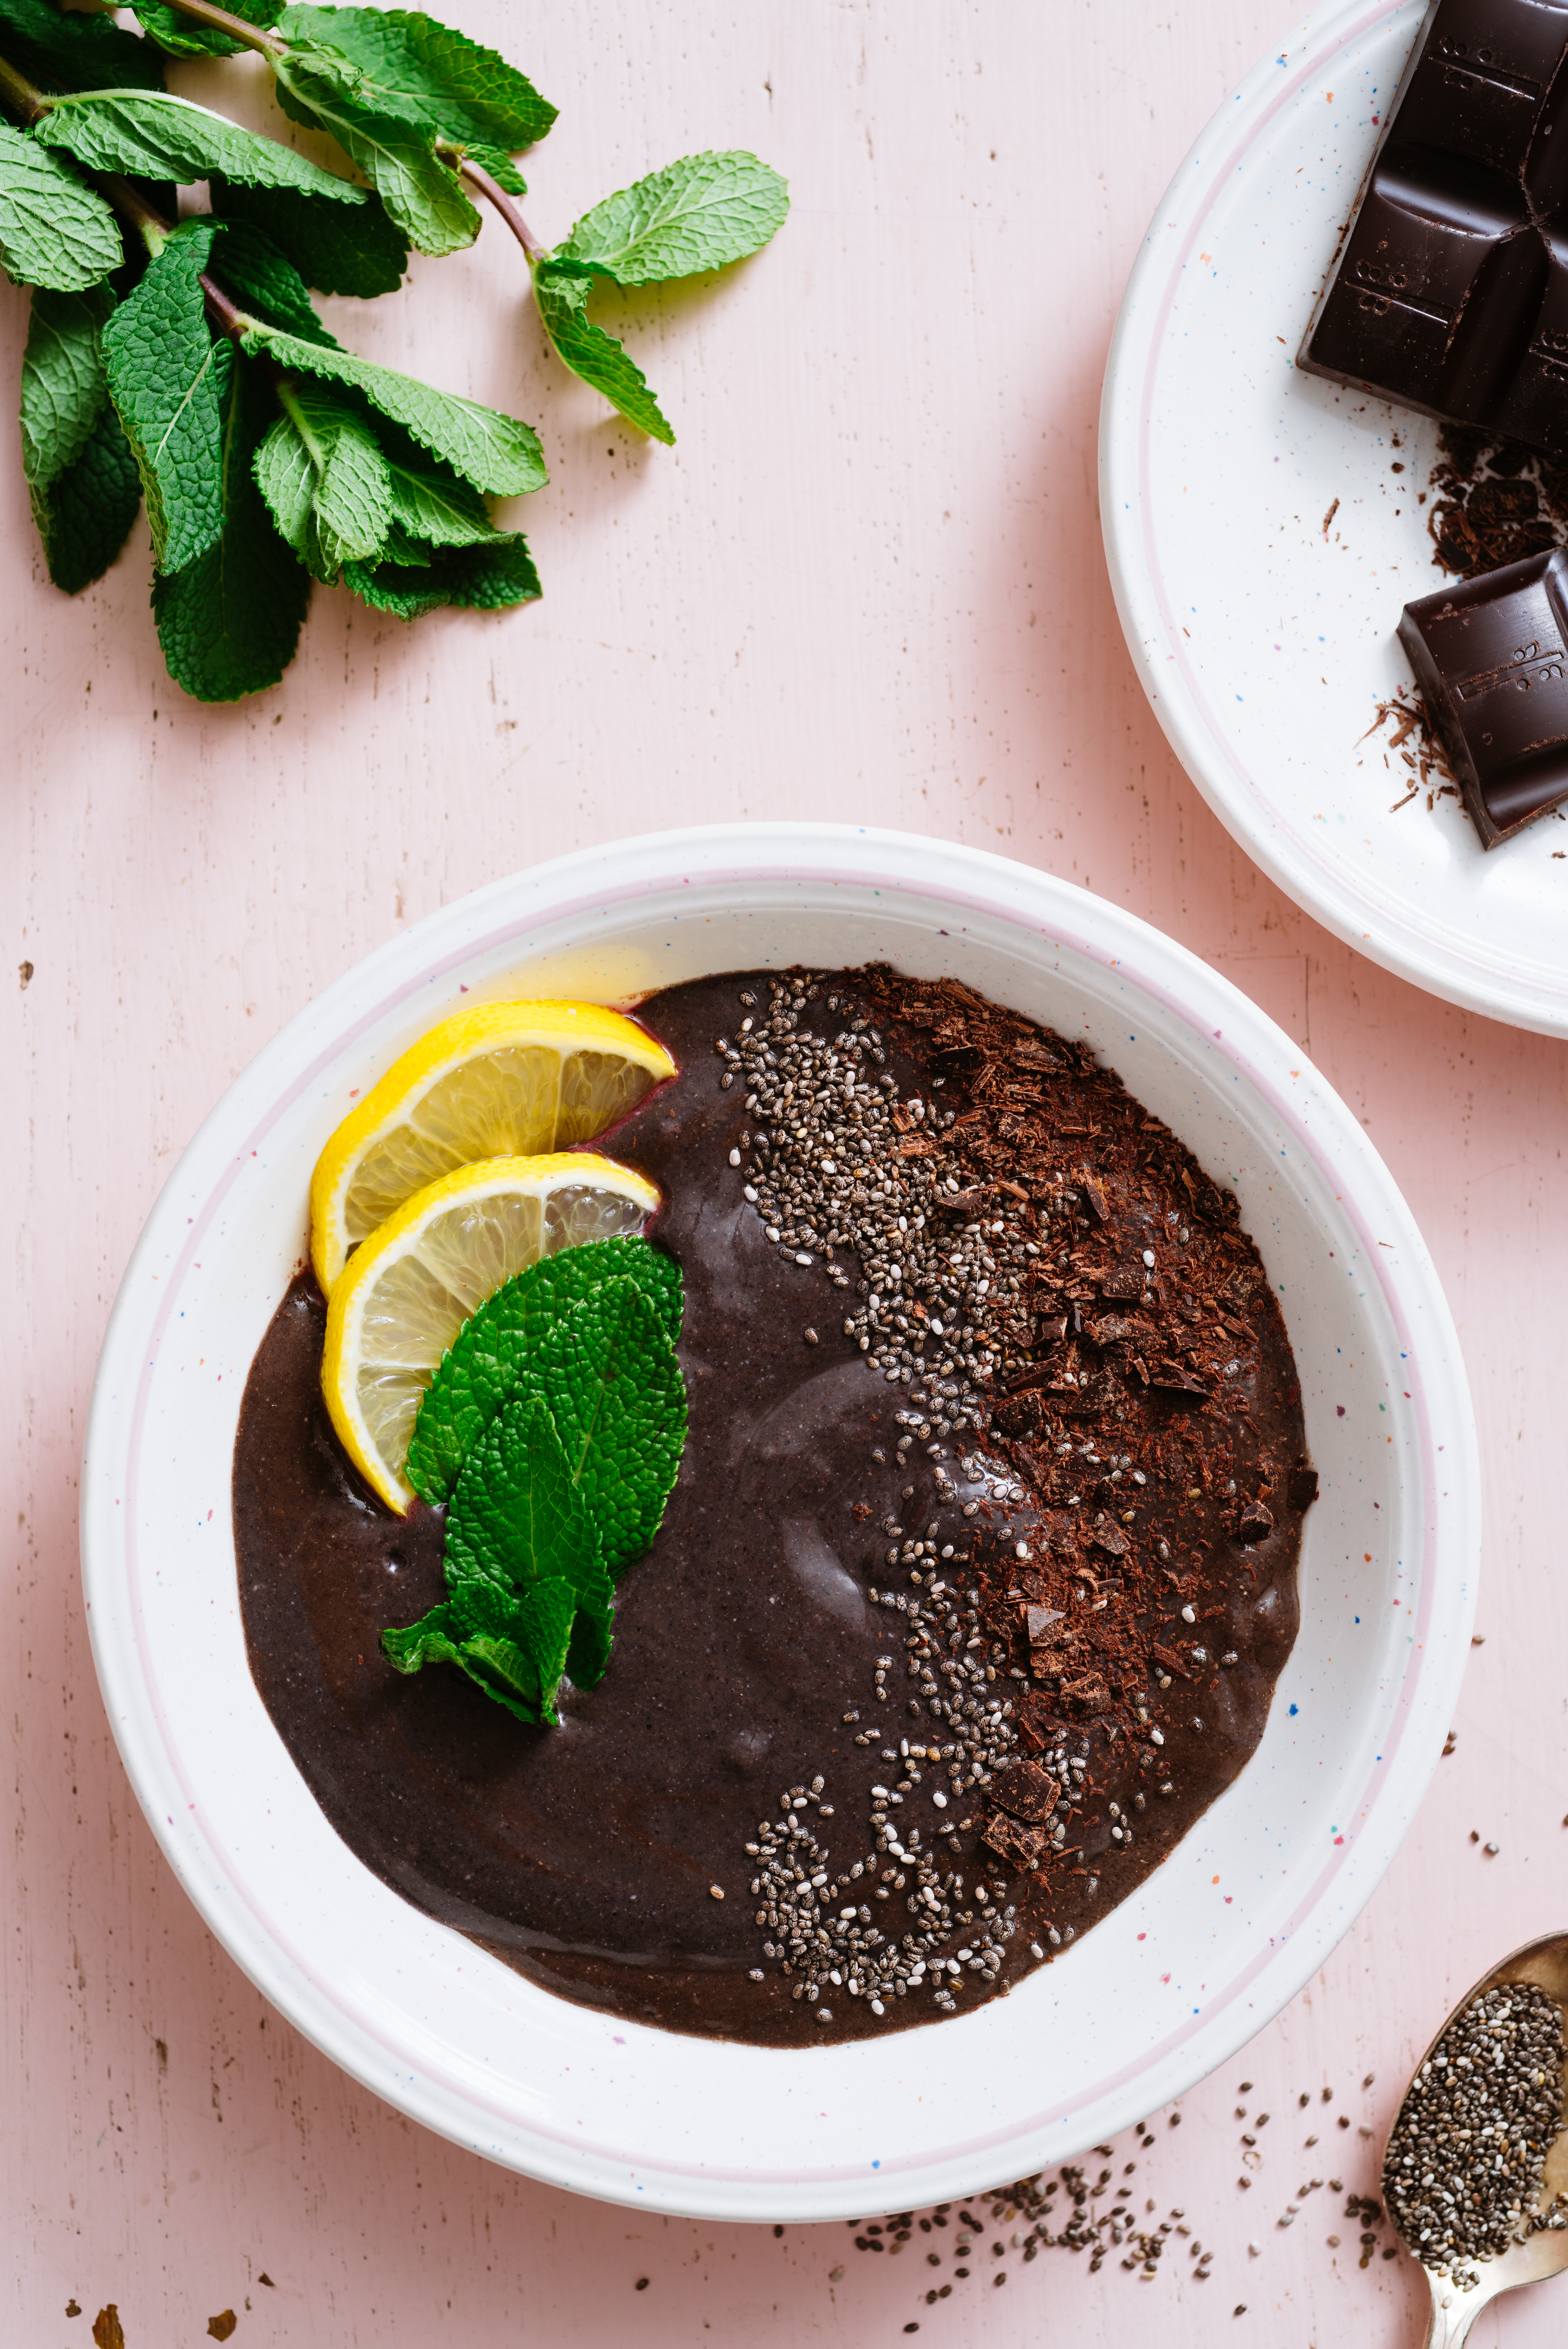
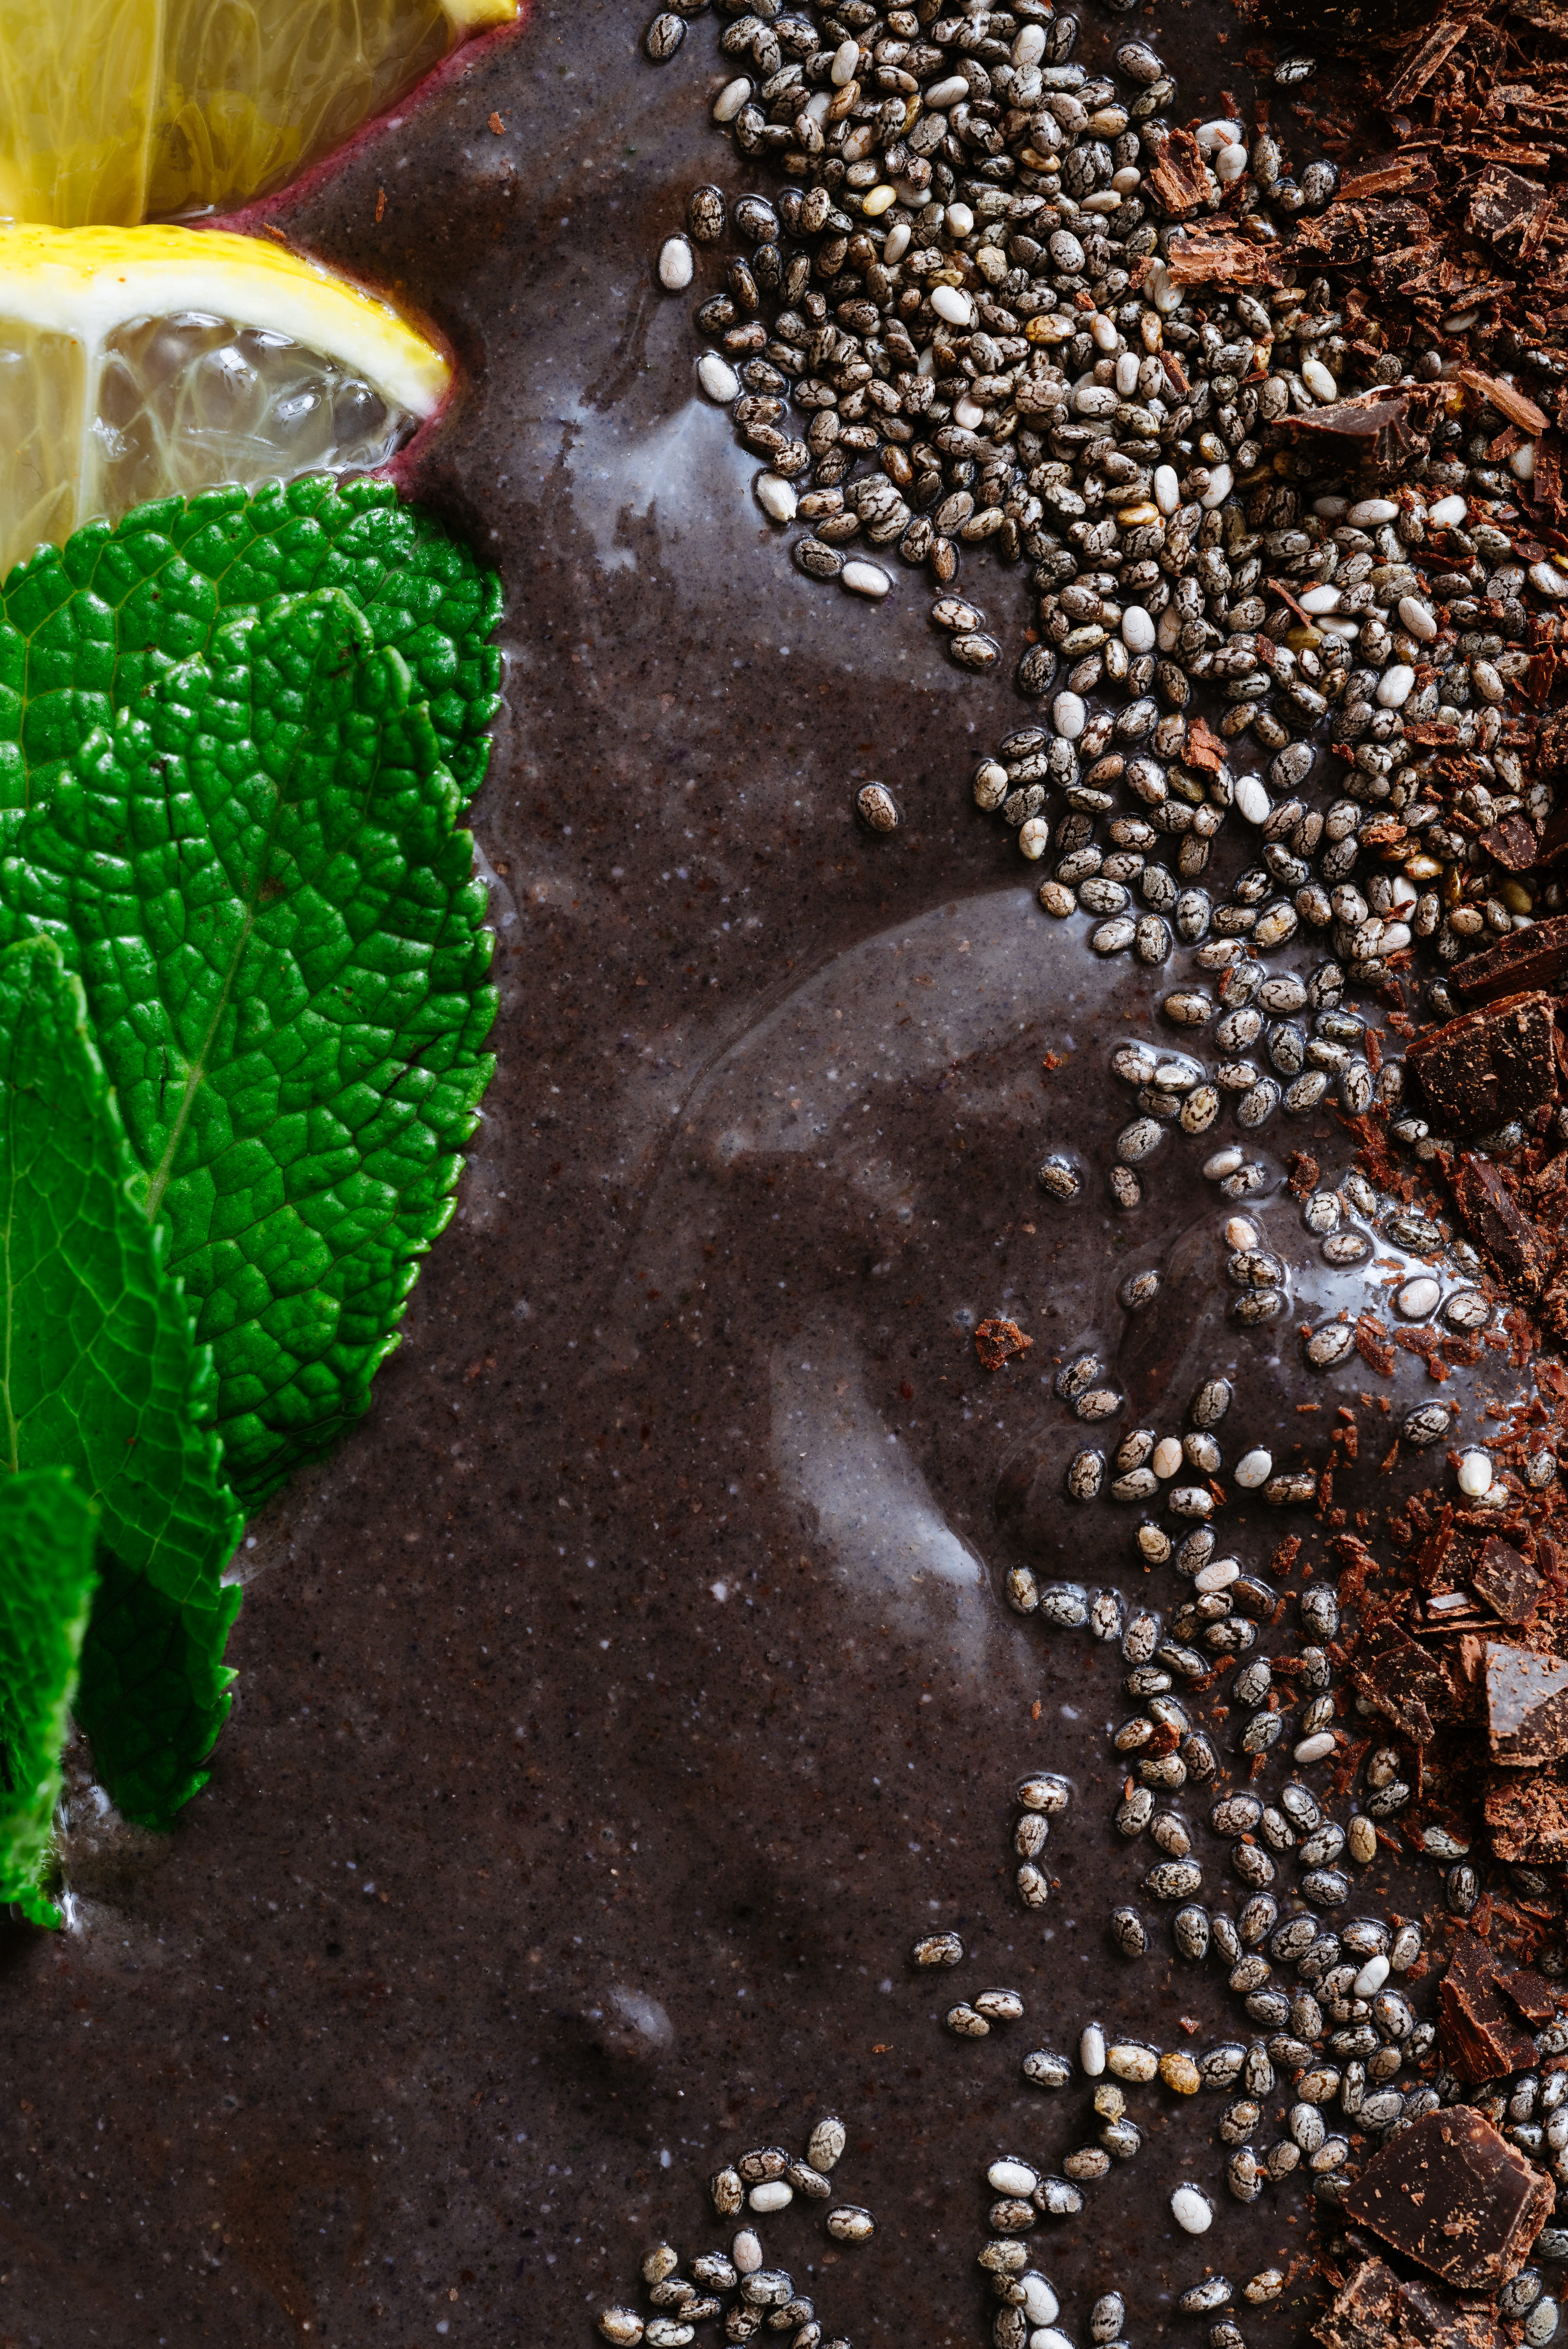
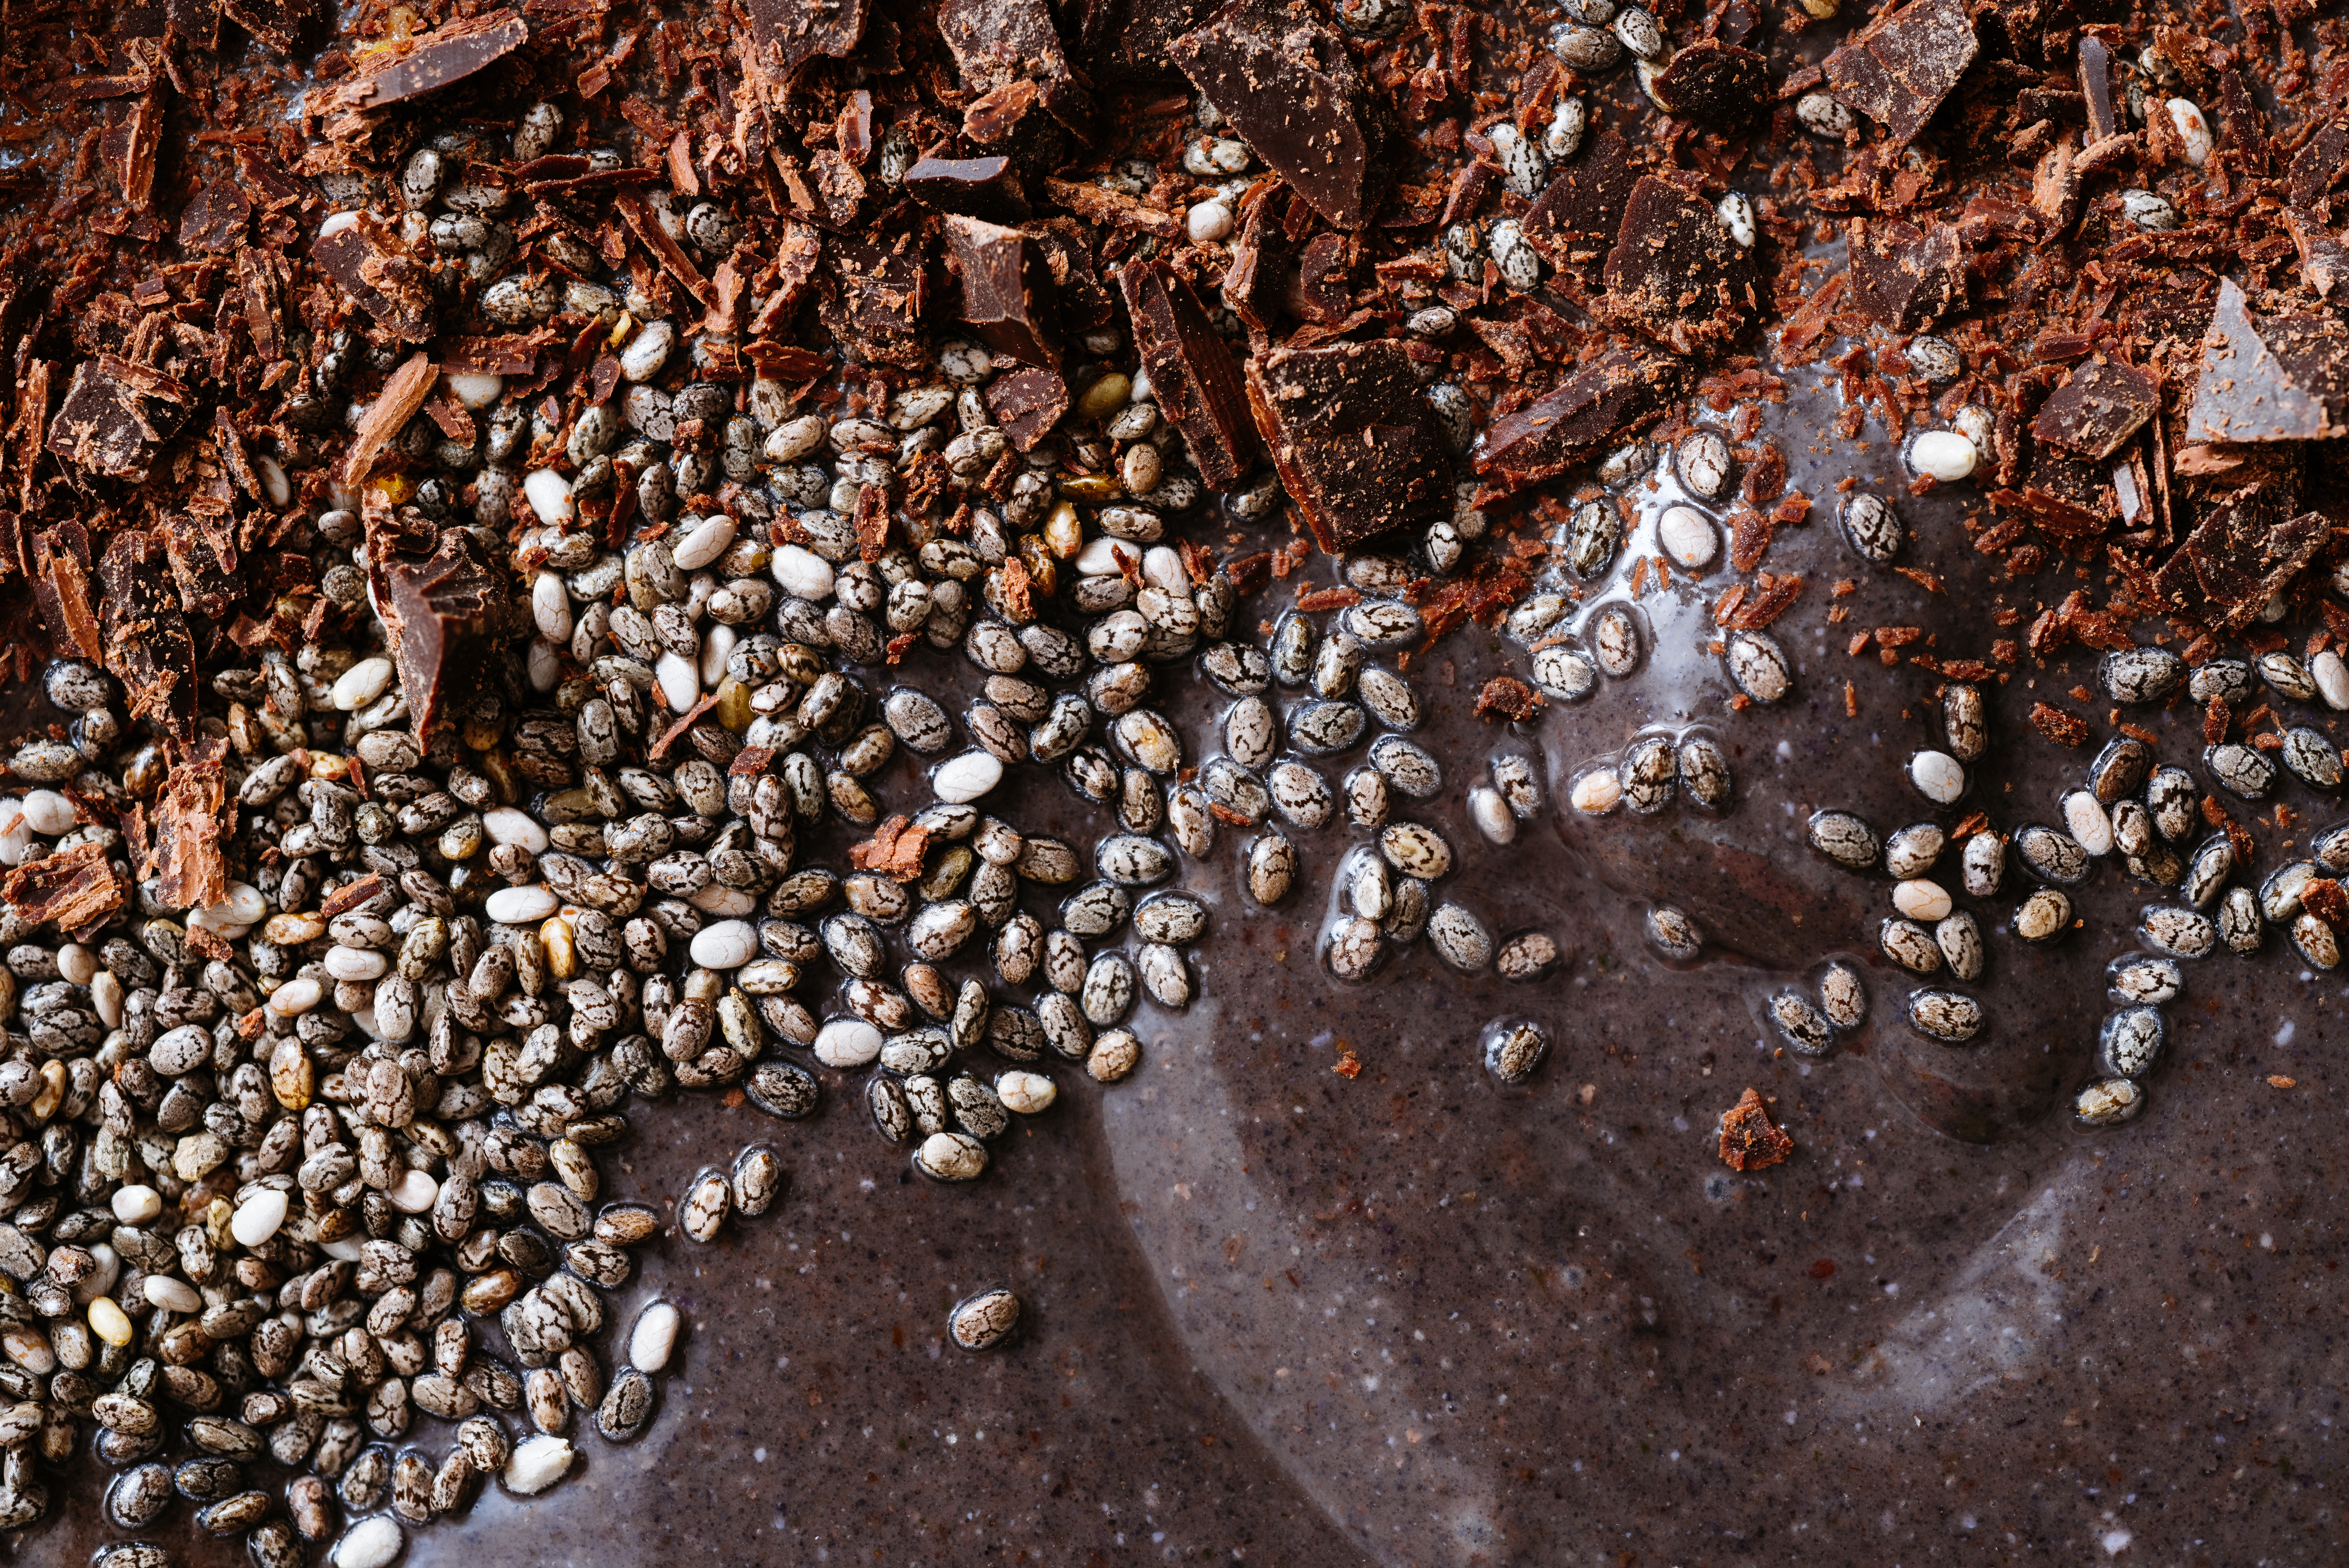
Lemon Blueberry Chia Smoothie Bowl with Fresh Mint and Chocolate
Lemon juice amplifies and balances the sweetness of blueberries and banana in this smoothie bowl. Don’t worry if your mixture is super thick in the blender; that means you are doing it right! Top with mint-flavored dark chocolate for an even sweeter, minty flavor. You can also find this recipe in the January issue of Birmingham magazine.
Yield: 1 smoothie bowl
What You Will Need:
● 1/2 cup unsweetened nut milk plus 1 tablespoon filtered water
● 1 scoop plant-based protein powder (23 grams), chocolate or vanilla flavor
● 1 cup frozen blueberries
● 1 tablespoon cold chia seeds, plus more for topping
● 1/2 frozen banana, broken into two pieces
● 1 teaspoon fresh lemon juice
● 1 tablespoon cocoa powder
● 1/4 of an avocado
● 5 fresh mint leaves, plus more for topping
● 80% cacao dark chocolate, shaved (or mint dark chocolate)
What You Will Do:
Blend all ingredients (except for additional mint for topping and dark chocolate) on low speed in a blender for about a minute. Move to medium speed for about one minute more.
Stop blending and remove top from blender. Use a large spoon (or tamper) to push any remaining unblended ingredients towards bottom of mixture.
Continue to blend; if blender gets stuck, simply stop blending, push ingredients down into blender, and blend again until smooth and creamy.
Pour into a bowl, top with chocolate and mint, and enjoy!
*If using unsweetened protein powder, add 1-2 teaspoons of maple syrup or honey to taste.
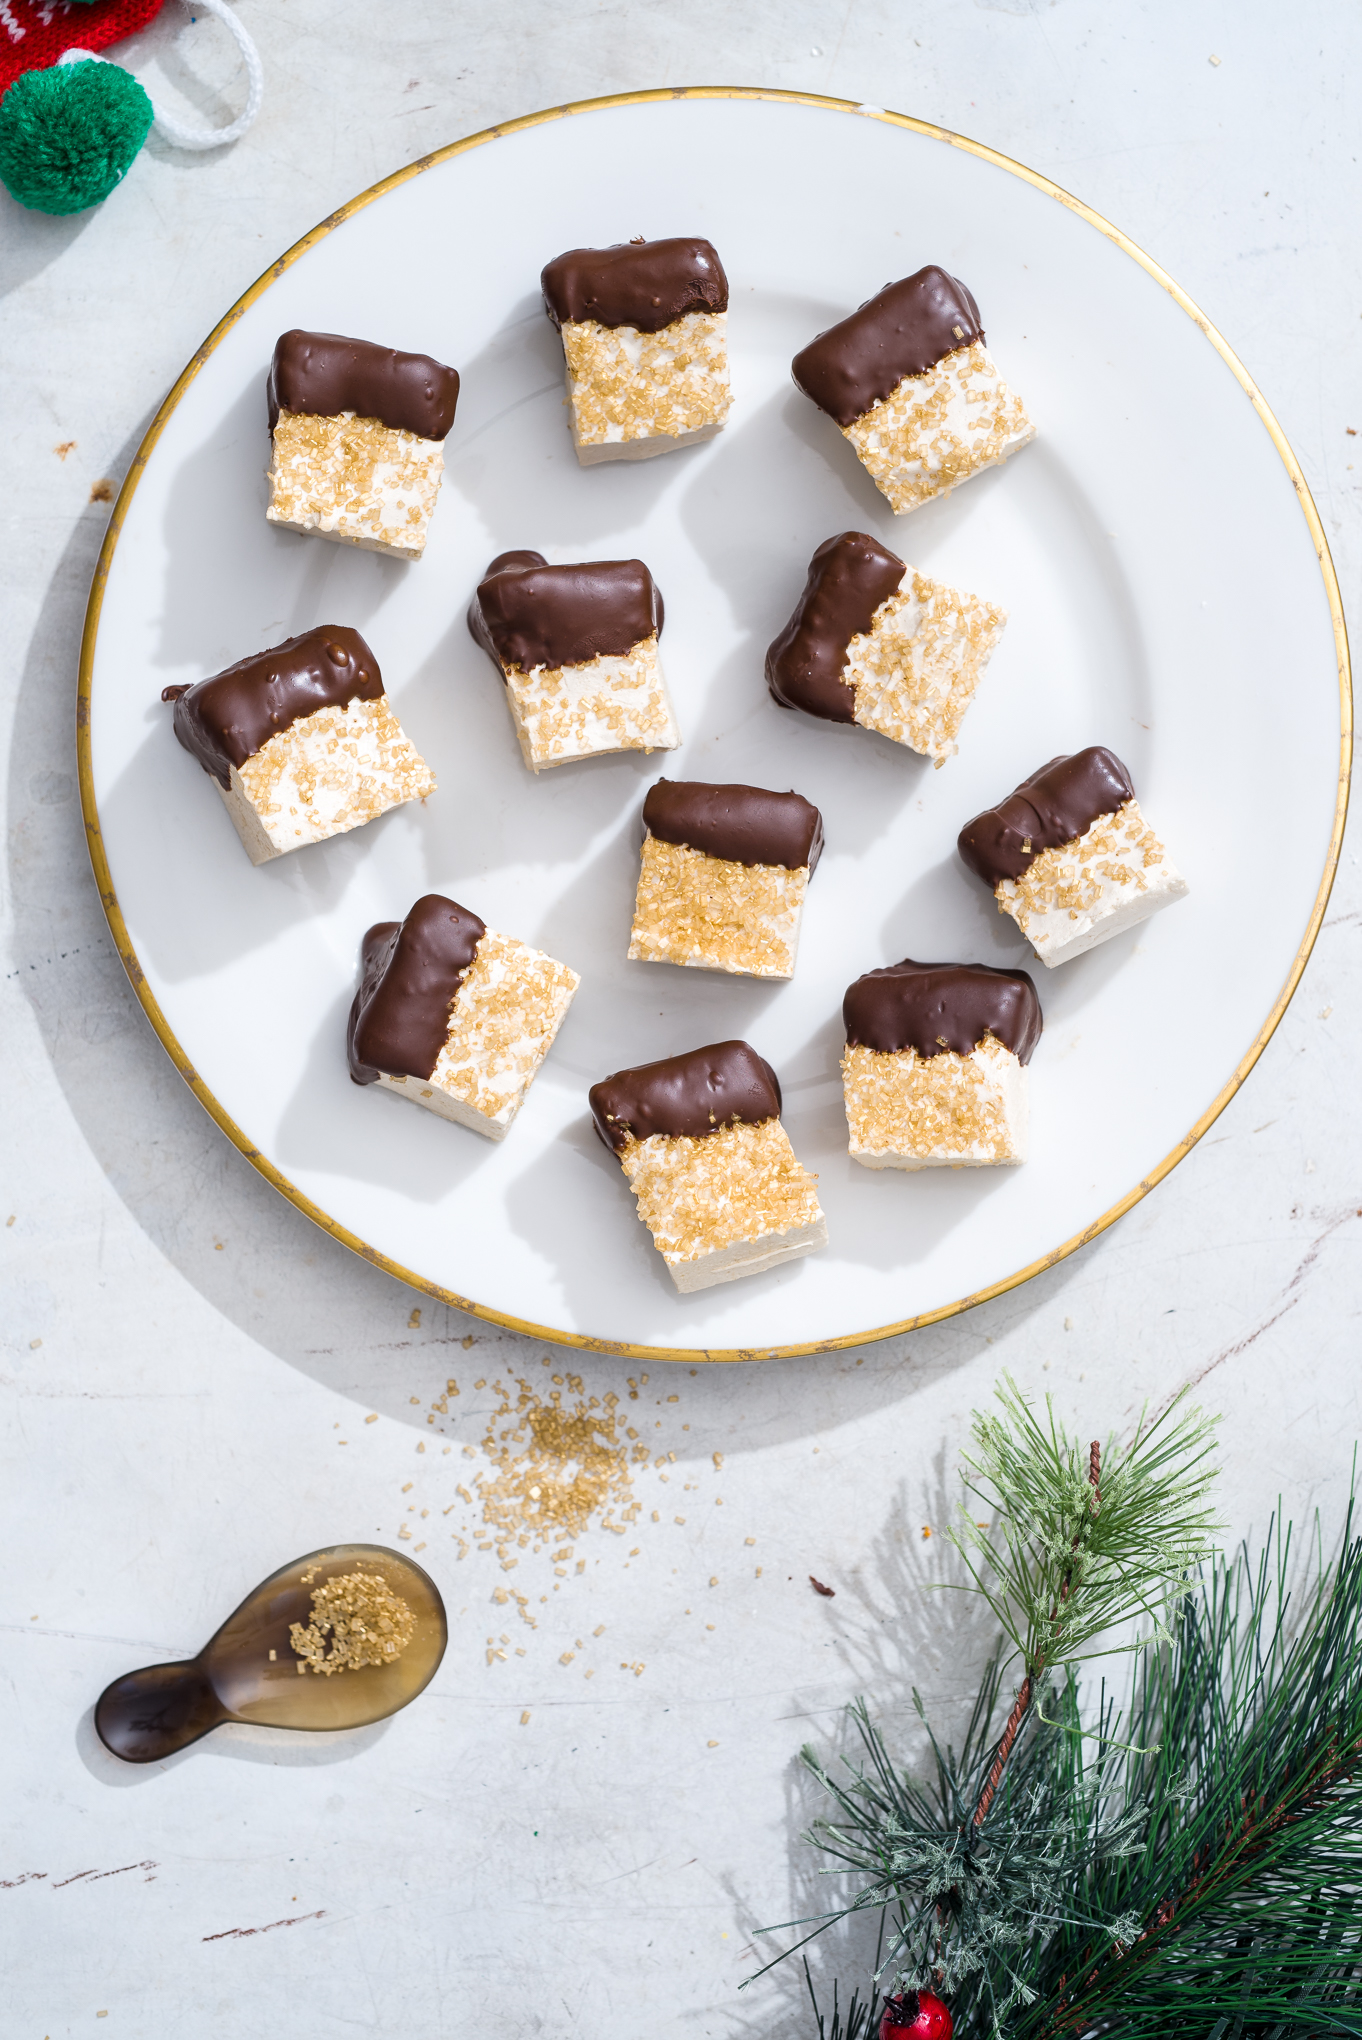
I can’t get enough of marshmallows. Growing up, I ate the kind that came in a giant puffed bag- and did not miss a beat topping my hot chocolate and/or hot fudge sundaes with them.
But marshmallows were elevated to an art form the first time my then-boyfriend, now-husband Jake sent me homemade marshmallows in the mail. From Seattle. WOAH. Mind completely blown!
And until I had the opportunity to work on recipe development for Birmingham magazine, I forgot a bit how much I loved eating them- and now, making them. In fact, I have full confidence that as long as you have a working thermometer, YOU HAVE GOT THIS MARSHMALLOW RECIPE! Go you pastry chef, GO!
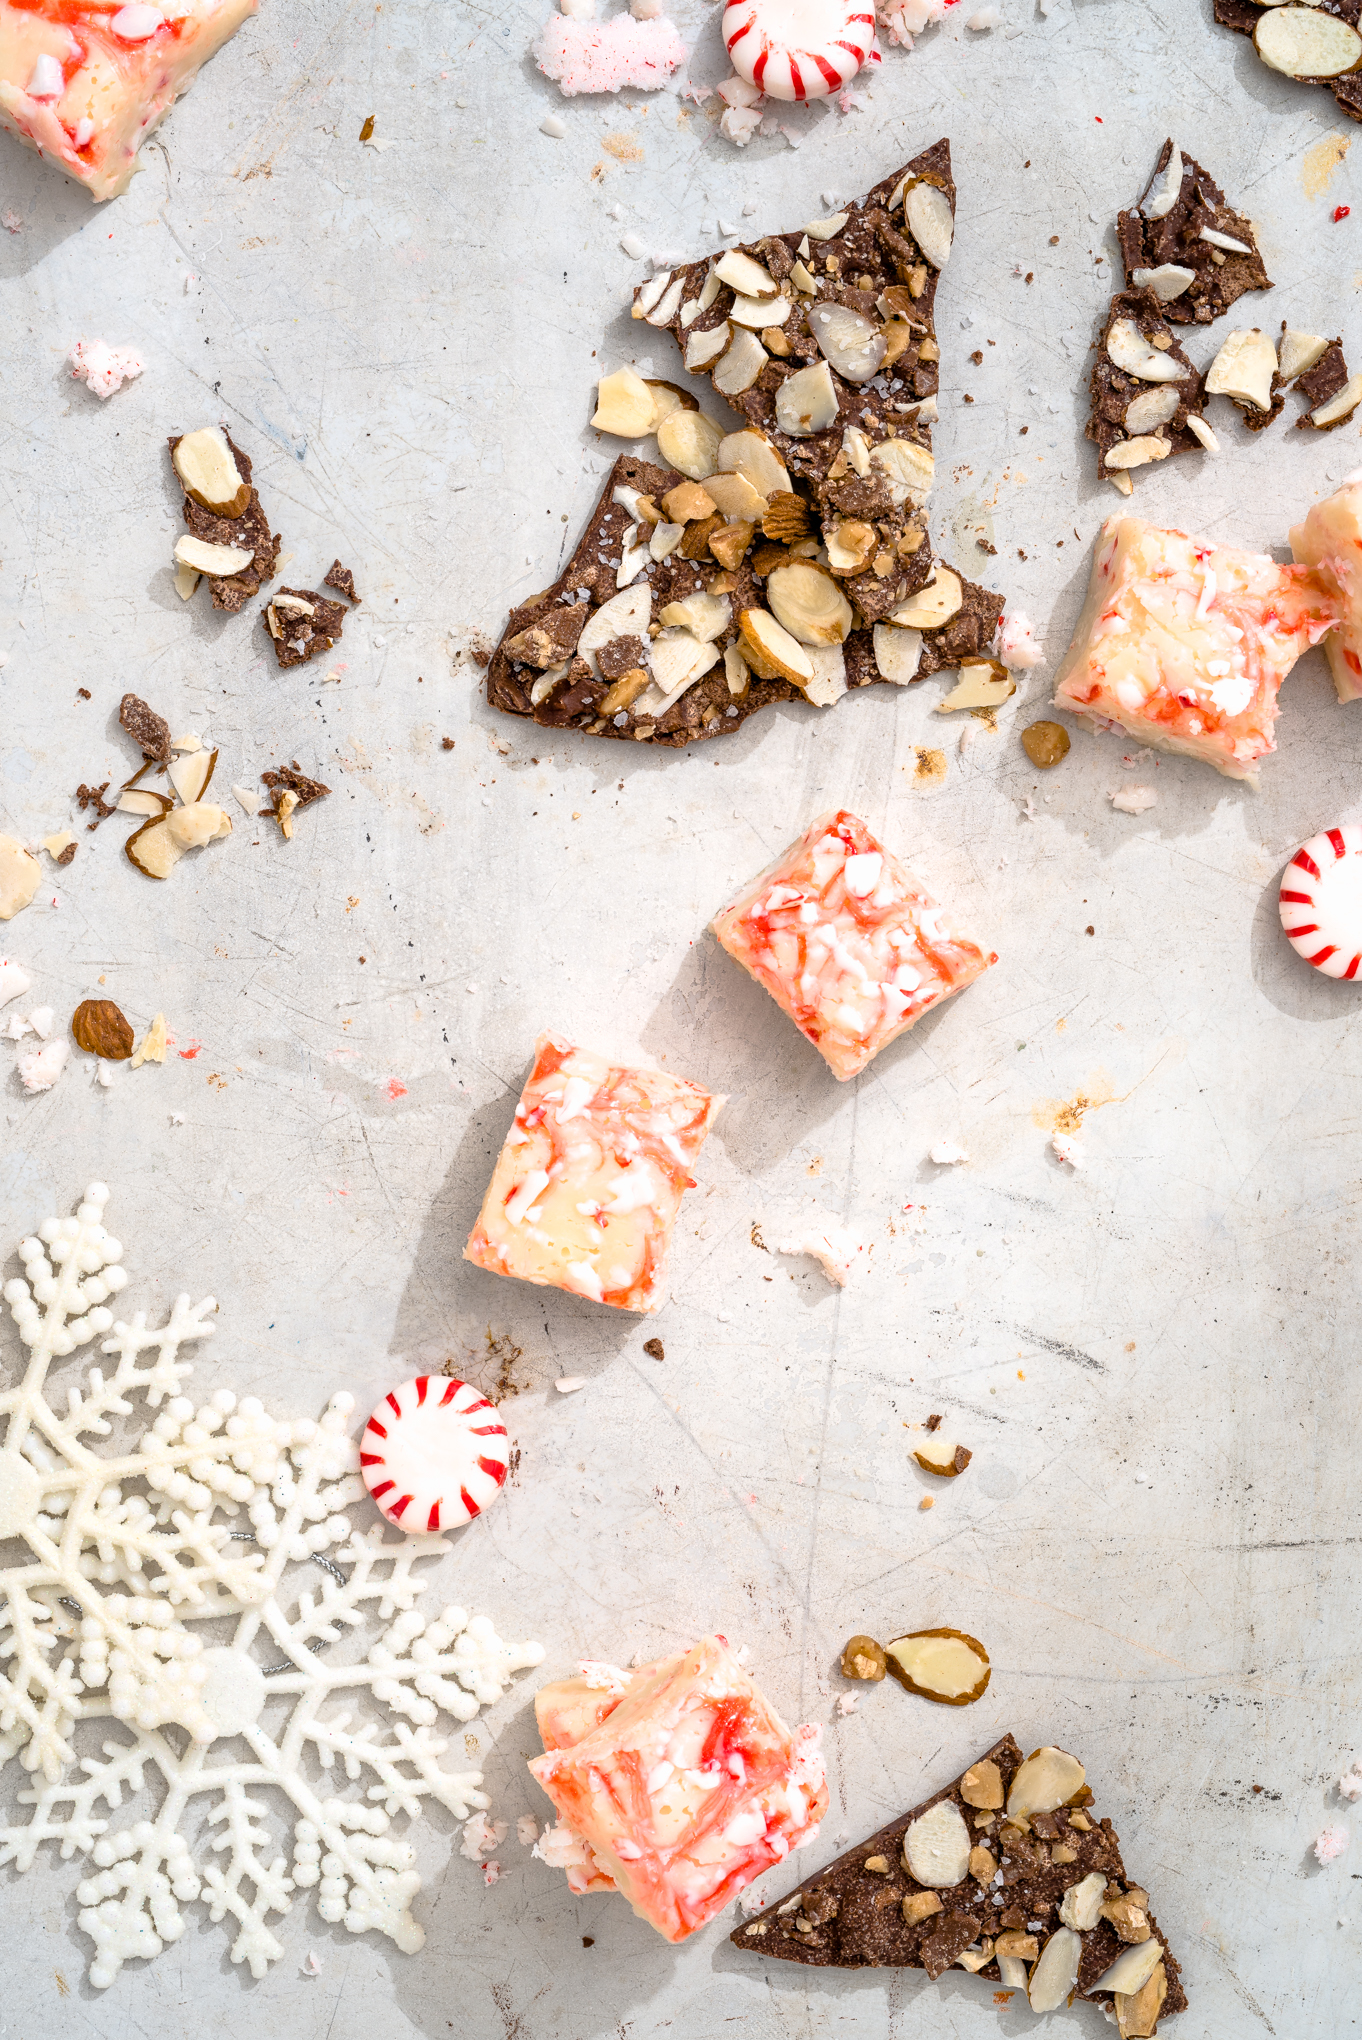
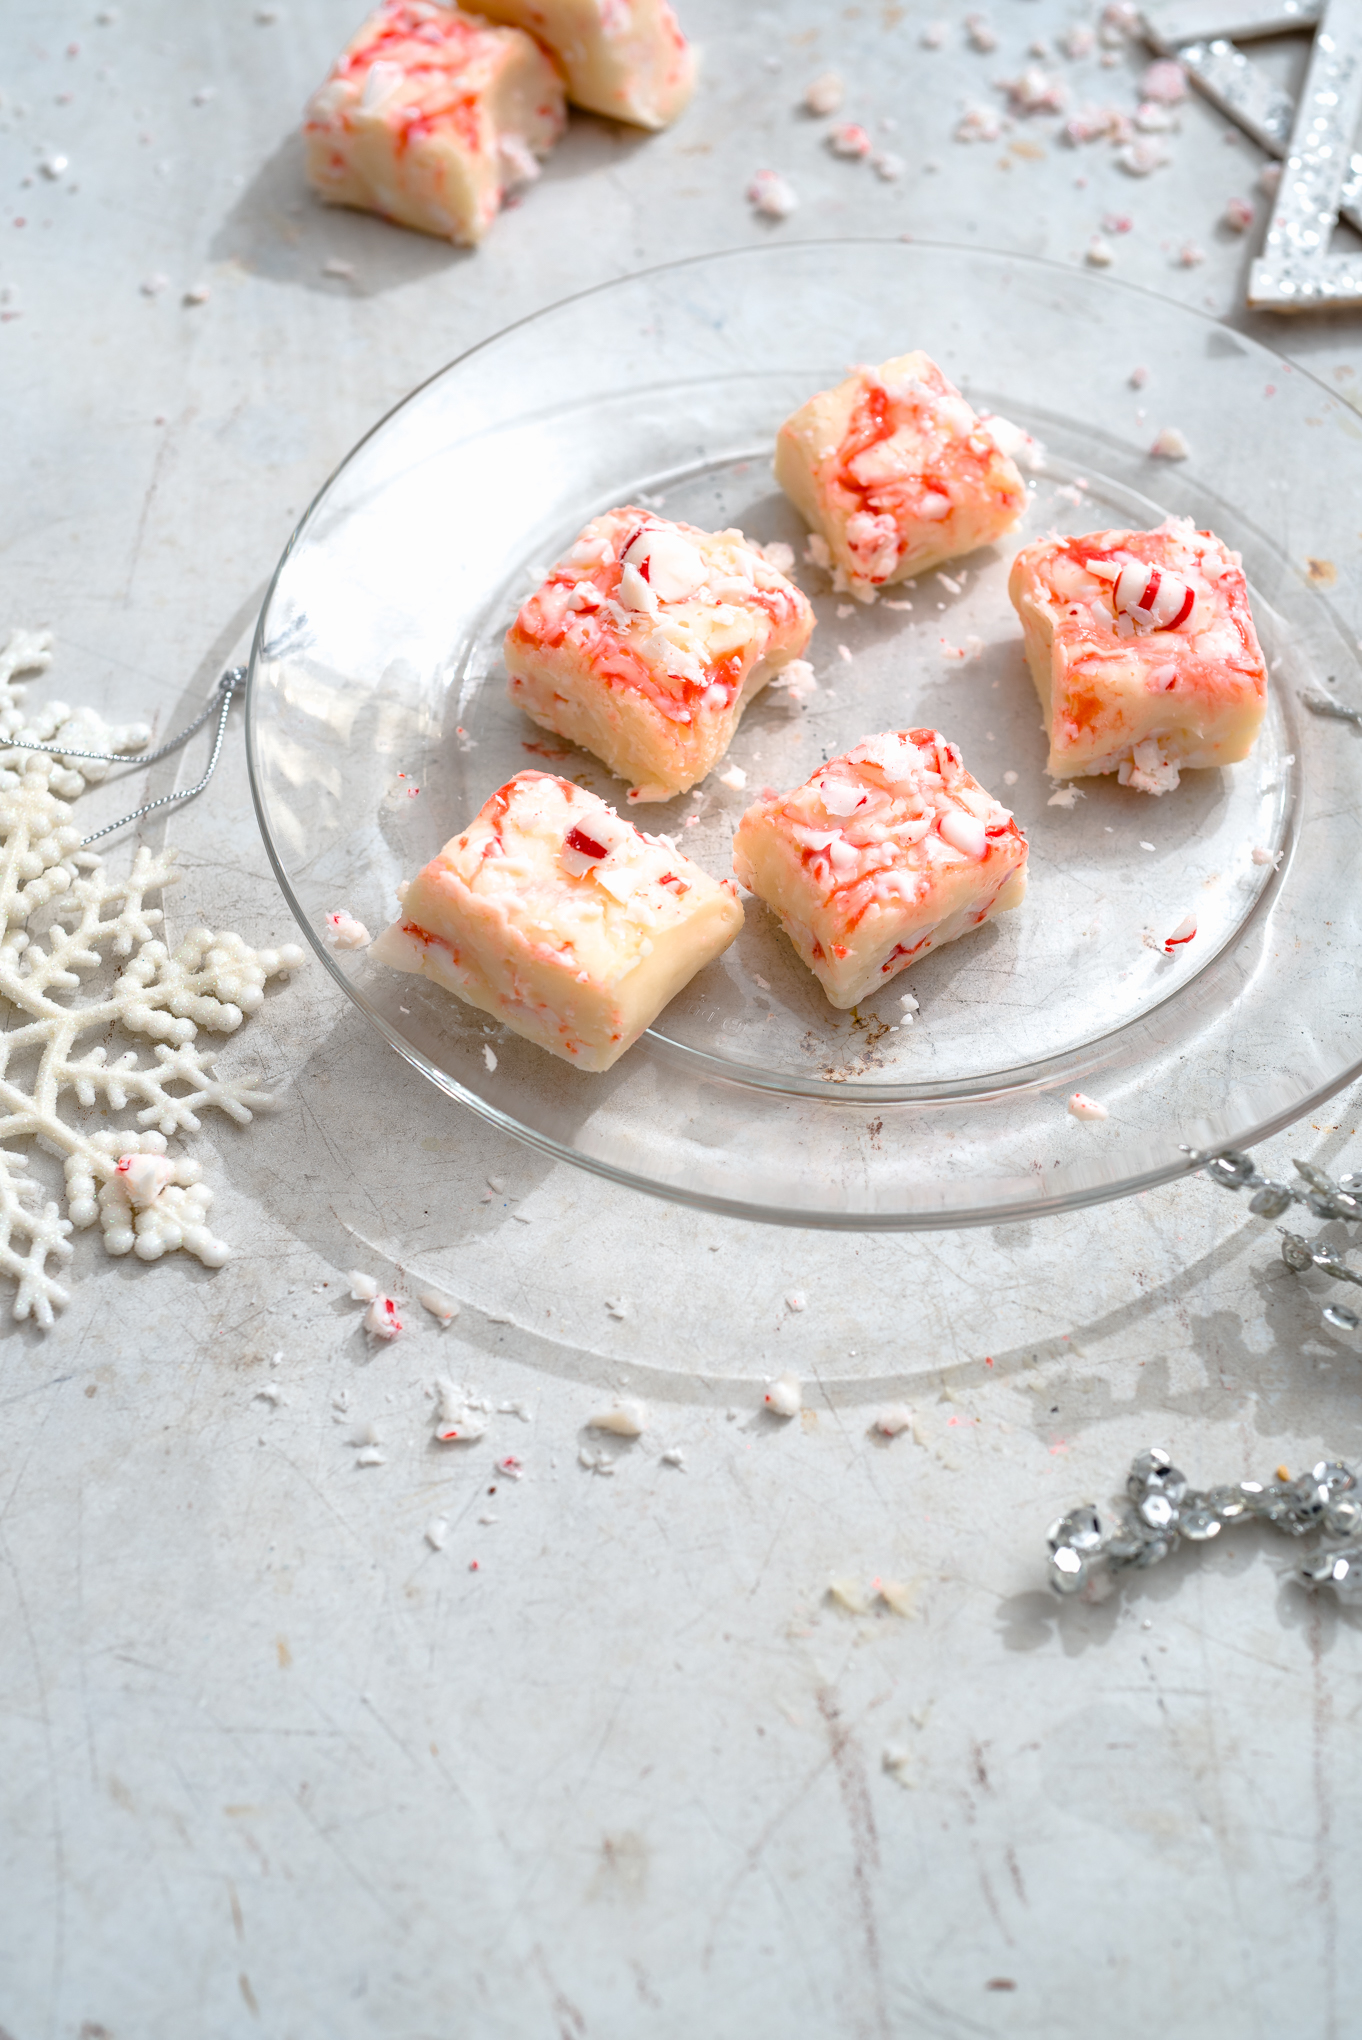
And speaking of easy, rounding out our 12 Days of December recipes, I give you- FIVE ingredient candy cane crunch fudge!
This recipe is super simple, a fantastic way to use your leftover candy canes, and did I mention it had FIVE ingredients?
As we end 2017, I want to tell you how incredibly grateful I am for YOU. For your support, for reading these recipes (and hopefully making them!), for allowing me to share a part of my heart for the kitchen and food with you. 2018 is going to be an incredible year, and I can’t wait to begin a fresh creative journey with you all.
LOVE LOVE! XOXOX – Callie
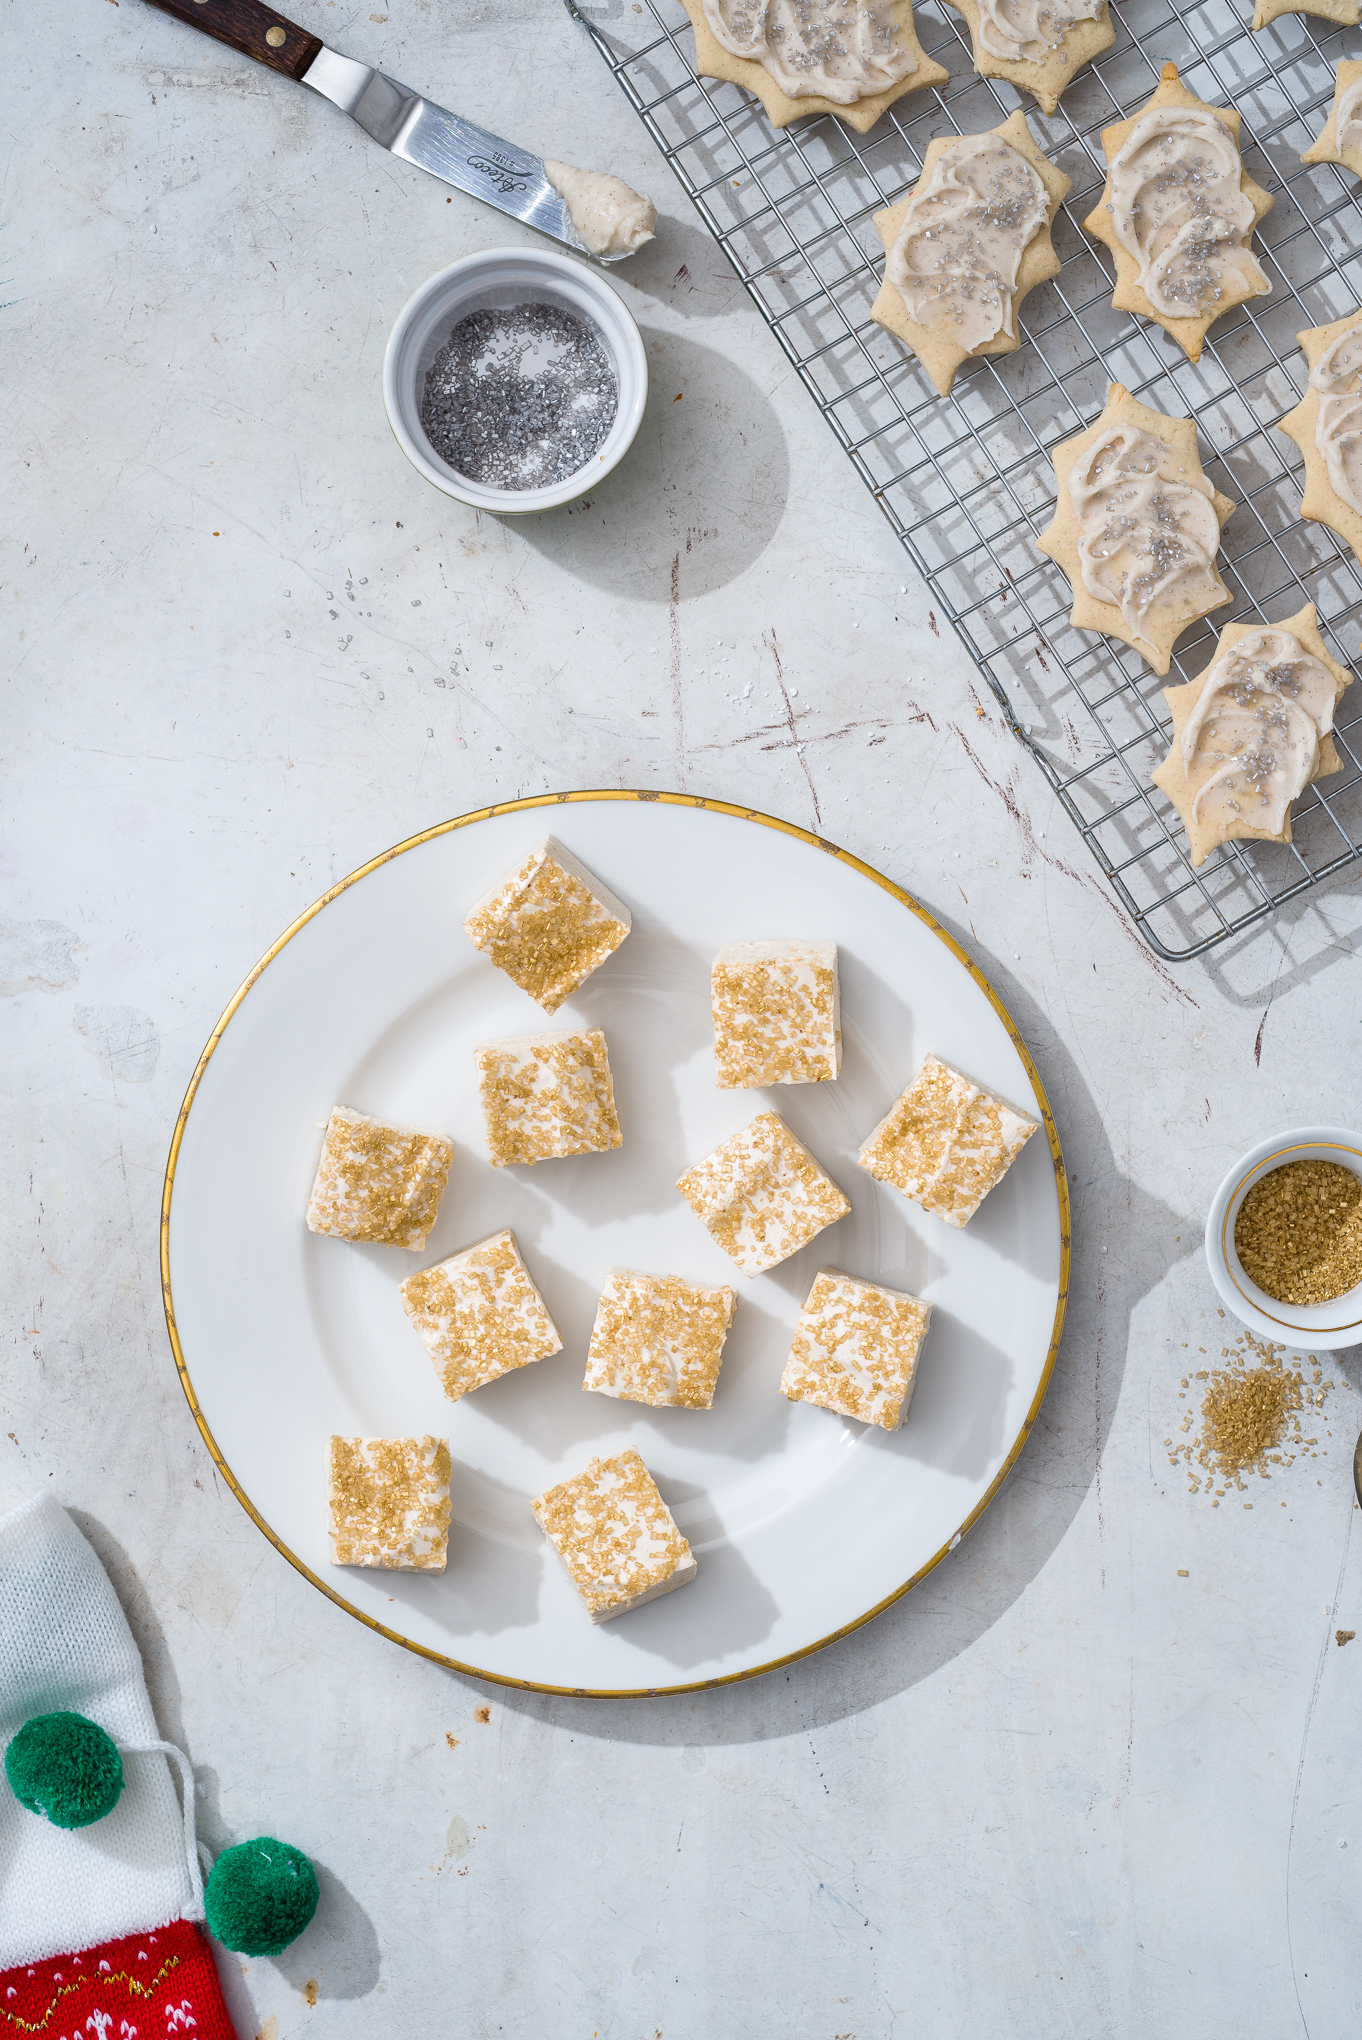
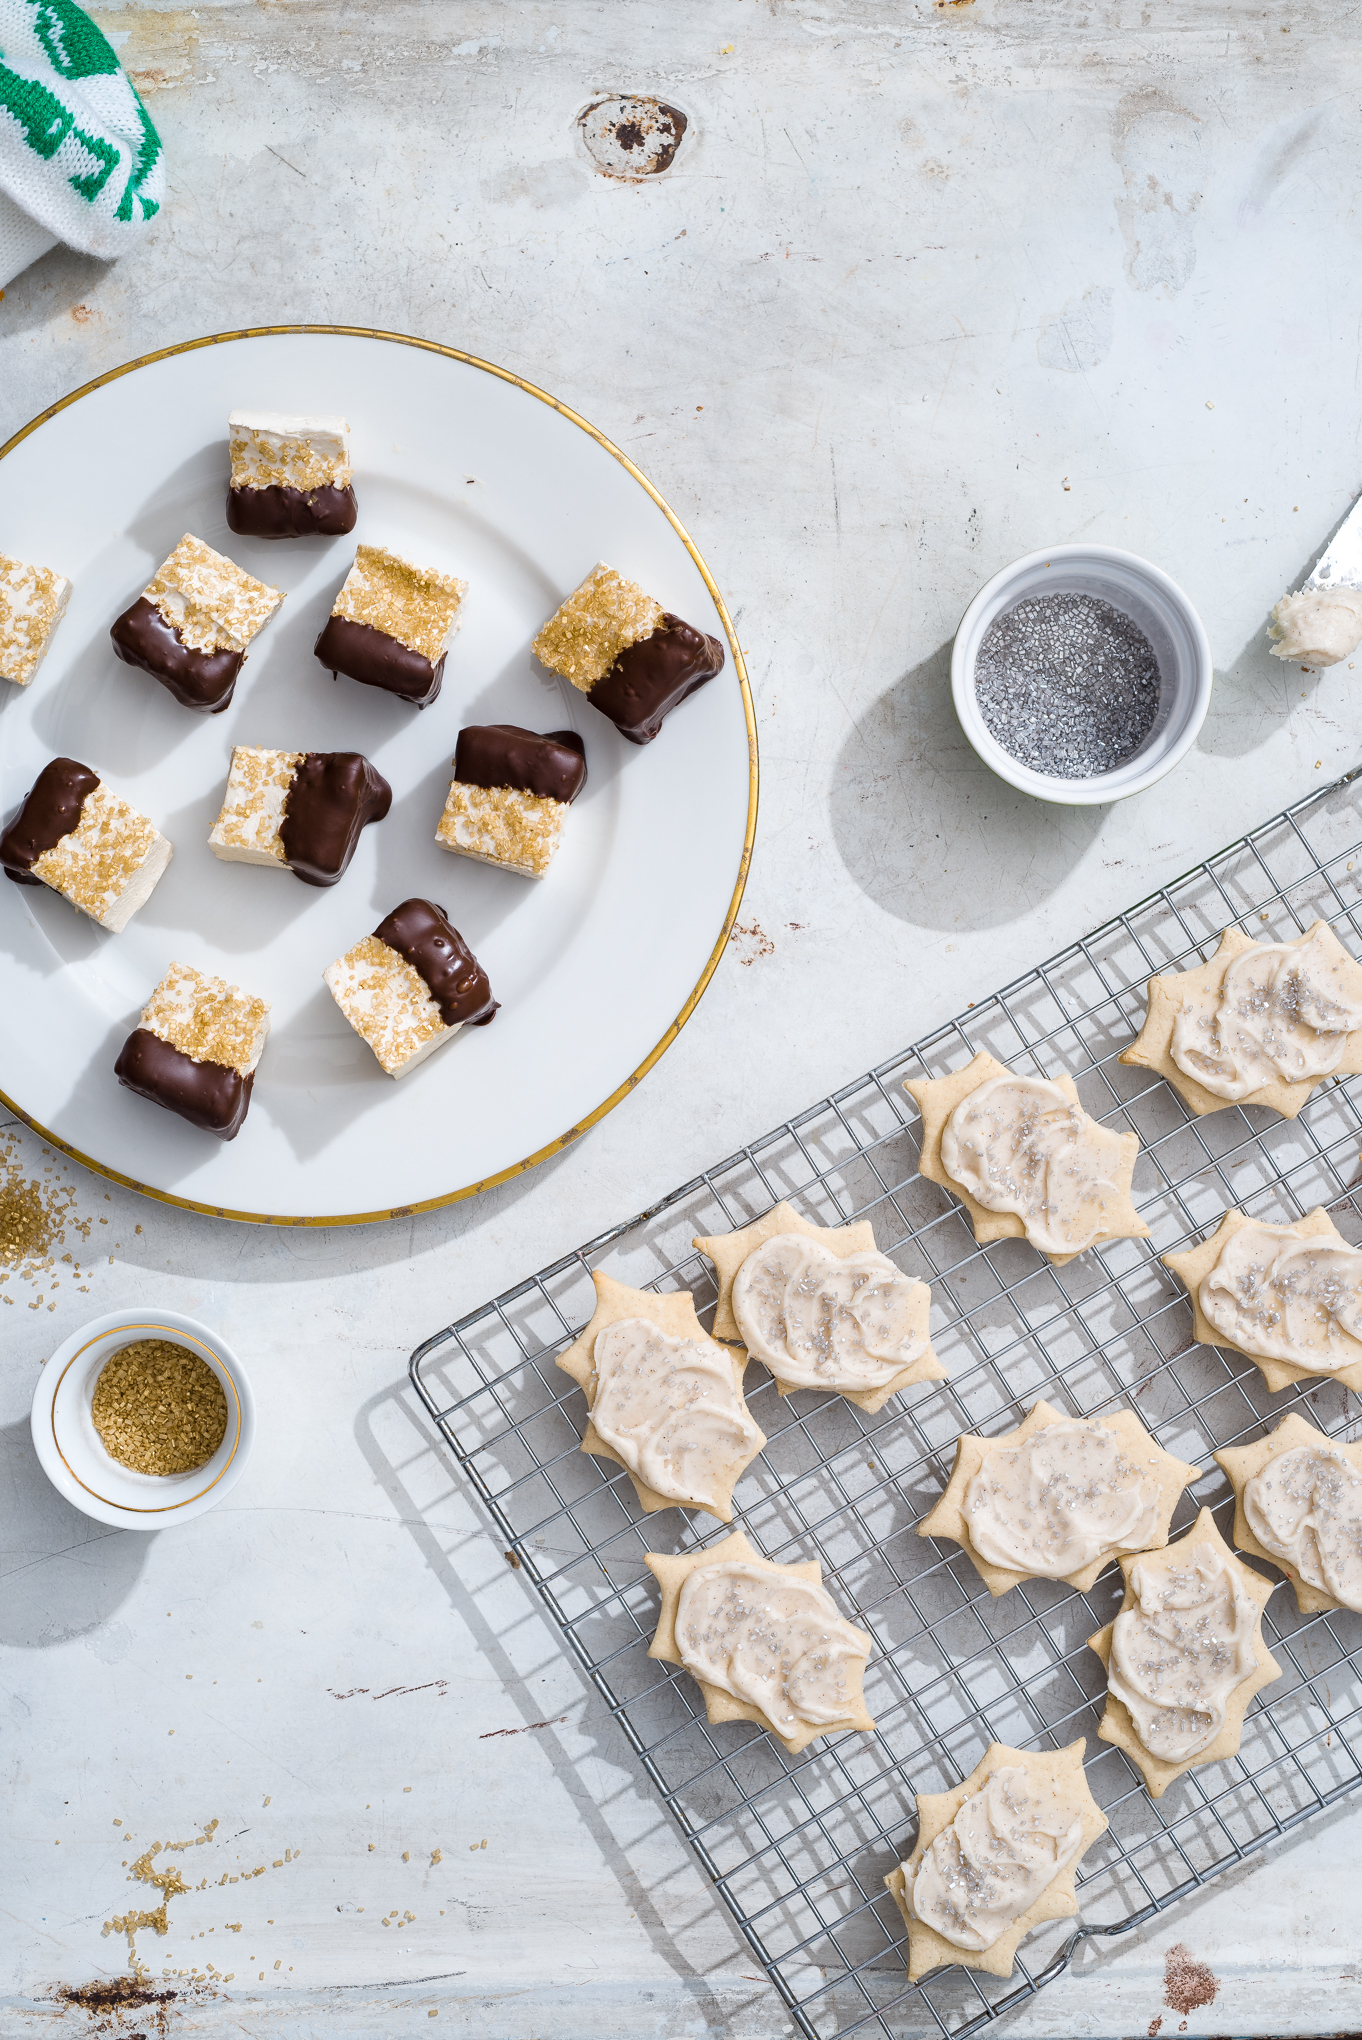
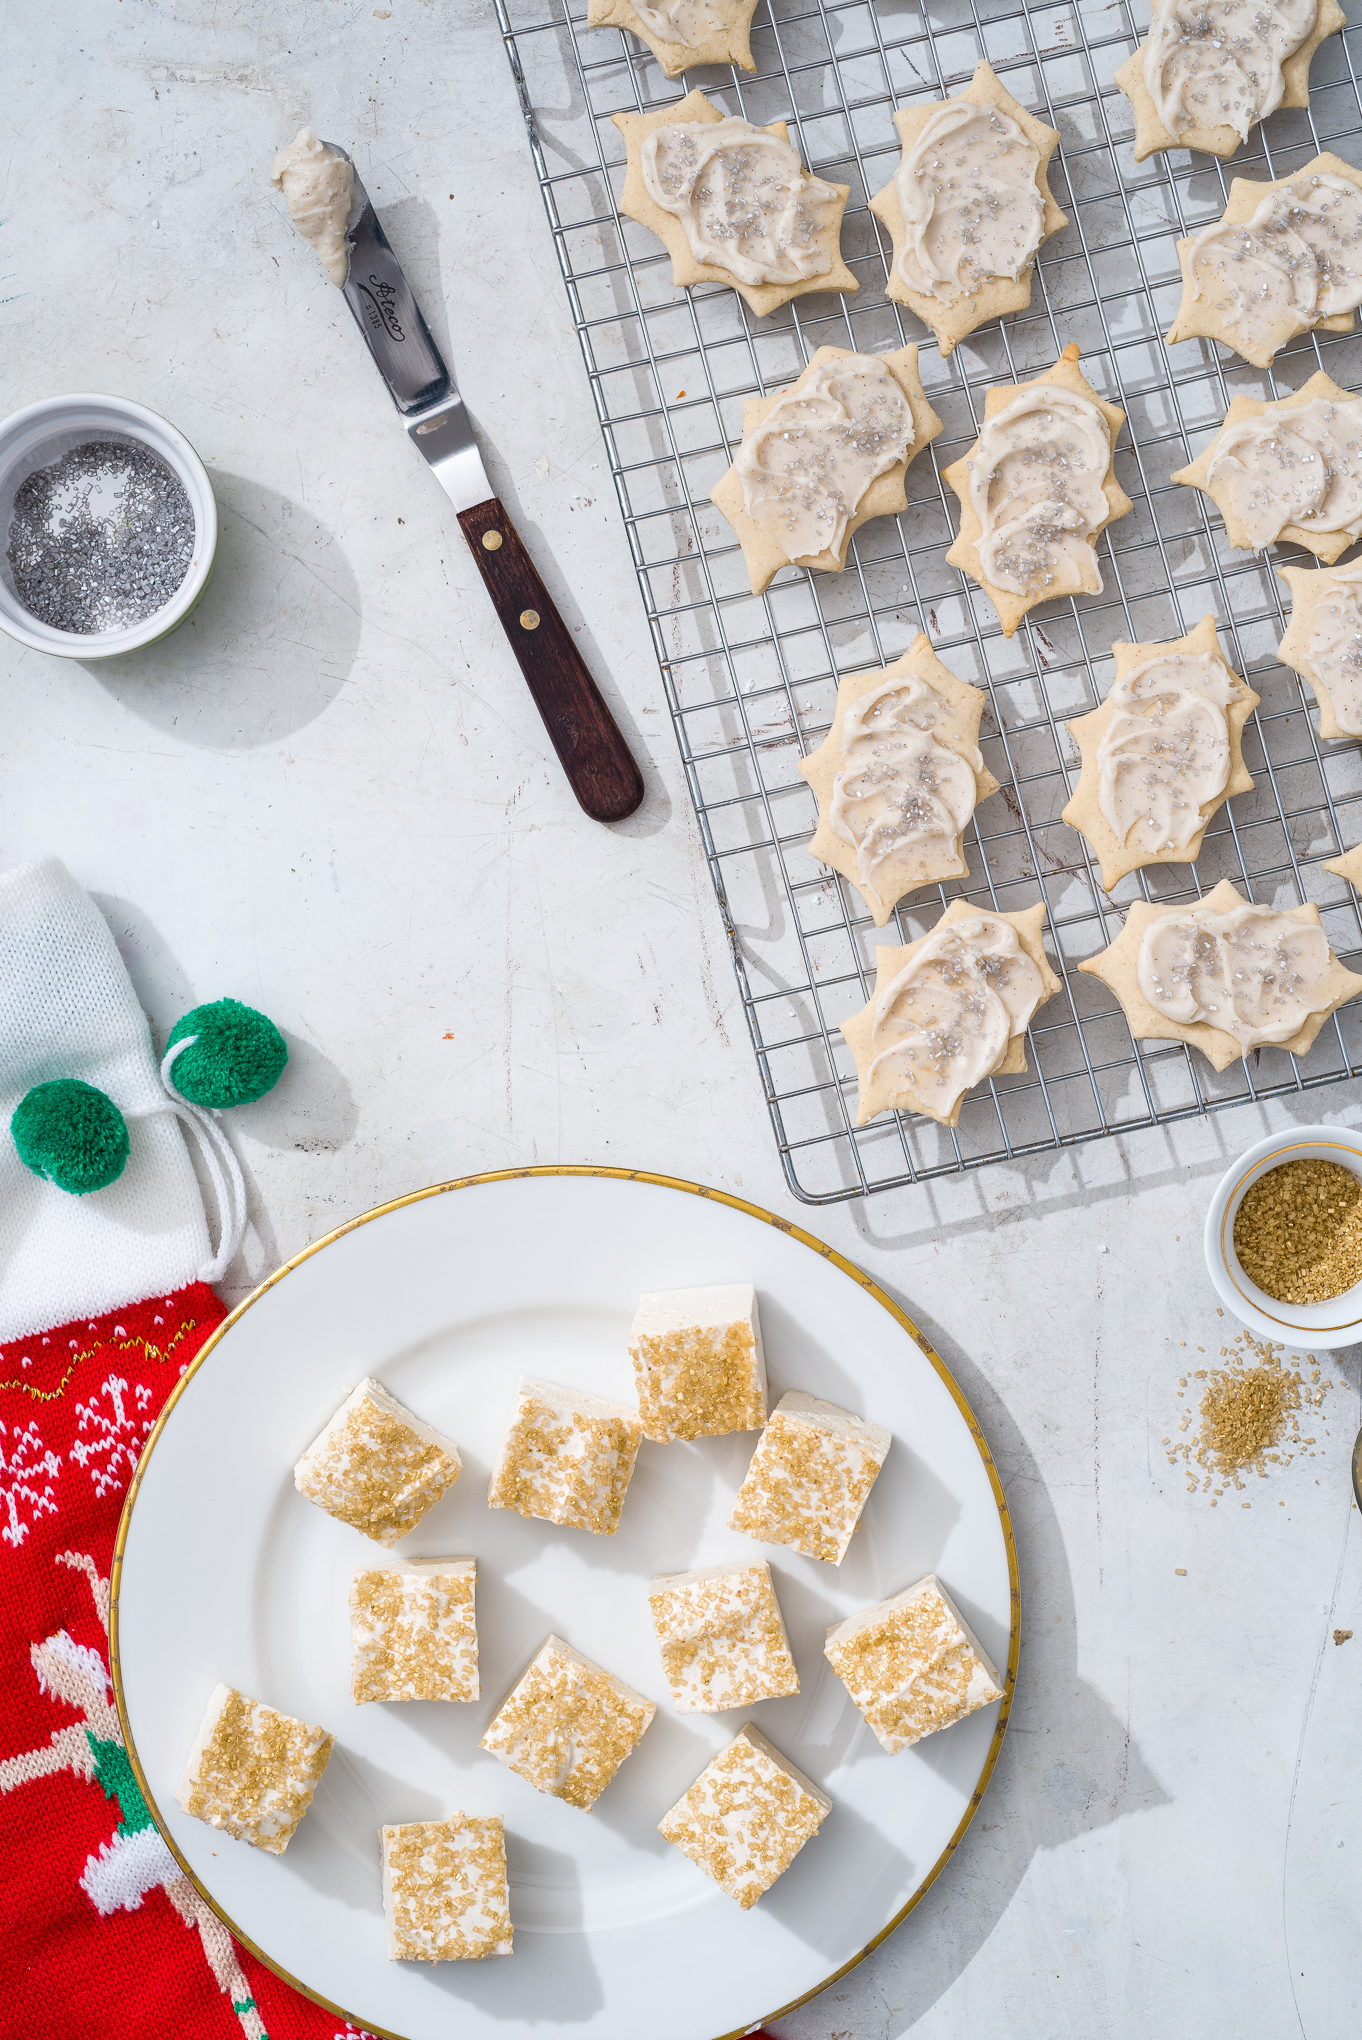
Whiskey Vanilla Gold Fleck Marshmallows
Once you try homemade marshmallows, you may never go back to the prepackaged versions! This recipe does require setting overnight, but it’s an easy one to follow. The gold flecked sprinkles and chocolate dip make the candy a visual stunner for party guests; add them to hot chocolate for a perfect New Year’s Eve treat. You can also find most of these holiday recipes in the December issue of Birmingham magazine!
What You Will Need:
3 packets unflavored gelatin
6 tablespoons cold, filtered water
1 cup maple syrup
2 1/2 tablespoons Tennessee honey whiskey
2 teaspoons vanilla extract
1 teaspoon maple extract
1 cup semisweet chocolate chips
Gold sparkle sprinkles, for topping
What You Will Do:
Pour cold water over gelatin in the bowl of a large stand mixer fitted with a whisk attachment.
Prepare a 9 by 9 square baking pan. Spray pan thoroughly with cooking spray, then line with two layers of parchment paper. One layer should be horizontal and the other vertical. Parchment should be overhanging a bit on the sides of the pan.
Bring maple syrup and bourbon to a boil. Use a candy thermometer to make sure the liquid is at 230 degrees.
Take hot syrup off heat.
Turn mixer on medium low to blend gelatin/water mixture for 30 seconds. Slowly add hot syrup. Once all syrup is poured into mixer, put a towel over mixer to prevent hot sugar from flying out of the mixer!
Turn mixer to high for about 8 to 10 minutes, or until mixture is shiny and silky.
Add extracts and whip for one minute more.
Using a rubber spatula, pour marshmallow mixture into parchment-lined pan. Use spatula to smooth the top of marshmallow mixture, pressing it into the corners of the pan.
Sprinkle marshmallows with gold sprinkles.
Spray plastic wrap with cooking spray and press the sprayed side firmly onto marshmallow mixture to seal. Set at room temperature overnight.
Lift marshmallow mixture out of the baking dish. Remove plastic wrap and roll down the sides of parchment paper away from candy.
Spray knife with cooking spray and cut into inch squares.
Line a baking sheet with parchment paper.
Melt semi sweet chocolate chips in a glass bowl in the microwave in 30 second intervals, stirring after each interval, until smooth.
Dip one side of cut marshmallows in chocolate. Place on parchment paper and put in fridge for at least 10 minutes to set chocolate.
Tip: Spray your knife! Spraying your knife with cooking spray makes it easy to slice through the soft candy without sticking. Tip: Double-layering your parchment paper makes lifting the marshmallows out of the pan much easier.
Candy Cane Crunch Fudge
This fudge is delightfully creamy and bright, just like the way even the tiniest bit of snow feels on a cold day. Crushing peppermints releases their fragrance and flavor into the fudge, and with only five ingredients, this treat is also wonderfully simple.
Yield: 28 to 36 pieces
What You Will Need:
1 3/4 cups white chocolate chips
5 ounces sweetened condensed milk, warmed in the microwave for 20 seconds
1 tsp peppermint extract
1 tsp vanilla extract
1/2 cup crushed peppermints or candy canes, plus 5 peppermints, crushed, for topping
Sparkle red icing
What You Will Do:
Prepare an 8 by 8 inch glass baking pan by lining it both horizontally and vertically with waxed paper.
Heat chocolate chips and condensed milk in a glass bowl for 30 seconds in the microwave. Stir with a rubber spatula. Repeat this process until the mixture is smooth, stirring thoroughly, for about five rounds of 30 seconds.
Stir in crushed peppermints and extracts until combined.
Carefully pour into lined glass baking pan. Smooth mixture into corners of pan and smooth top with rubber spatula. Drizzle with sparkle icing, then use a flat toothpick to create swirls. Top with additional crushed peppermints.
Freeze for three hours, cut into squares and serve!
Since I was a child, I was a bit obsessed with any food that came in a tin.
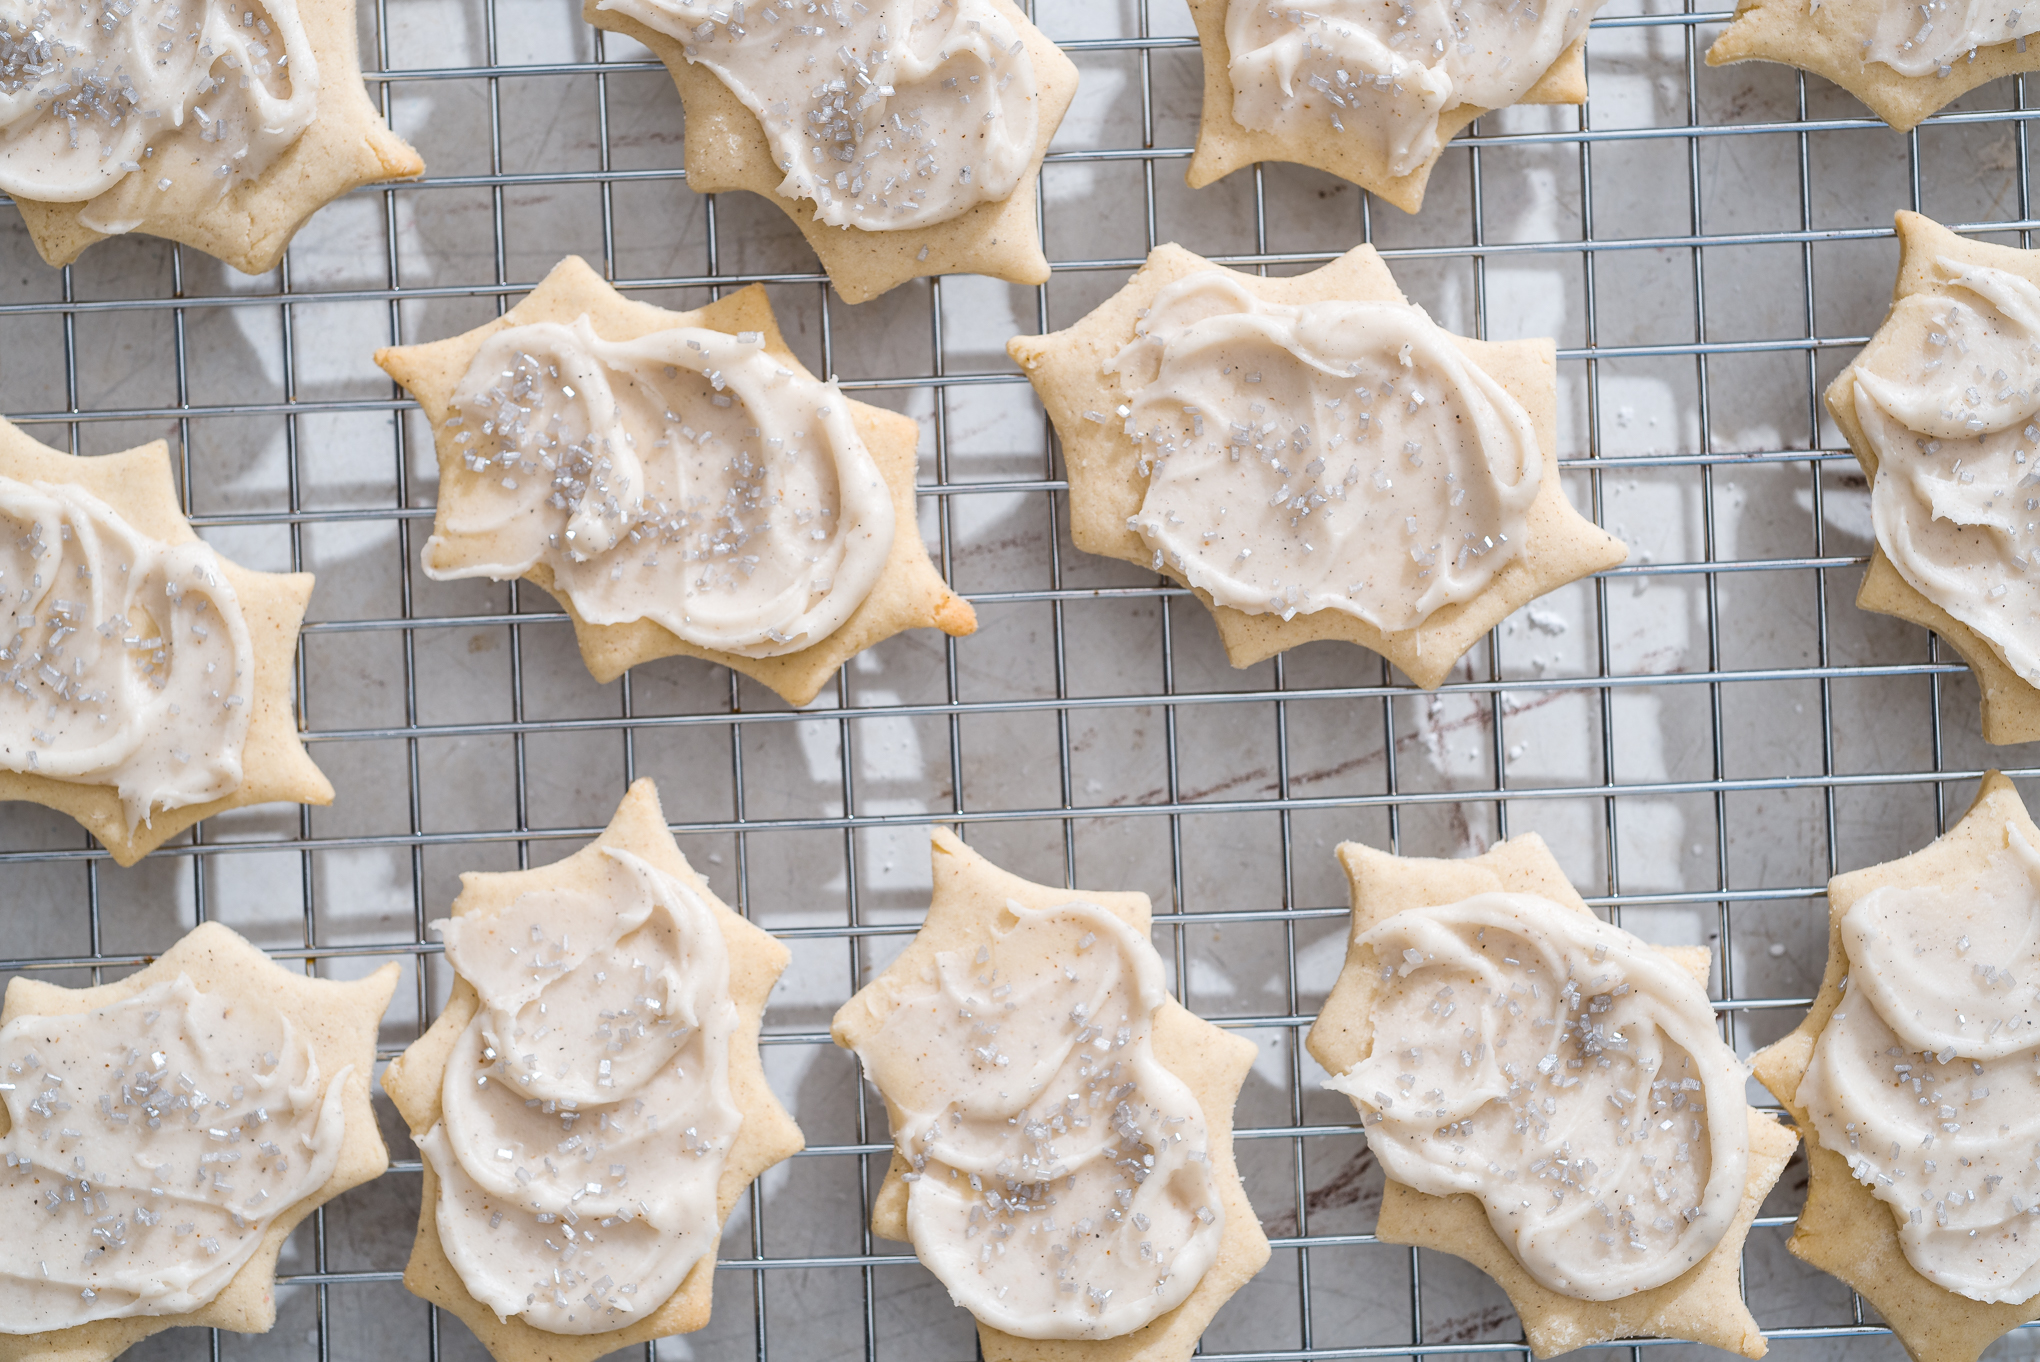
Ground coffee in a tin? Felt like a special treat reserved only for those adults brave enough to drink the black stuff. Cheese popcorn organized between three paper dividers in a giant Christmas tin that I could hug and/or physically protect from my siblings? It felt like Santa came early. And COOKIES in a tin? Oh my geez, hold the phone, I’m running toward that one like someone broke out the Hanson Tour (circa early 2000’s) DVD.
Needless to say, this recipe makes my mouth water because these butter cookies were developed to be similar to the ones you find in the blue tins, at the store, that also come with paper dividers inside the packaging. Soooo classy.
This recipe differs, however, in the icing. The four-ingredient cardamom frosting makes the cookie flavor your own! Unlike the cookies that come in a tin, these guys are topped with homemade goodness (made with powdered sugar and cream) that is wonderfully, slightly spiced, with cardamom.
So, if buying cookies in a tin for your friends and fam is part of your tradition, maybe break the mold this year. Bake up some butter cookies instead. Whip up an easy homemade frosting. And ship them off to your fab loved ones- paper dividers optional.
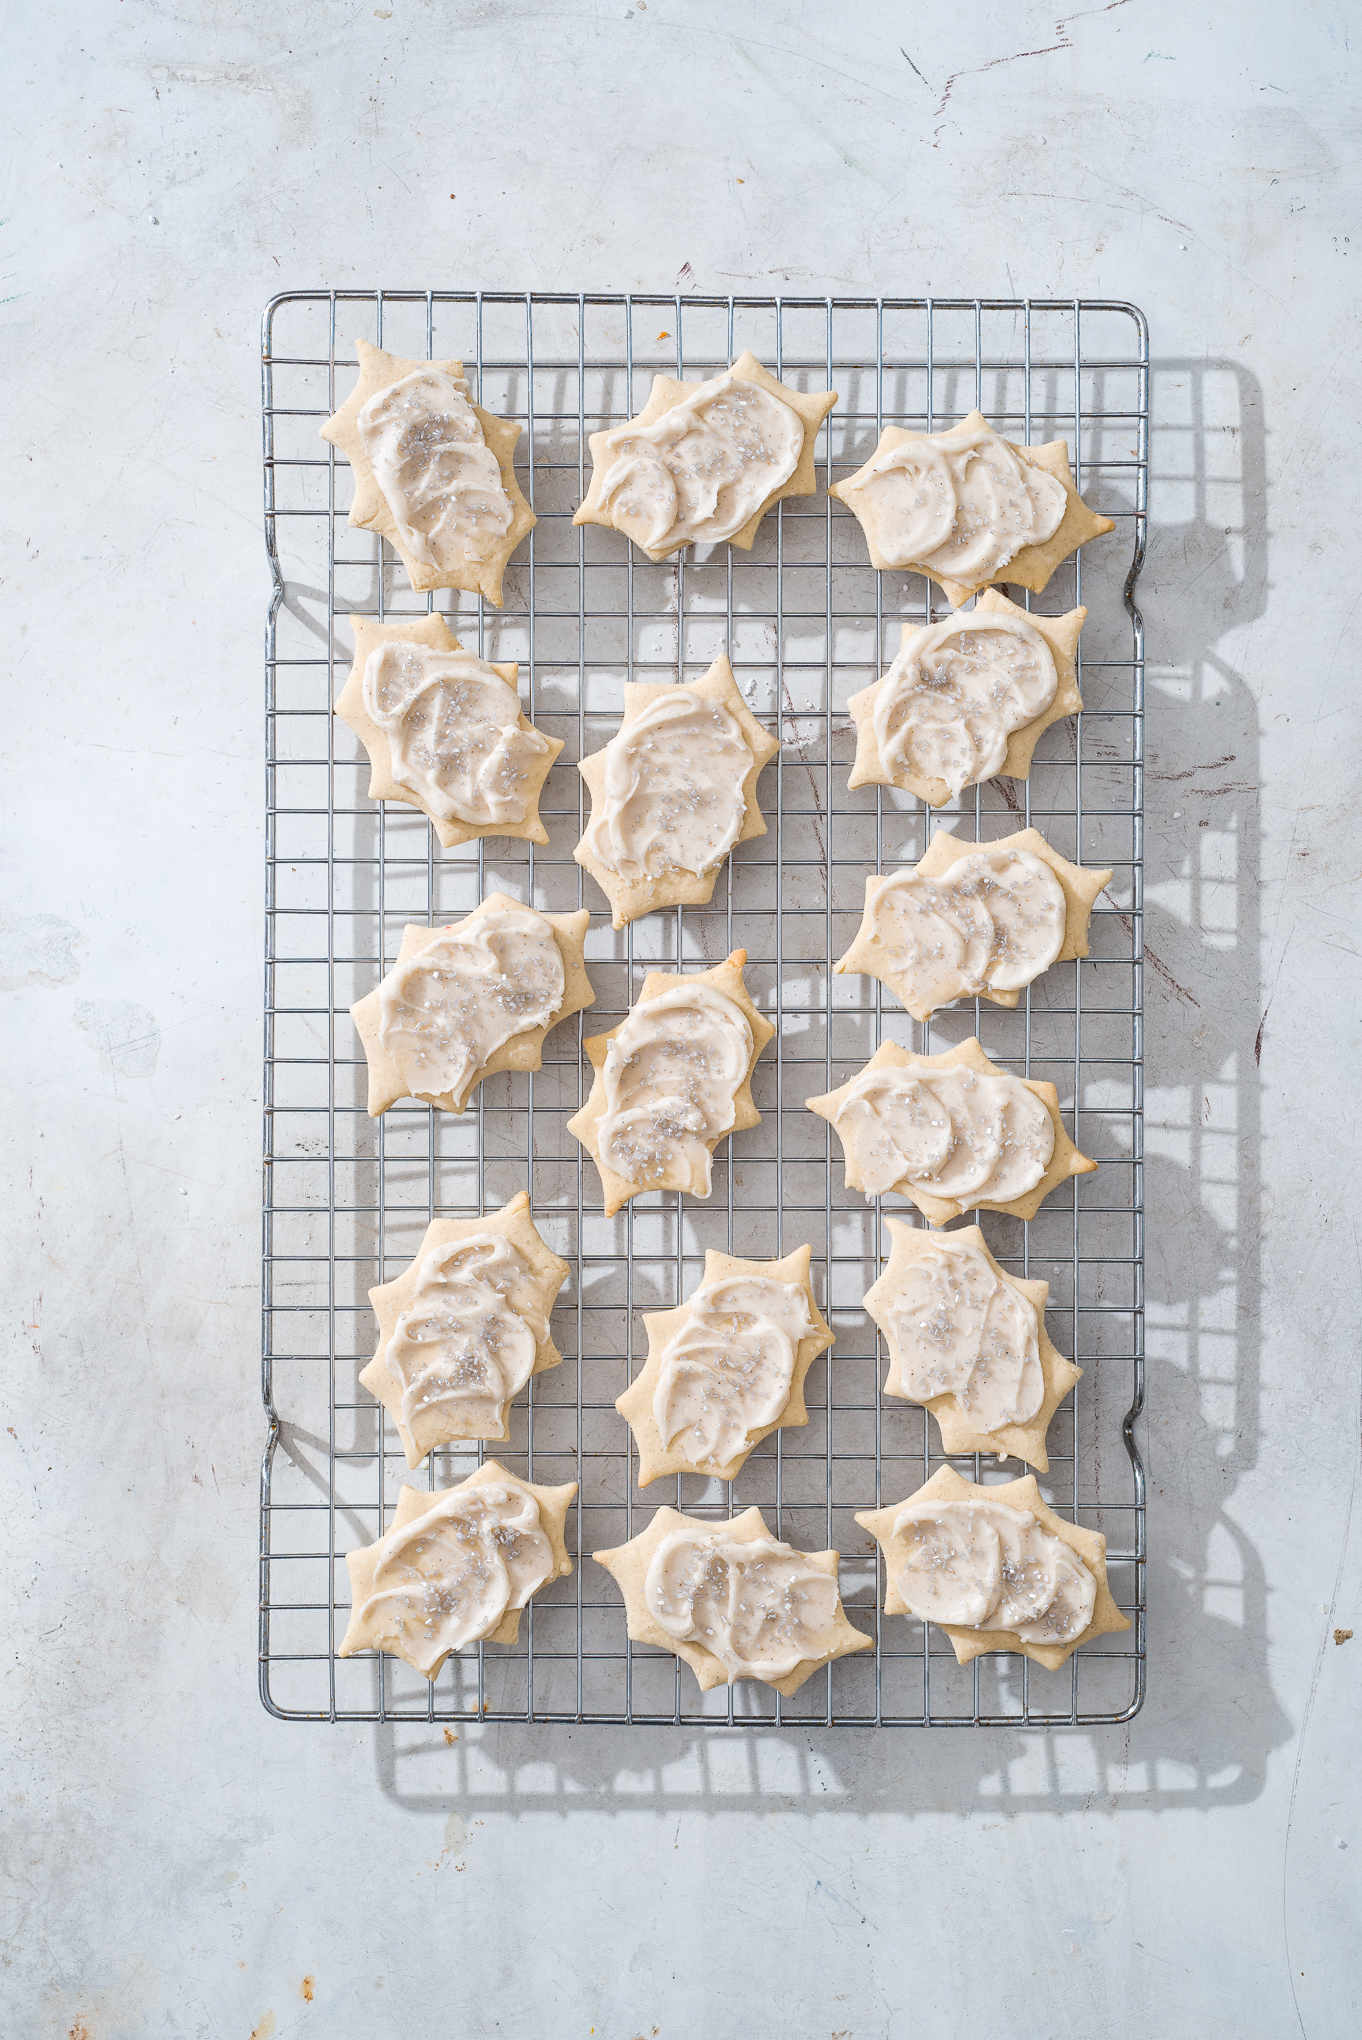
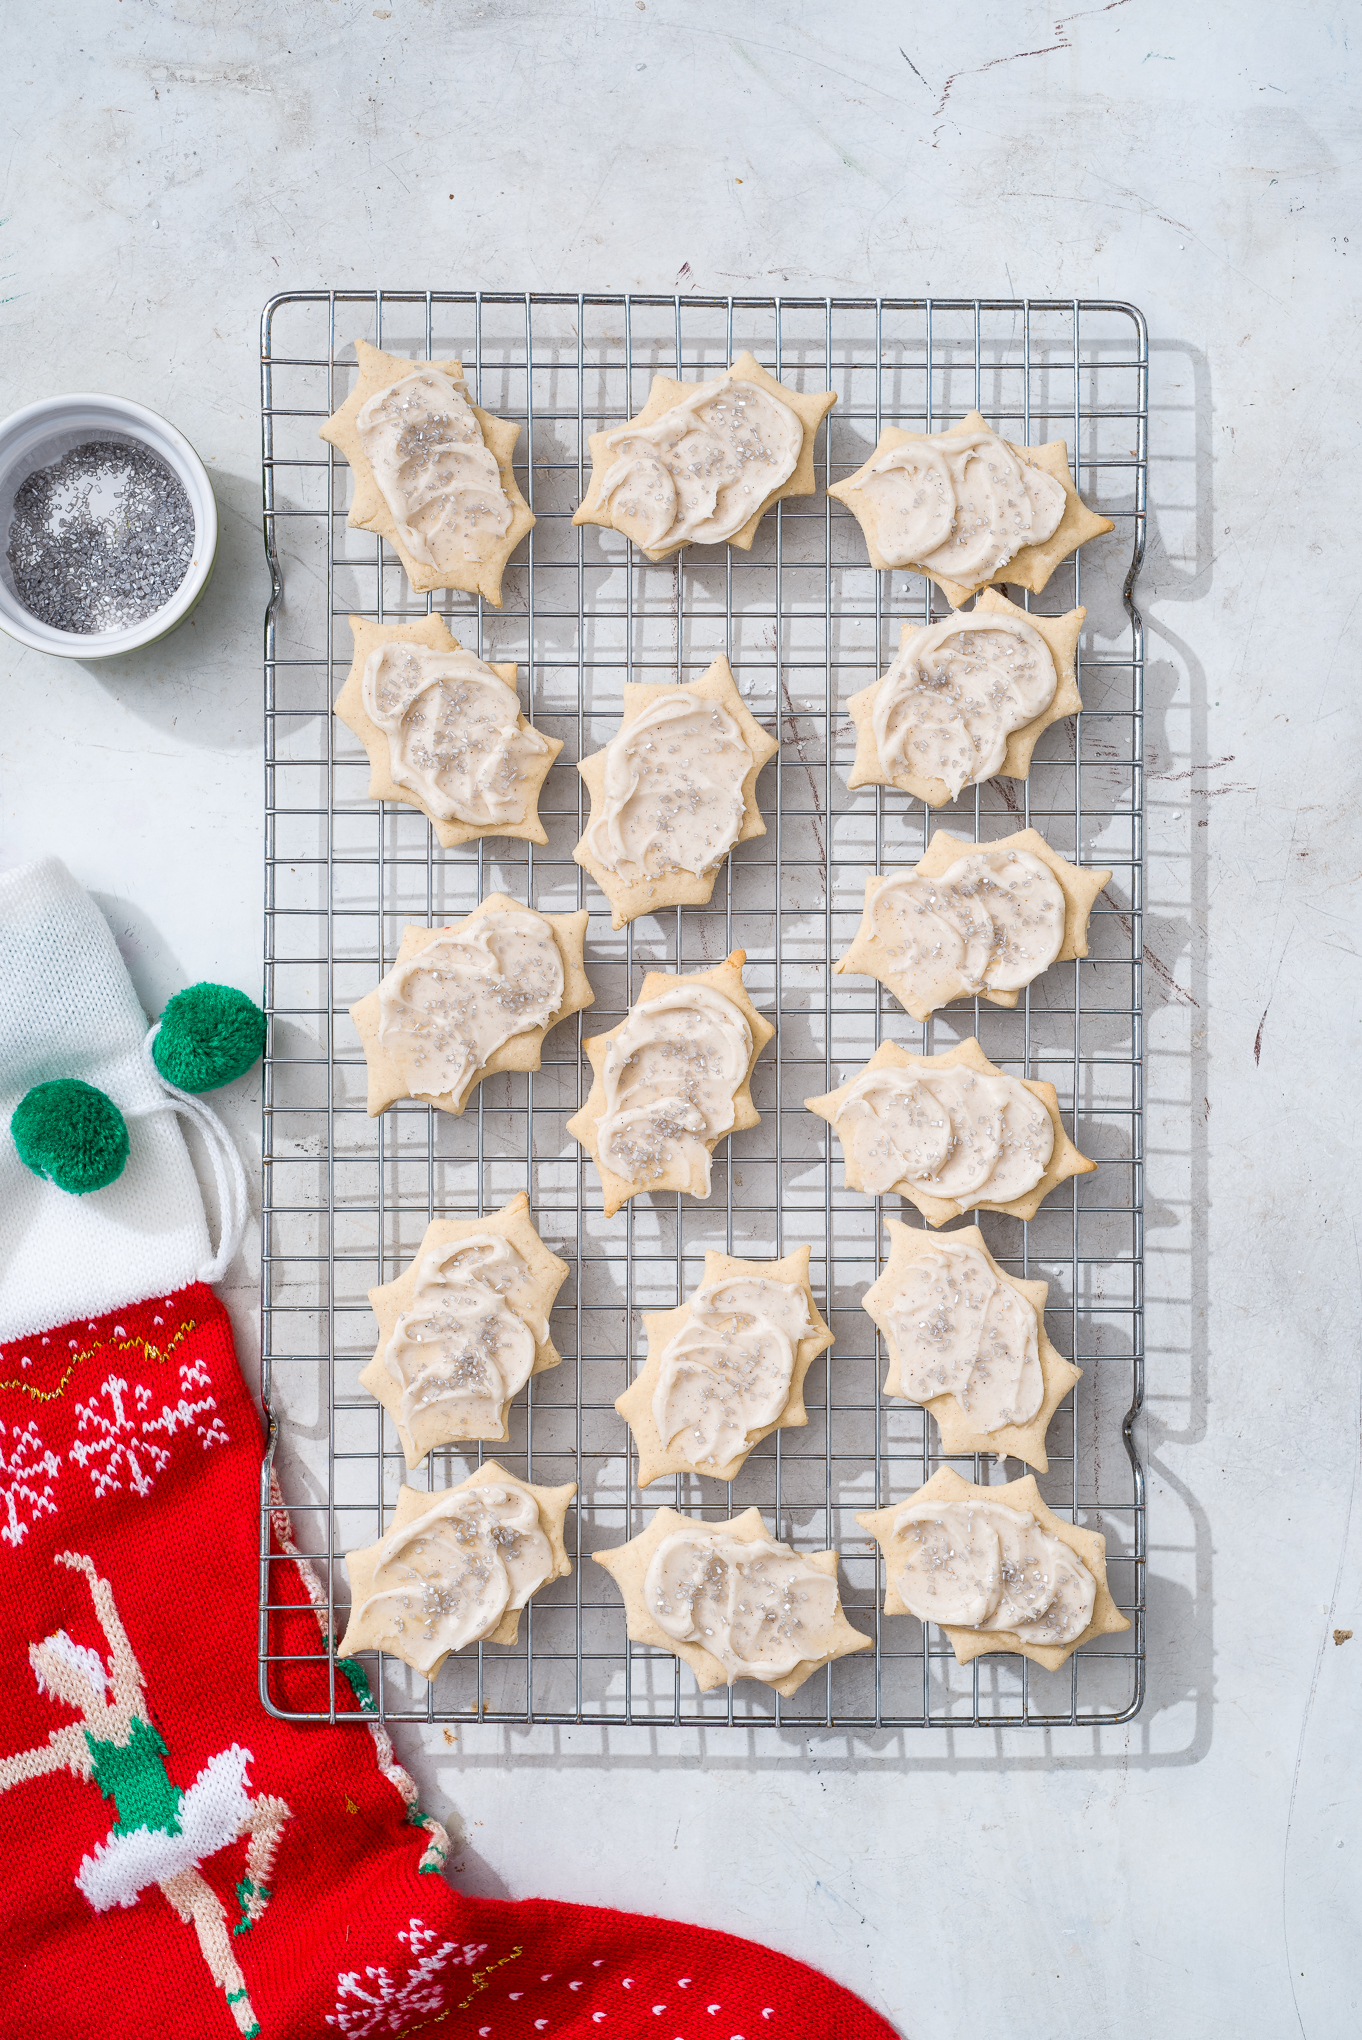
Butter Cookies with Four Ingredient Cardamom Vanilla Icing
These butter cookies bring back memories of the nostalgic variety found in holiday blue cans during December. Make a fresher version at home with a savory twist of cardamom and sweet spread of creamy vanilla icing. Top with silver sprinkles to ring in the New Year! You can find this and many of Luv Cooks December recipes in the December issue of Birmingham magazine.
Yield: 33 cookies (depending on cookie cutter shape)
What You Will Need:
1 cup unsalted butter, room temperature
1 cup powdered sugar
2 teaspoons vanilla extract
1 large egg, room temperature
2 1/4 cups all purpose flour
1 teaspoon baking powder
1/2 teaspoon salt
1/2 teaspoon ground cinnamon
1/4 tsp ground cardamom
Preheat oven to 350. Line a baking sheet with parchment paper.
In the bowl of a stand mixer, beat butter, sugar and vanilla on medium high for two to three minutes, or until light and fluffy.
Add egg, stir until combined.
Whisk together flour, baking powder, salt, cinnamon and cardamom until combined.
Add flour mixture to butter/sugar in one large batch; stir just until combined.
Roll dough onto floured surface with floured rolling pin until 1/4 inch thick. Cut out with a holiday cookie cutter and use a spatula to transfer cookies to parchment-lined baking sheet.
Bake for 10 minutes. Cool for two minutes, then transfer cookies to cool completely on a wire rack.
Once cooled, frost with vanilla cardamom icing and top with sprinkles!
Four Ingredient Vanilla Cardamom Icing
What You Will Need:
1 cup powdered sugar
2 tablespoons heavy cream
1 tsp vanilla
1/8 tsp ground cardamom
Silver sprinkles, optional
1. Whisk all ingredients (except for sprinkles) together until smooth. Frost cookies once cooled and top with sprinkles. Enjoy!
Ok right, I know, who ever says “Ahh, fruitcake! That’s just what I am craving on a Tuesday, fruitcake.”
Ok, I have never actually said that, but you know what? I think the idea of fruitcake– a sweet loaf of cake stuffed with nuts, dried and/or candied fruits, baked with lots of butter and soaked in liquor (I think namely rum and/or brandy?) sounds pretty fantastic.
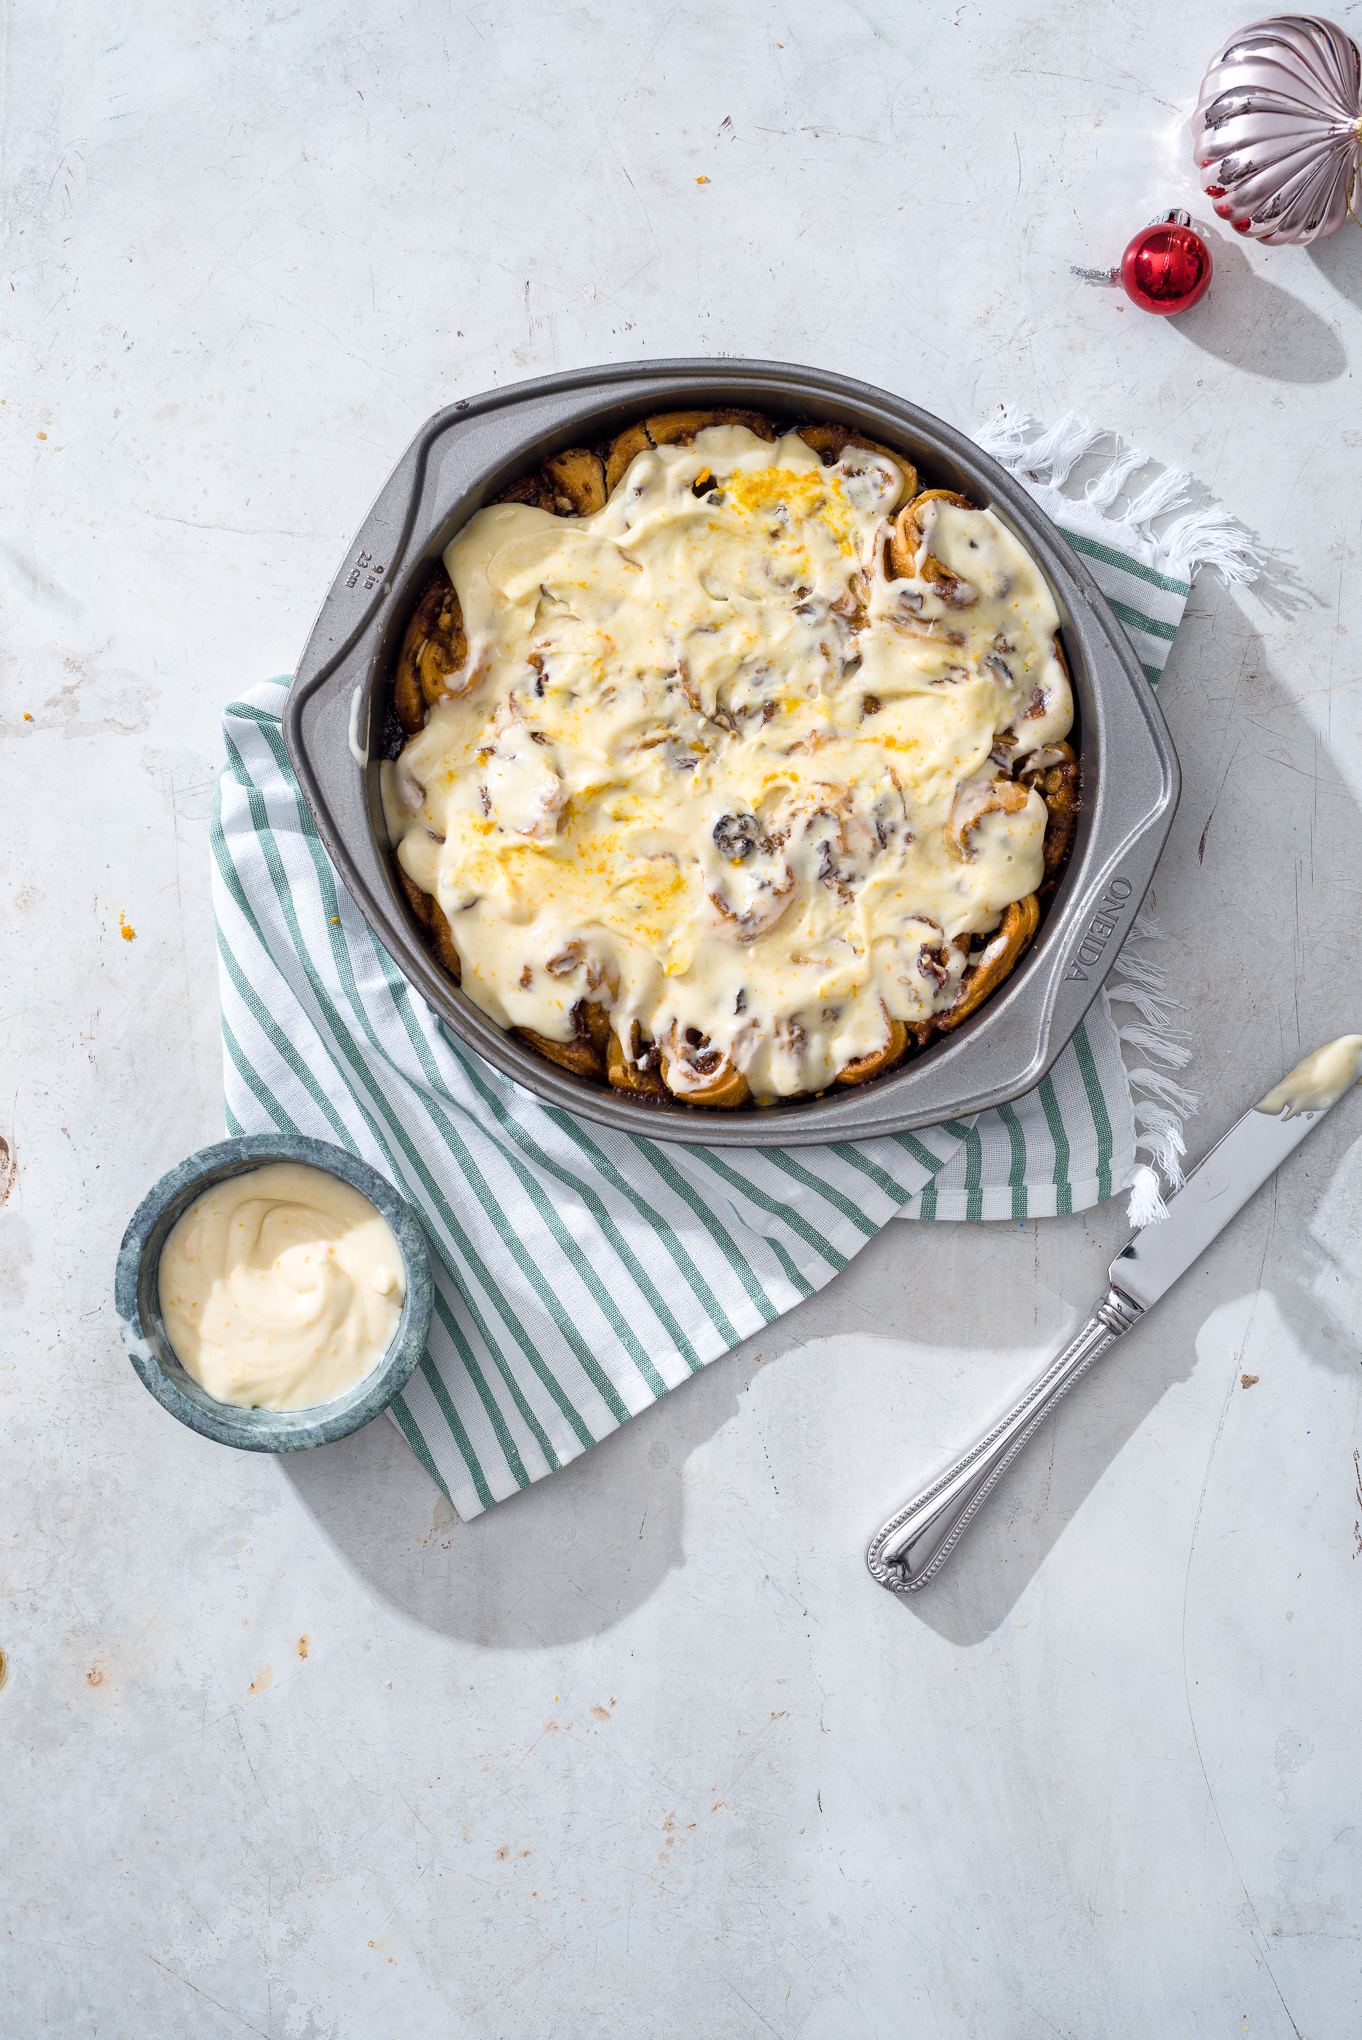
So in theory, this idea sounds tasty, right? I think so. And what BETTER a vehicle for the idea of rum-soaked, buttered, dried fruit-and-nut delicacy than a cinnamon roll? Exactly.
So today I am sharing with you recipe number EIGHT in our Twelve Recipes of Christmas- and another awesome one to share with those people who won’t get out of their Christmas onesies long enough to help you in the kitchen. (I hear onesies can be quite flammable near an open flame. ;))
Alright my loves! Let’s get to making those delicious holiday fruitcake rolls!
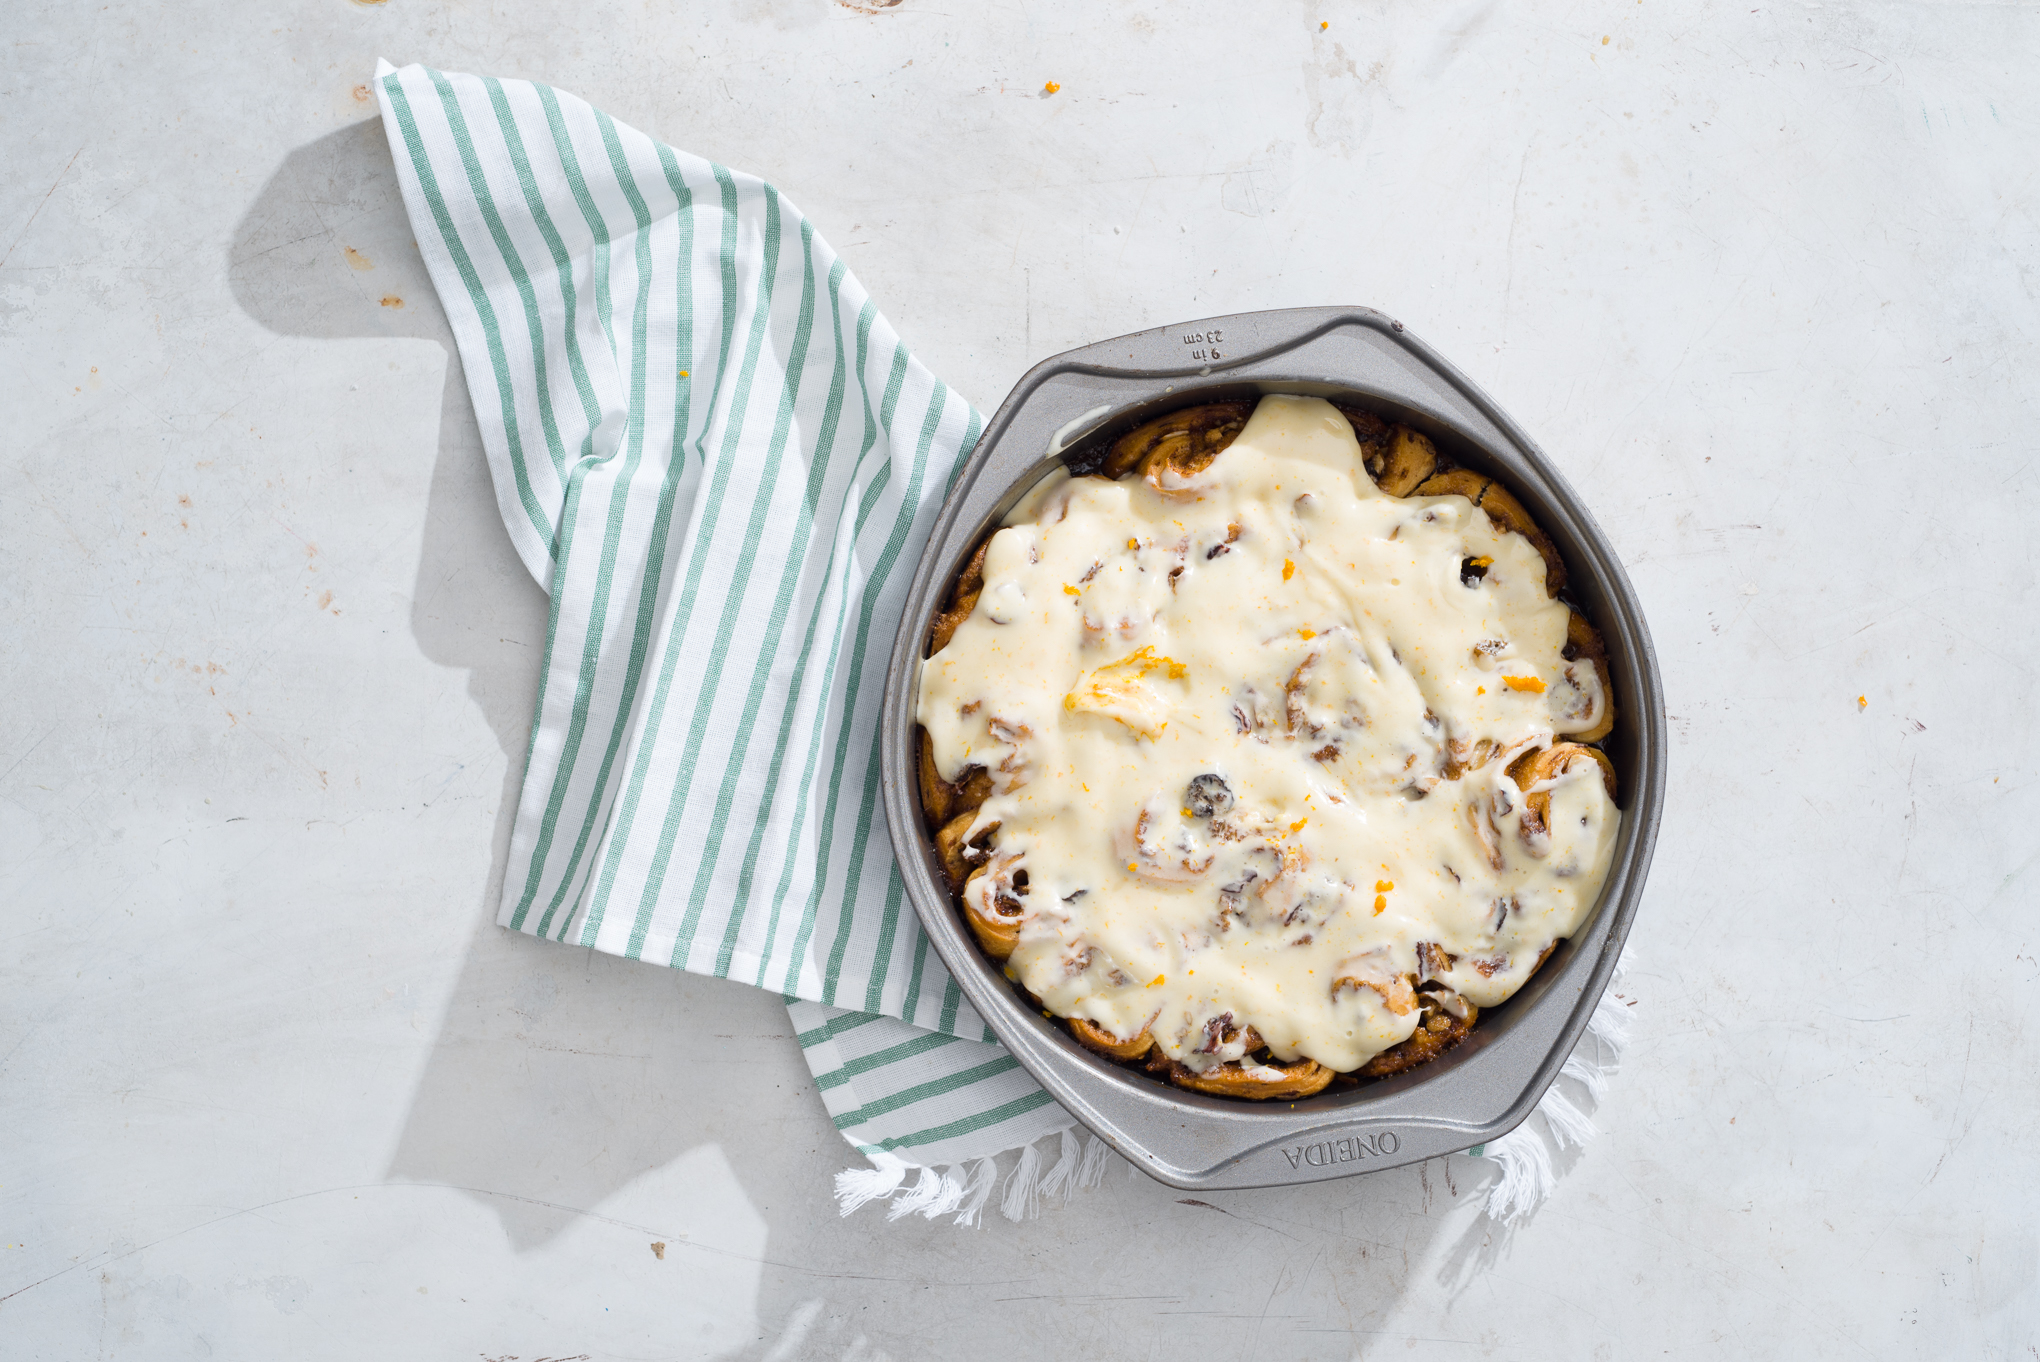
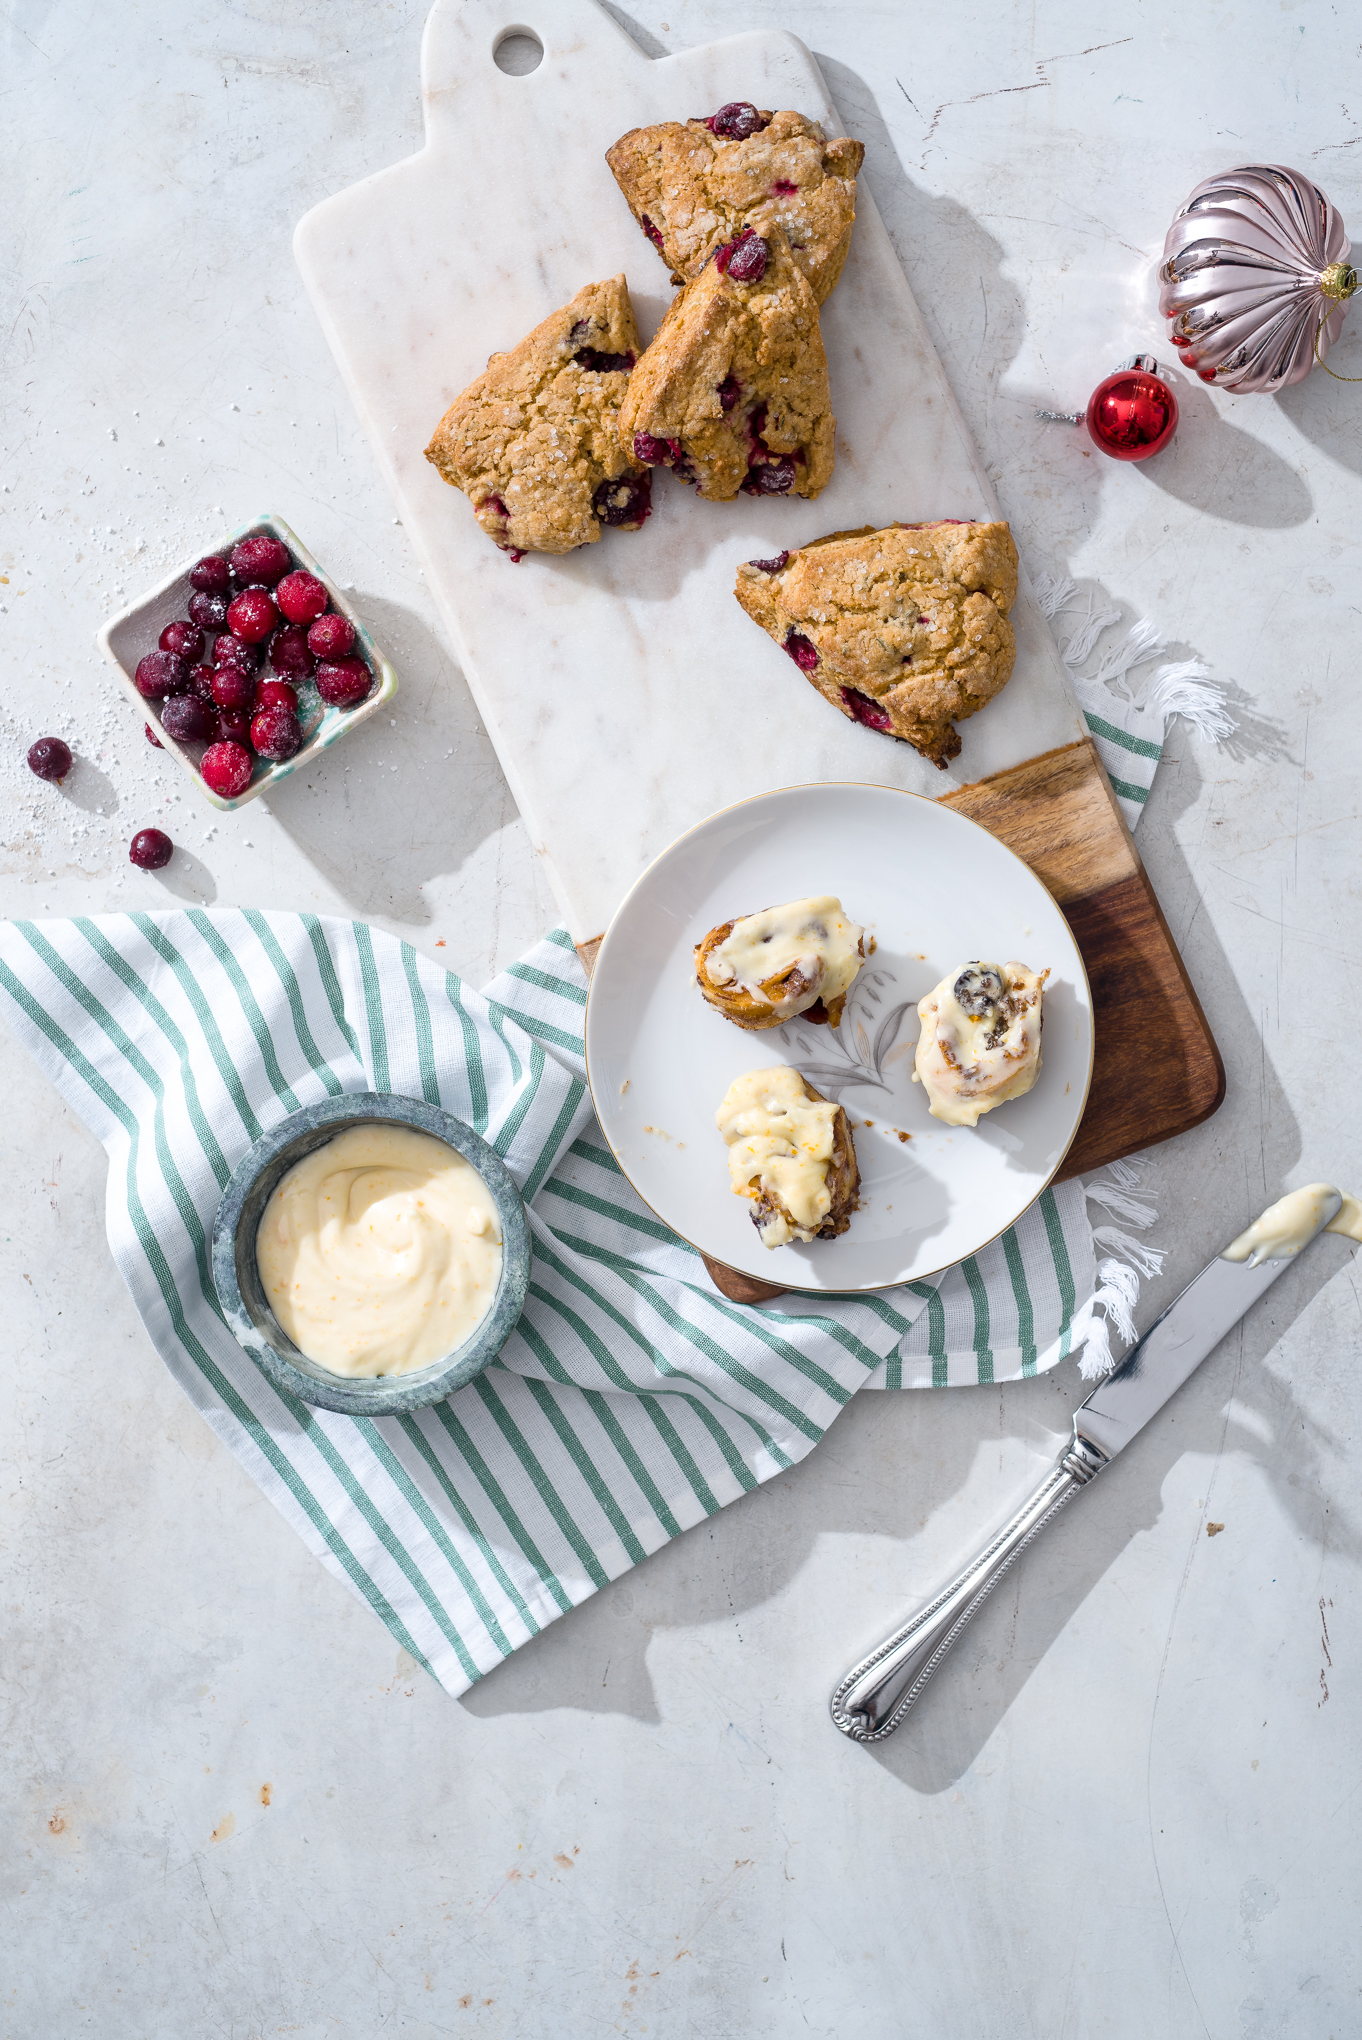
Mini Fruitcake Cinnamon Rolls with Orange Zest Cream Cheese Frosting
Here we update a wintertime staple! A classic cinnamon roll is filled with fruit and a bit of Tennessee honey whiskey to keep our version in line with the spirit-centric tradition of the original dessert. Serve it warm on a cold morning to rouse even the sleepiest of friends or family members. You can also find the recipe in the December issue of Birmingham magazine!
Yield: 16-20 mini rolls
For the rolls: What You Will Need
1 12.4 ounce package cinnamon roll dough (such as Pillsbury cinnamon roll Original)
2 tablespoons melted butter
1 tablespoon Tennessee honey whiskey
1 teaspoon cinnamon
1/4 tsp ground cloves
1/4 cup dark brown sugar
1/2 cup of mixed dried fruit (such as golden raisins, dried cherries, cranberries, and/or apricots) *
1/2 cup of mixed nuts (such as slivered almonds and/or finely chopped pistachios and pecans)
*You can also soak the dried fruit in hot apple cider for five minutes, then drain, for even more holiday flavor! You could also add some rum to that apple cider if your house guests are of the over-21 variety:)
What You Will Do:
Preheat oven to 350. Spray 9 inch metal pie pan with a generous amount of cooking spray, making sure to thoroughly coat the bottom and sides of the pan to prevent sticking.
Stir together melted butter, whiskey, spices and brown sugar.
Separate individual cinnamon rolls.
On a well-floured surface, press the seams of four rolls together. Use your hands to really get in there and warm up the dough so the main seam in the middle is pressed together, as are the sides- so you create a rounded, about 4 to 5 inch square of flat dough with no gaps between rolls. You can use a rolling pin to help flatten it too, but I like using my hands!
Spread 1/2 bourbon sugar mixture onto dough, spreading to almost the edges of the square.
Top with dried fruit and nuts, using about 1⁄4 total mixture. Don’t overload the rolls or you can’t roll them up, hah!
Roll into a log, using your fingers to continue to press the seams of the rolls together if needed. Then use a SHARP knife to cut it into 8-10 small rolls. A sharp knife makes slicing so much easier!
Repeat entire process with remaining 4 rolls.
Gently put mini rolls with edges touching in sprayed pie pan.
Bake for 20 minutes, or until tops are beginning to turn golden brown.
Once cooked through, top with cream cheese frosting and serve warm.
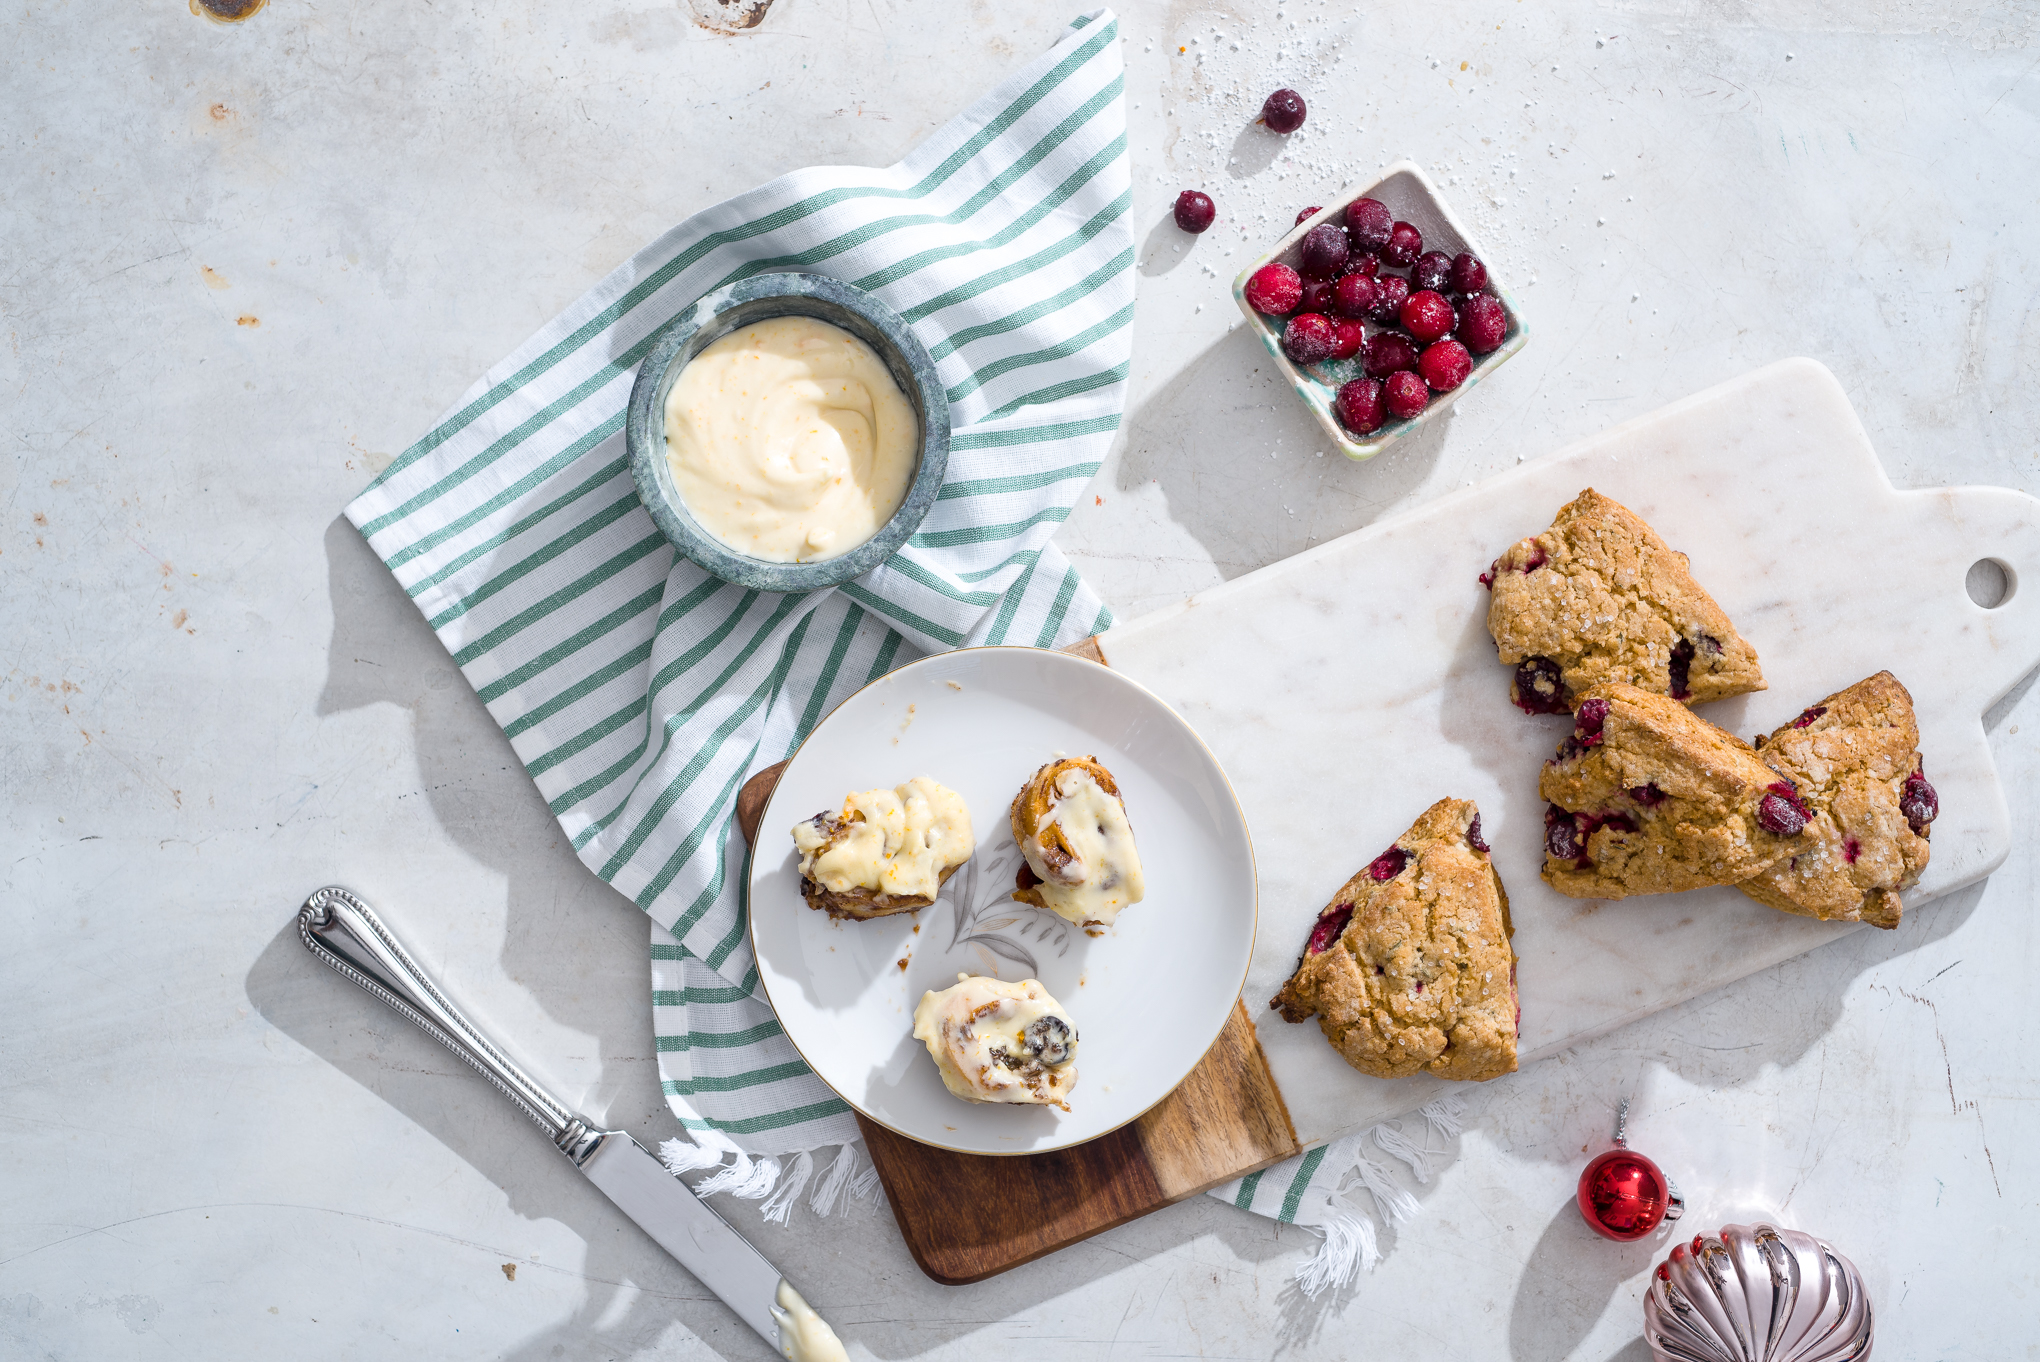
Orange Zest Cream Cheese Frosting
What You Will Need:
4 ounces cream cheese, room temperature
3/4 cup powdered sugar
2 ounces heavy cream
1 tsp vanilla extract
1/2 tsp orange zest (about the zest of one medium orange) plus additional zest for sprinkling
What You Will Do:
1. In the bowl of a stand mixer fitted with a paddle attachment, beat cream cheese, powdered sugar, heavy cream, and vanilla extract on medium speed for one to two minutes, or until smooth and creamy.
2. Stir in orange zest. Spread with a butter knife or offset spatula on rolls while still warm. Enjoy!!
Is anyone having holiday guests over for Christmas? Or New Year’s?
Then do I have some recipes for you!
As part of recipes 7 and 8 of our Twelve Recipes of Christmas, these next two days I’ll be filling you up with easy, comforting, warm- insert alllll the baking adjectives here- recipes to feed the people sleeping in your extra bedroom or on your sofa! Or in our case- umm, in the “creative room” that we also use to store all of our guitars, photo equipment, video cameras, reflectors and a computer. BLESS YOU!
Let’s start the recipes off with miniscones. I loooveee a scone, especially one made with great butter. And a great crumb (*cue Mary Berry!). And an interesting flavor combo. So when these guys came into being, I was pumped. While I love a baked good in the morning, anything too sweet and I feel a bit doozy. Since I like to stick with whole-grain based treats (or anything stuffed with cheese and/or meat) in the a.m.**, I thought I would play around with a combo of white wheat and all-purpose flour, instead of the traditional all white flour I’m used to seeing in scones.
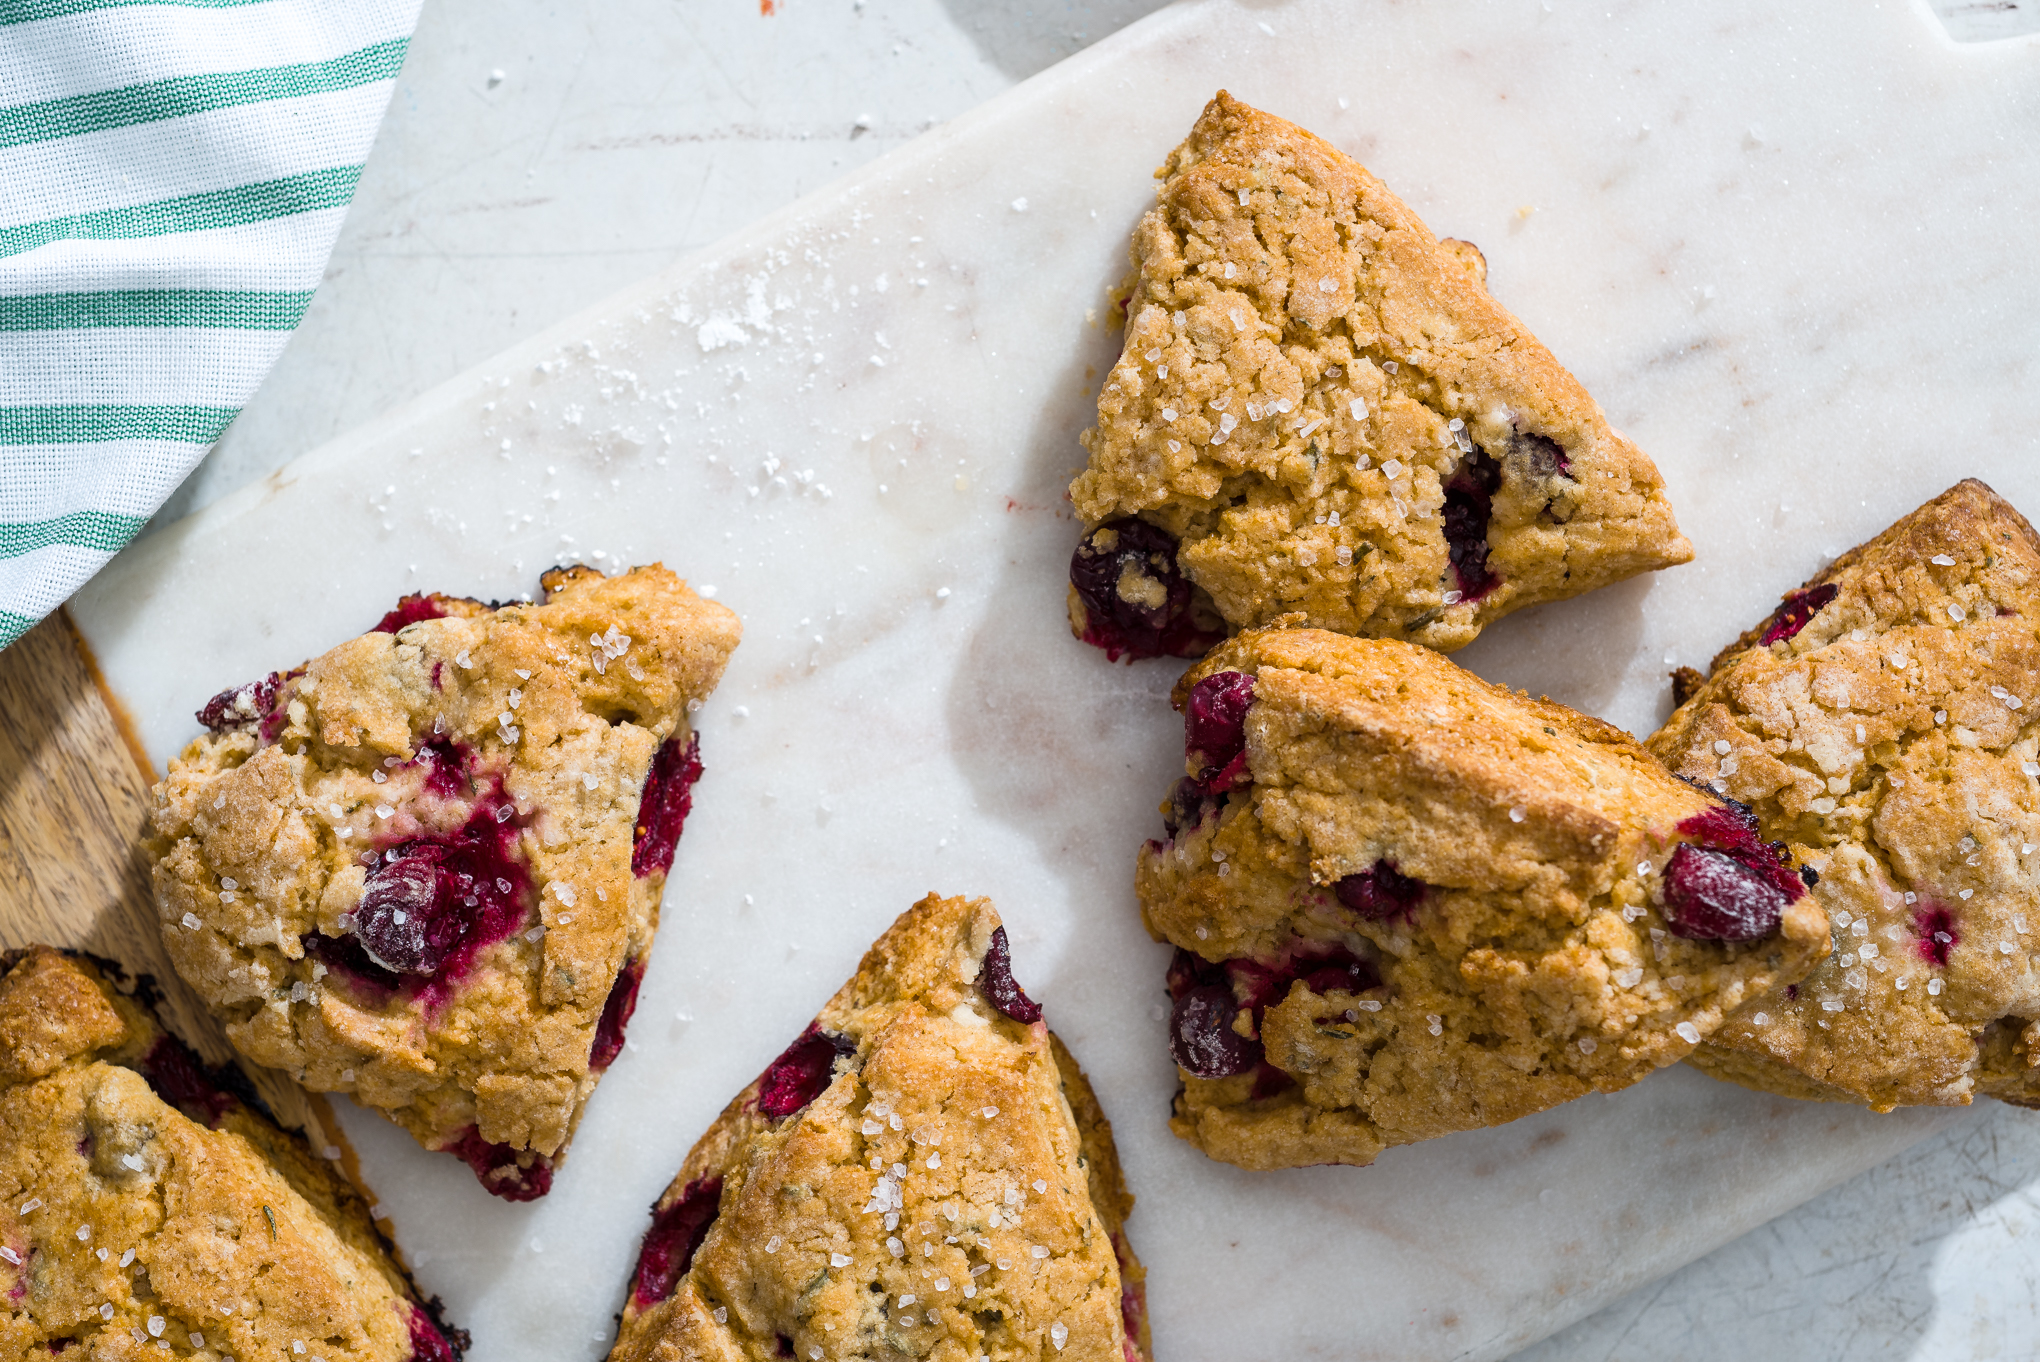
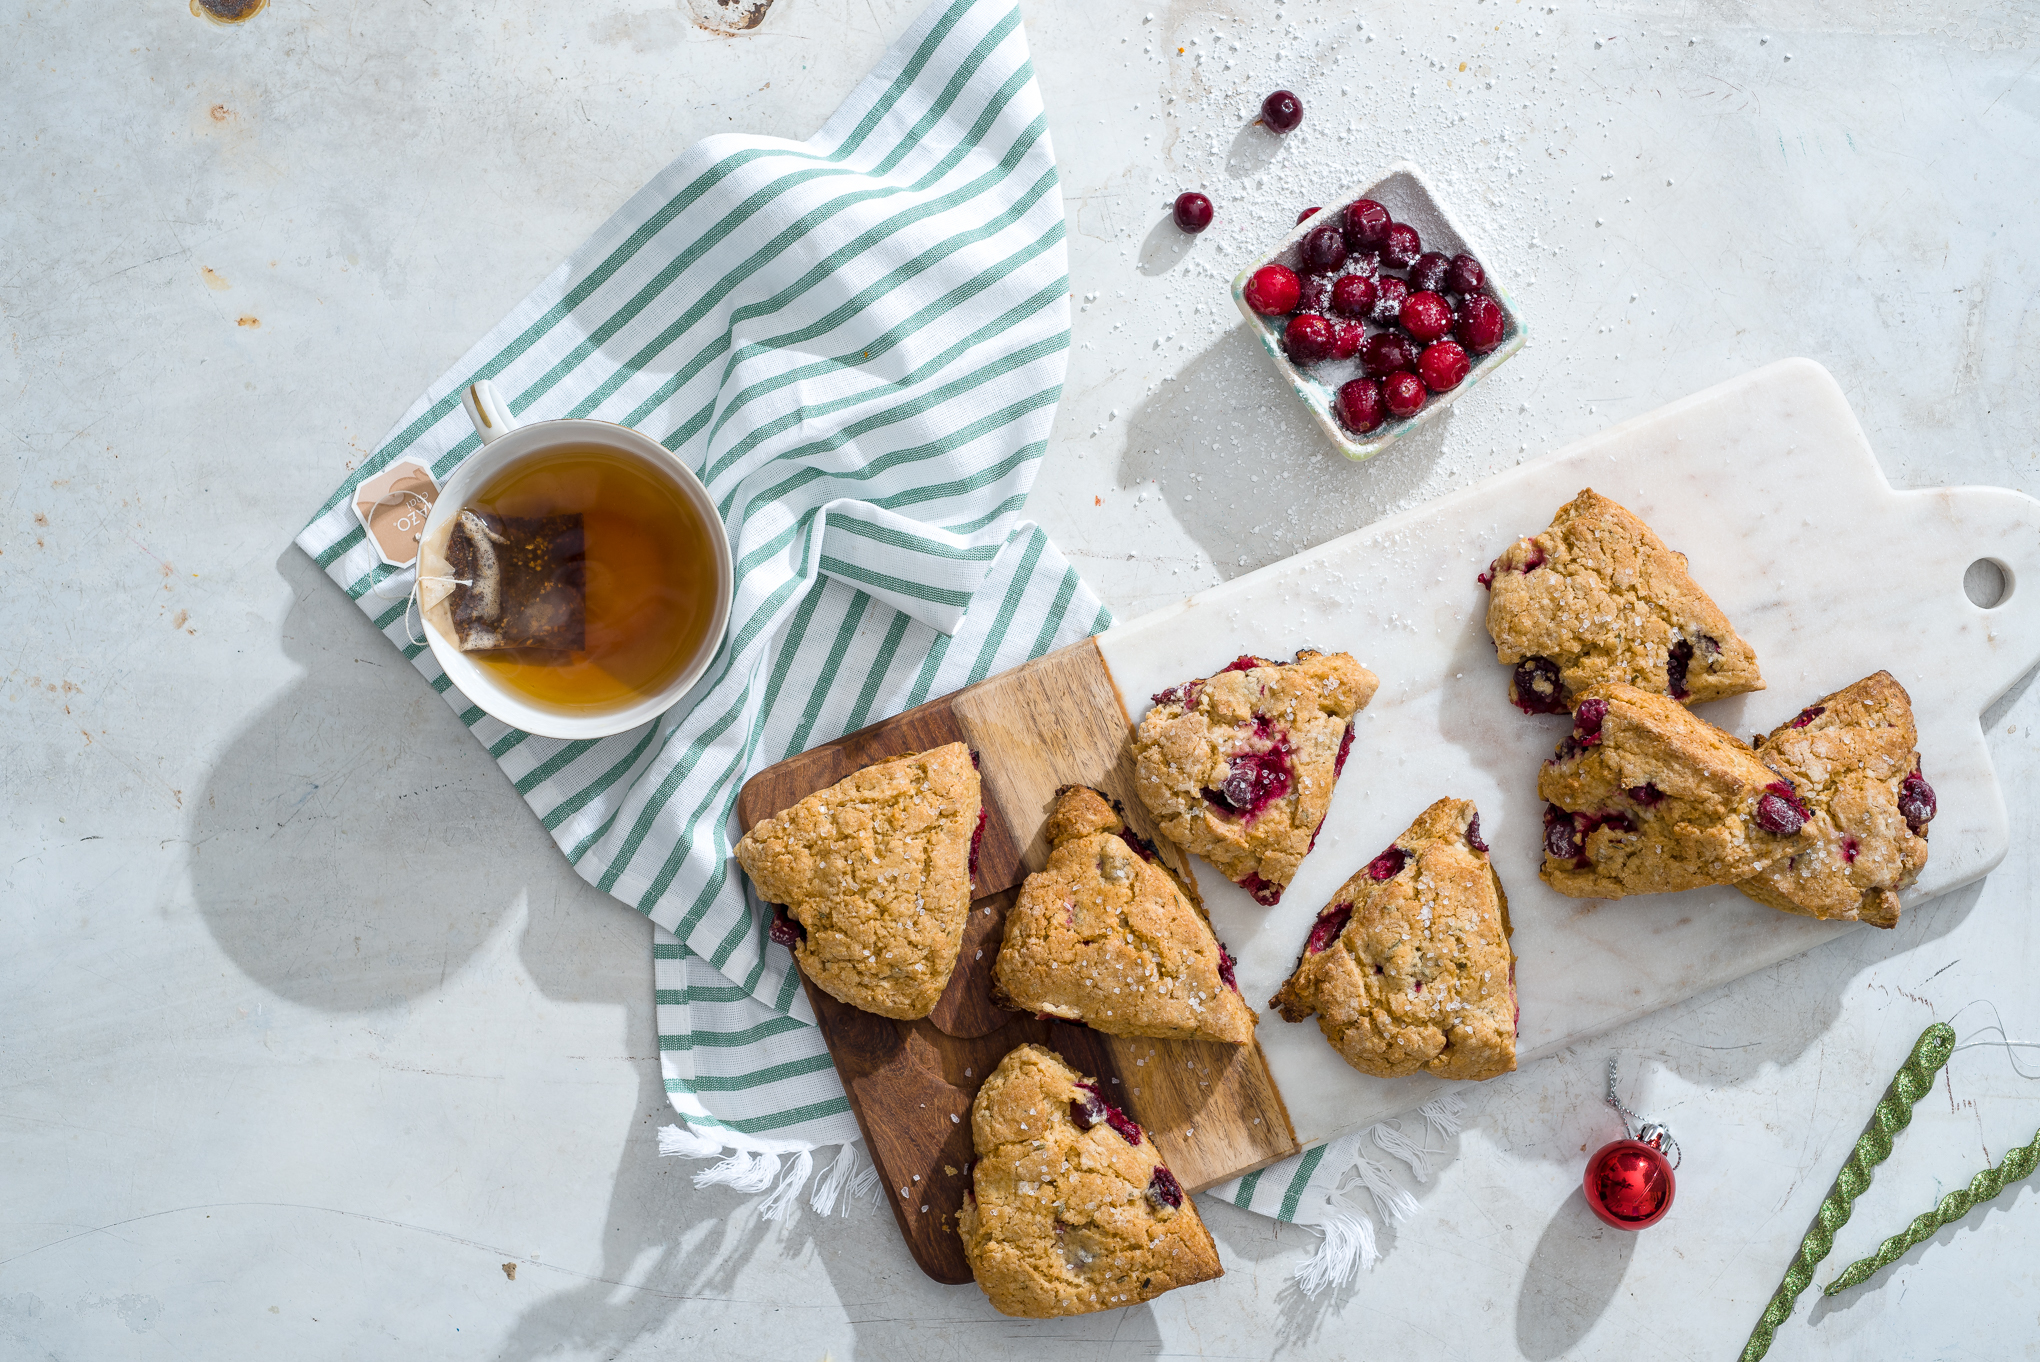
I also left out the vanilla extract and traditional sugary glaze atop this scone- and instead used a bit of coarse kosher salt to highlight the sweetness of the cranberries without adding extra sugar. The addition of rosemary makes things feel nice and holiday-special!
And one last scone-baking tip: freeze your butter! I promise this step is actually worth it and makes your scones all the more fantabulous and buttery. The texture truly is affected by the butter! Also, don’t overmix these guys- the less stirring it takes to incorporate everything, the better. Remember that those chunks of butter are creating the air pockets you WANT in your final baked good!
Alright my loves, let’s make some scones!
Hint hint at what tomorrow’s recipe will be!
Mini Whole Wheat Cranberry Rosemary Scones
Topping these scones with coarse kosher salt hints at their savory nature. By leaving out the vanilla extract and additional sugary glaze that comes with sweeter recipes, these scones are only lightly sweet with a comforting flavor of rosemary and richness of cream. They are perfect served on a cold winter day with a cup of strong black tea or coffee. You can also find this recipe in the December issue of Birmingham magazine!
Yield: 12 mini scones
What You Will Need:
1 cup all purpose flour
3/4 cup white wheat flour
1/2 cup light brown sugar, packed
1 teaspoon baking powder
1/4 teaspoon baking soda
1/2 teaspoon kosher salt
1 tablespoon finely chopped rosemary
1/2 cup frozen butter
4 ounces heavy cream
1 egg
1 cup frozen cranberries
Coarse salt, for sprinkling
What You Will Do:
Preheat oven to 400. Move oven rack to bottom third of oven; line a baking sheet with a baking mat.
Whisk together flours, sugar, baking powder, baking soda, salt, and fresh rosemary in a large bowl until combined.
Remove butter from freezer; grate over the large holes of a box grater into the flour.
Incorporate the butter curls into dry mixture with your fingers or a pastry cutter until it is a coarse texture and no pieces of butter remain larger than a pea.
Whisk together egg and heavy cream thoroughly in a small bowl until they are a light yellow color.
Pour egg/cream mixture into flour/butter. Stir gently with a rubber spatula to barely incorporate the liquid, or until large clumps of dough begin to form.
Pour 1 cup cranberries into clumped dough and use your hands to evenly distribute. Dough should be sticky; just mix it until the cranberries are not in one large clump in the dough.
Here’s the fun part! Gently use your hands to form one large dough. Try not to overmix here- just use your hands until the dough comes together into a large mass.
Separate the dough into two discs.
On a heavily floured surface (I like all-purpose flour on the surface), sprinkle each disc and a rolling pin with flour. Roll a disc into a 6 inch diameter, 3/4 inch thick circle.
Cut dough into six wedges with a sharp knife. Transfer each scone to the baking sheet. Repeat with other disc.
Put scones on baking sheet a few inches apart. Sprinkle lightly with coarse salt.
Bake for 18 to 20 minutes, or until they are golden brown!
Tip: Store butter in the freezer for at least 30 minutes to prepare it for the scones.
Tip: Find whole cranberries in the frozen fruit section of your grocery store.
Tip: If you don’t have a baking mat, you can use parchment paper, but the total baking time may be one to three minutes less than 20 minutes.
**Well, except for croissants- but those always get an exception in my book.