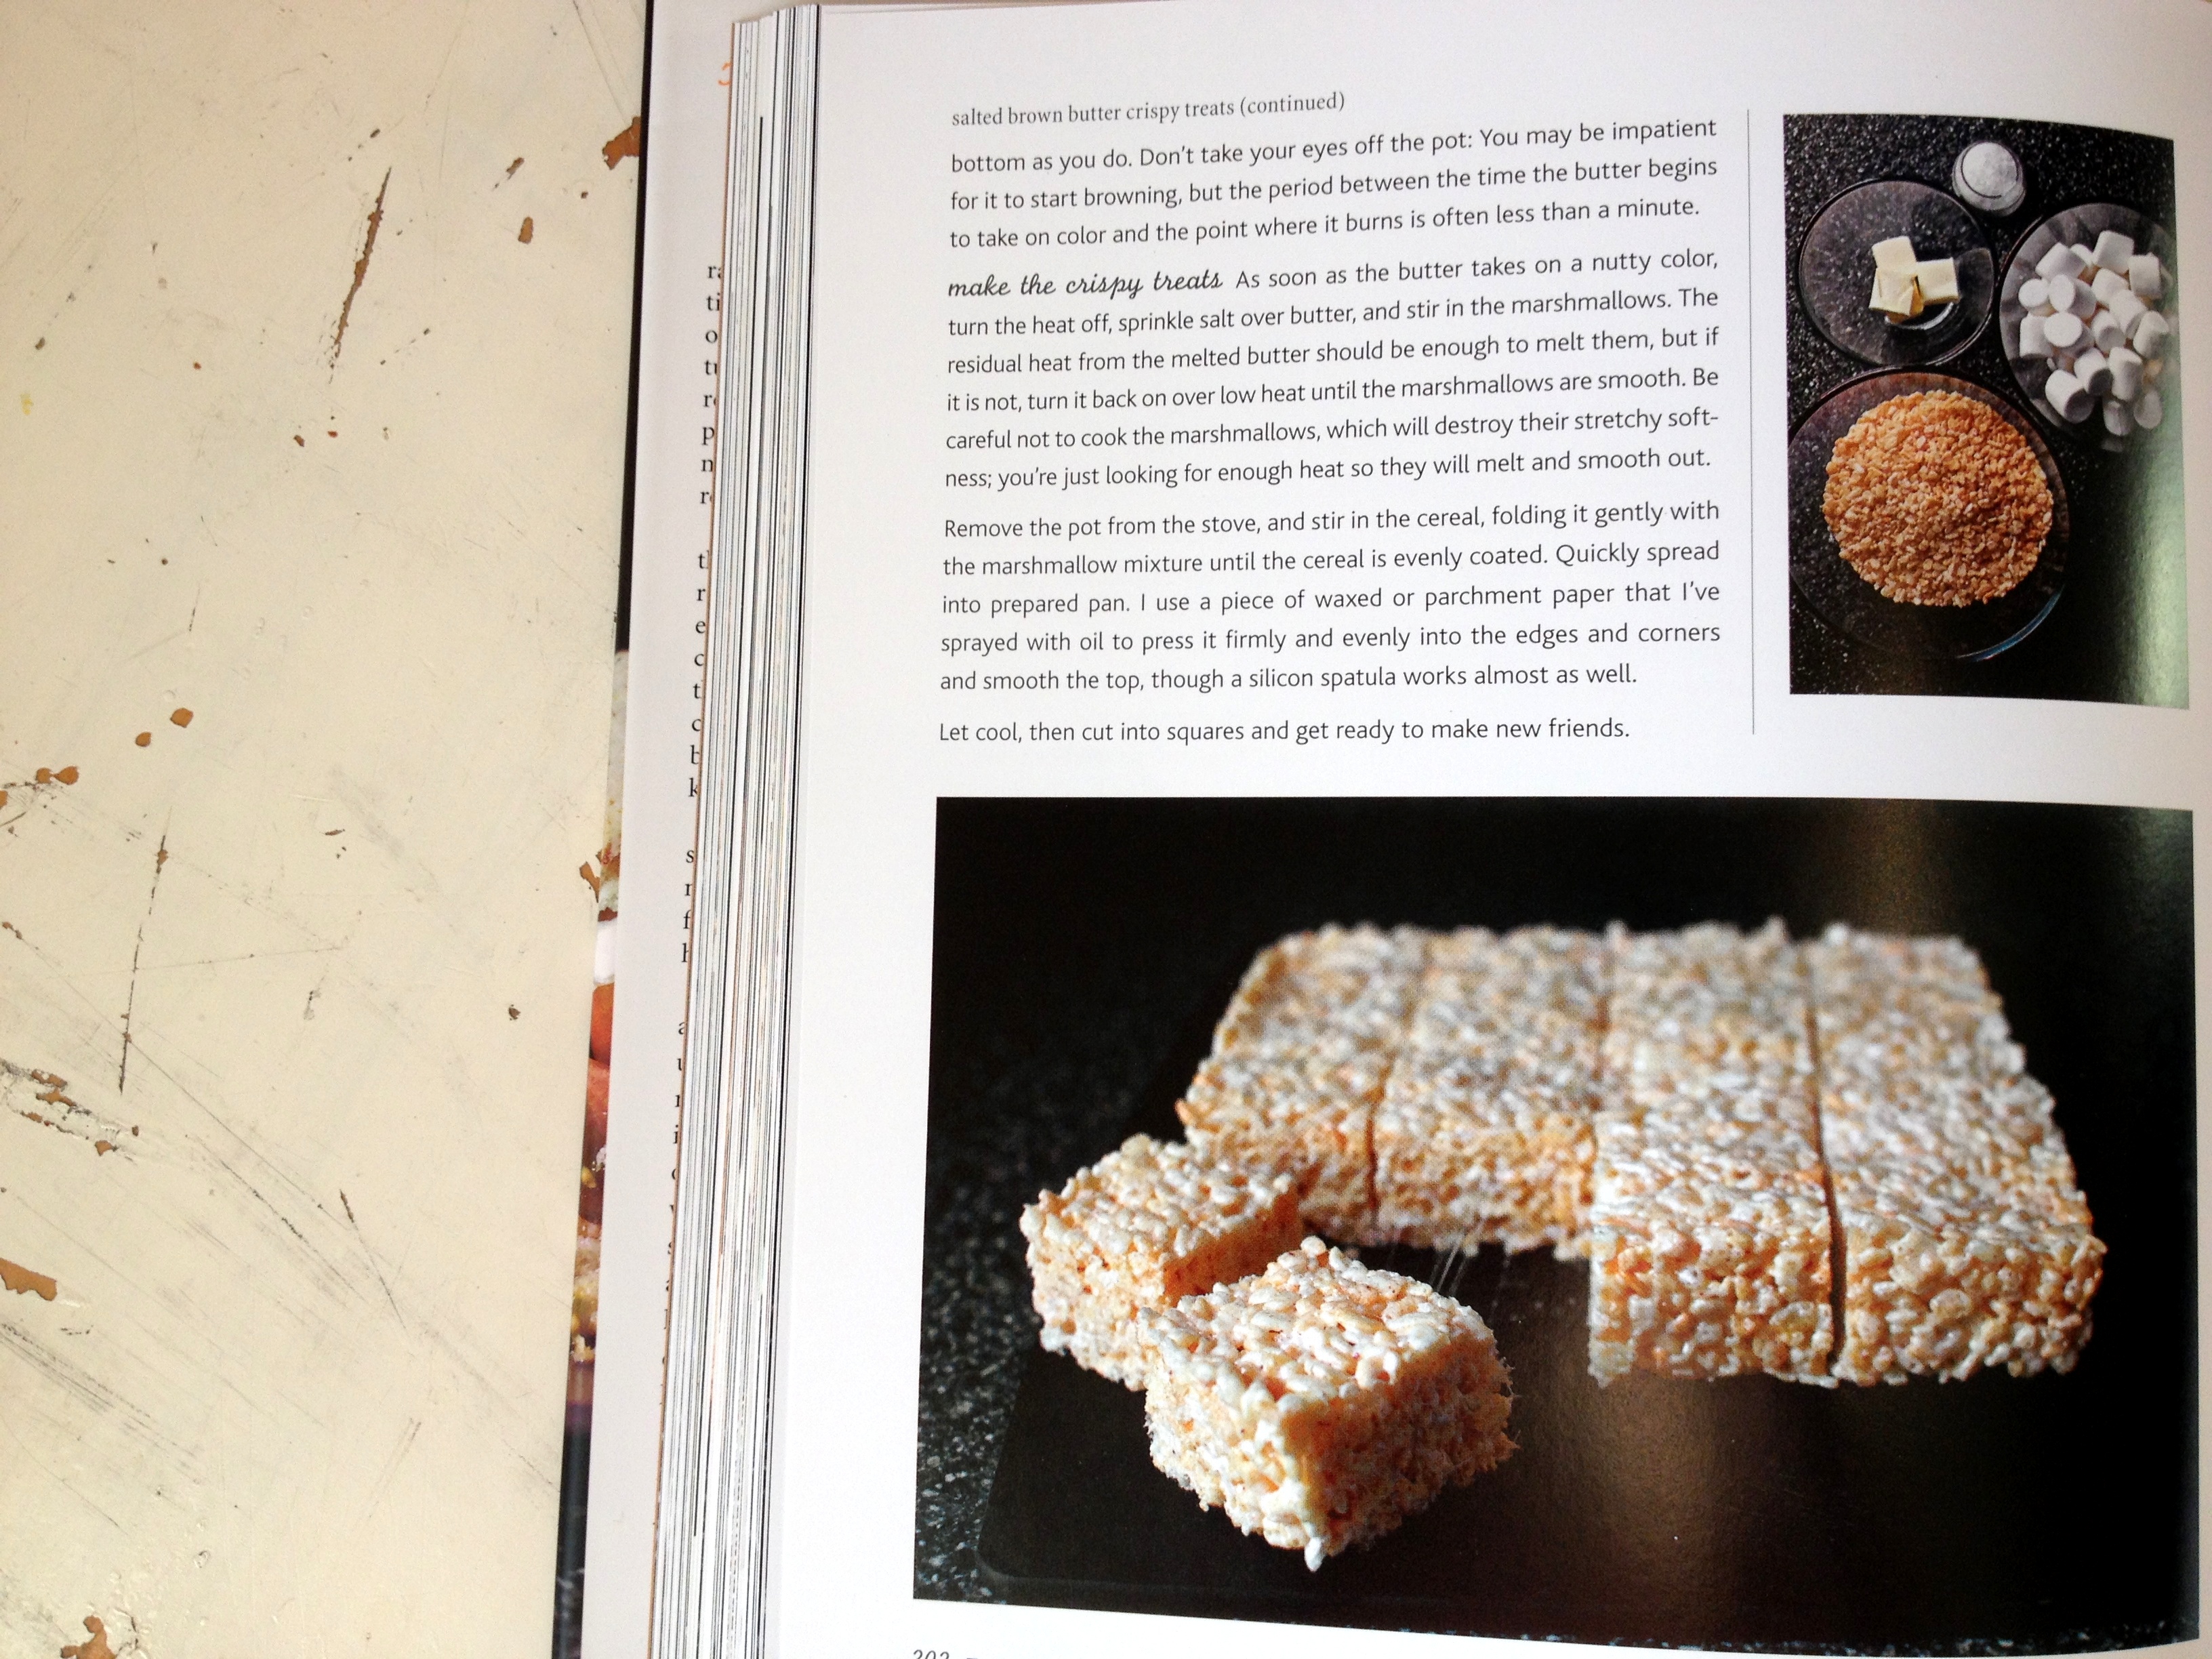
Coconut Sweet Potato Soup with Toasted Chickpeas

Lovely, spicy soup
Lovely, spicy soup with crunchy chickpeas

Accidents happen.

A lot of times in cooking this is a good thing. You run out of cinnamon, scan your pantry, and decide that another spicy ingredient like chili powder would go great in those chocolate brownies. Or, you run out of lemon for your hummus and decide to use lime juice instead (so good; another post for another day).

But this accident was not one of those creative culinary breakthroughs you see on Cooking Channel where someone finds a miracle solution to pizza dough and builds a million-dollar food truck empire. This was more along the lines of, “Oh, my Lord, I have just dumped all of the soup I was supposed to bring to my food shoot on my carpet, down my purple pants and in-between my toes. And on my neighbor’s front door. Oh dear-and their door mat.”

This, by the way, was the first time I met my incredibly sweet neighbor across the hall. In an attempt to carry all of my food props, the food itself and my large purse in one trip to my car- because, heaven forbid I have to take two trips- I also tried balance my pot of soup on the steps next to her door. Instead, the pot slid forward, cascading in a slow-motion orange waterfall from my orange dutch oven down my (now-orange) lower half.

After the initial shock, squishing back into my apartment for paper towels and trying my best to sop up the thick, slightly warm mess from her surrounding steps and entryway, I knocked on her door, mustered my brightest smile and shouted a very overenthusiastic “HI! I just spilled sweet potato soup all over the entryway to your home. I AM SO SORRY!” She was, of course, incredibly gracious and wonderful and understanding. While I, on the other hand, had orange gew in my hair and was experiencing mild symptoms of a panic attack and/or emotional breakdown.

But the lovely blessing in disguise from this was the answer to the prayers I quickly uttered right after the pot of soup splattered down our hallway. In a final, last-ditch effort, I rushed back to the pot in my kitchen sink with the faint hope of any liquid left inside we could photograph. And you know what? A thin rim, silver-lined rim remained. It was a total loaves-and-fishes moment: like the miracle of feeding the five thousand (but with a tiny bowl and stage lighting).

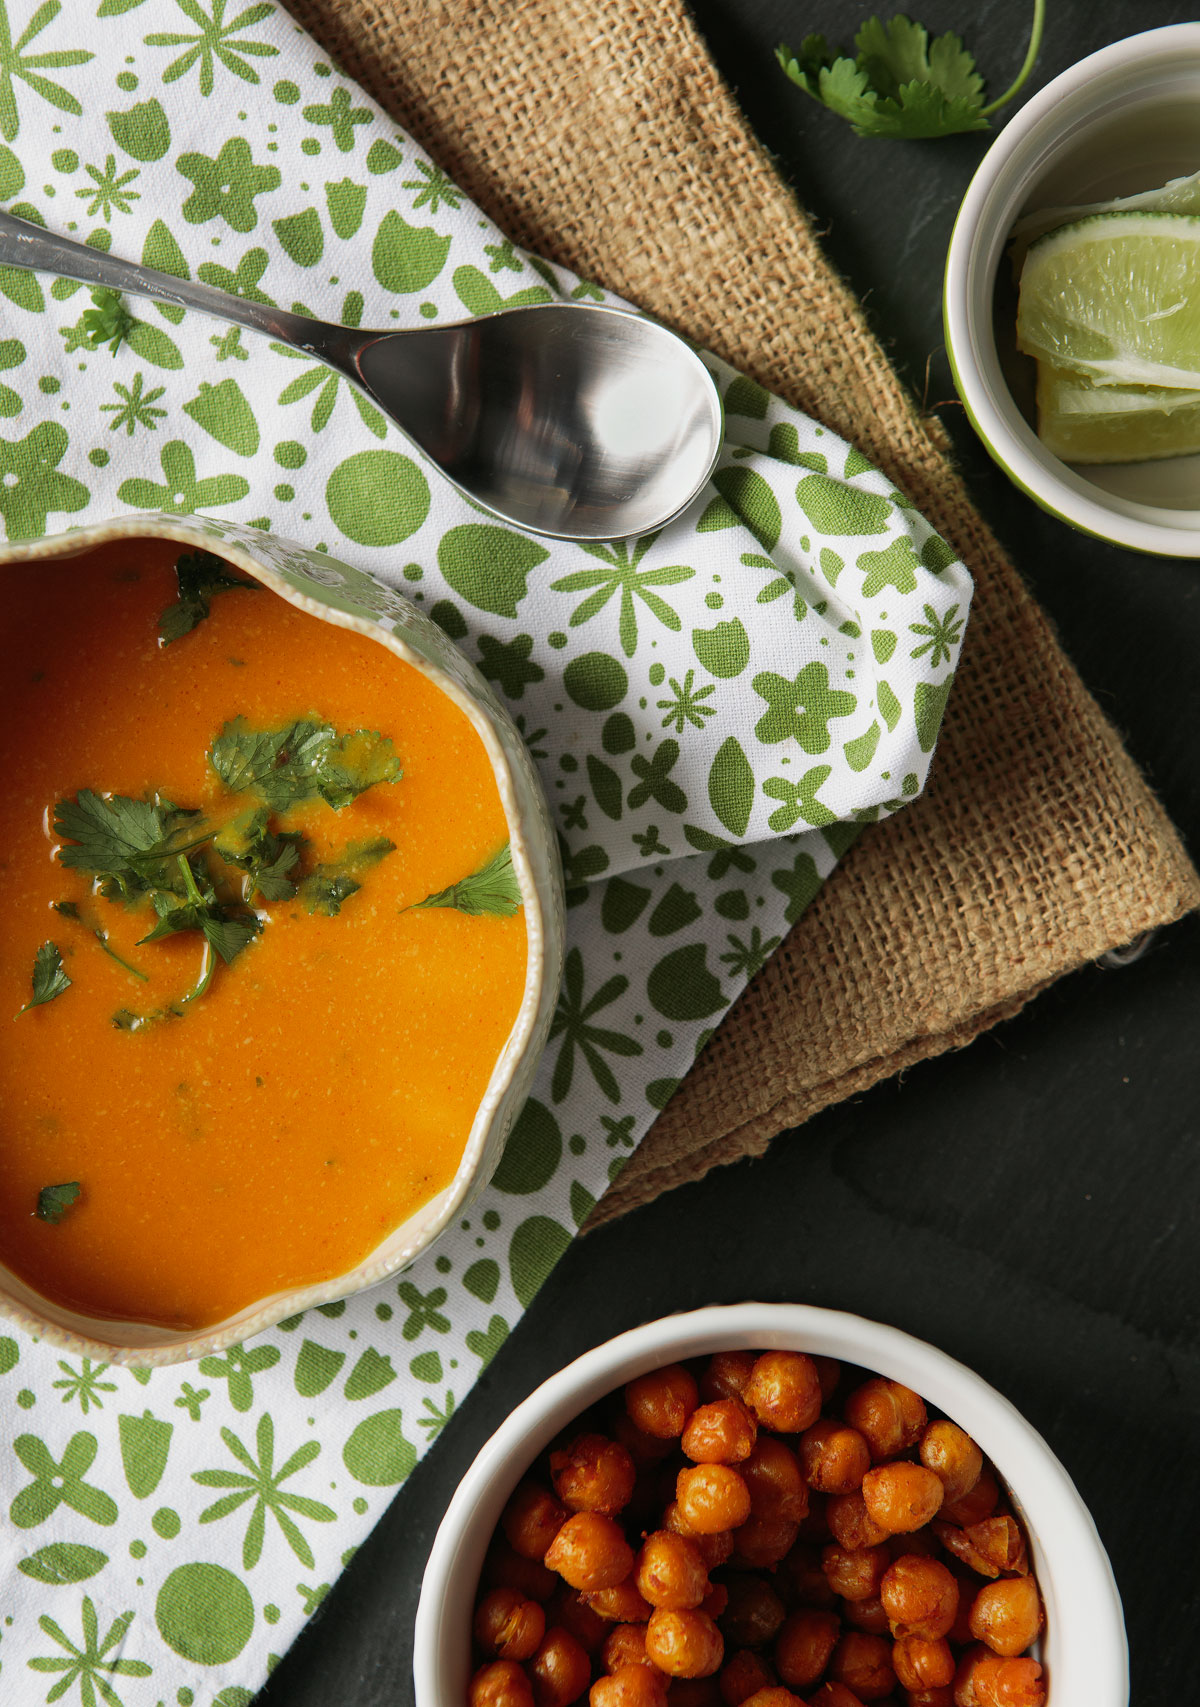
The miracle continued as my talented friend Stephen DeVries took my offering and once again made the spread look gorgeous. I am so glad he did because, y’all, it is delicious. As a Southern girl far from the country of Thailand, I imagine it tastes like what that country would offer: spice, tons of flavor, and a sweet nuttiness from the potato and peanut butter combination. And the toasted chickpeas offer a fantastic spicy crunch to compliment the jalepeno and cilantro in the broth.

Take a Southern, Thai advenure this week- just try not to spill your luggage.

Coconut Sweet Potato Soup (This recipe was taken from the lovely blog Foodess.com)

What You Will Need

  • 1 tbsp oil
  • 1 cup chopped onion (from 1 medium-large onion)
  • 1 jalapeno, chopped (seeds removed)
  • 1 large clove garlic, minced
  • 3 tbsp Thai red curry paste
  • 1 large sweet potato, peeled and chopped into 1½” pieces
  • 1 can coconut milk
  • 3 cups vegetable or chicken broth
  • ⅓ cup natural peanut butter
  • 3 tbsp minced fresh cilantro, plus additional for garnish
  • salt, to taste
  • ⅛ tsp cayenne (optional)
  • 1 lime, cut in wedges (optional)

What You Will Do

  1. Heat oil in a medium saucepan over medium heat. Add onion and saute until just softened (and a bit translucent). Add jalapeno and garlic; saute for one minute. Stir in curry paste.
  2. Add chopped sweet potato, coconut milk and broth. Bring this mixture to a boil, then turn it back down to medium and cover. Cook until the sweet potato is very soft, about 20 minutes (I like to test mine with the back of a wooden spoon; if it gives gently when you press it, it is ready-to-go). Puree the mixture with an immersion blender, or do it in batches in a regular blender. (Does anyone out there own an immersion blender? I feel like if I had one I would be a total gourmand, much more like the Foodess, and it would save me from clumsily pouring boiling liquid into a blender. Be warned; if you pursue the blender method, do not fill the liquid up to the top of your blender! The steam will explode the top off and soup will go flying everywhere. Trust me.)
  3. Stir in peanut butter, cilantro, and a generous pinch of salt until combined. Stir, and adjust salt to taste. Add cayenne if additional heat is desired.
  4. Serve with more minced cilantro and lime wedges on the side. And chickpeas! And jasmine rice if you have some.

Toasted Chickpeas (This recipe is adapted from the wonderfully detailed Everyday Maven)

What You Will Need

  • 2 cans chickpeas, drained and rinsed
  • 1 tablespoon vegetable oil (if you have coconut, it would work great here)
  • ½ teaspoon curry powder
  • 1/2 teaspoon hungarian paprika
  • ½ teaspoon ground cumin
  • ½ teaspoon ground coriander
  • ¼ teaspoon cayenne pepper
  • 5 to 7 turns of fresh ground black pepper

What You Will Do

  1. Preheat the oven to 350F.
  2. Drain and rinse chickpeas and place them into a bowl. Add in oil and spices. Toss with a spoon until the beans are evenly coated.
  3. Scoop chickpeas onto a non-stick baking sheet OR a baking sheet lightly sprayed with cooking spray. Leave any extra liquid in the bowl (don’t pour it onto the cookie sheet).
  4. Roast the peas for 15 minutes. Toss them again, making sure to evenly distribute them across the cookie sheet, and roast for another 15 minutes.
  5. Let cool for 5 to 10 minutes, then place in a bowl and serve! (Make sure that you let these completely cool before you put them in the bowl; they get mushy if you let them cool together).

Now enjoy your tasty Thai adventure!

Bacon Sweet Rolls with Maple Glaze

Bacon sweet rolls

Most everything is better with bacon.

In the South, bacon might as well be one of the five food groups, alongside vegetables, biscuits and/or cornbread, cheese dip, and sweet tea. It’s the basis of any true Southern side item, tops most casseroles, and makes a great afternoon snack with the aforementioned tea.

While reflecting on what I could post that epitomized a truly Southern breakfast, this recipe for bacon sweet rolls caught my eye. Could there  be a way to take a cinnamon roll- perfect with it’s warm cinnamon smell wafting from the oven, soft in the center with ripples of vanilla icing- to another level? Is there a way to actually upgrade nature’s most perfect fried pork product? Can I personally contribute to a breakfast roll awakening in the kitchens of bacon-lovers everywhere?

I do not claim to know the answers to life’s most serious questions. This one, however- can bacon and sweet rolls coexist in perfect unity?- I can answer. With a resounding yes.

These rolls are why bacon makes most everything better. Filling, rich sweet dough swirled around salty, applewood smoked bacon that folds with brown sugar and butter into a wheel of national championship caliber (Did someone say 11:00 pre-game tailgate food? The other team’s fans will cheer for you). These are a first-meal treat in its highest form.

So don’t let all of that bacon go to waste on the side of your eggs. Wrap it in dough, throw it in the oven, and celebrate the South’s most perfect breakfast roll.

Also, a huge thank you to the incredibly talented Stephen DeVries for taking these beautiful photos. I don’t think breakfast has ever looked this good.

What a polite breakfast eater's plate would look like.
What a polite breakfast eater’s plate would look like.

Bacon Sweet Rolls with Maple Glaze (Recipe adapted from this great food blog)

What You Will Need

1/2 cup granulated sugar
6 TBSP brown sugar
Sweet Dough (recipe below)
4 tablespoons (1/2 stick) unsalted butter, warm room temperature
1 pound bacon, cooked (I liked this brand, applewood-smoked), crispy and crumbled
Maple Glaze (recipe below)

Sweet Dough

1 cup warm whole milk
2 envelopes (4 ½ tsp.) active dry yeast
1/4 tsp. plus 2/3 cup granulated sugar
3 3/4 cups all-purpose flour
1 1/4 tsp. salt
1 large egg
1 large egg yolk
1/2 cup (1 stick) unsalted butter, at room temperature

Stir milk (I microwaved mine until it felt pretty warm to the touch; typically it should be about 110-120 degrees), yeast, and 1/4 tsp. sugar in a small bowl. Let it stand until the mixture bubbles, about 6 minutes (you will see tiny bubbles rising to the surface). Stir it again.

Using a stand mixer fitted with paddle attachment, add the flour and salt and mix on low speed just to combine.

Add yeast mixture to the flour and mix on medium-low speed until dry shaggy mass forms, scraping down the bowl occasionally, about 2 minutes.

Add egg and egg yolk and beat on medium speed until well blended. Then add the sugar and beat until moist soft dough that resembles thick batter forms, about 3 minutes. (Keep on beating the batter here, even when it looks like it is already in dough form. It needs to become more like a silky batter than a thick dough.)

Add room temperature butter 1 tbsp at a time and beat on medium-low speed until almost incorporated before adding more, about 2 minutes (your dough will be sticky, not thick like a traditional bread dough). Beat dough on medium-high 2 minutes longer (make sure all of your butter is incorporated here).

Scrape dough out onto a work surface then gather together. Place it in a large bowl that is oiled or buttered. Cover with plastic wrap; let rise at room temperature until almost doubled, about 2 hours. Punch dough down; cover with plastic wrap and chill overnight.

Peabody’s recipe was slightly adapted from Dorie Greenspan

Maple Glaze

2 TBSP unsalted butter
1/4 cup pure maple syrup (the darker the better, go for the real Vermont thing if you can)
1 ¼ cup powdered sugar

In a small saucepan, melt butter and syrup together over medium heat (watch the mixture because it comes together quickly).  Whisk powdered sugar into the hot mixture until smooth. Let cool slightly…if too thick add a little more maple syrup. Pour over rolls.

To Bring It All Together

Whisk both sugars together.

Turn cold Sweet Dough out onto floured surface; sprinkle with flour. The more flour the better here; when you roll it out it gets a bit sticky.

Divide the dough in half. Roll out the dough to two 15 by 12 inch rectangles. I can never seem to make actual rectangles with my dough, it’s always more of a large oval, so whatever works for you will still be delicious.

Using fingers, spread the butter evenly over each rectangle. Sprinkle ½ sugar mixture and half of the bacon over each. Starting at one long side of each dough rectangle, tightly roll up dough jelly-roll style, enclosing filling. Using a sharp serrated knife, cut each roll crosswise into fifteen or sixteen one inch-thick slices. Arrange your  dough slices on a cookie sheet, spacing evenly apart.

Cover with plastic wrap; let them rise in a warm, draft-free area until the buns are puffy and doubled, about 1 hour 45 minutes.

Bake buns at 375F until deep golden brown. The cooking time varies here. I used a dark metal pan, and it only took mine about 15 minutes to cook. If you use a light metal cookie sheet, it will probably be more like 25 minutes. Just watch your rolls-because of the sugar inside of them, it can become a syrupy pool around your dough and burn them the bottom. Let the buns stand 2 minutes. Then cover with glaze and say hello to the best bacon baked bun of your life!

Aunt Annie’s Strawberry Layer Cake

Perfect strawberry heaven
Spring strawberry greatness

I wish I had an Aunt Annie.

If I did, I would ask for her for her home address so I could show up every Saturday morning and listen as she lovingly taught me to bake cakes.

The unfortunate reality is that this recipe was not easy to come by. I did not find it on Pinterest, or google “best strawberry cake,” or ask Pioneer Woman. No, this cake took me by complete surprise. And the moment I tasted it, I knew the recipe had to be yours.

Cake on a platter

At a recent photographer friend‘s birthday party, a coworker of ours arrived with a strawberry cake. I love strawberry cake. There is a bakery in my hometown that makes impeccable strawberry cake. But I had yet to recreate anything like it on my own. And to be completely honest, I almost didn’t try this one. I had been let down too many times, sure that it was going to be another missed attempt at strawberry greatness.

But my first bite was a game changer. This cake was pure strawberry; fresh, light and moist with chunks of strawberry, delicately sweet and airy. The frosting was whipped, dense with a strawberry punch. A perfect precursor of spring on a plate. With light streaming in from the cafe windows where we ate, I thought for a brief moment I was living and breathing happiness. And before I left my dream state, the slice was gone.

I think something's missing

My obsessive quest for the recipe began. The owner of the ingredients list did not want to share it (see egg salad dowry entry last week), and so there was one thing left to do: I stalked her. I came by her desk every day and told her I wouldn’t give up. I pled, whined, hid behind office doors to pop out and remind her I wanted it . Then one day, a lovely slip of paper appeared at my desk. A lovely piece of newspaper.

Newspaper recipes are a lost art. I know my generation has passed them over for quick reviews and input from social media sources; I can’t tell you the last time I read a local paper on a Sunday. But the great thing about recipes in the Food section is you know they were loved. Someone took the time to type it out from most likely a handwritten card. They knew it was worth printing and putting on everyone’s front door step. And that’s what I want for this blog- to share with you recipes that are loved, known, and appreciated.

And so, without further ado, I present to you the infamous (stalked) Auntie Anne’s Strawberry Layer Cake. Trust me, it’s worth the effort.

A slice of strawberry

Aunt Annie’s Strawberry Layer Cake

What You Will Need:

1 cup fresh frozen strawberries, thawed (I washed two pints of strawberries, sliced a cup of them in half, then put that cup in a freezer safe bag for the cake. I then froze and thawed the rest of the berries to make sure I had enough juice for the frosting.)

1 box white cake mix

1 box strawberry Jello

3 tablespoons all-purpose flour

1 cup vegetable oil

4 eggs

1/2 cup water

2 batches strawberry butter cream frosting, recipe below

Fresh sliced strawberries and white chocolate coconut truffles for garnish if you like

What You Will Do

1. Preheat your oven to 350 degrees.

2. Spray two (9-inch) metal cake pans with nonstick cooking spray. Set them aside.

3. Drain your cup of strawberries well, reserving the juice for the frosting. I would go ahead and drain the rest of your frozen strawberries separately at this point to make sure you have enough juice.

4. Combine the cake mix, strawberry Jello powder and flour in a large bowl of an electric mixer. Add the oil, eggs, water and drained strawberries. Mix well on low for 30 seconds, then at medium speed for two minutes (make sure NOT to overmix here; it messes with the jello texture), scraping the sides of the pan as neccessary.

5. Divide the batter equally among two prepared pans and bake for 30 minutes. Check these at about 28 minutes to make sure they don’t over-bake. Remove the cake from the oven and let it cool for 10 mintues in the pan, then turn it out onto wire racks to cool for another 30 minutes.

6. At this point you can go ahead and frost the cake with buttercream. However, BAKERS ALERT– you will have a moister cake if you take these rounds, wrap them in plastic wrap first then aluminum foil, and freeze them overnight. Take them out of the freezer the next morning and let them sit at room temp until you need to frost them.

7. Garnish to your heart’s content with strawberries, white chocolate truffles, sprinkles, marshmallows, edible glitter

Strawberry Buttercream Frosting

What You Will Need

1 stick butter at room temperature (This is important for your frosting to whip up to it’s peak fabulousness)

1/4 cup strawberry juice (Please, please, please don’t skimp on this; the juice makes this frosting!)

1 pound powdered sugar

What You Will Do

1. Using an electric mixer, mix the butter, juice, and sugar together on low until blended. Then cream the mixture on high until light and fluffy, about two minutes. The icing will start to form peaks and feel like a dense buttercream when it is ready.

2. Scrape the sides of the bowl and/or taste frosting as necessary.

BAKER ALERT (These are way too much fun) If you dip your icing knife or spatula into a bowl of warm water, it will help smooth the frosting without tearing the cake. Also, it is easier to make one batch of frosting for the layer between the two cakes, then make a second batch for the top and sides of the cake. This ensures even frosting in the center and on the outsides of the cake.

Spicy Egg Salad with Homemade Wheat Thins

Bright and spicy, a sweet twist on a Southern tradition
Bright and spicy, this egg salad is a sweet twist on a Southern tradition

Maybe it’s the bunnies, or the baby showers, or the easter egg dying I have been eying on Pinterest, but spring is in the air. And it has left me with a serious craving for egg salad.

Spring is a season for parties in the South, and a good egg salad recipe is very similar to the antiquated idea of a bride’s dowry- a pursuit to be taken seriously, most importantly because it ends up on your great Aunt Frances’ silver platter that was passed down through three generations and used at your next best friend’s wedding shower. The pressure is on to not mess this thing up- expectations are high, but unfortunately, egg salad is something that can easily over promise and under deliver.

Too much mustard and it’s stained a fluorescent sunshine color; too much mashing and your eggs end up the texture of warm cement; too much mayonnaise and it tastes about as bland as a jar of the stuff on a spoon.

This fact, as you might have assumed, drives me crazy.  Every recipe that winds up on this blog should be a winner- something you are proud to take to your great aunt Sally’s third cousin’s twice removed housewarming party. Something people will scoop onto their plastic plate, taste, and go, “This is fantastic! I must know you! And your recipes!”

Spicy and smoky-sweet from the paprika (I highly recommend Hungarian paprika here) with a liveliness and bright note of dill, this egg salad ushers in spring beautifully. And to top it off (no pun intended), the homemade wheat thins are a fabulous vehicle for the eggs. Well worth the extra effort, the crackers are crispy (depending on how thin you roll them), slightly sweet and deliciously nutty. Sprinkle them with a bit of flaky salt and voila- so much better than the version you tear open from a box.

Addictively easy and delicious

I can’t wait to see all that spring has in store- for you, for me, and for our egg salads.

Spicy Egg Salad (This recipe was adapted from Meg’s Everyday Indulgence)

What You Will Need:

8 boiled eggs (This is the best method for boiling eggs, trust me)
1 tablespoon mayonnaise (I like Duke’s brand)
2 tablespoons prepared Dijon-style mustard (I like Grey Poupon)
1 teaspoon dried dill weed
1 teaspoon paprika
1/4 cup minced red onion
salt and pepper to taste
Homemade wheat thins (recipe below)

What You Will Do

1. In a large bowl, combine the eggs, mayonnaise, mustard, dill, paprika, onion and salt and pepper.

2. Mash the mixture well with a fork, but make sure you don’t get carried away and form a paste. Egg paste never appealed to anyone; its best left for tooths.

3. Serve on your best silver platter with a plate of homemade wheat thins.

Homemade Wheat Thins (This recipe is adapted from none other than one of my favorites, Smitten Kitchen. Have I told you lately that I want to be like Deb when I grow up? Because I do.)

What You Will Need 

1 1/4 cups (155 grams) whole wheat flour
1 1/2 tablespoons (20 grams) light or dark brown sugar
1/2 teaspoon (3 grams) table salt, plus additional for topping
1/4 teaspoon smoked paprika (a friend of mine gifted me with this kind and I am officially addicted; it smells amazing)
4 tablespoons (55 grams) unsalted butter, cold is fine, cut into small bits

What You Will Do

If you have a food processor:

1. Combine the flour, sugar, salt, paprika and butter in a food processor, pulsing the mixture until the butter is evenly disbursed in the crumbs. It looks like fine sand. Drizzle in 1/4 cup (60 ml) cold water with the machine running; run it until the mixture begins to form a ball. You might need more than 1/4 cup of water; just slowly add a little bit of water until the mixture darkens and clumps together.

If you don’t have a Cuisinart and love to work out your arms:

1. Combine the flour, sugar, salt, paprika and butter in a medium bowl. Using a pastry blender or your fingertips, work the butter into the mixture until mixture resembles coarse cornmeal. Add 1/4 cup (60 ml) cold water, stir with spoon until combined. Knead once or twice on counter.

2. Roll your dough out, half at a time, to a large, very, very thin rectangle-ish shape on a well-floured counter. Thinner than you even think necessary is best. I rolled mine out to be about 6 inches wide by at least twelve inches tall. Frequently check to make sure your dough isn’t sticking (this is an important step because it sticks easily); if it is, gently scrape a spatula underneath to lift it, then flour the counter again. Using a knife or pastry wheel, cut dough into about 1 1/2-inch squares. Dock crackers all over with a toothpick or sharp knife.  I sort of free styled the dots like I thought Emeril Lagasse would if he were making these. Bam!

3. Evenly coat a baking sheet with cooking spray.

3. Transfer crackers to baking sheets using your hands or a spatula, depending on how delicate they are. You only have to space them a little bit because they really don’t spread. Sprinkle with flaky sea salt if you’d like to approximate the salty exteriors of the store-bought crackers.

4. Bake the crackers until they are crisp and bronzed, about 5 to 7 minutes, but please keep a close watch on the first batch as thinner crackers will bake faster and the thicker ones will take longer. I also didn’t roll my dough out perfectly evenly, so some of my crackers cooked faster than others. If this happens, I recommend just sliding the thinner crackers off the sheet to cool and baking the others a few minutes longer, until the edges turn light brown or look crisped.

5. Cool the crackers in baking pans on racks. Crackers will keep in an airtight container officially for a week, if they can last that long, but mine have seemed to disappear. You can also freeze them in an airtight container between sheets of waxed paper for a couple months.

Spicy Turkey Sausage and White Bean Soup

Makes you feel warm inside.

In the south, “winter” is a loosely defined term.

Sometimes it means 75 degrees, flip-flops, shorts, and a football sweatshirt. Other days, it is defined as freezing temperatures, layers, more layers, gloves, and a freak snowstorm which requires at least another layer.

But this week, we are in a weather gray zone. Not quite warm- it hovers around the lower fifties, upper forties; drizzly, with no snow; and fog. Fog in the morning, fog in the evening, fog in the noontime.

And it’s times like these that call for soup. It’s the one time a year I feel (somewhat) urban with my cooking, imagining myself walking home from the market around the corner, toting a super cool umbrella and handmade grocery bag, skipping up to my loft and making a big pot of stew from locally grown organic tomatoes, hand-fed chicken broth, and the cilantro I raised in my rooftop garden.

But, back to reality, my tiny foggy kitchen, and the February “Winter Comforts” issue of Bon Appetit. Their Chorizo and White Bean Stew recipe caught my eye- the flavor profile was spicy, balanced by the beans, and quick. Looking for a way to make due of what I currently had in my refrigerator (and not being able to retro-bike to my nearest fresh foods market) I substituted spicy Italian turkey sausage for the chorizo, splurged on fresh thyme at Publix, added some smoked paprika, and got simmering.

This soup hit the spot, easily one of the best I have made in a while, and made me long for the end of the in-between: when fog clears, the sun comes out, winter needs no definition, and it’s time for flip-flops again. But this time without the layers.

Spicy Turkey Sausage and White Bean Soup

This recipe was adapted from Bon Appetit

What You Need

  • 2 tbsp olive oil, divided, plus more for drizzling
  • 1 1b spicy Italian turkey sausage (or you could use mild for a sweeter flavor)
  • 1 large onion, thinly sliced
  • 4 garlic cloves, finely chopped
  • 1 sprig thyme
  • 2 15-ounce cans cannellini (white kidney) beans, rinsed
  • 2 cups low-sodium chicken broth
  • Kosher salt, freshly ground pepper
  • 5 ounces baby spinach (about 10 cups)
  • Smoked paprika

What You Will Do

1. Heat 1 tablespoon oil in a large skillet over medium heat. Add sausage and cook, turning occasionally, until browned and cooked through, 15-20 minutes. Mine took about 23 minutes; I think turkey sausage links take a bit longer to cook through. Transfer the sausage to a plate.

2. Reduce heat to medium. Heat remaining 1 tablespoon oil in the same skillet. Make sure you keep all of those delicious pork bits in the pan to saute with your veggies. Add the onion slices, garlic, and thyme sprig. Cook, stirring occasionally, until the onion is softened, about 5-8 minutes. I like to add the garlic later; at about six minutes. Because burned garlic is no good to anyone.

3. Add the rinsed beans and broth and cook, crushing a few beans with the back of a spoon to thicken sauce, until slightly thickened, about 8-10 minutes. Watch the soup here; mine needed a bit longer to thicken. When it is the consistency of a chili, it’s perfect. Season with salt and pepper. Add spinach by the handfuls and cook just until wilted, about 2 minutes.

4. Slice the turkey sausage and fold it into stew; add water to thin, if you like. Normally I don’t like to add water because I feel it dilutes the flavor, but this is a thicker soup, so you have some room to play. Taste it again to make sure your salt and pepper ratio is working.

5. Divide the soup among bowls; drizzle with oil. I highly recommend sprinkling it with more paprika, and then some more just for good measure.

Peanut Butter Chocolate Crunch Granola

Oats baked to a sweet, nutty crunch

Happy Belated Valentine’s Day!

For a blog devoted to luv, it is bit embarrassing that I missed the February 14 deadline for this recipe.

To be fair, the treat I planned to debut was a bit of a sweet-potato-biscuit disaster. Marshmallows melted with chocolate do not become marshmallow fluff, they become liquid Tootsie-Roll, and my gluten-free heart-shaped peanut butter cookies were a bit ambitious.

But, hope springs! And, if you are like me, and may have eaten one too many sugary hearts, truffles, cereals, cupcakes, and donuts this week, then this recipe might be a nice change of pace.

Plus, when it comes to nutty-sweet combinations, peanut butter and chocolate wins.  If chocolate combinations competed in a doubles tournament, pb+c would serve aces every time, win the trophy, and do a fantastic victory dance over the net. Strawberry-and-chocolate, vanilla-and-chocolate, banana-and-chocolate: no competition. Peanut butter and chocolate’s flavor profile is simply complimentary; rich whipped peanuts and sweet, dense chocolate: perfect. This is why the following confession is a bit embarrassing.

I have never posted a peanut-butter chocolate recipe on this blog.

I know, I know. I talk a mean game, but have yet to deliver. Maybe I have been waiting for the right recipe, maybe I was caught off guard by how dependable and delicious this recipe is-maybe I was afraid to commit to the first posting. But you know something good when you find it, and I can’t think of a better way to start a day than with a perfect pair for breakfast. Or lunch. Or dinner.

Peanut Butter Chocolate Crunch Granola

*This recipe has been adapted from Allrecipes.com version 

What You Need:

2/3 cup creamy peanut butter 

1/3 cup honey

1/3 cup agave nectar

1/2 teaspoon cinnamon  (I like Saigon Cinnamon, it has a kick to it)

1 teaspoon vanilla

4 cups uncooked rolled oats

1 cup dry-roasted, salted peanuts

1 bar semisweet chocolate

What You Will Do

  1. Preheat oven to 300 degrees.
  2. In a small saucepan, combine peanut butter, honey, agave, cinnamon, and vanilla, over medium heat, and stir until smooth.
  3. Place oats and peanuts in a large, shallow roasting pan or a 15 x 10 x 1-inch baking pan. Pour warm peanut butter honey/agave mixture over the oats and peanuts and stir gently until oats are coated. Spread evenly in the pan.
  4. Bake, taking the oats out of the oven every 10-15 minutes, stirring to make sure they are evenly cooked. I did mine in two rounds of 15 minutes, then baked them for about 8 minutes more. Just make sure your oats are golden and a bit crunchy; you don’t want to burn the edges of the granola, or the peanuts.
  5. Burned peanuts are not delicious.
  6. Once the granola is done, put your cookie sheet on a baking rack to cool for about 15 minutes.
  7. While your granola cools a bit, use a vegetable peeler to peel half of your chocolate bar into small curls. Once you have passed the 15 minute mark, sprinkle the chocolate curls over the granola and stir to combine, making sure you coat all of the oats with the chocolate.
  8. Let the granola cool for about an hour, then chop the other half of your chocolate bar into small chunks. Sprinkle the chunks over your granola, and mix to combine.
  9. This makes a large batch, so you could easily feed an entire tennis team with it, or two large families, or yourself, if all you had to eat was this for a week.

Salted Brown Butter Rice Krispie Treats

Squares of melt-in-your mouth marshmallow decadence
Squares of buttery, marshmallow goodness

It’s funny how cookbooks can change your mind about things.

To me, Rice Krispie treats lack the luster of other desserts. Piled high on the glass shelf of almost every bakery in America, they pale in comparison to  dark chocolate chunk break-up cookies, golden Nutella croissants, or pink raspberry macaroons.

But- Deb Perlman changed my mind. About a month ago I began consuming the Smitten Kitchen Cookbook like it was my job, and came across her recipe for salted brown butter crispy treats. It flipped every traditional recipe for the bars on it’s wax-paper-lined 8X8: browned butter instead of melted; marshmallows folded into the butter until they were light and airy; the addition of coarsely ground kosher salt.

Deb's recipes are detailed, beautiful amazingness.

And Deb, like she always does, provided just enough detail in the recipe to make you feel like a.) you should do this and b.) if you don’t do this, you are making a poor life choice because she does such a great job of making things easy to follow. Result?

Y’aaaalllllll.

These will, guaranteed, change your opinion of the (formerly lowly) crispy treat.

Treats stacked

The squares are rich, decadently buttery, and brought to life with the accent of salt.  The first time I made these, my mom, sister and I ate roughly 1/3 of the pan- my brother ate the rest.

In one day.

This recipe, like Deb’s blog, will not disappoint you. In fact, pull out an old cookbook or two from the back of your (cook)book shelf. Which, if you are like me, may or may not be covered in what appears to be dust-or is that a fine layer of powdered sugar? Remnants of what used to be frosting? Wait- I think that’s grits.

Regardless, the search for a new take on an old recipe might surprise you. But be warned- this recipe will make you pass over every other crispy treat you find, even if you weren’t one of those snub-your-nose, make-judgements-about-dessert-choices, kind of people. Totally unlike anyone I know…

Salted Brown Butter Rice Krispie Treats, text detail added, from Smitten Kitchen‘s recipe here

What You Will Need:

4 ounces (1/4 pound or 1 stick) unsalted butter, plus extra for the pan
1 10-ounce bag marshmallows
Heaping 1/4 teaspoon coarse sea salt
6 cups Rice Krispies cereal (about half a 12-ounce box)*

What You Will Do:

1. Butter (or coat with non-stick spray) an 8-inch square cake pan with 2-inch sides.

2. In a large pot, melt butter over medium-low heat. It will melt, then foam, then turn clear golden and finally start to turn brown and smell nutty. Stir frequently, scraping up any bits from the bottom as you do. Make sure you stir it frequently; I like to use a pastry brush to lift any bits off of the bottom.

3. Don’t take your eyes off the pot. While you may be impatient for the butter to start browning, the period between the time the butter begins to take on color and the point where it burns is often less than a minute. If your butter burns, then it will make little black specks in your treats. Unless you like the way white highlights black specks in your baked goods, watch the butter.

4. As soon as the butter takes on a nutty color, turn the heat off and stir in the marshmallows. The residual heat from the melted butter should be enough to melt them, but if it is not, turn the heat back on low until the marshmallows are smooth. Make sure and don’t over stir this; take the mixture off the heat when it just comes together, or it will get too stretchy and lose the light texture we are looking for.

5. Remove the pot from the stove and stir in the salt and cereal together. Quickly spread into a prepared pan. I like to use a piece of waxed or parchment paper that I’ve sprayed with oil to press it firmly and evenly into the edges and corners, though a silicon spatula works too. I have done both, and prefer the parchment paper method- this gives you the smoothest finish.

5. Let the mixture cool, it took mine about twenty minutes, and cut into squares. Try not to take them to your nearest bakery and taunt others. I dare you.

*I did a test to compare the off-brand of crispy cereal to Rice Krispies. Rice Krispies not only tasted more toasted, but they had a darker color. It’s worth it to splurge on the name-brand here.

Black Bean Smothered Sweet Potatoes

A bright spot in January

I may have eaten more vegetables in the past twelve days than December combined.

As a lover of meat, and Southern cook comfortable sticking to the dairy, powdered sugar, and Diet Coke aisles,  I was a bit concerned about this 21-day transition into vegetable territory. There are few things that comfort like a bit of hot, melted butter and dark chocolate, whisked together and poured over ice cream.

This journey as a pseudo, 21-day-vegetarian has taught me two things. One, I want to be Heidi Swanson. Two, few things out- perform a black bean in flavor and fillability.* If I was crafty, I would take their cans, paint them gold and shape them into a trophy, then award Goya the MVP kitchen medal for January.

IMG_2040
Fresh basil and cilantro with powdered peppers are delicious.

But my friend Courtney from Kinora Films (the best wedding videographers in the universe) inspired my affection for the black beans and sweet potatoes combo. She has a killer black bean and sweet potato chili recipe that one day I hope to share with you.

The recipe below is a modified version of one I found online; I thought the added brightness of basil and the kick of ground chipotle peppers would elevate the flavors, and it takes a roasted sweet potato to, as they say, a whole-notha-level. Or, as my relatives say, “man, them sure is ‘werd but tasty.” Good black beans smothering anything will do that to you. Maybe even more than chocolate-covered ice cream? Let’s not get carried away…

Black Bean Smothered Sweet Potatoes

What You Will Need

  • 2 medium sweet potatoes
  • 1 15-ounce can black beans, 1/4 of beans removed; 3/4 rinsed
  • 1 medium tomato, diced
  • 2 scallions, chopped
  • 1 tablespoon fresh basil, chopped
  • 1 tablespoon fresh cilantro, chopped
  • 2 teaspoons extra-virgin olive oil, plus more for drizzling
  • 1/2 generous teaspoon ground cumin
  • 1/4 teaspoon smoked paprika
  • 1/4 teaspoon ground chipotle peppers
  • 1/teaspoon kosher salt, plus more for drizzling**

What You Will Do:

  1. Preheat oven to 450.
  2. Prick sweet potatoes with a fork in several places. Do this gently. When I pricked mine, I was a tad aggressive and accidentally got my fork stuck. Be warned; this is not an easy disassembly.
  3. Drizzle a bit of olive oil on your cleaned sweet potatoes, then sprinkle them lightly with kosher salt. Wrap each in aluminum foil, making sure to leave no skin exposed, and put both on a cookie sheet.
  4. Cook until tender all the way to the center, about one hour. Side tip: If you are feeling adventurous with your potatoes, cook these babies for 2 hours. They develop a roasted, sweet, pillowy softness that is addictive.
  5. Meanwhile, combine beans, tomato, scallions, basil, cilantro, oil, cumin, paprika, smoked peppers, and salt in a medium saucepan.
  6. When they are cool enough to handle, cut each sweet potato lengthwise, press them open to make a well in the center, and spoon the bean mixture into the well.  Hot sauce is also an excellent topper here.

*This word refers to a bean’s ability to make you feel like you ate meat.

**Depending on how salty you like things, you could use a bit less salt than this because of the addition of the unrinsed beans. I like things salty, so it worked for my palate.

White Christmas Snack Mix

IMG_1995
Snack food heaven

Happy New Year!

I am really looking forward to 2013. The idea of a brand new year is always exciting- but it’s also an excuse to be more creative with your life. To plan new things, set goals, make changes, drizzle dark chocolate like Jackson Pollock over a heap of white chocolate-covered marshmallows and cashews.

Yes, New Years is a fantastic time for the ultimate, chocolate-covered, dessert mix. It couldn’t be easier, or a better fit for New Years football games, parties, or just sitting at your kitchen table making grand plans for 2013. Whatever works.

This is dangerous to serve on large platters. It means more people can eat your leftovers.
Serving this on large platters means more people can eat your leftovers.

To be frank, whenever I see a recipe for dessert/snack mixes- really anything loosely tied together by a sugary substance with some Chex cereal thrown in- I am wary. I have too often been dissapointed by dessert mixes that look amazing (peanut butter, pretzels, and powdered sugar- sign me up!) but end with a cloyingly-sweet aftertaste.

This mix is different. The light white chocolate layer over salty cashews and pretzels is a nice balance- and I adore marshmallows, so any excuse to add those in anything is perfect. Also, this recipe requires white chocolate almond bark, which (don’t be decieved) is not a health-food product. It is the easiest way to melt white chocolate, and for this recipe, it’s what you need.

Here’s to the best year yet- and an excuse to fling dark chocolate in whatever way you please.

White Christmas Snack Mix

What You Will Need:

6 cups of Crispix cereal
2 cups of Honey Nut Cherrios cereal
Big can of cashews halves and pieces (or an 8 ounce bag)
1 large bag of peanut butter M&M’s
One bag of mini marshmallows
2 cups of knot pretzels
2 high quality dark chocolate bars  (don’t skimp on quality here; it really makes a difference in the contrasting tastes between the two types of chocolate)
Wax paper
What You Will Do:
1. In a very big bowl, mix the Crispix, Honey Nut cheerios, cashews, M&M’s, marshmallows, and pretzels.
2. In a separate bowl, melt one package of white almond bark in the microwave, or follow the directions on the package to melt it on the stove. Pour melted white almond bark onto the cereal mix and stir, making sure to coat each piece.
3. Spread the entire mixture out on wax paper.
4. While it is hardening, melt two dark chocolate bars in the microwave. My preferred method is to melt both bars on high in a microwave-safe bowl for one minute; then microwave the chocolate for 15 second intervals, stirring briskly after each heat blast, to melt the chocolate and create a smooth consistency. Try and microwave the chocolate as little as possible;  the more you microwave it, the more likely it is to burn.
5. After the dark chocolate is melted,  take a spoon and drizzle it over the cereal mixture like the artist that you are. Let it harden for about 15-20 minutes.
6. Once hardened, break the pieces apart and share them with your loved ones. Or not. :)

Dark Chocolate Christmas Cookies

Salty and sweet. Kind of like a sailor with a santa hat.
Salty and sweet. Kind of like a sailor with a Santa hat.

Can you tell I like Christmas cookies?

Honestly, I didn’t want to do two Christmas cookies posts in a row. It goes against every food blog rule out there. But I had to, because this recipe is so good. It’s worth a second batch of Christmas cookies. And I want you to have the chance to make some before time runs out and we are all post New Year’s, drinking smoothies and eating kale.

Well, some people are doing that. I never liked kale and only drink smoothies with peanut butter. But best of success to you, juicers!

These cookies are dense, chocolatey and rich, and the salty kick after you bite into them takes the flavor to another level. And for those of you who don’t like the chocolate/sea salt combination, you can also accent them with cinnamon candies, sanding sugar, and what the heck- go all out with some icing too.

I wish all Christmas trees were made of chocolate.
Chocolate cookies en papillote (sort of)
Chocolate cookies en papillote (Well, sort of; I think that was French-lish)

Dark Chocolate Christmas Cookies with Sea Salt

(This recipe is adapted from the fabulous blog Sweetapolita; My changes are in italics)

What You Will Need:

  • 6 cups (750 g) all-purpose flour, sifted (I used whole wheat pastry flour)
  • 1 and 1/4 cups (137 g) dark cocoa powder (I love organic cocoa powder!)
  • 1 teaspoon (8 g) salt
  • 2 cups (454 g)(4 sticks) unsalted butter, softened (Try organic here too)
  • 2 cups (400 g) granulated sugar (I used 1 3/4 cup)
  • 1 cup (228 g) light brown sugar
  • 3 eggs, cold
  • 2 teaspoons (10 ml) pure vanilla extract
  • Various fun toppings (cayenne pepper, sea salt, icing, more chocolate, sprinkles!)

What You Will Do:

  1. In large bowl, sift together flour, cocoa powder and salt. Set aside.
  2. In an electric mixer fitted with the paddle attachment, cream butter and sugars until fluffy and pale, about 5 minutes. Beat in eggs until just combined.
  3. Add flour mixture and mix on low speed until thoroughly combined. (Please do this slowly. I got carried away and ended up with a light brown powder on my mixer, counter, and clothes. And pants? I have no idea.) Add vanilla and blend.
  4. Remove 1/2 of the dough from bowl, make a ball, and place it on a large piece of plastic wrap on the counter.Wrap the sides of wrap over the ball, then press down with the palm of your hand and make a disc about 2″ thick. Finish wrapping the disc with the plastic wrap. Repeat with the second half of dough. Chill both discs of dough for about 45 minutes or up to a day in the fridge.
  5. Once ready to bake, preheat your oven to 325.
  6. Remove one disc and remove the plastic wrap. Place on top of a large piece of parchment paper (I used a silicone bakers mat underneath it to make sure it didn’t slip while I was rolling it out), then put another large piece of parchment paper on top of the dough.
  7. Roll dough with a rolling pin (Ok, this is where your work-out comes in. It takes a bit to get it warm and ready to cut) until it is an even thickness; I aimed for about 1/4 of an inch.
  8. Remove the dough from the fridge, and cut your shapes using the cutters of your choice, placing them on a cookie sheet lined with parchment or a Silpat, with 2″ clearance around each one and the edge of sheet. Top with salt, cayenne- whatever you like!
  9. Bake until cookie edges are just crisp, about 16 minutes. Repeat with the second disk of dough.
  10. Cool the sheets on wire racks for 10 minutes, then gently remove cookies and place on wire racks to finish cooling. After cool, ice or glaze to your heart’s content! And don’t forget the sprinkles!
  11. Promptly consume with a large glass of egg nog. So delicious!