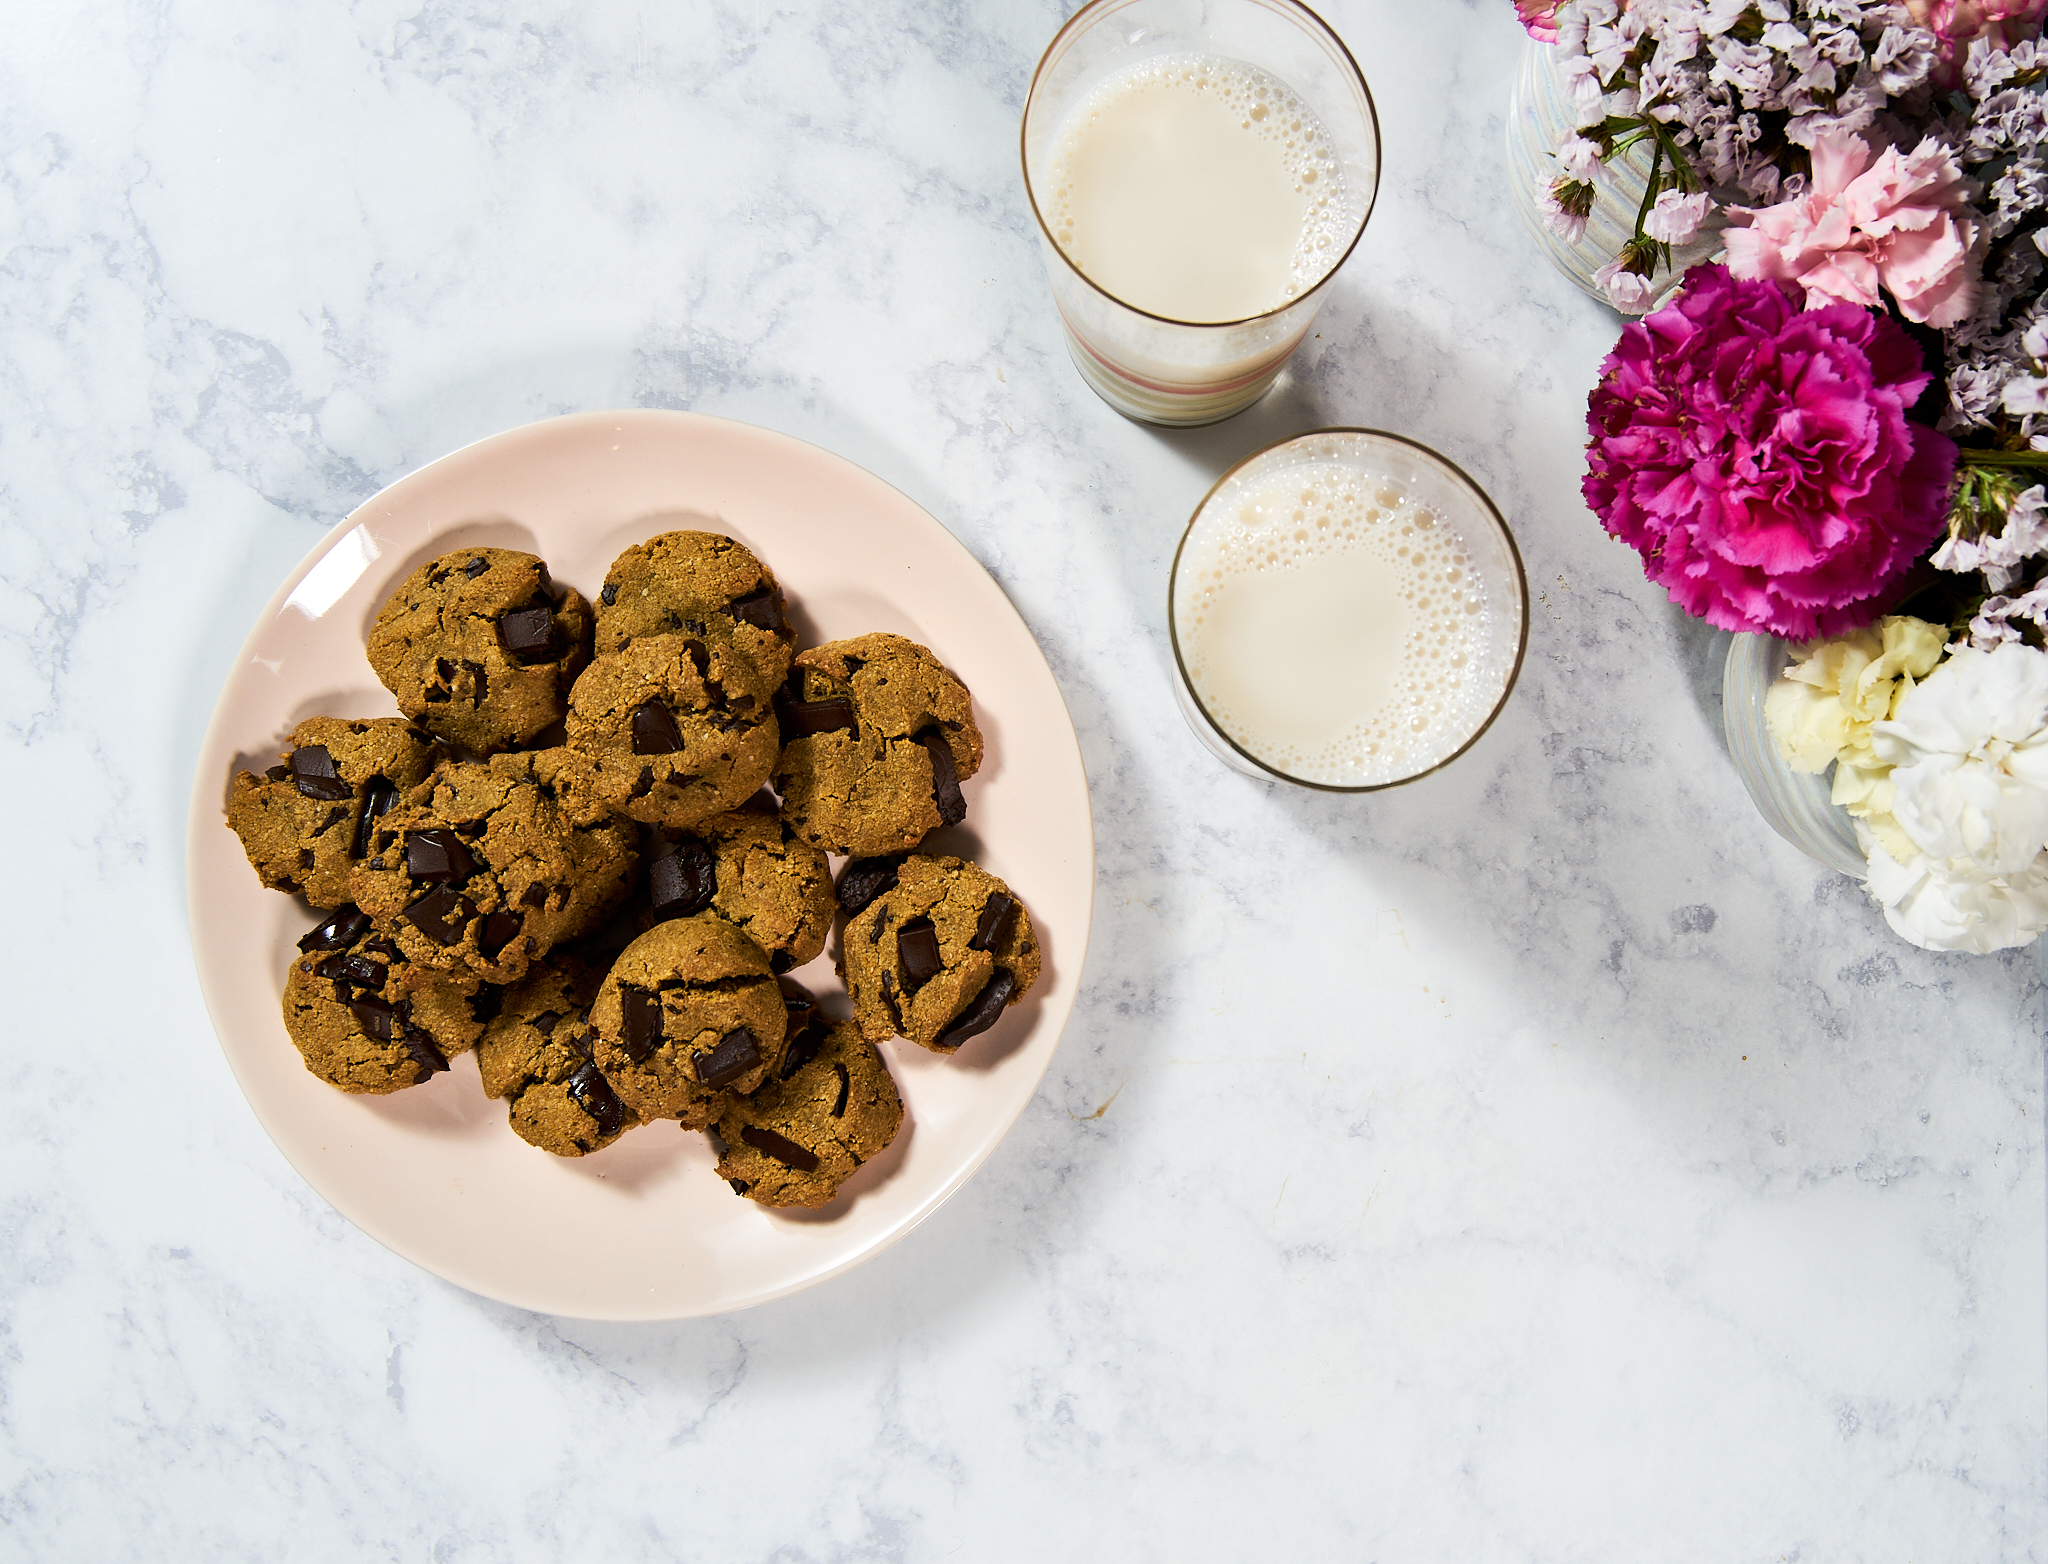
For those of you new to Luv Cooks, there are three foods I will almost always choose. Peanut butter, coffee and COOKIES. This week’s recipe combines two of my faves in a Paleo chocolate chip cookie full of caffeinated goodness! Welcome to the flair espresso paleo chocolate chip cookie!
flair Espresso Paleo Chocolate Chip Cookies (HUGE shoutout to Fooduzzi for her inspiration for this recipe!)
What You Will Need:
1.5 cups almond flour
3 tablespoons coconut flour
3/4 teaspoon baking soda
1/4 teaspoon salt
1/4 cup melted coconut oil
1 shot flair espresso (or about 35 grams strong coffee) made in a flair espresso maker
1/4 cup maple syrup
2.5 ounces chopped Paleo chocolate or dairy-free chocolate of your choice
What You Will Do:
Whisk flours, baking soda and salt together until evenly combined.
Whisk coconut oil, fresh shot espresso (or strong coffee) and maple syrup until somewhat combined (the oil will separate a bit).
Pour wet ingredients into dry, stirring with a rubber spatula until combined.
Add chocolate to wet dough and stir until combined.
Roll dough, a generous tablespoon at a time, out into small balls.
Place on a parchment-lined baking sheet; use hands to lightly flatten each dough ball.
Preheat oven to 350.
Put dough into freezer to set for 15 minutes. Remove from freezer to oven to bake for 12 minutes.
Move to rack to cool for about 5 minutes, and enjoy!
I hope you you are enjoying such a restful and peace-filled start to your Easter weekend (and that you have already eaten a few chocolate-malt Easter eggs):)
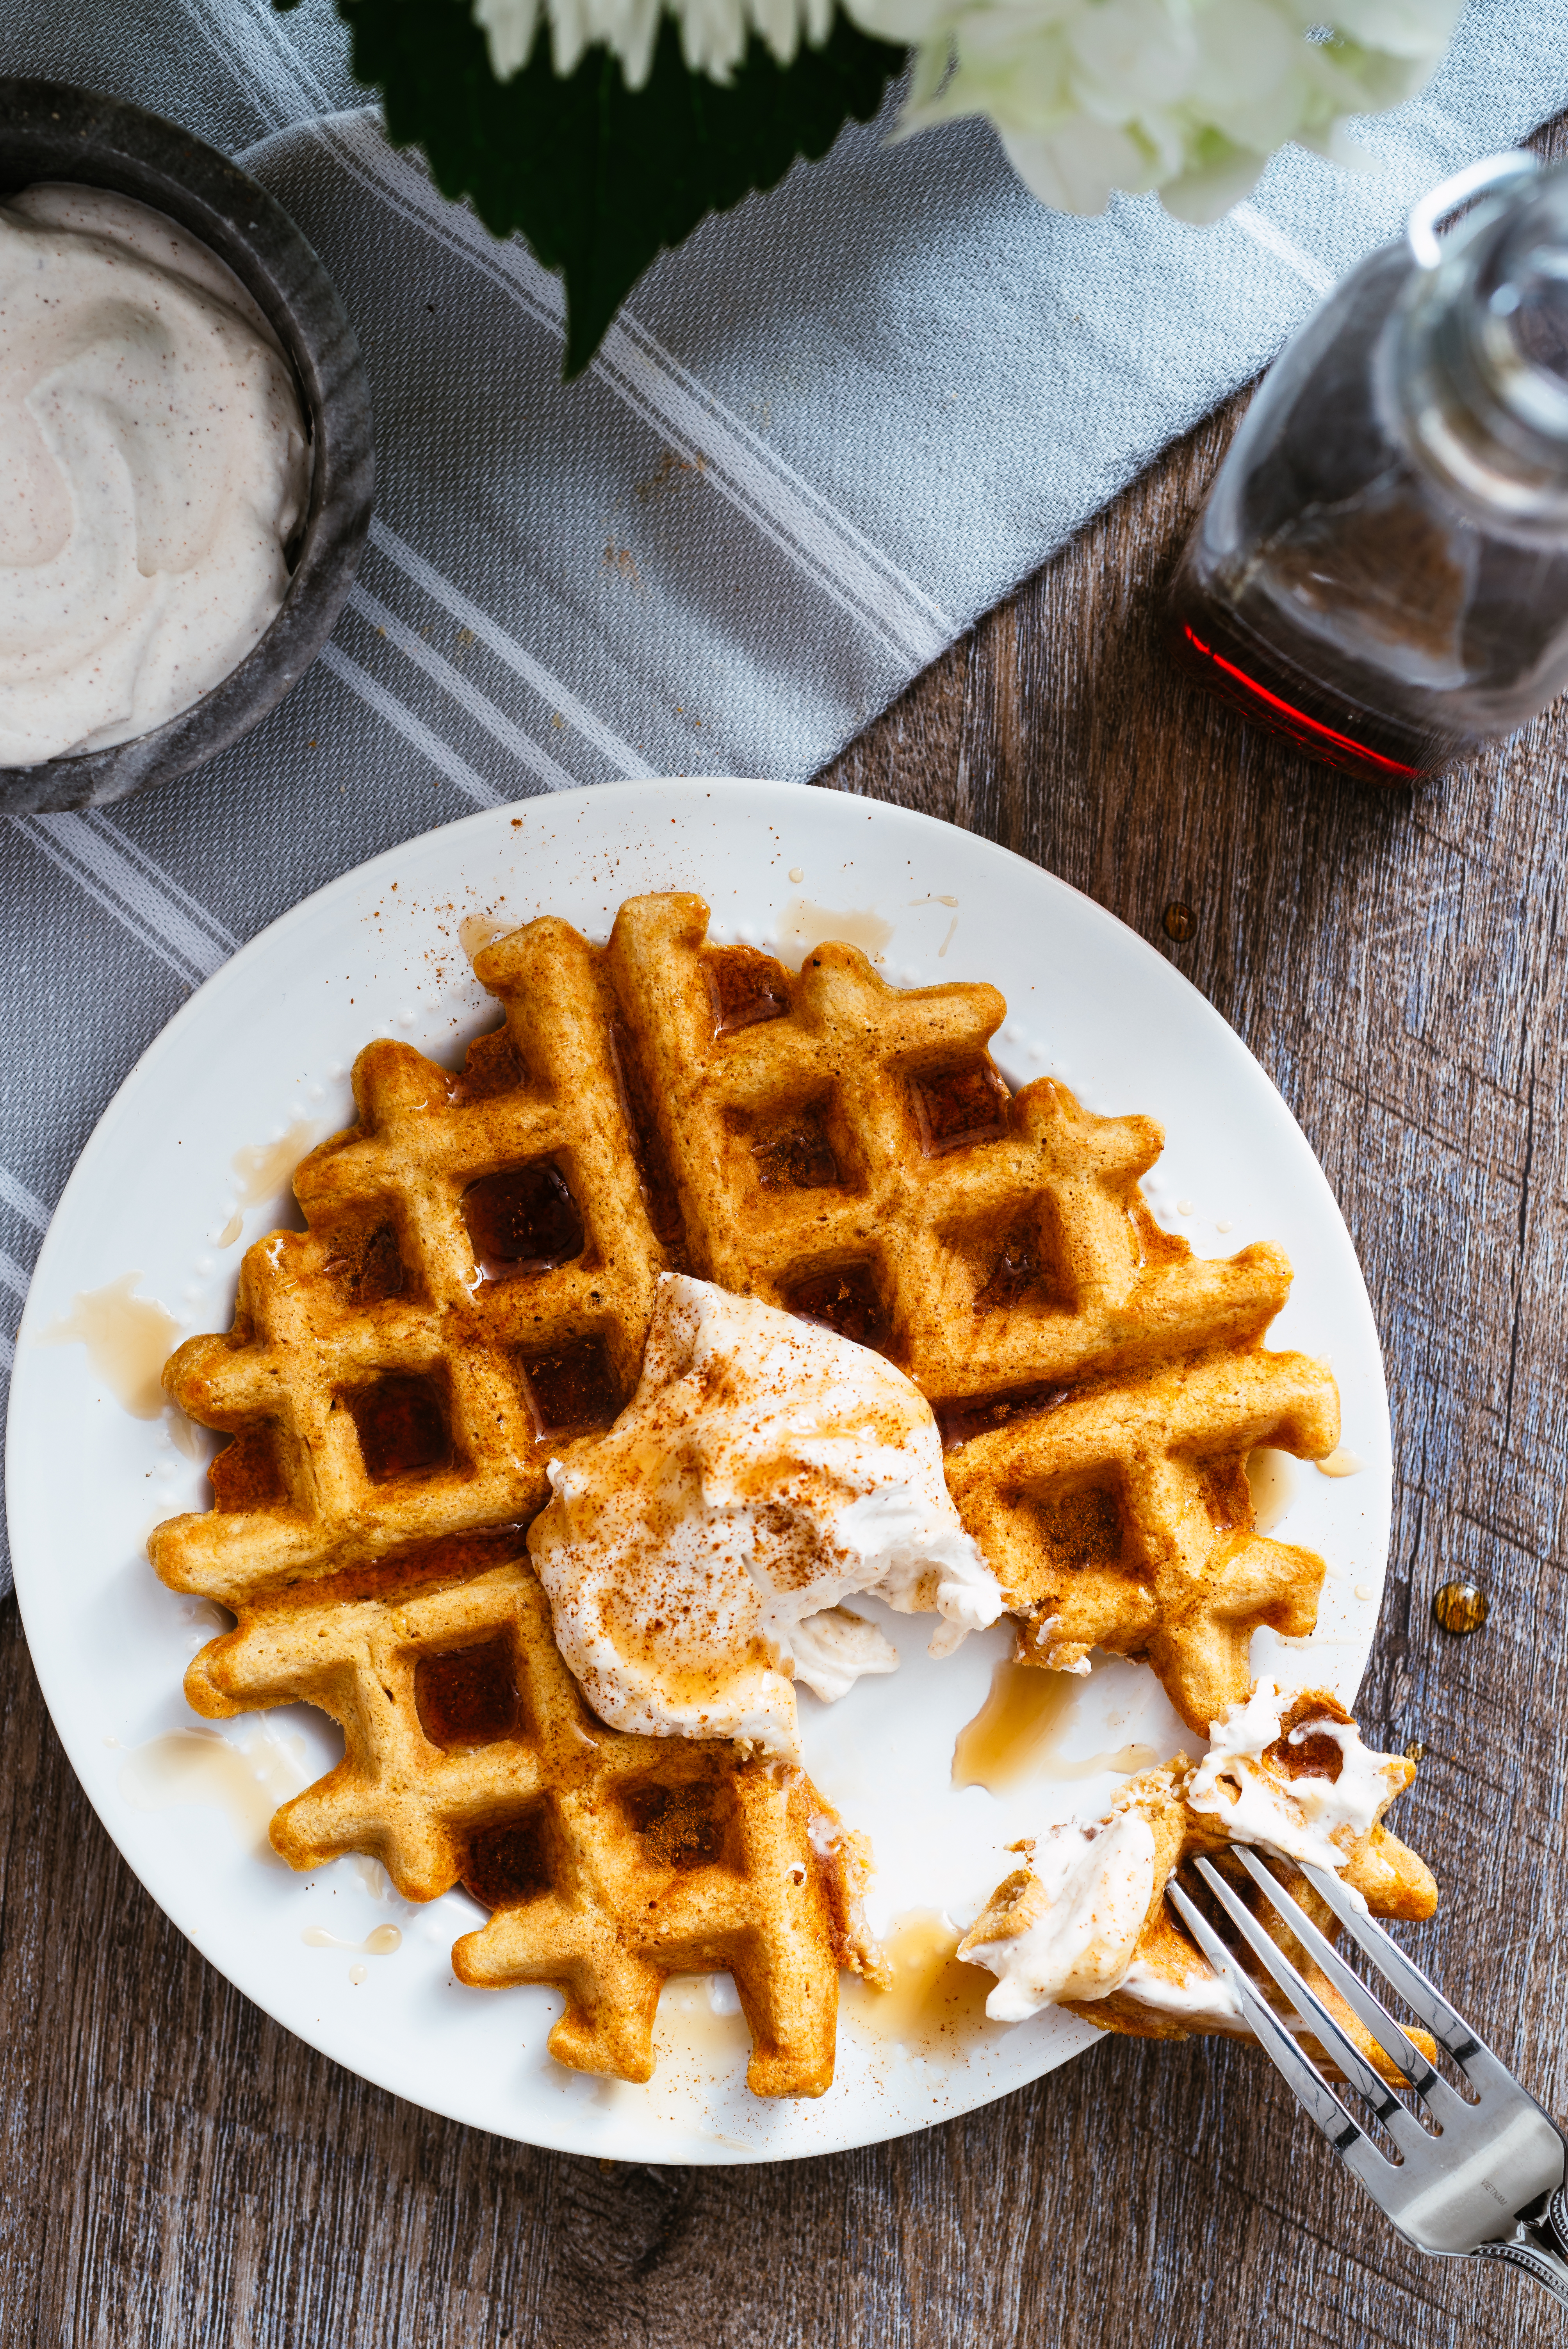
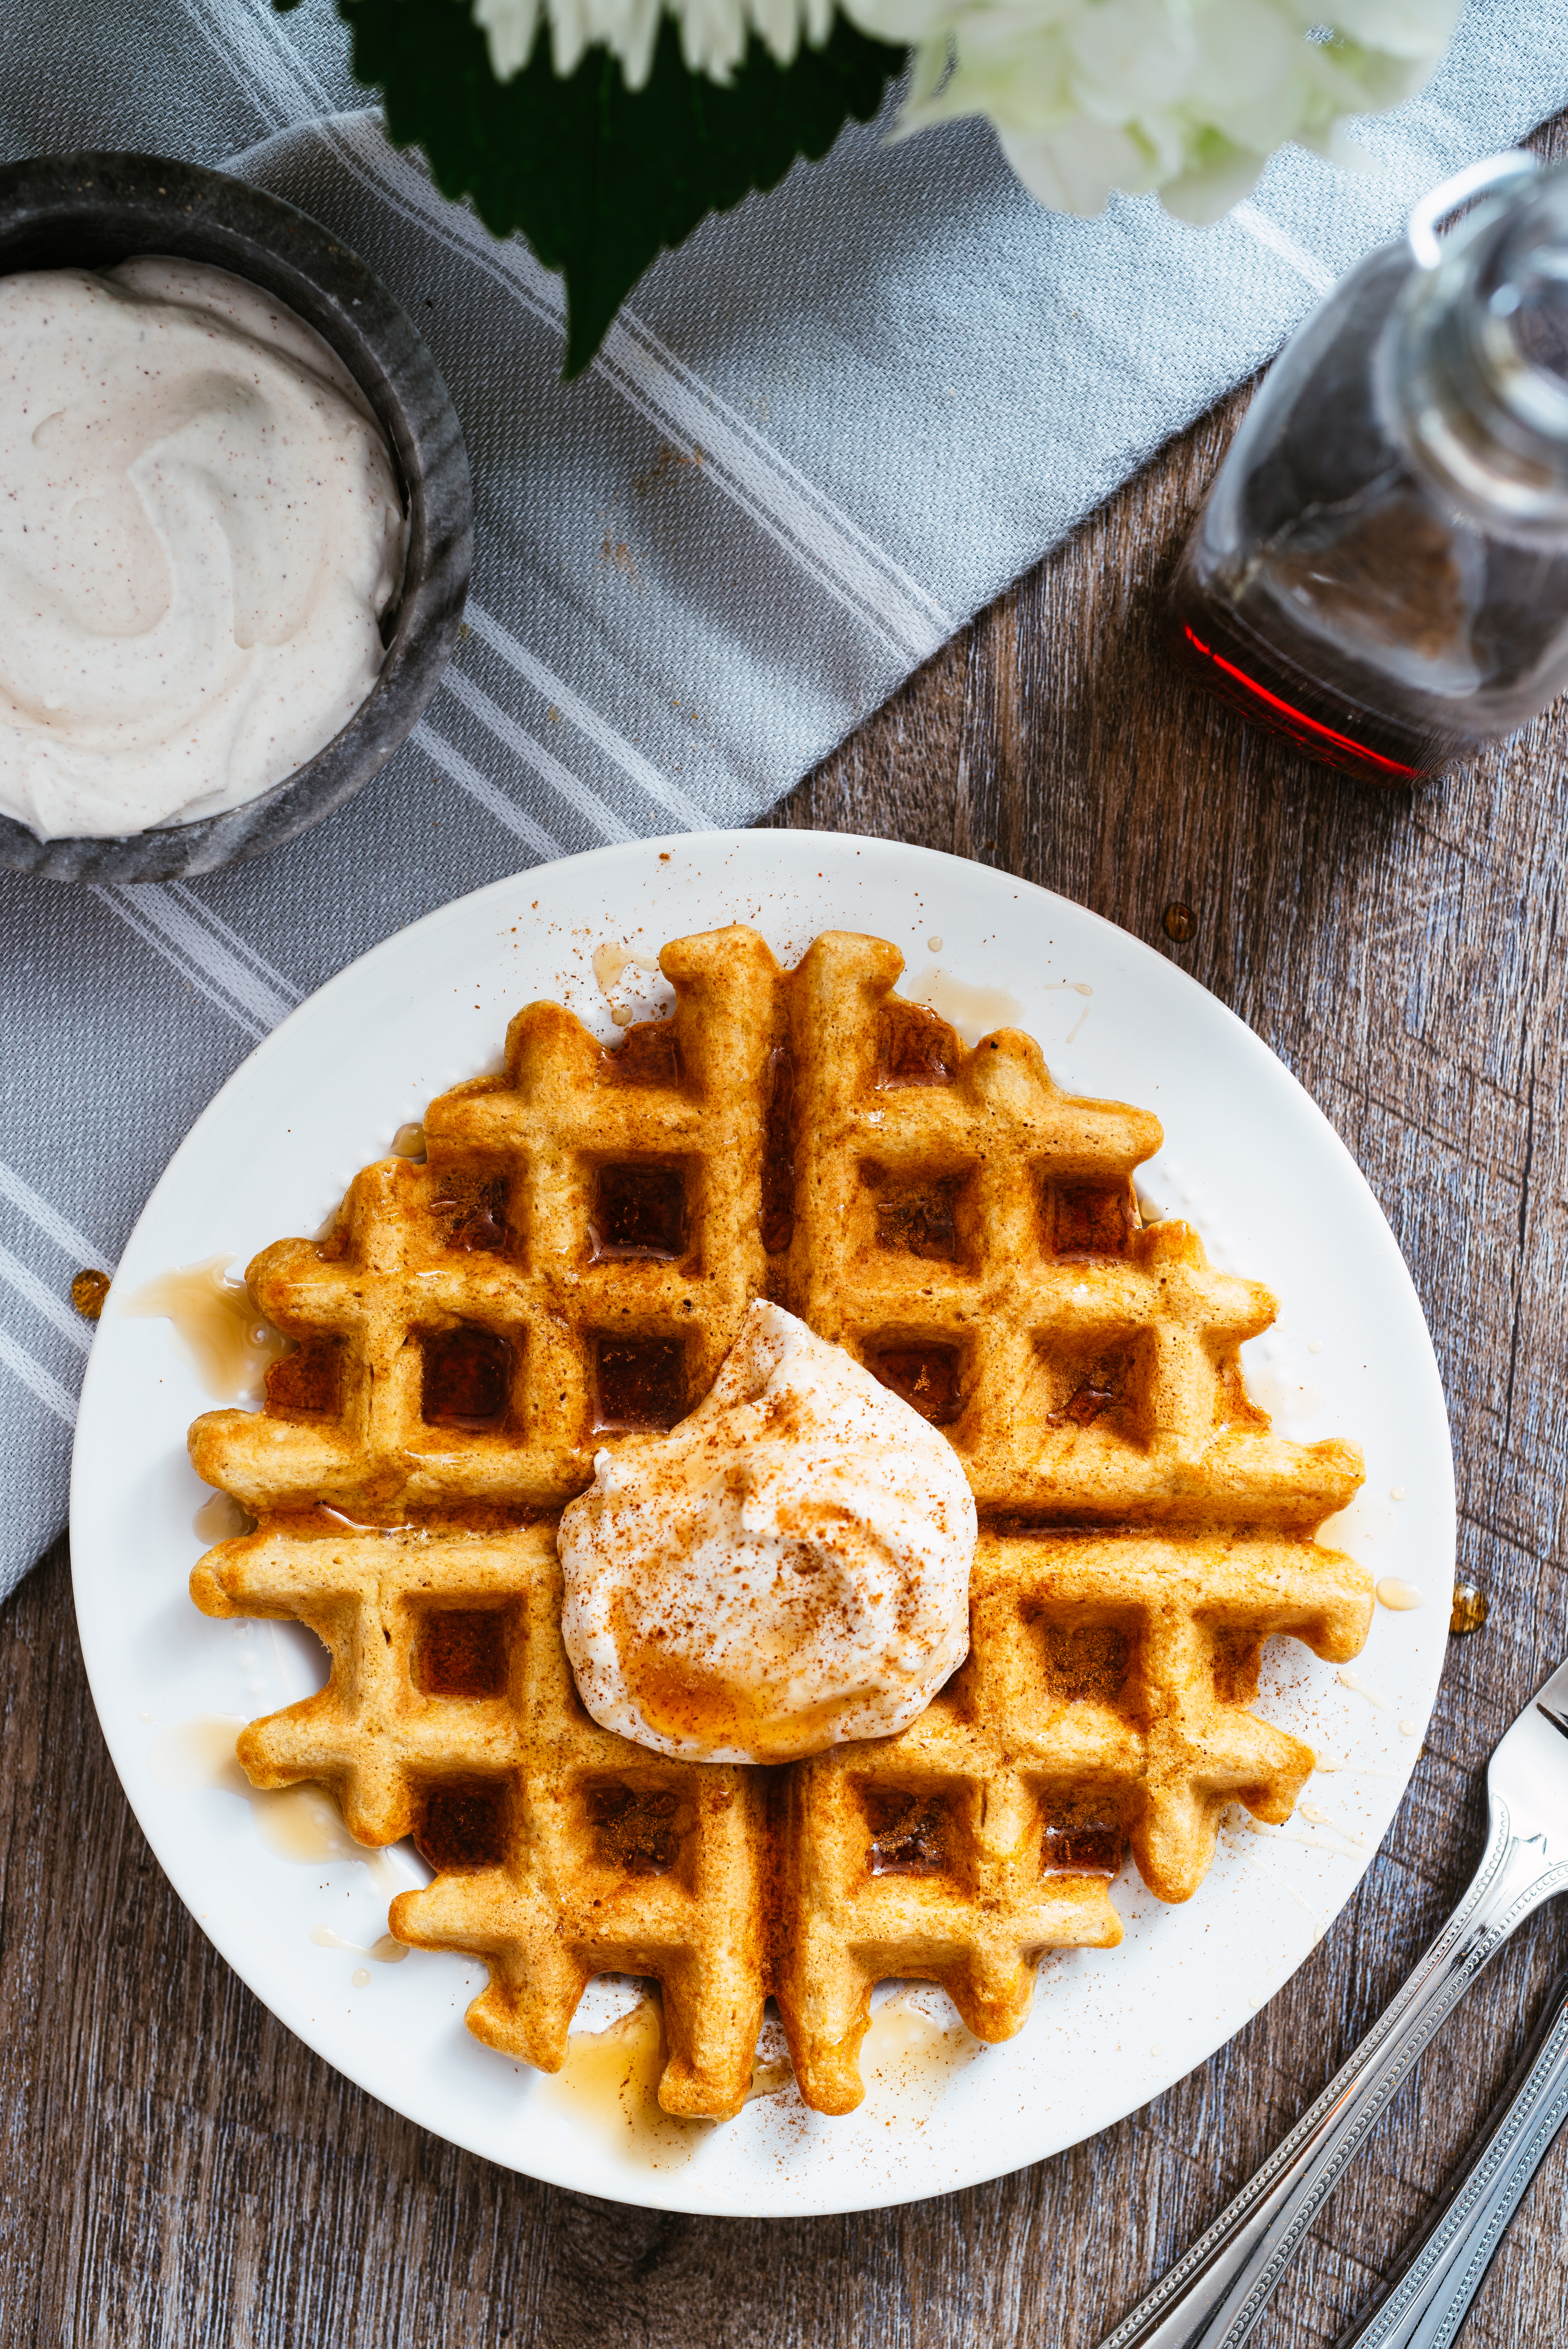
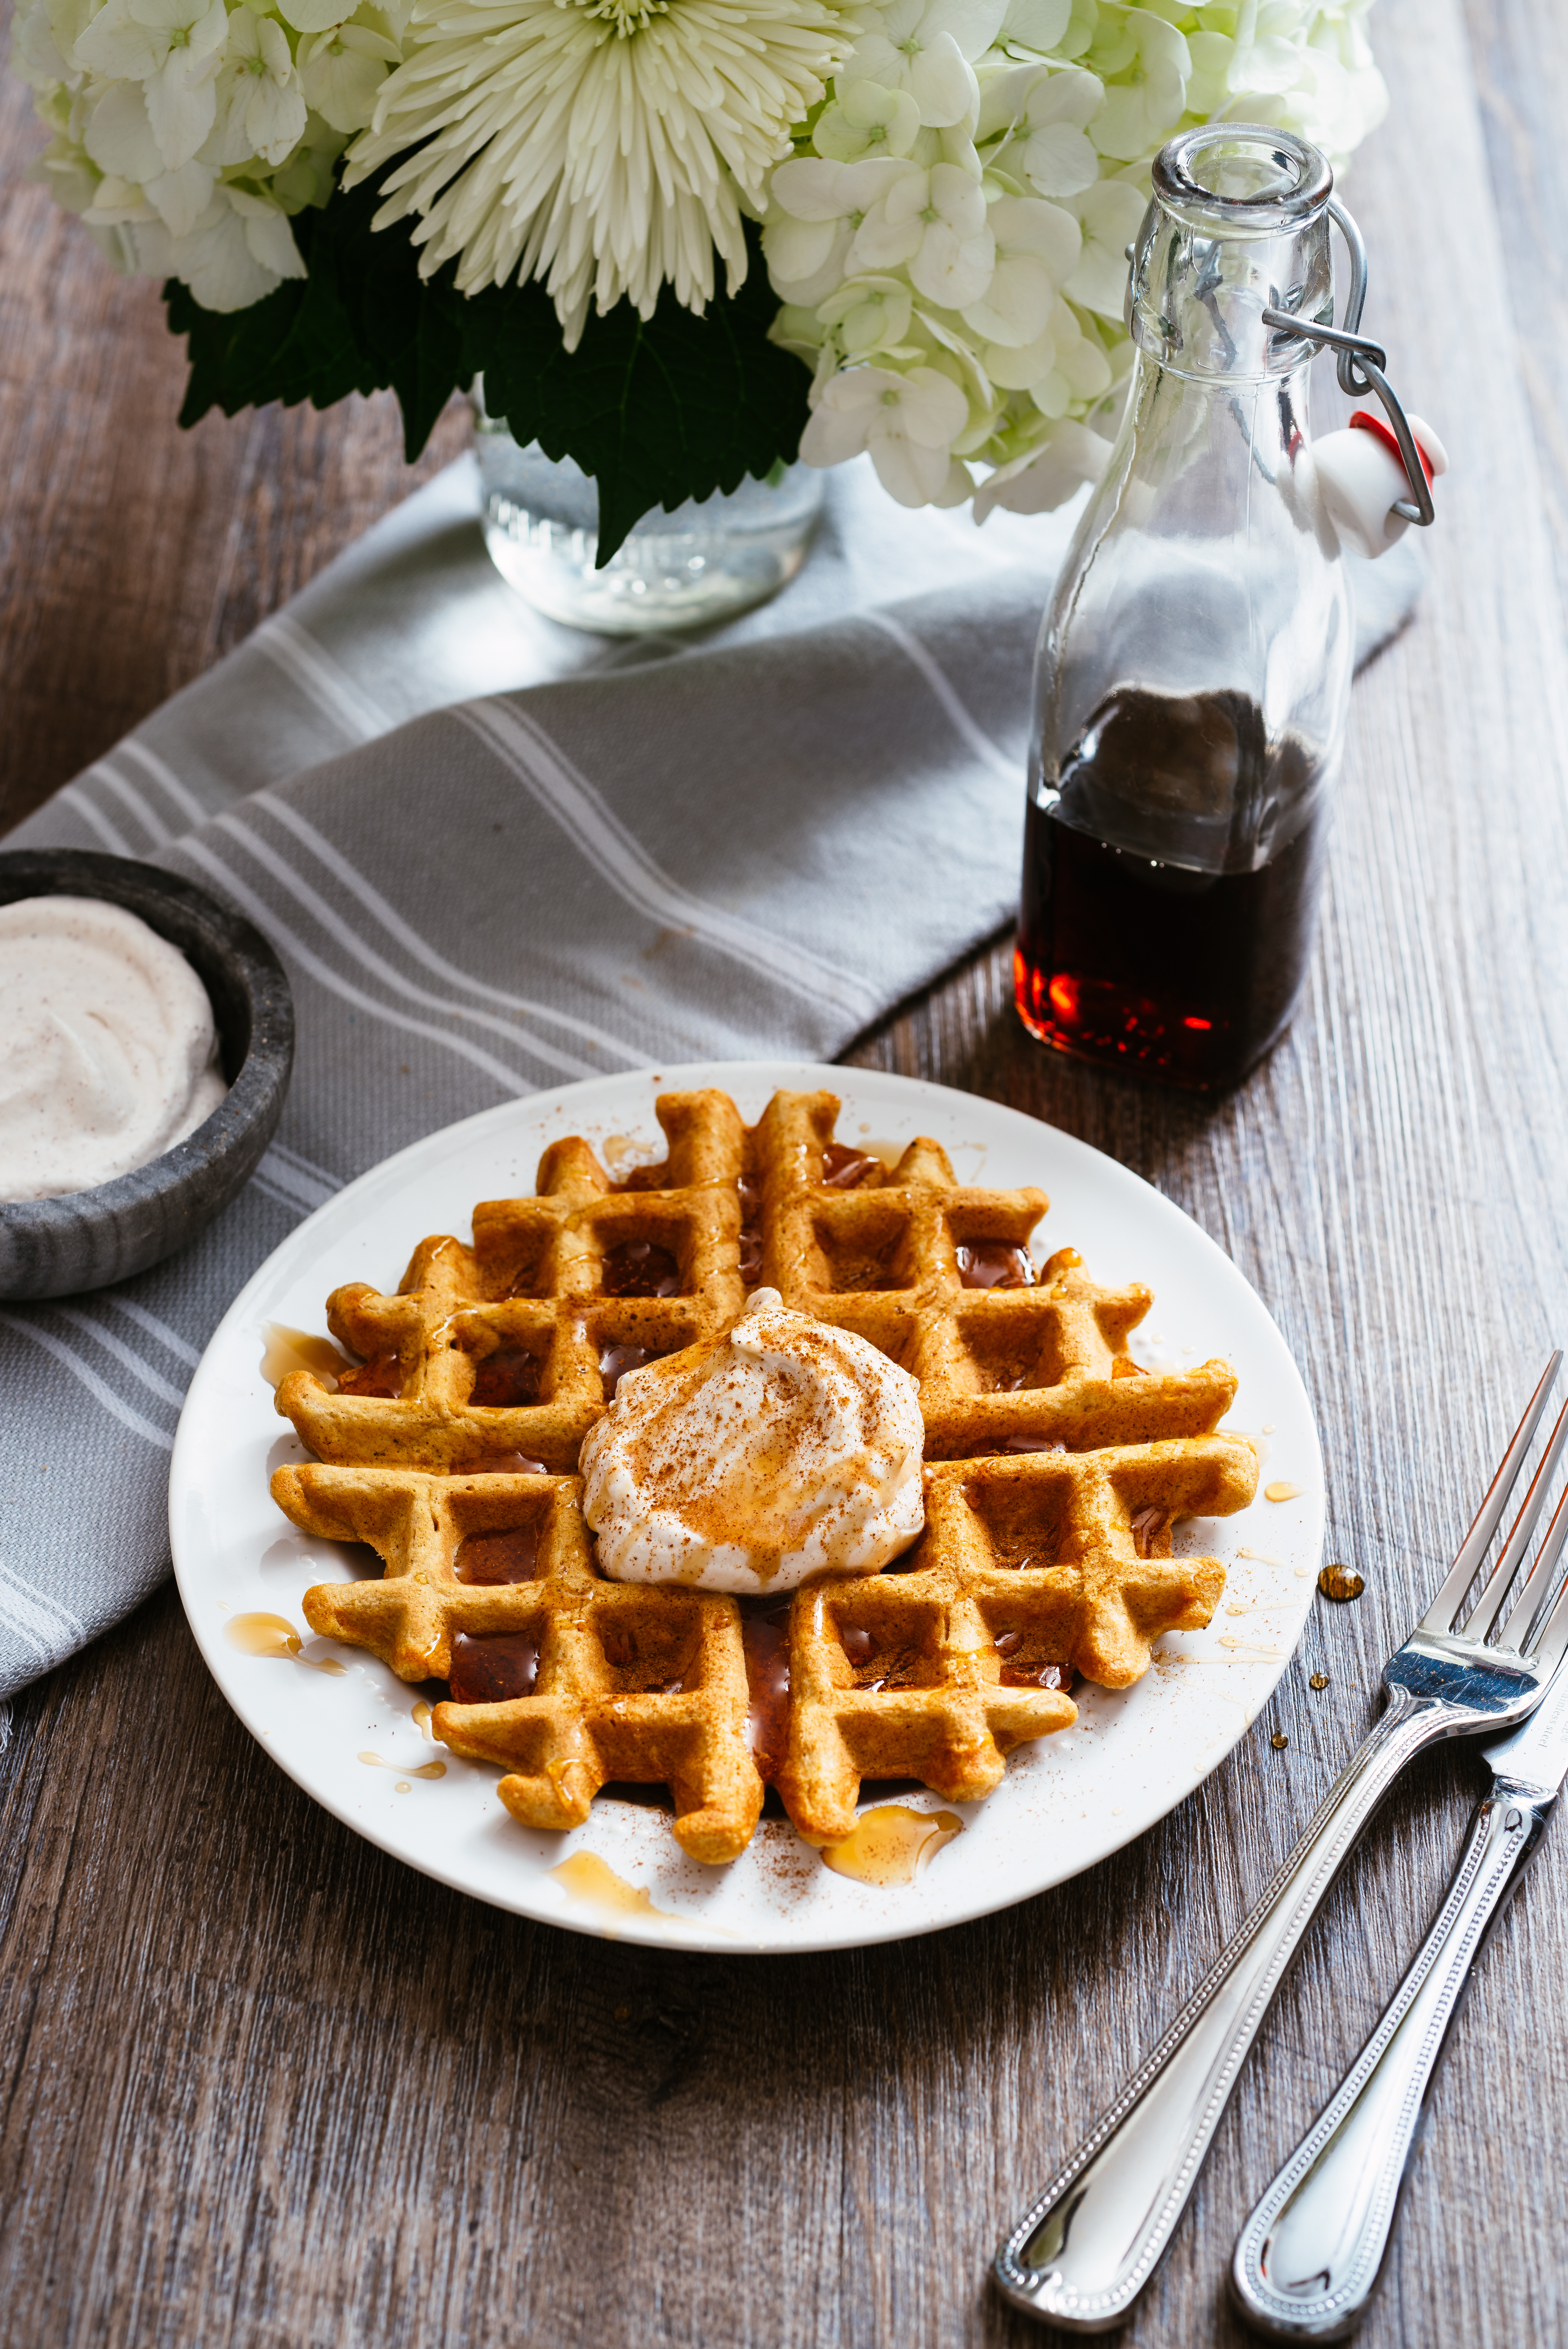
When I think long weekend, my mind automatically goes to breakfast. Yes, I know you are more than likely planning to attend a fabulous Easter dinner, but really, what’s better than sleeping in, drinking coffee and making homemade waffles?
Yep, not much, so this week I wanted to share with you these delicious sweet potato waffles I developed for Birmingham magazine. My goal with this recipe was to make them super easy, healthy, and satisfying for everyone in your “love-your-peeps” circle! In fact, you don’t even have to cook the sweet potatoes on the stove top- we microwave them instead. *You know I love you when I suggest a microwave!*
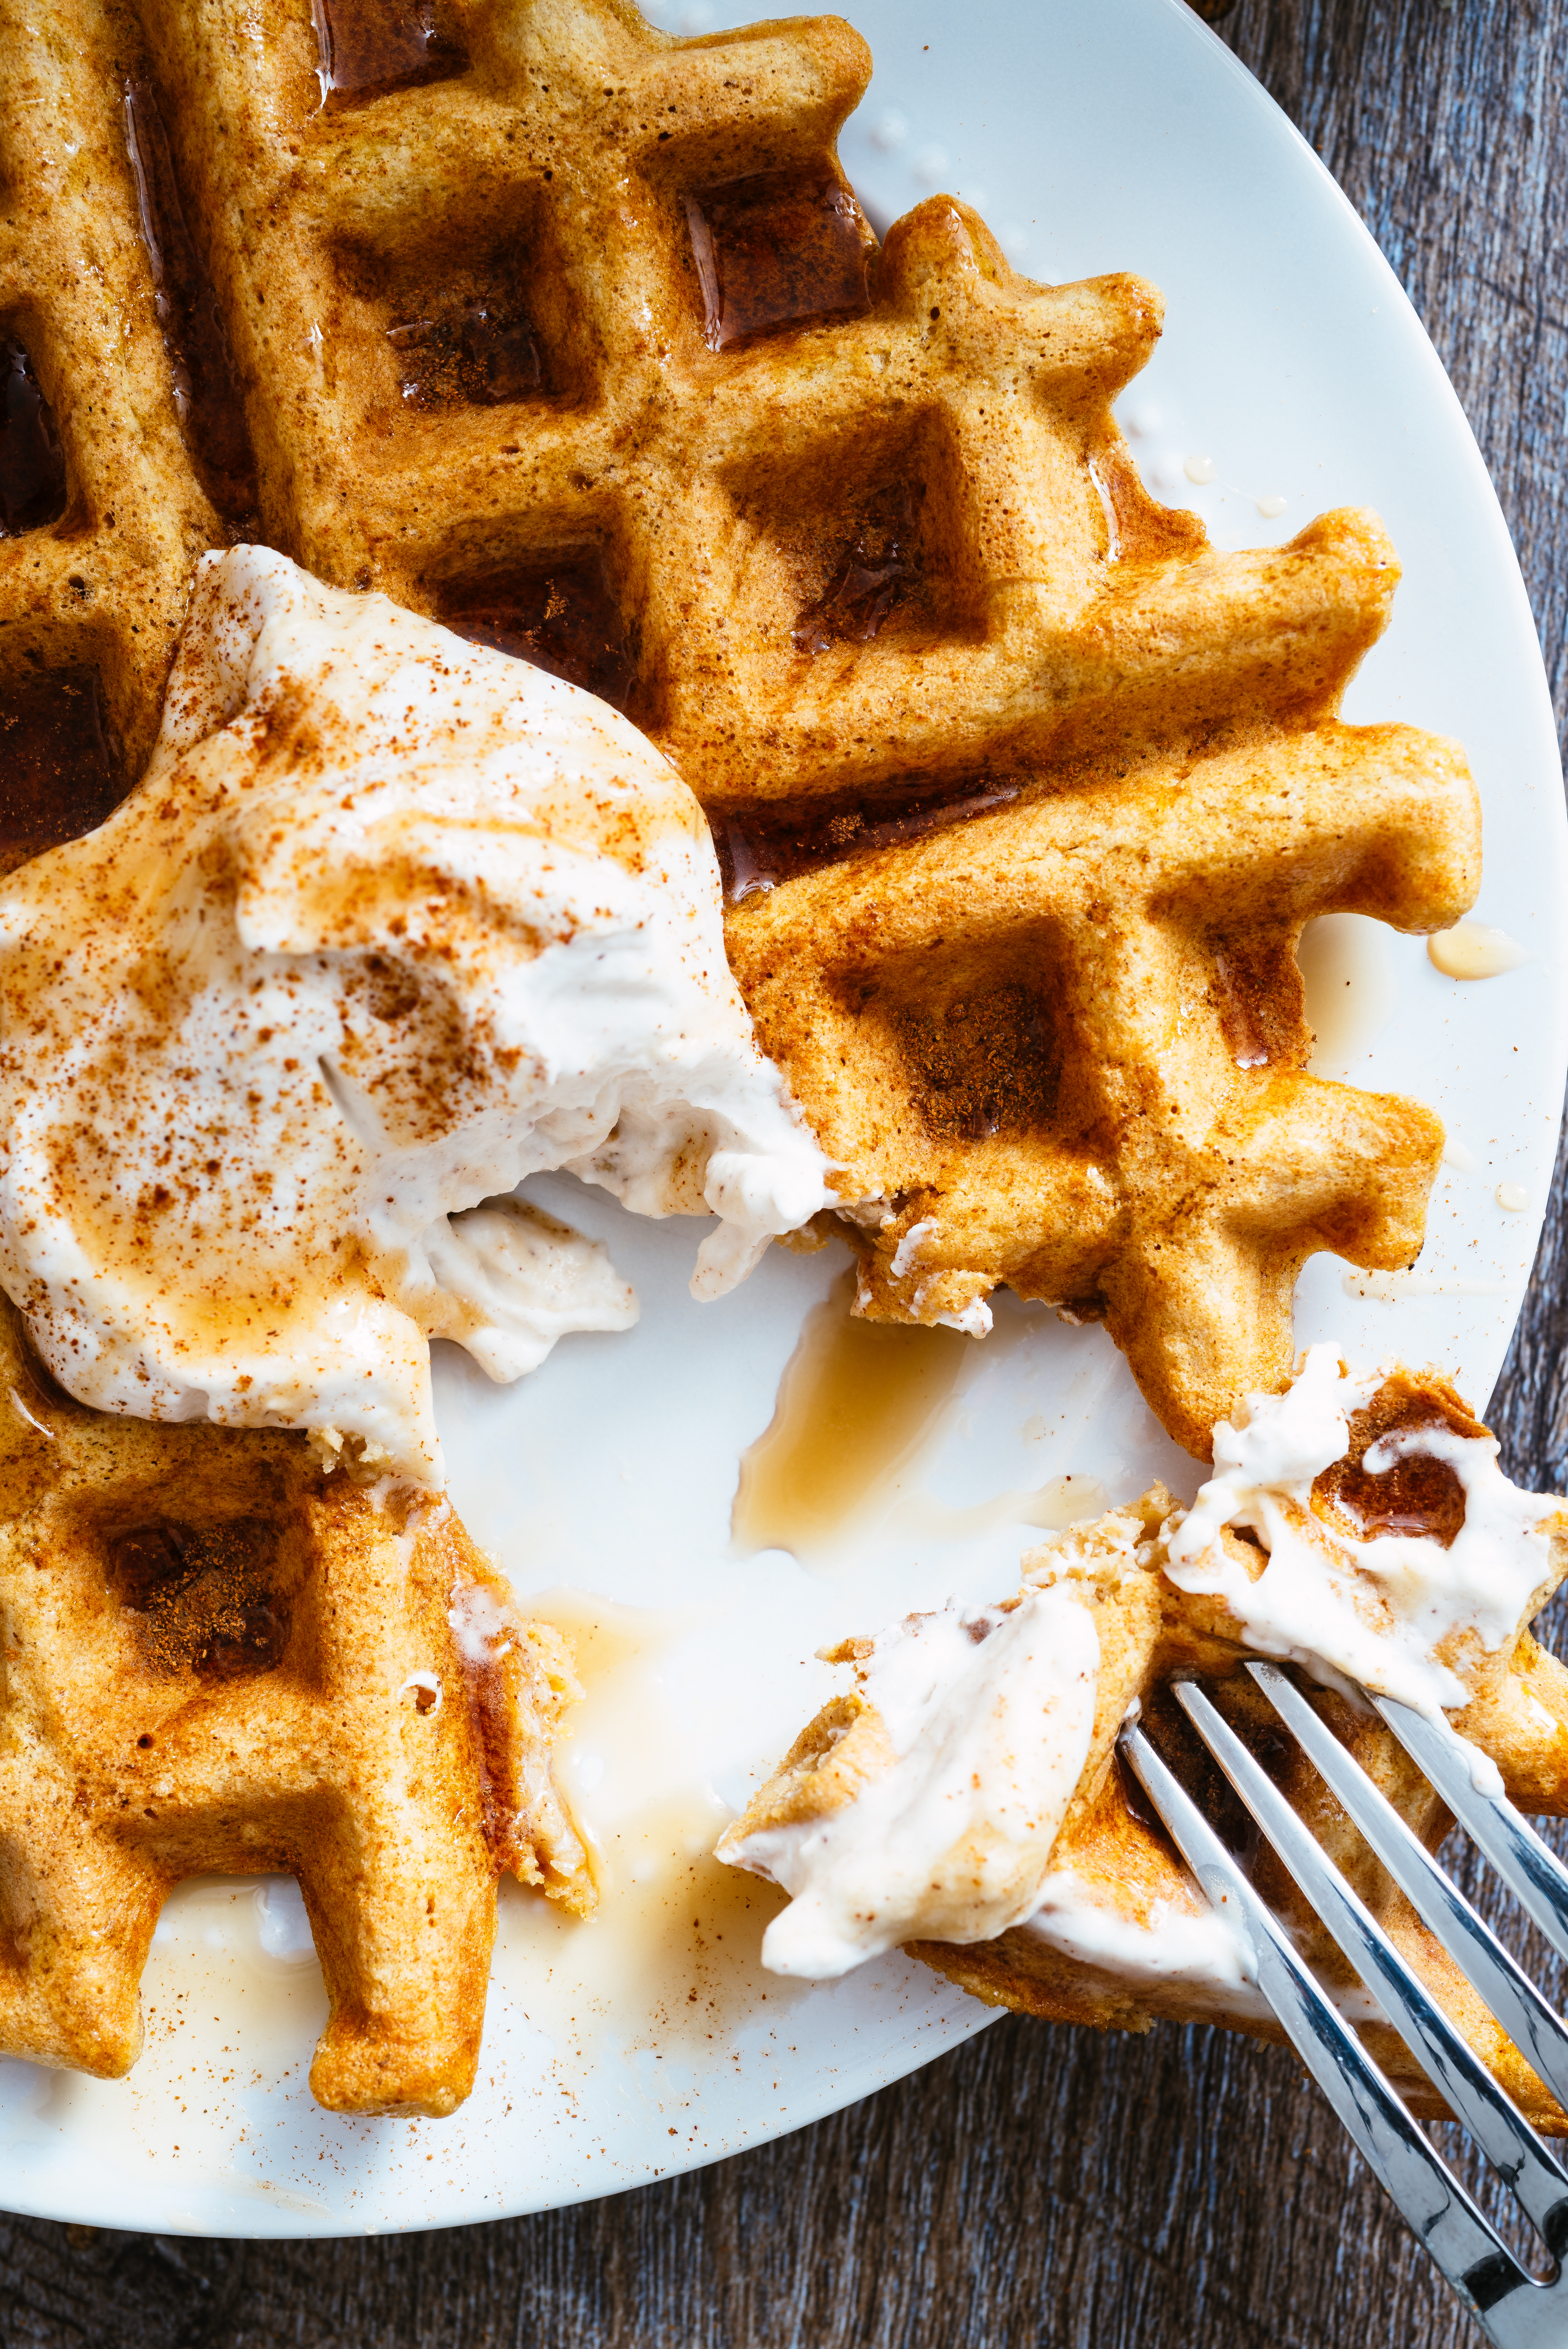
So, my fantastic Easter bunnies, without further ado, sweet potato waffles with cinnamon whipped cream. Top with maple syrup at your leisure
Sweet Potato Waffles with Cinnamon Whipped Cream
Sweet potato puree adds moisture and sweetness to these hearty, satisfying waffles. A perfect homemade breakfast for the ones you love to cook for on Easter weekend, top them with fresh cinnamon whipped cream and maple syrup for a springtime treat.
Yield: 7 waffles
What You Will Need:
1 cup peeled, diced sweet potato
3 cups water
2 egg whites
2 egg yolks
1 cup unsweetened almond milk
3 tablespoons coconut oil, melted
2 teaspoons vanilla
1 cup all-purpose flour
2 tablespoons dark brown sugar, packed
2 teaspoons baking powder
2 teaspoons ground cinnamon
1/2 teaspoon salt
1/2 teaspoon pumpkin pie spice
Cooking spray, for waffle iron
Cinnamon Whipped Cream (recipe follows)
Maple syrup (for drizzling)
What You Will Do:
Put diced sweet potato in a large microwave-safe bowl. Pour water over. Cover; microwave for 10 minutes.
While potato is cooking, preheat waffle iron to medium-high heat.
Let bowl with sweet potato in it cool for a few minutes; carefully remove from microwave with oven mitts.
Uncover and drain sweet potatoes. Mash with a fork in a large bowl until smooth.
Beat egg whites in separate, medium bowl with a whisk until fluffy, white, and forming soft peaks, about 3-4 minutes.
Add egg yolks, almond milk, melted coconut oil, and vanilla extract to sweet potatoes. Stir with a fork until smooth and combined.
In another large bowl, stir together flour, sugar, baking powder, salt, and spices.
Pour sweet potato mixture into dry ingredients and stir until just combined and flour disappears (don’t over stir). Fold in egg whites until combined and evenly moistened.
Pour batter by cups into preheated waffle iron sprayed with cooking spray. Smooth evenly in iron. Cook for about 5 minutes, or until darkened and crispy.
Serve immediately with cinnamon whipped cream and maple syrup, if desired.
Cinnamon Whipped Cream
*YUMMY!
What You Will Need:
1 cup cold heavy whipping cream
2 tablespoons powdered sugar
1/2 teaspoon cinnamon
What You Will Do:
Whip all ingredients on low in a cold mixing bowl.
Once ingredients are combined, switch to high and beat until stiff peaks form.
I hope you are having the sweetest start to your year!
To start this January off in the most loving of ways, I am HONORED to partner with Kristen Shoates, one of the most talented freelance Nashville writers I know, to talk about my absolute favorite topic in the world, HOW TO FALL IN LOVE WITH FOOD.
Kristen has had an incredible journey with food- and without giving too many details away, let me just say she went from Lean Cuisines to now functioning as a total, holistic girl boss in the kitchen.
You can find Kristen at www.kristenshoates.com!
I also know that January is the month of resolutions. And whatever decisions you have made on ways to better your life- I honor that! But I’m also wondering what would happen if we all decided to, instead of seeing food as bad or dirty or evil- to flip the light switch on and see it as GOOD, HEALING and NOURISHING. To focus first on the way we THINK about food, which will then affect our motivation to cook- and creativity in the kitchen!
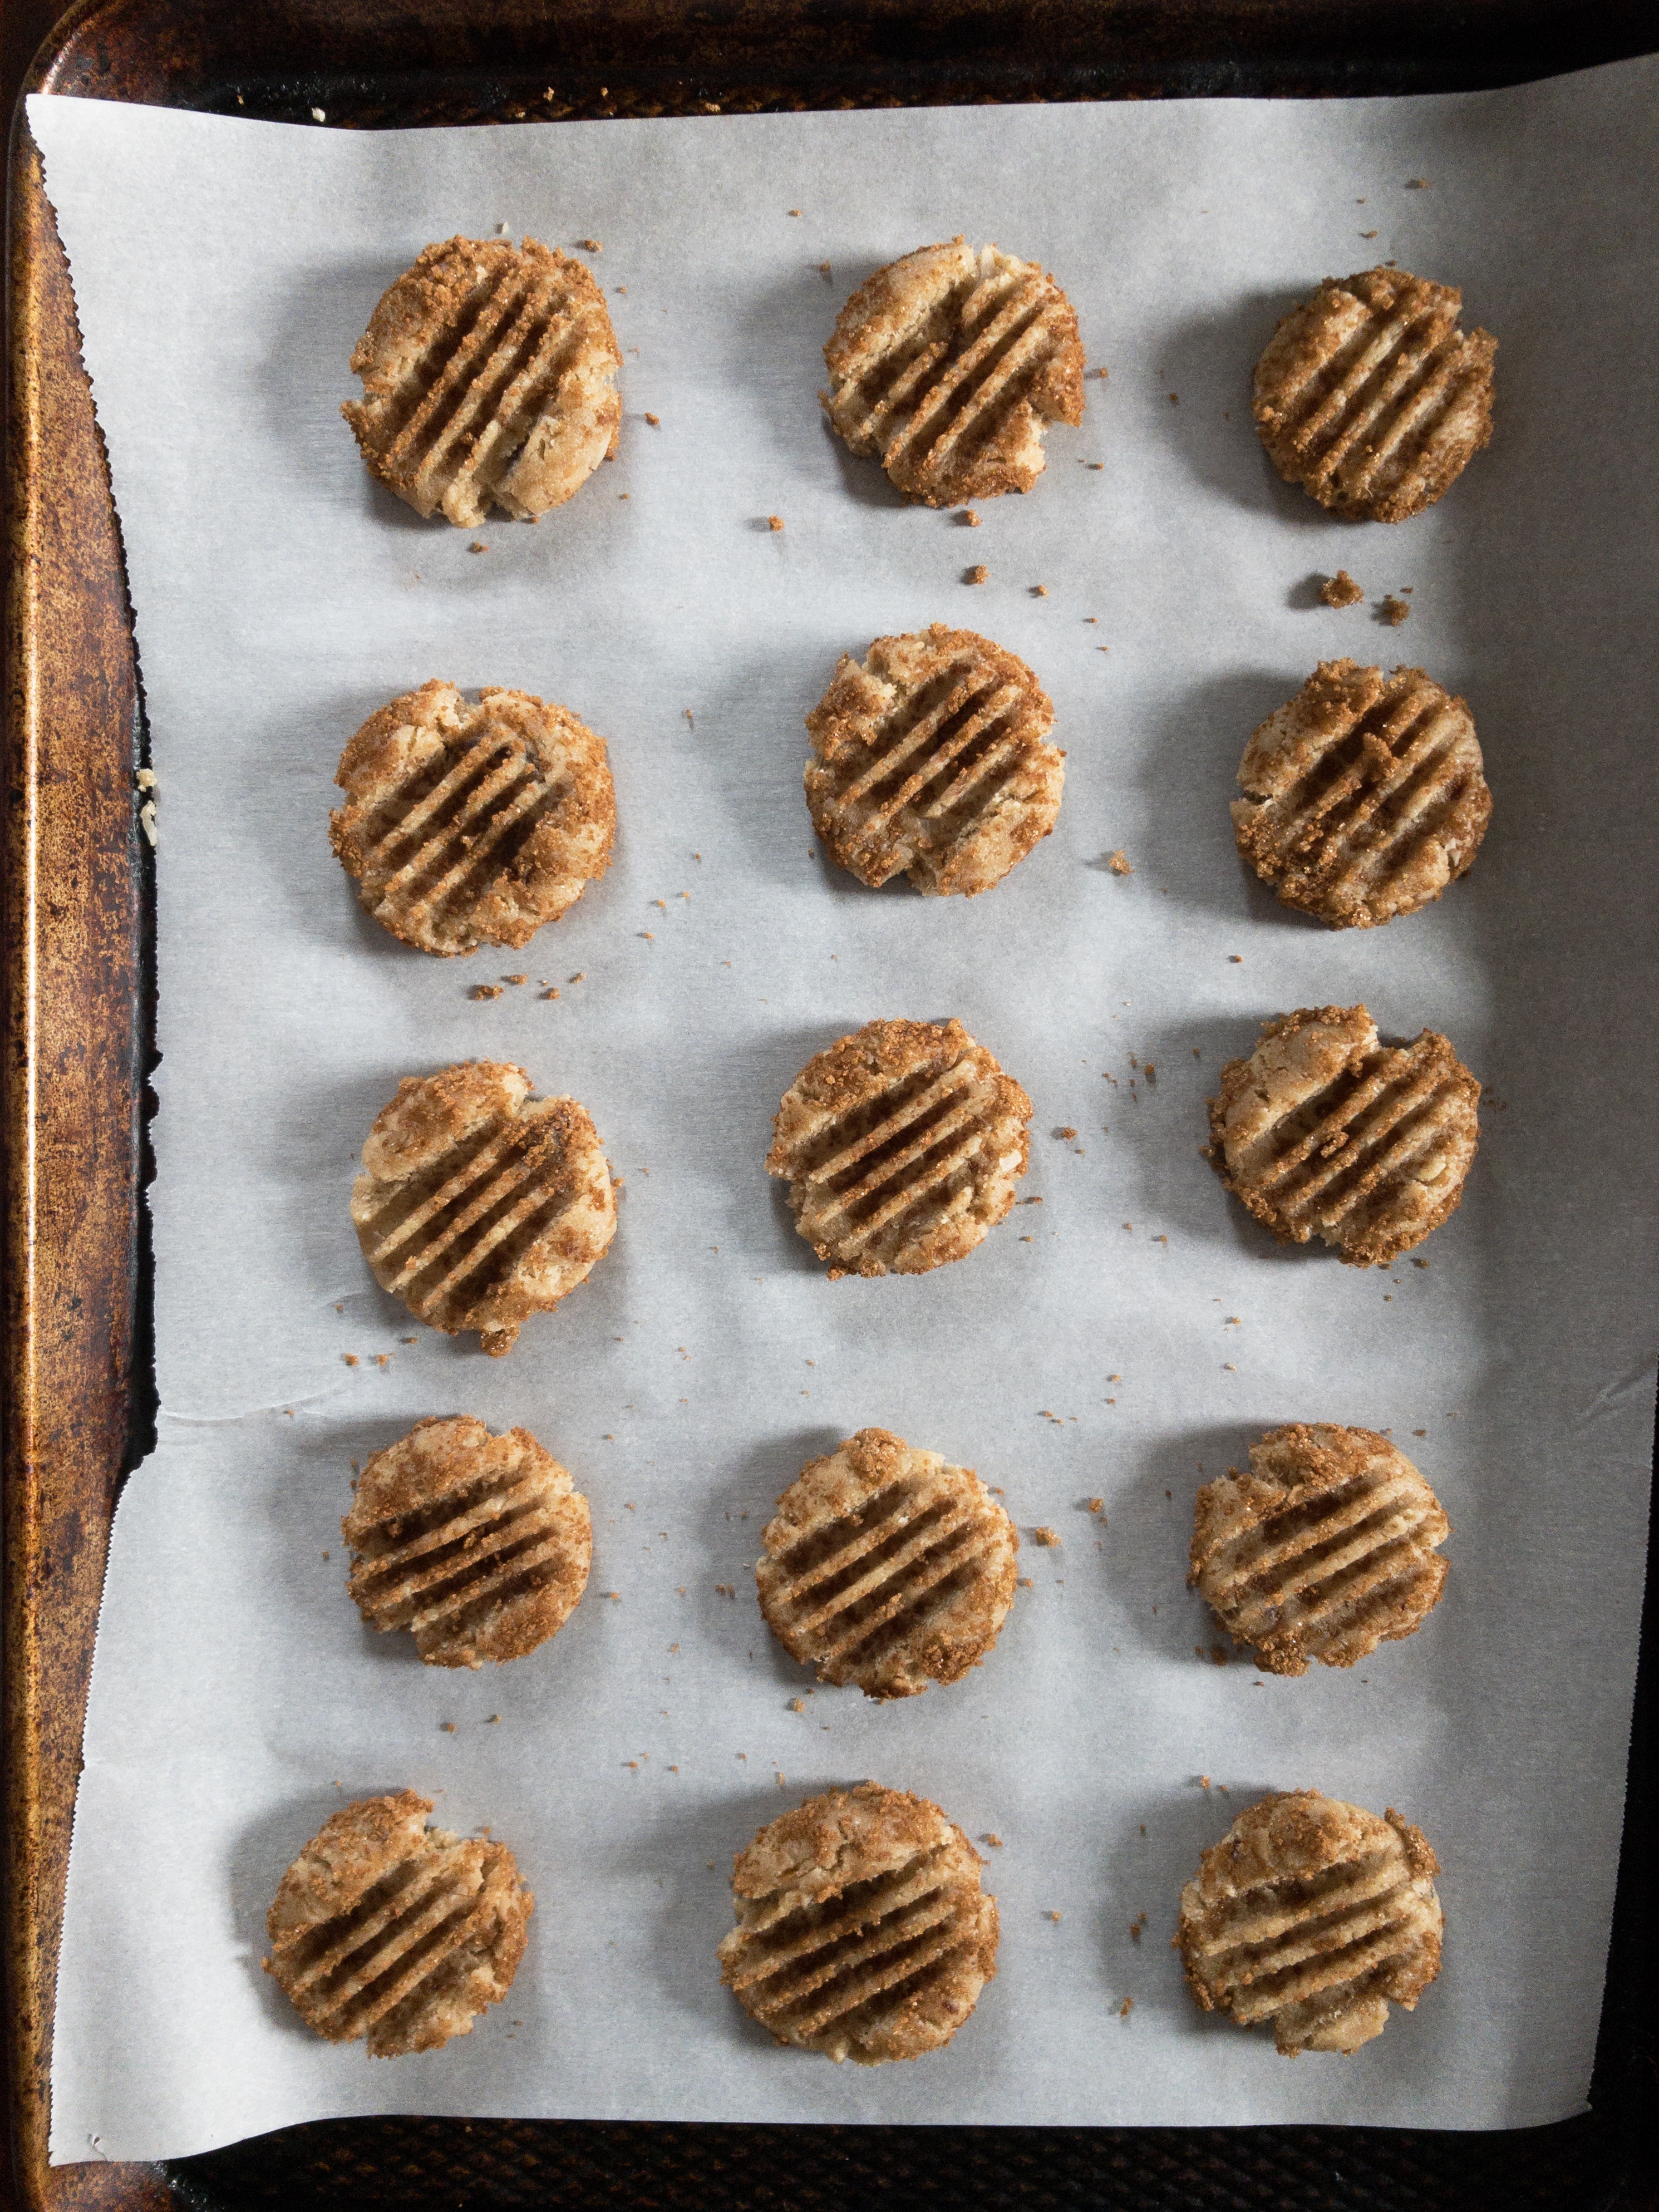
Vegan snickerdoodles before the oven…
Also, in partnership with Kristen’s amazing writing, I’ll be posting a YouTube video over on the Luv Cooks channel about each reason she gives. I can’t wait to share this content with you!
So without further ado, here’s Kristen:
I remember the first time I went to the grocery store in college, with my first apartment to stock and the purchasing power of my first debit card in my hands. It felt exhilarating to walk through those automatic glass doors into a store filled with thousands of options and get to buy whatever I, the new boss of my refrigerator, wanted.
But as I aimlessly wandered the aisles, I quickly realized I had absolutely NO idea what to buy. Going from my parent’s table to college dining halls, the question of what to eat had always been an abstract one – until at age 19, I found myself standing bewildered beneath the fluorescent lights of the Chapel Hill Food Lion, filling my cart with sugary yogurt and processed crackers and Lean Cuisine. After all, these were the foods the skinny girls ate on commercials, and as women, wasn’t our primary dietary objective to choose food that makes us skinny?
After school, my supposedly healthy diet of low-fat microwave dinners and prepackaged snacks took much of the joy out of food and cooking. Preparing a meal was a chore, eating it a necessity. Half of my meals were consumed in a car or at a desk, barely registering as a conscious act. When I started dating my now-husband, I very proactively warned him that I.did.not.cook. It wasn’t that I had never seen what it looked like to spread love through a meal – I was raised half Italian and half Southern Baptist after all – but my lifestyle and our food system had so greatly disconnected me from my food that I lost a sense of the purpose and power of it.
As simple as the question of “what do I eat for dinner?” might be, far too many of us don’t really know how to answer it. Our parents fed us, but often didn’t teach us why they fed us what they did, sending us out into a food jungle of additives and artificial flavors and abstract health claims, with little knowledge of how to truly fuel our bodies. As a result, many of us have a twisted relationship with our food. Perhaps you see it as the enemy, something to be feared and restricted in an attempt to fit into society’s beauty standard du jour. Maybe for you it’s all business, a transactional relationship focused on efficiency rather than substance. Maybe yours is volatile, or lifeless, or passionless.
But I want to propose a new kind of relationship with food. I want to propose that you fallin love with it.
My love affair with food began slowly, the kind of love that begins with a small spark and deepens over the years. Pre-packaged snacks were slowly replaced with fresh produce, to-go orders swapped for nights spent creating over a stove. As I filled my body with real, whole foods, I became healthier, more aware and more connected to everything around me. And as I discovered new flavors and varieties and foods I didn’t even know existed, I became enamored with the beauty and diversity of food available to us – and in turn, fell in love with eating and believe it or not, cooking (you’re welcome, hubs).
So as you and your food sit down for a much-needed DTR, here are four reasons to fall head-over-heels with your next meal:
Food as medicine. The greatest catalyst in changing my relationship with food was recognizing that what I ate actually had a real impact on how I felt, looked and lived. Though it wasn’t always an act of consciousness, eating was an act of consequence, and recognizing that my choices mattered turned eating well into a joy rather than a burden. Real, whole foods have the power to build up our bodies, enhance our beauty and even restore and reverse disease. Food truly is medicine, and eating something that you know is bringing wholeness to your body makes eating a richly positive experience rather than a fear-based one.
YES and AMEN!! Isn’t Kristen amazing?! And stay tuned! We have THREE more reasons to come in January!!
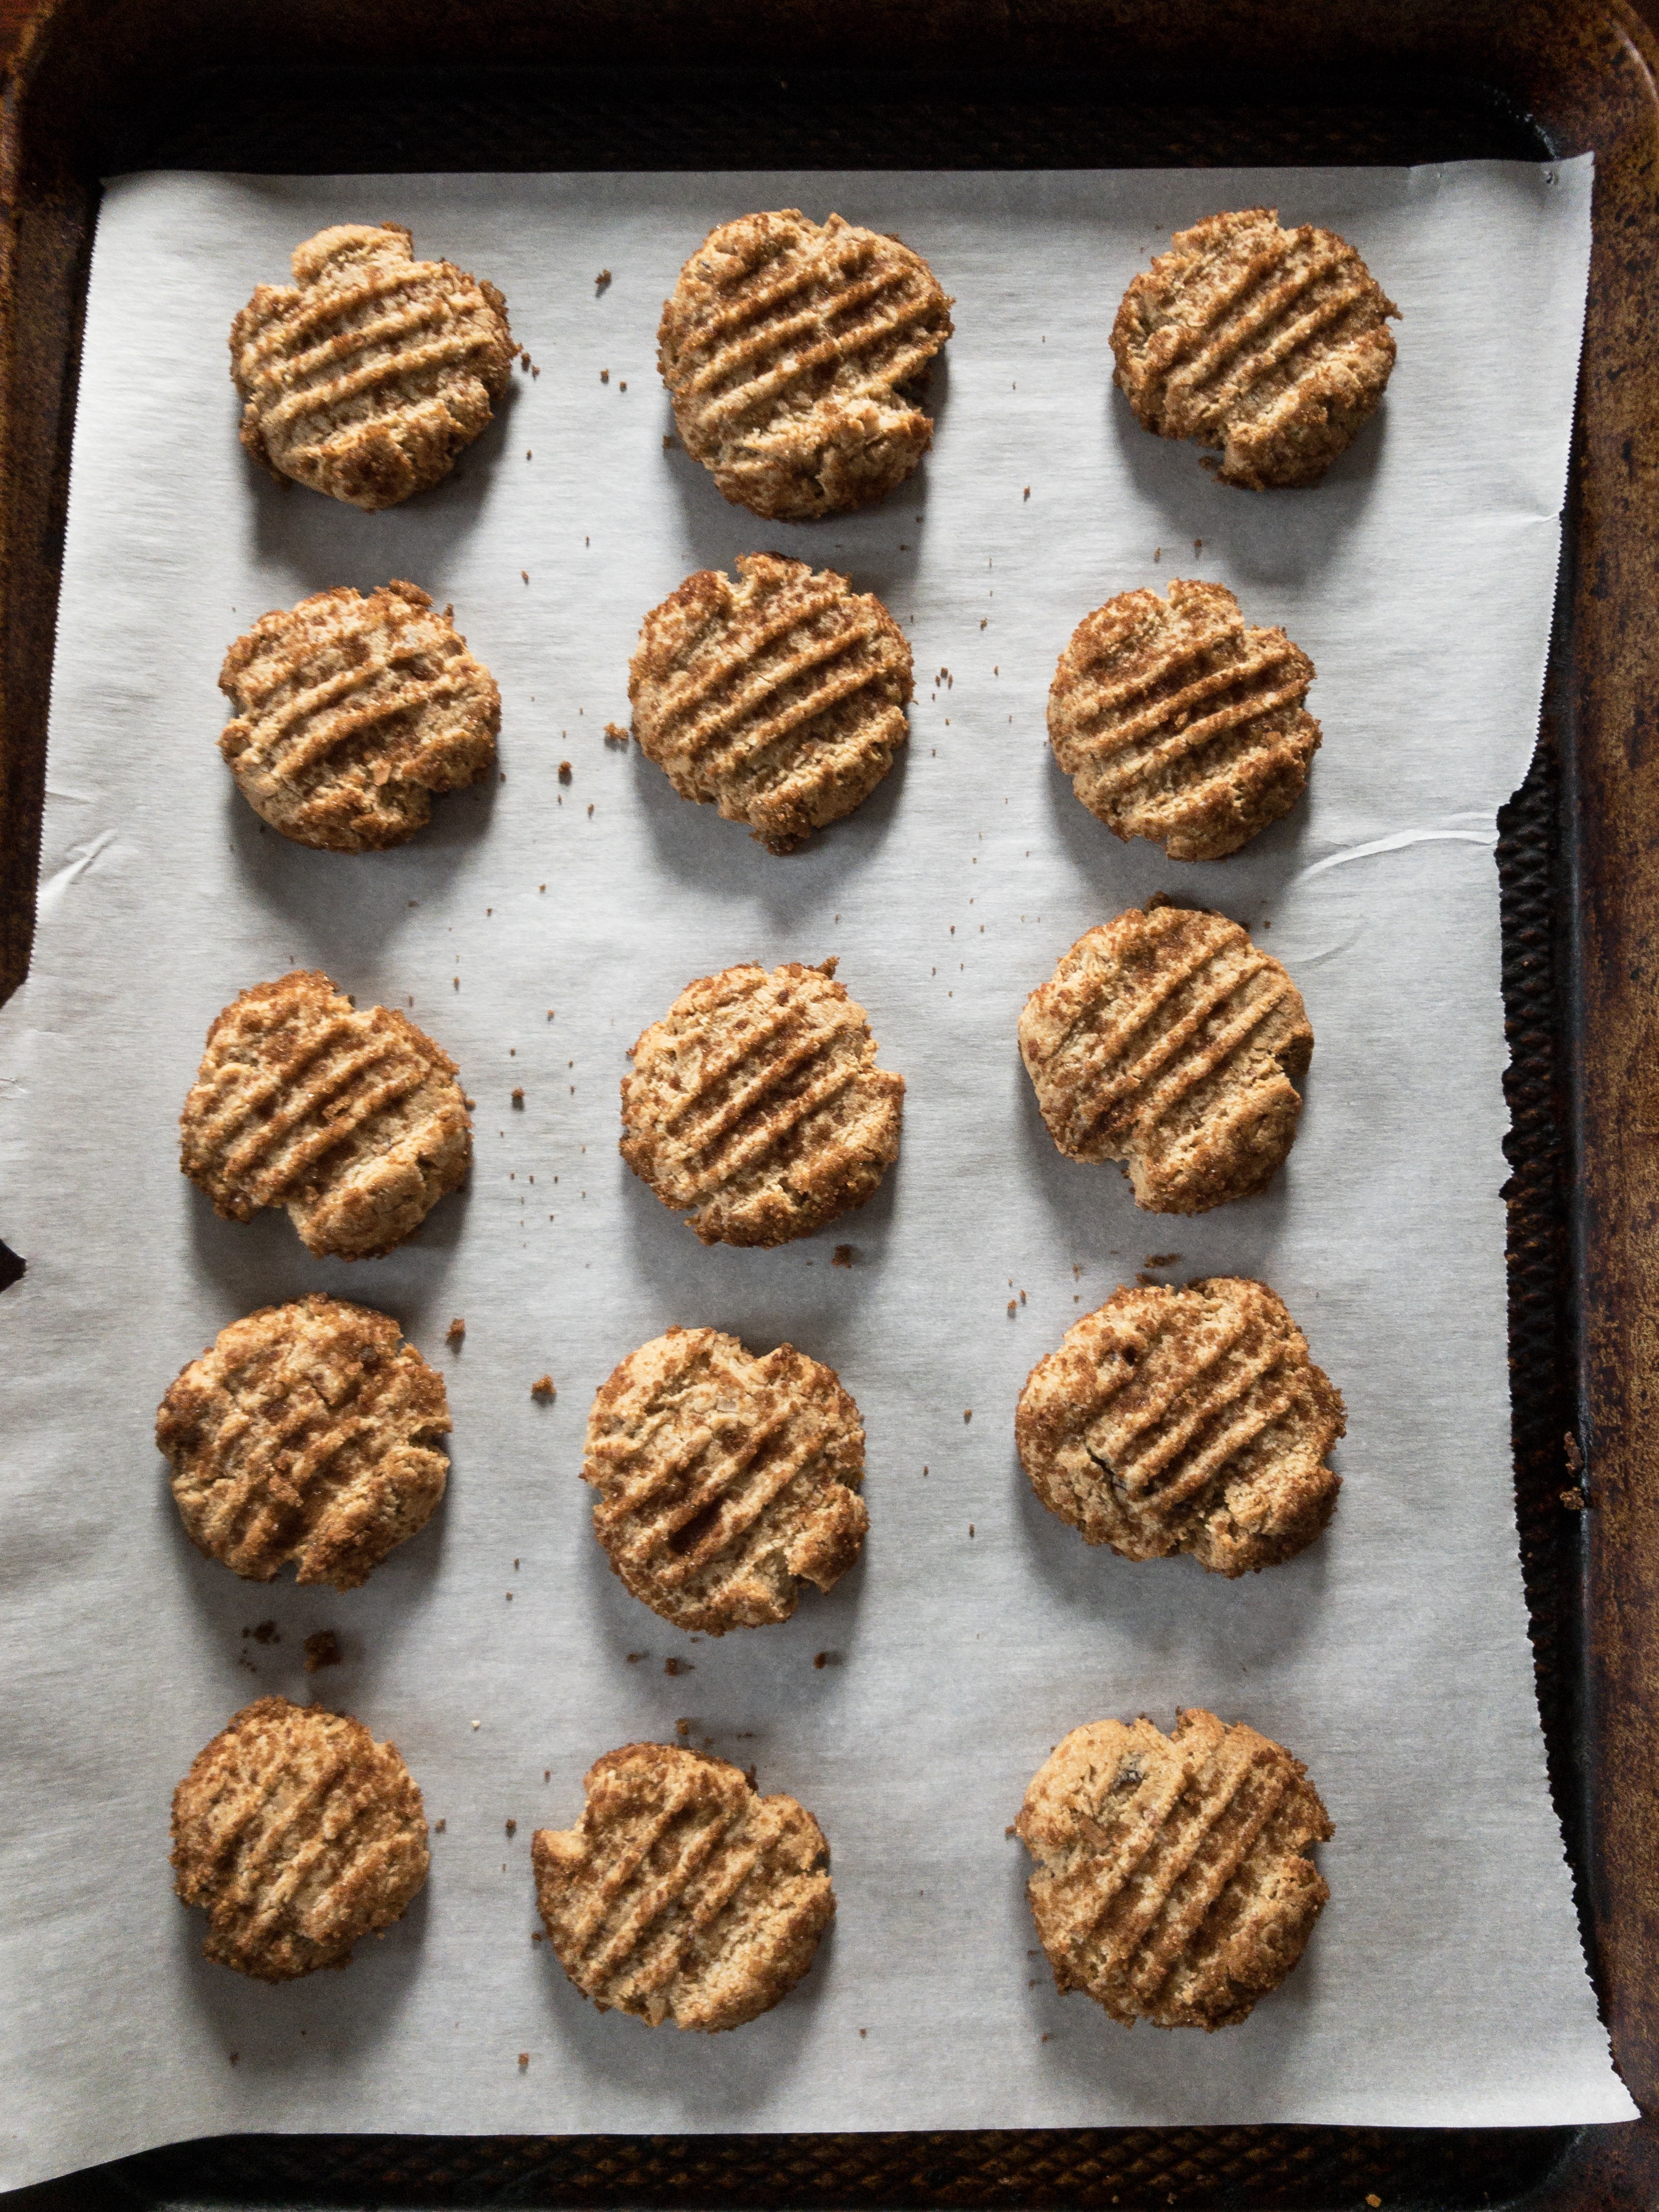
Snickerdoodles, featuring neat egg, after the bake!
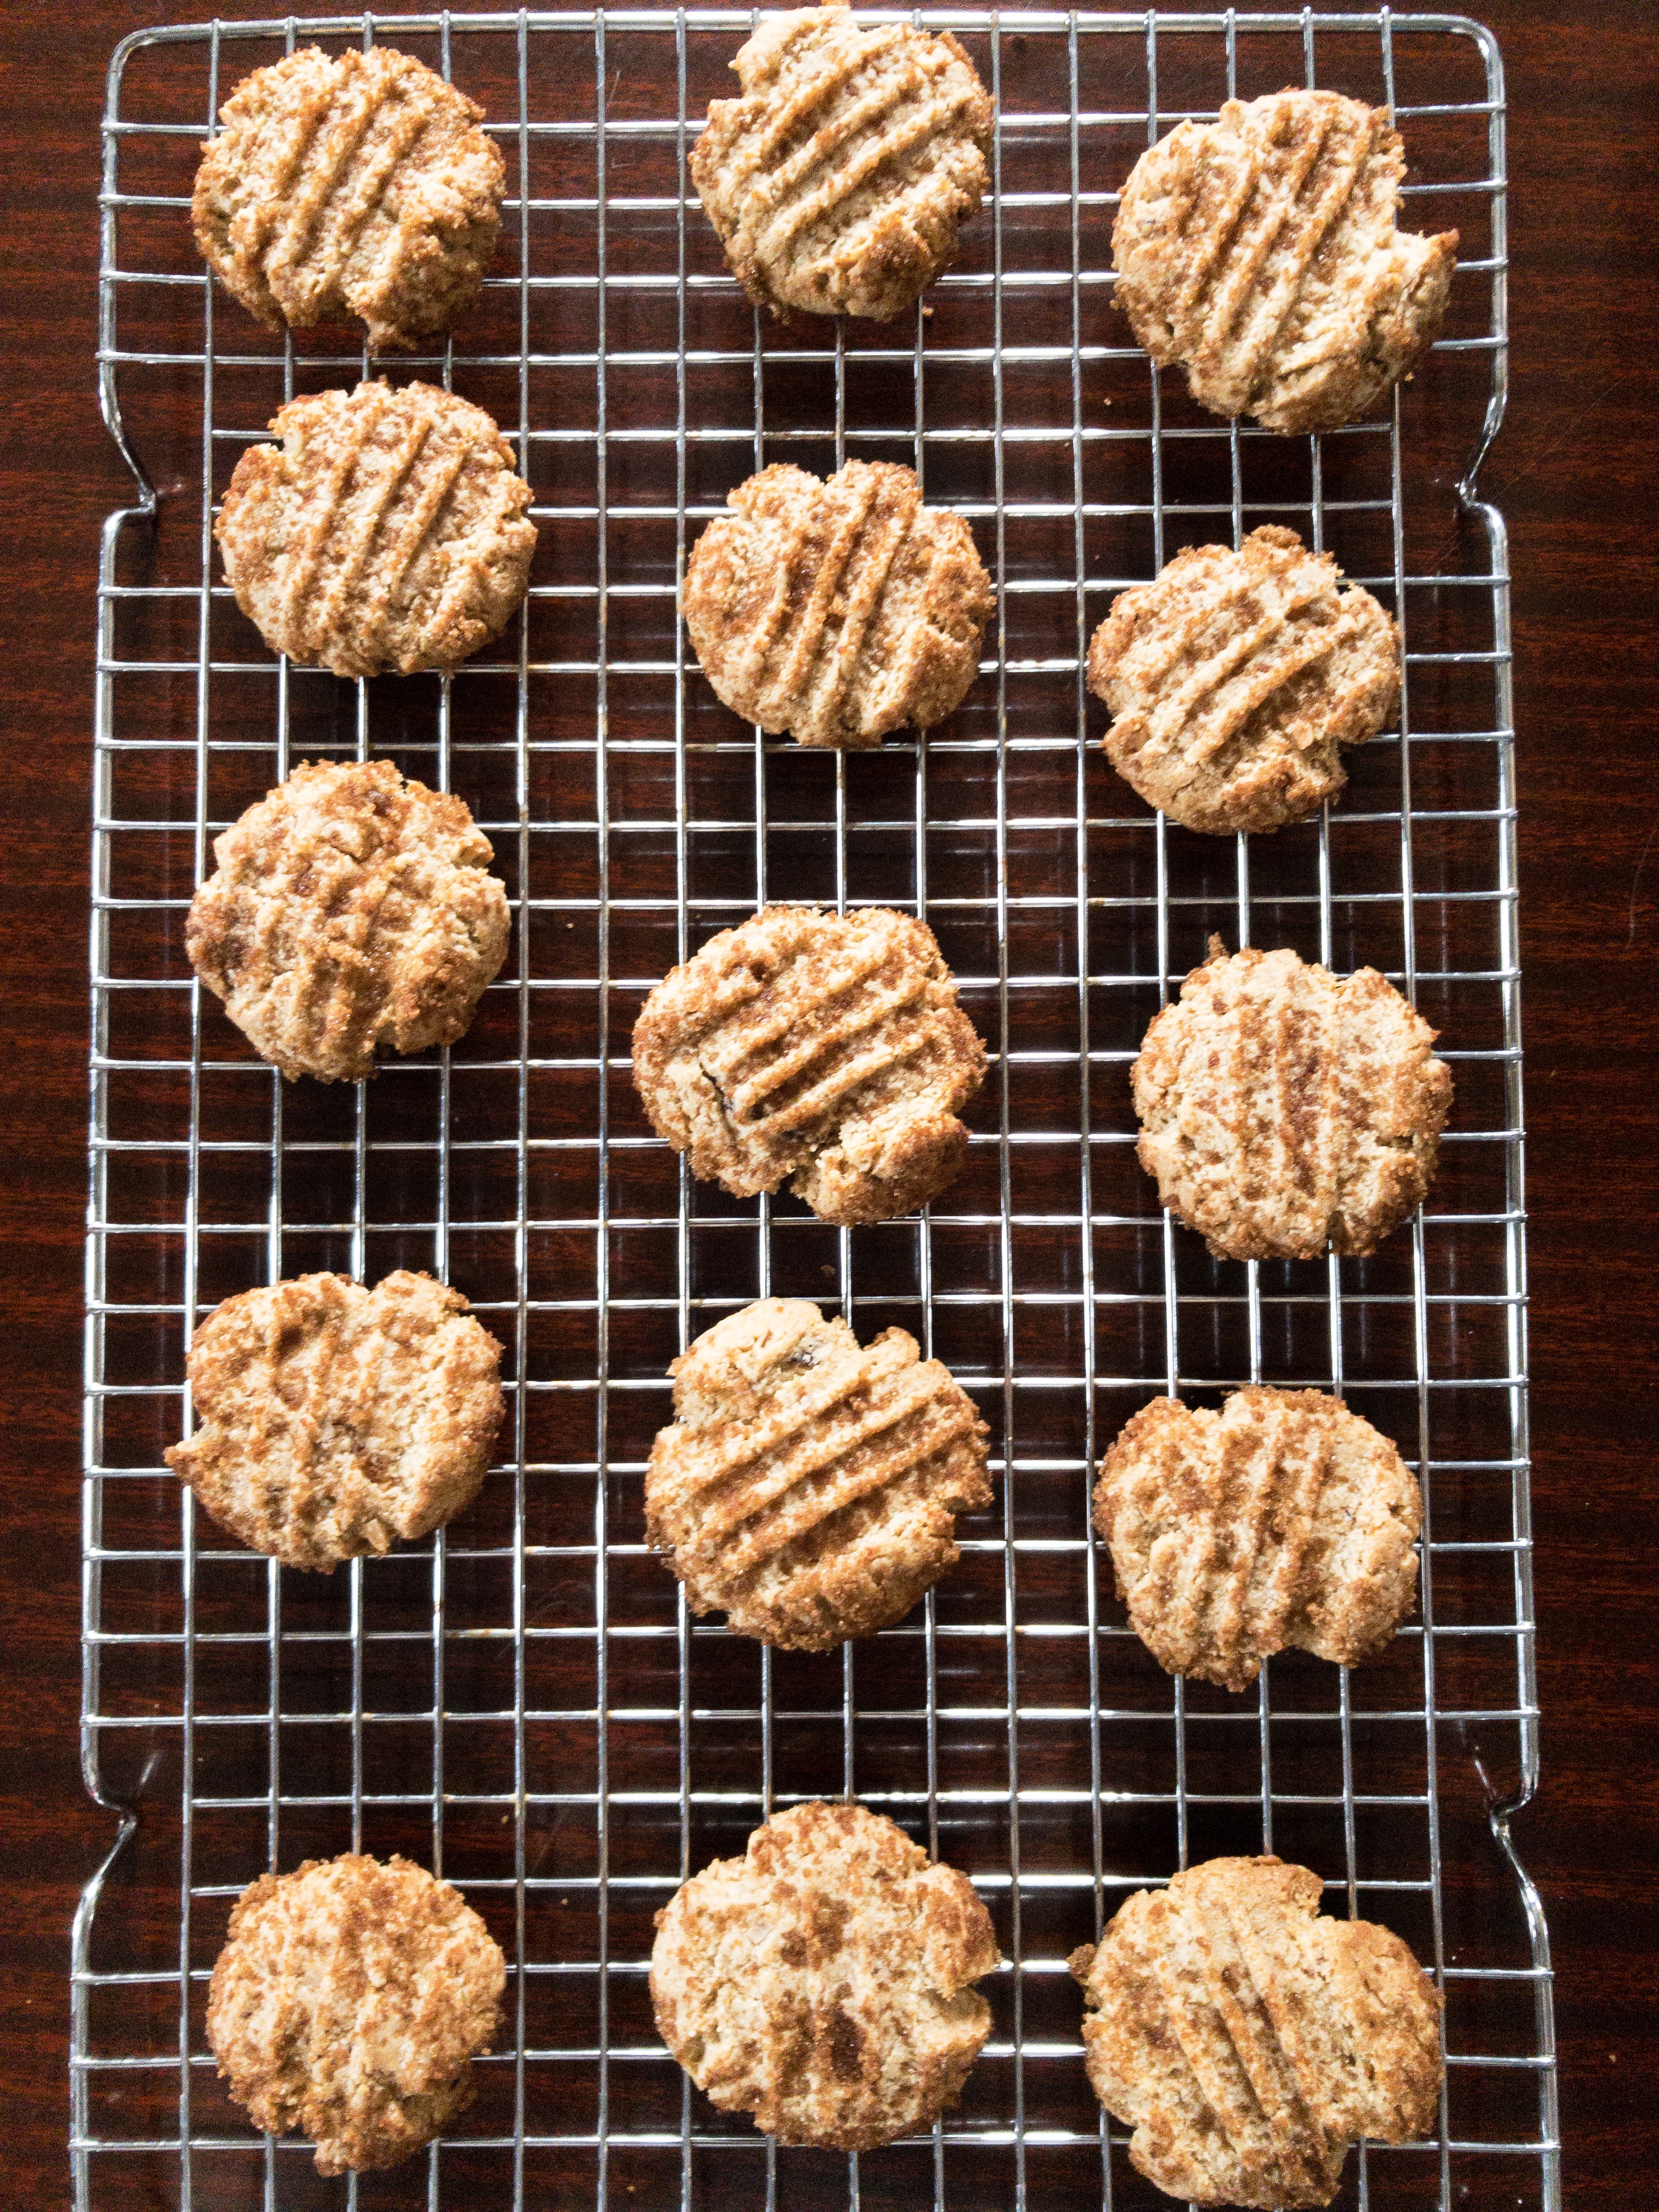
Gluten Free Vegan Snickerdoodles
Y’all! This week I was honored to post these gluten free and vegan snickerdoodles on Neat Foods page! Their vegan egg replacement is my favorite EVER. Just click HERE to find out more info about neat egg!
What You Will Need:
8 oz.superfine almond flour
1/4 tsporganic cinnamon
1/2 tspbaking soda
1/2 tspcream of tartar
1/4 tspgray salt
5 dates, soaked in hot water for 10 minutes, drained and de-skinned
1/4 cuplight brown sugar
6 tbspextra virgin coconut oil, room temperature
1 neat egg, prepared according to package instructions
2 tspvanilla extract
1/4 cuptoasted sweetened coconut
FOR BROWN SUGAR TOPPING:
1/4 cuplight brown sugar
2 tspcinnamon
What You Will Do:
Preheat oven to 350 degrees. Line two baking sheets with parchment paper.
In a small bowl, use a spoon to mash dates into a paste.
In a separate bowl, whisk together brown sugar topping.
In a medium bowl, whisk together almond flour, cinnamon, baking soda, cream of tartar and salt.
In the bowl of a stand mixer fitted with a paddle attachment, beat dates, brown sugar and coconut oil together on medium high for three minutes.
Add neat egg and vanilla extract and beat until combined.
Add almond flour mixture to the mixer slowly on low speed until incorporated. Beat on medium speed until a dough forms.
Stir in shredded coconut until combined and dough re-forms.
Roll 1 to 2 tablespoons dough into a small ball. Roll dough ball in brown sugar topping until covered.
Place dough balls evenly spaced on baking sheets, about 10-12 to a sheet. Use a fork to flatten each ball into a cookie shape.
Bake cookies one sheet at a time for 13 minutes. Remove from oven; rest for one minute on sheet then transfer cookies to a wire rack to cool. Enjoy!
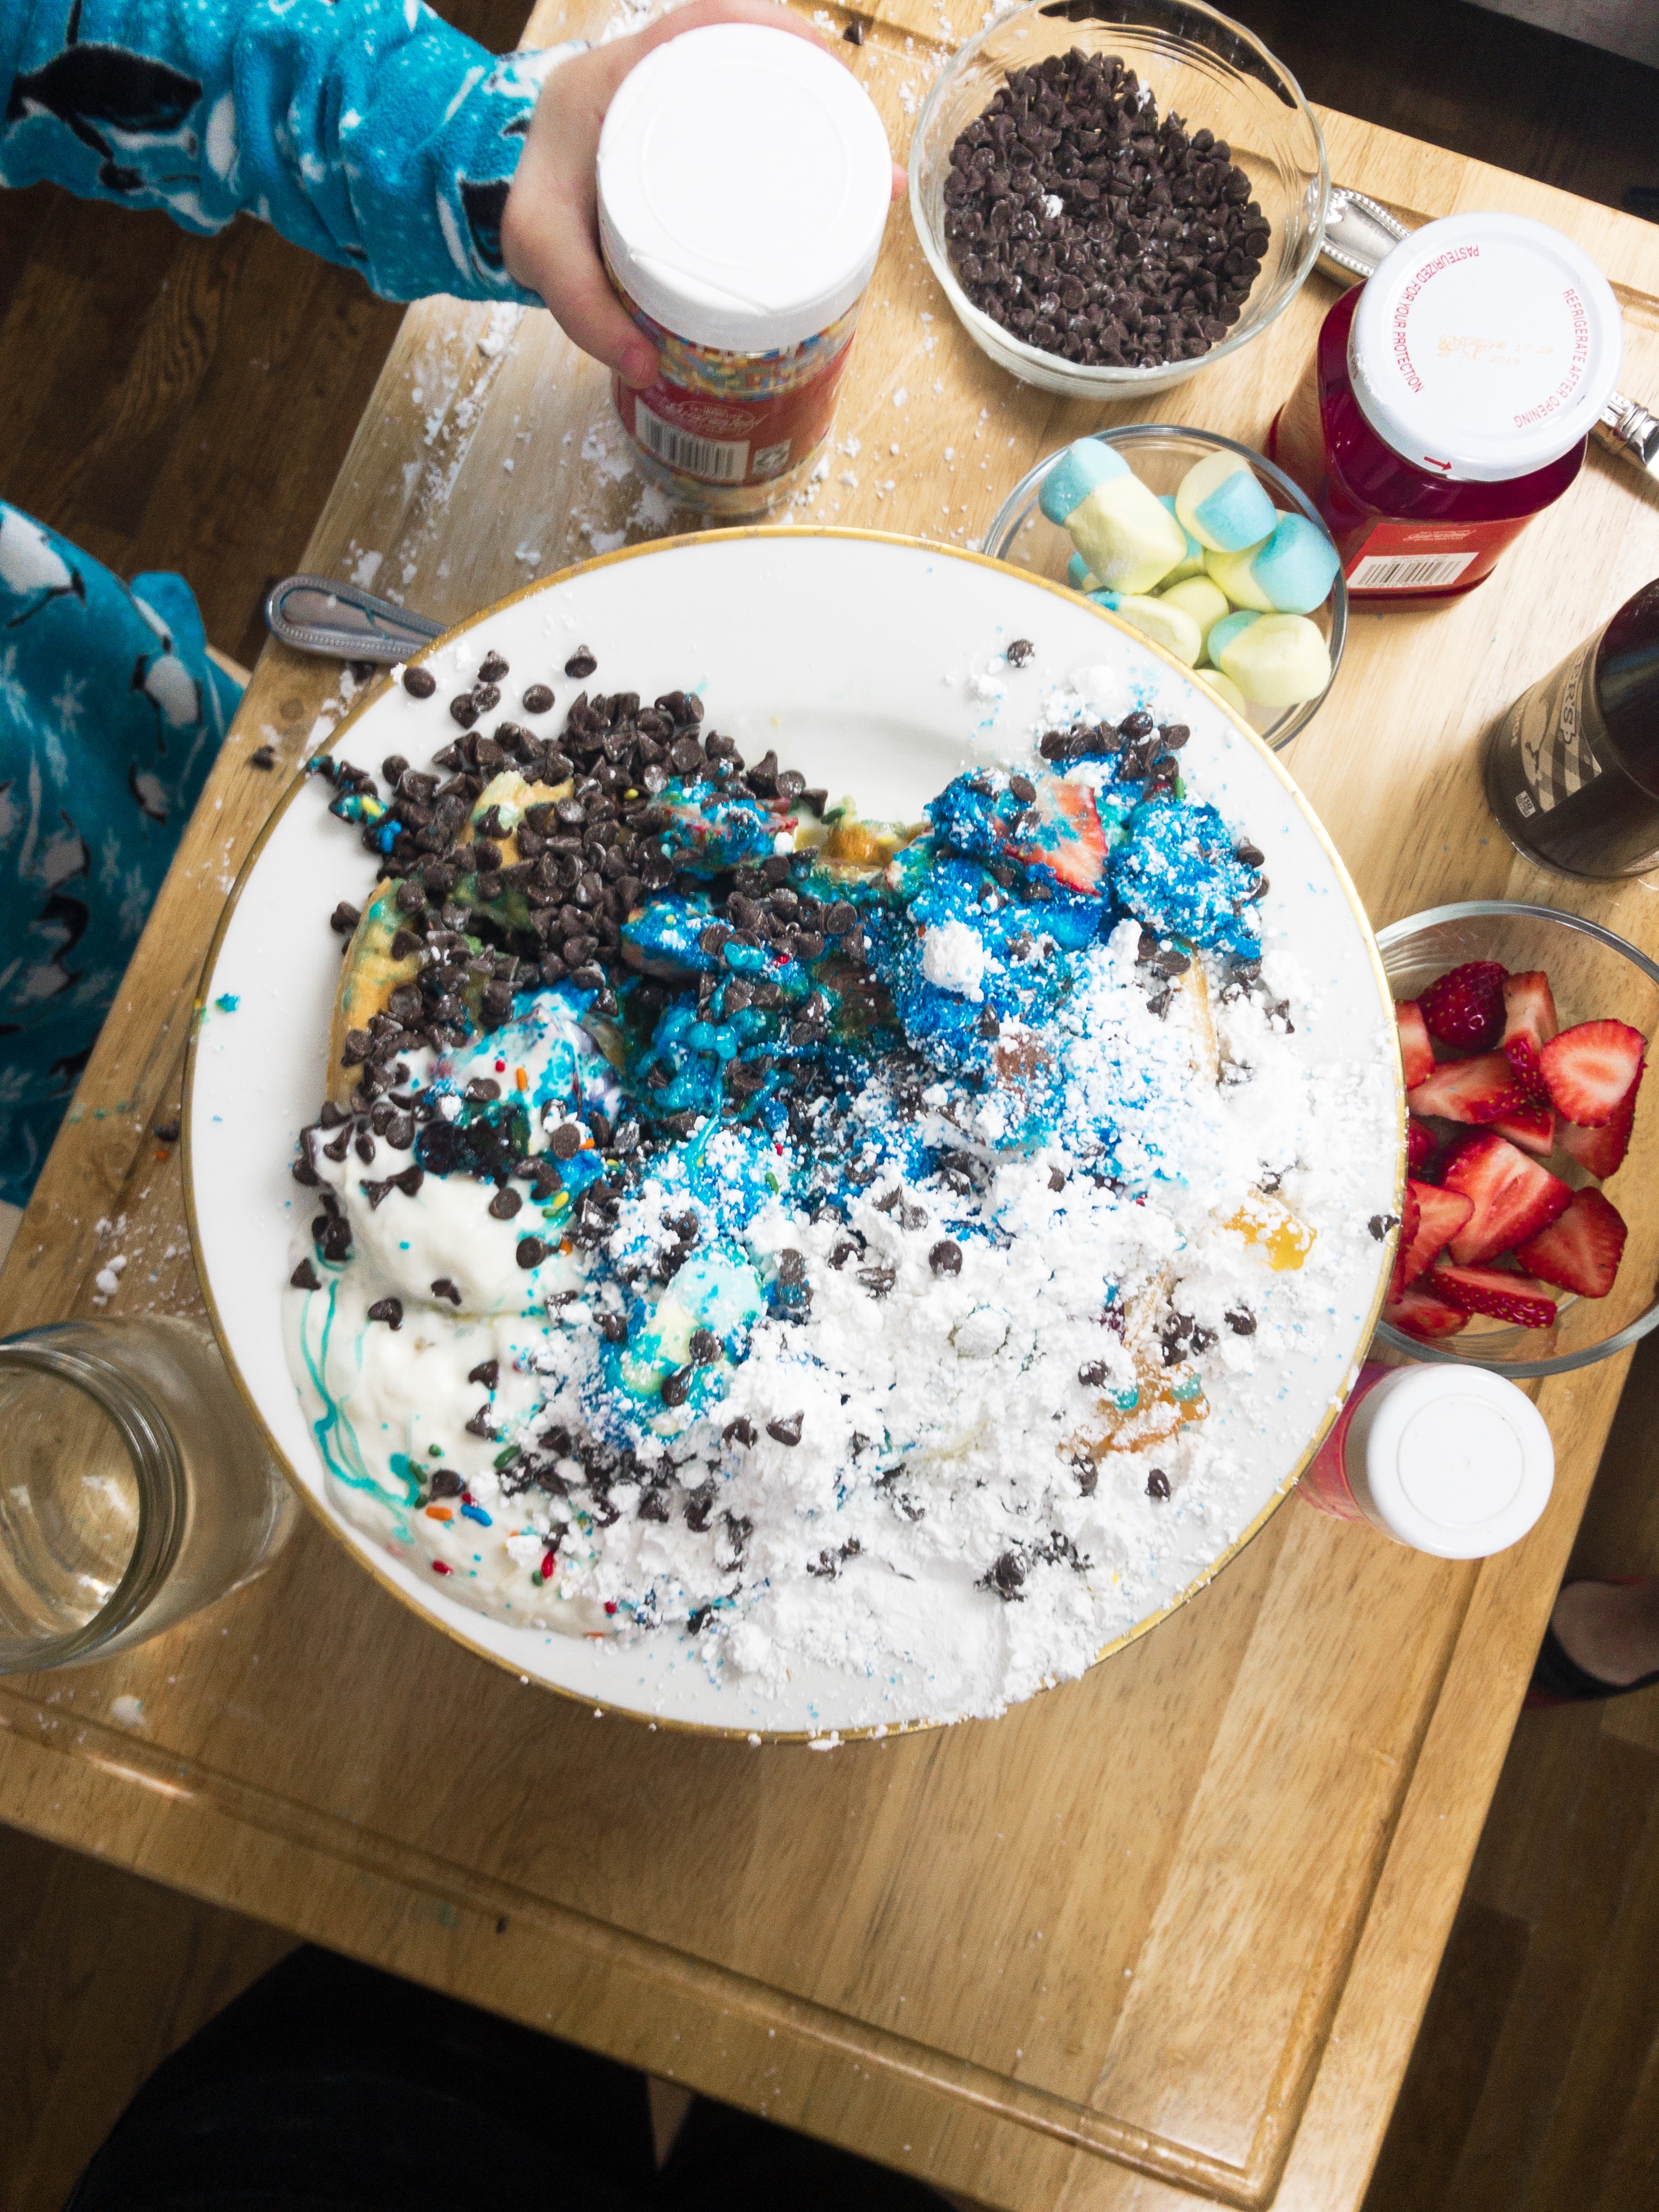
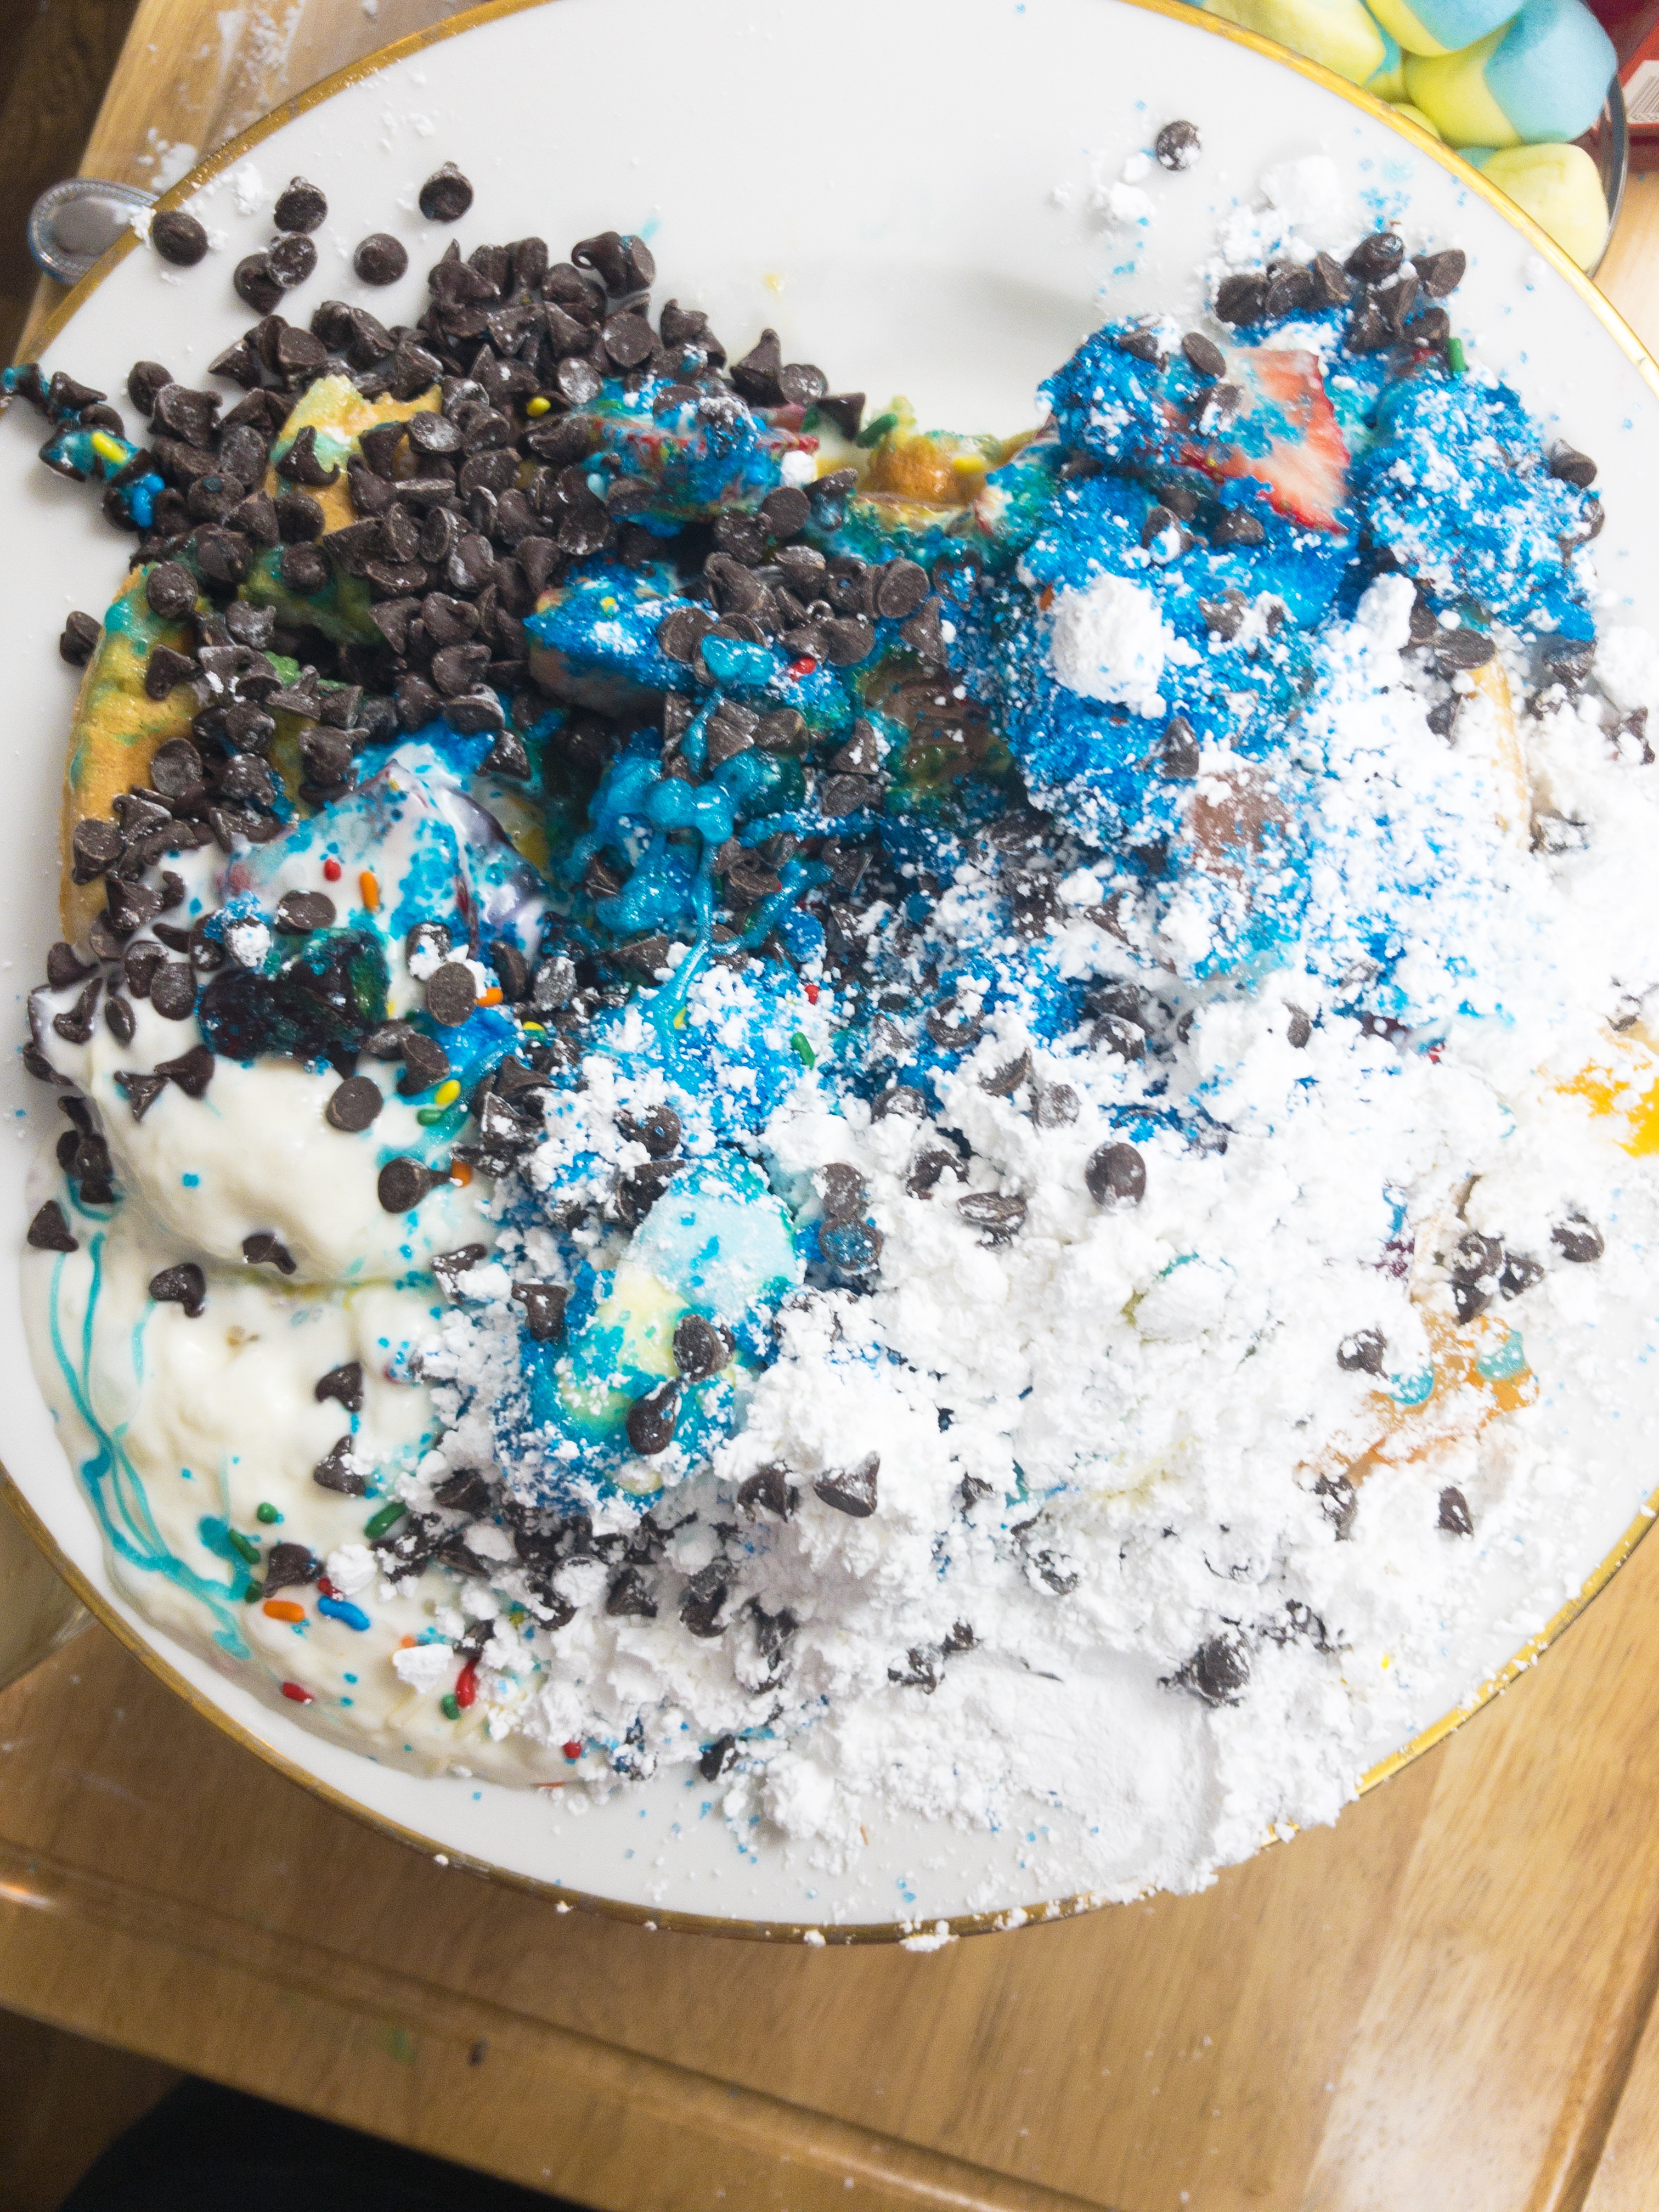
Soo, things got a BIT crazy at the Luv Cooks studios the other day.
And by studios, I am referring to my once-clean kitchen that became covered in powdered sugar, blue sparkle icing, and the occasional mini chocolate chip.
Messy in the absolute BEST way.
My precious friend Ashley Reale of Share Love Everywhere has an incredible daughter, Lottie. And by incredible, I mean this chick is already starting her own business at the AGE OF SIX.
That’s right, she is six years old and selling artwork and rings and all of the amazing things she makes. In fact, I think she technically started her business this past Spring. So, she’s a total girl boss. And Lottie is also a HUGE fan of the color blue, waffles, and YouTube.
So of course we had to have her (and her brother Wyatt) on the Luv Cooks YouTube channel to make their version of the ultimate Christmas waffle. This video is nothing short of brilliant and will make your HOLIDAY DAY I promise!!
Since Lottie is obviously a waffle topping connoisseur (and Wyatt’s enthusiasm for Star Wars and powdered sugar knows NO bounds) I had to throw in an awesome waffle recipe to this post. Also, in case you were wondering, our Christmas Minion Waffle included:
More gummy bears, chocolate chips, Minion marshmallows, rainbow sprinkles
Triple/double/quadruple layers of toppings
More chocolate, more rainbow and blue sprinkles, AND more toppings!
Some of the best pancakes I have ever had were from Aretha Frankenstein’s boxed mix. That is right, a BOXED mix. So I am assuming that this link to her waffle recipe via Canella Vita will be a number 1 hit with everyone you want to make a waffle for now or in the holiday future. And, of course, don’t forget the rainbow sprinkles.
Since I was a child, I was a bit obsessed with any food that came in a tin.
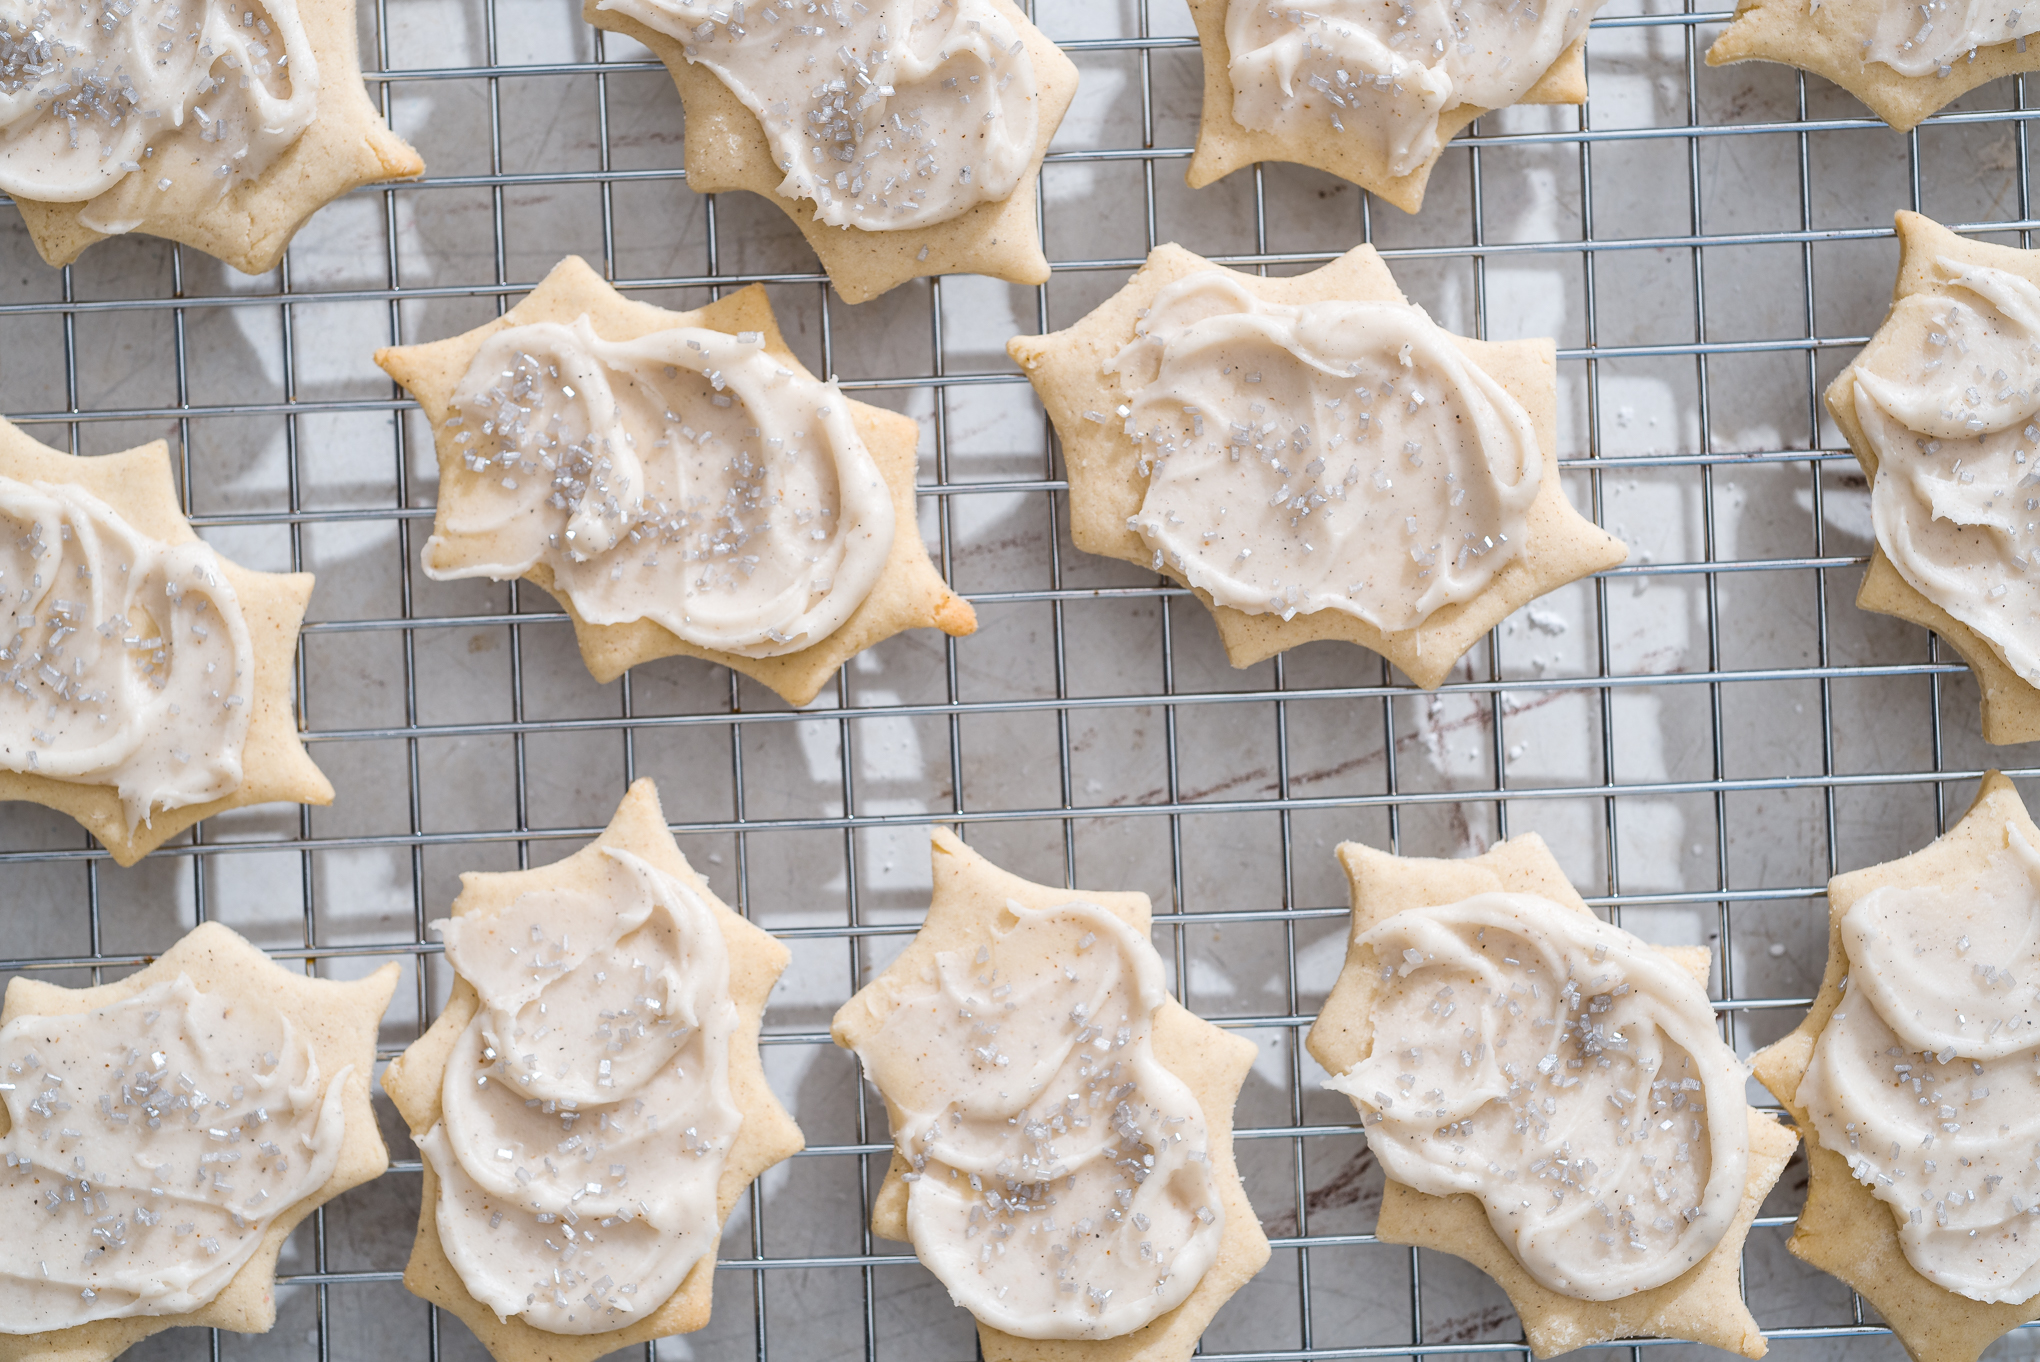
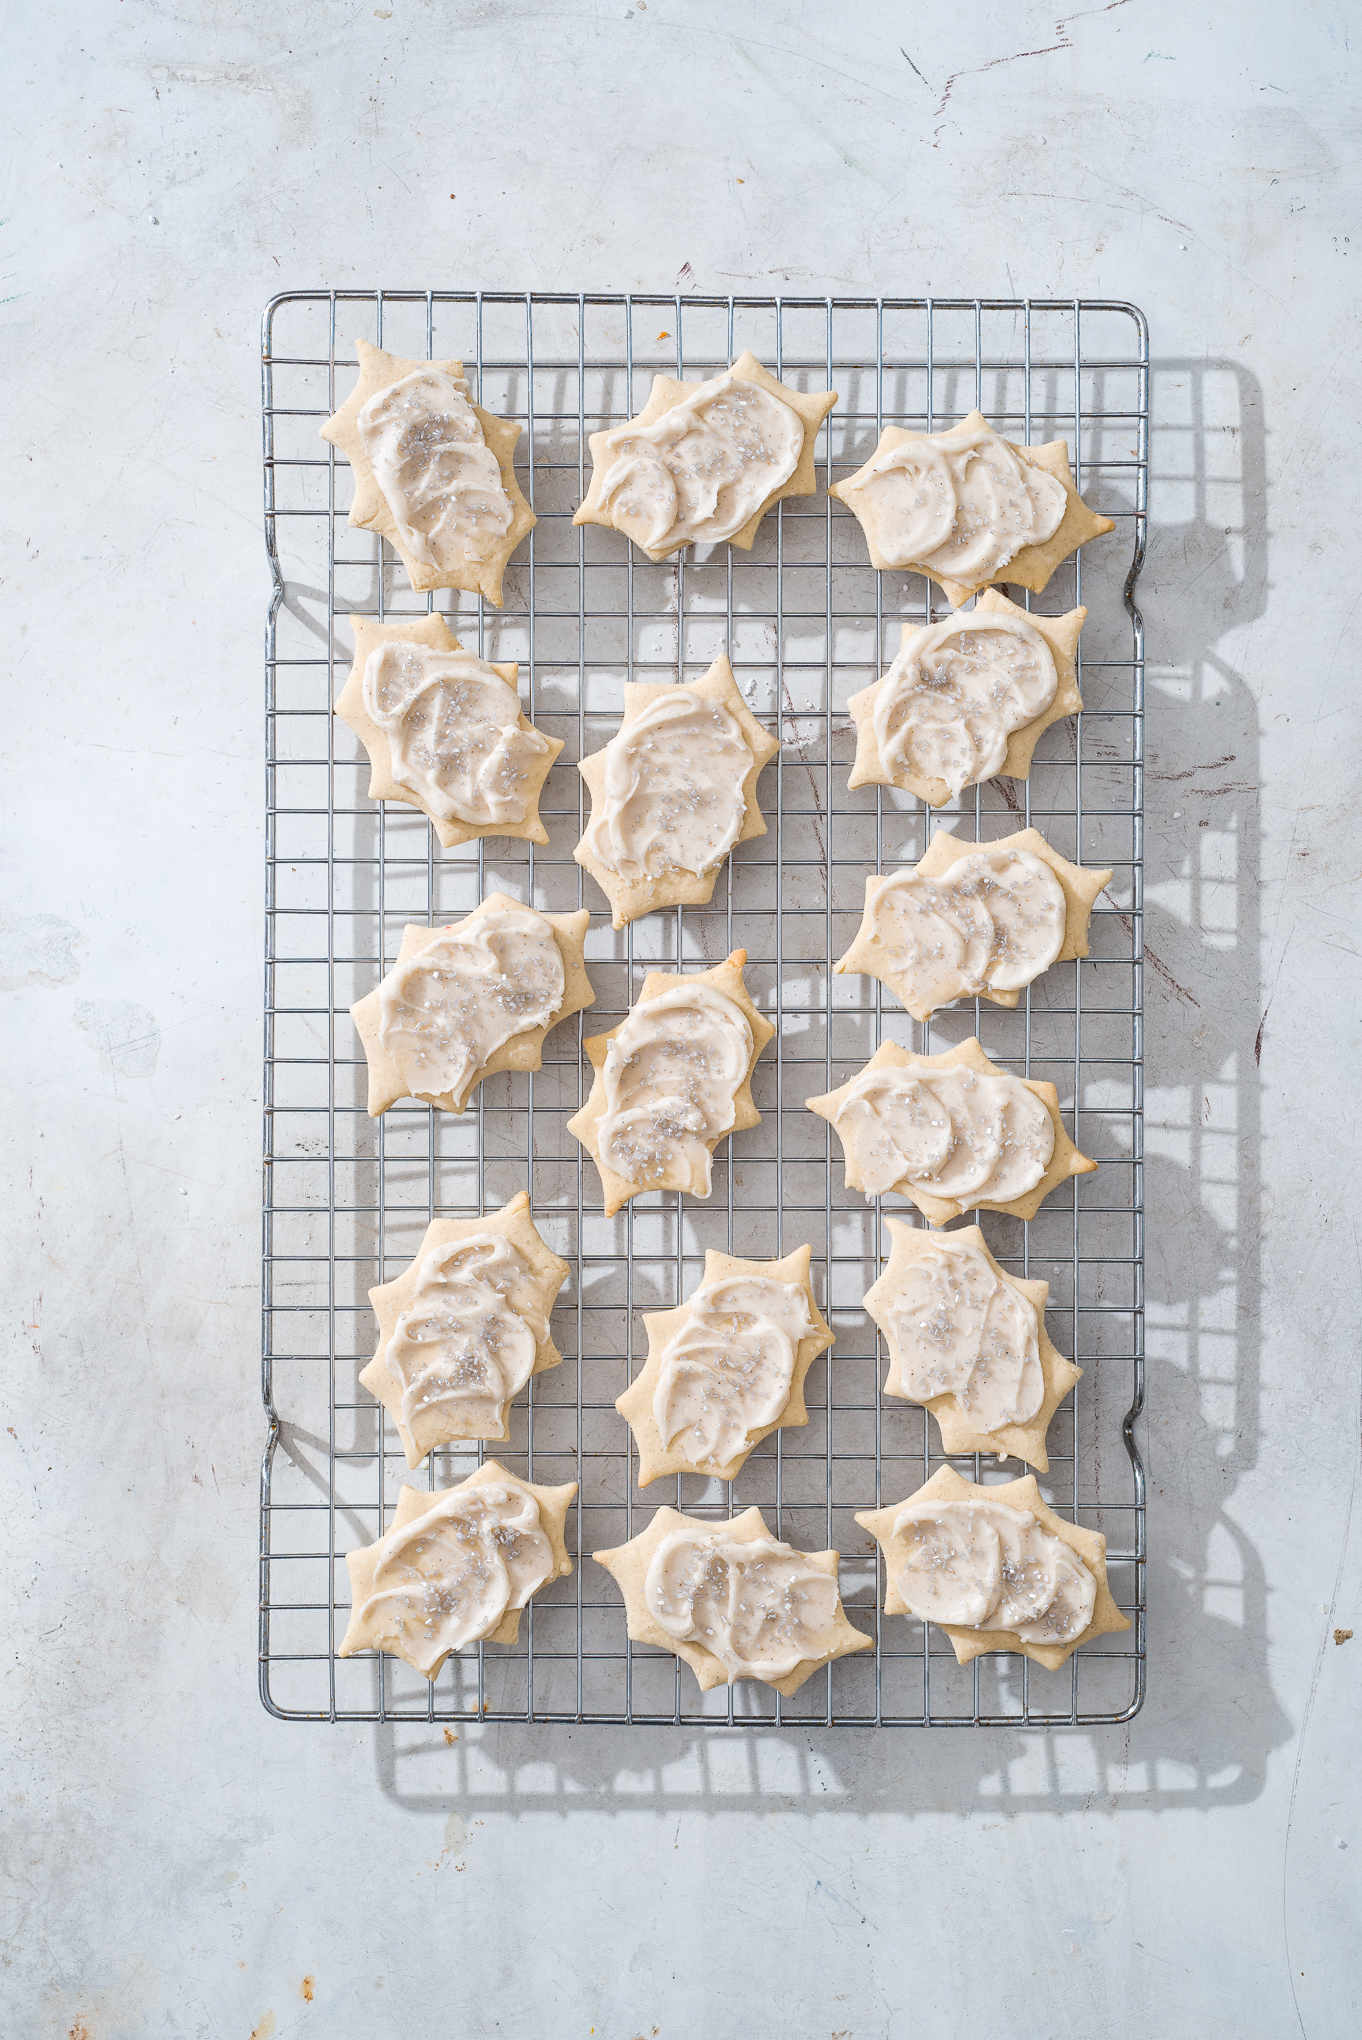
Ground coffee in a tin? Felt like a special treat reserved only for those adults brave enough to drink the black stuff. Cheese popcorn organized between three paper dividers in a giant Christmas tin that I could hug and/or physically protect from my siblings? It felt like Santa came early. And COOKIES in a tin? Oh my geez, hold the phone, I’m running toward that one like someone broke out the Hanson Tour (circa early 2000’s) DVD.
Needless to say, this recipe makes my mouth water because these butter cookies were developed to be similar to the ones you find in the blue tins, at the store, that also come with paper dividers inside the packaging. Soooo classy.
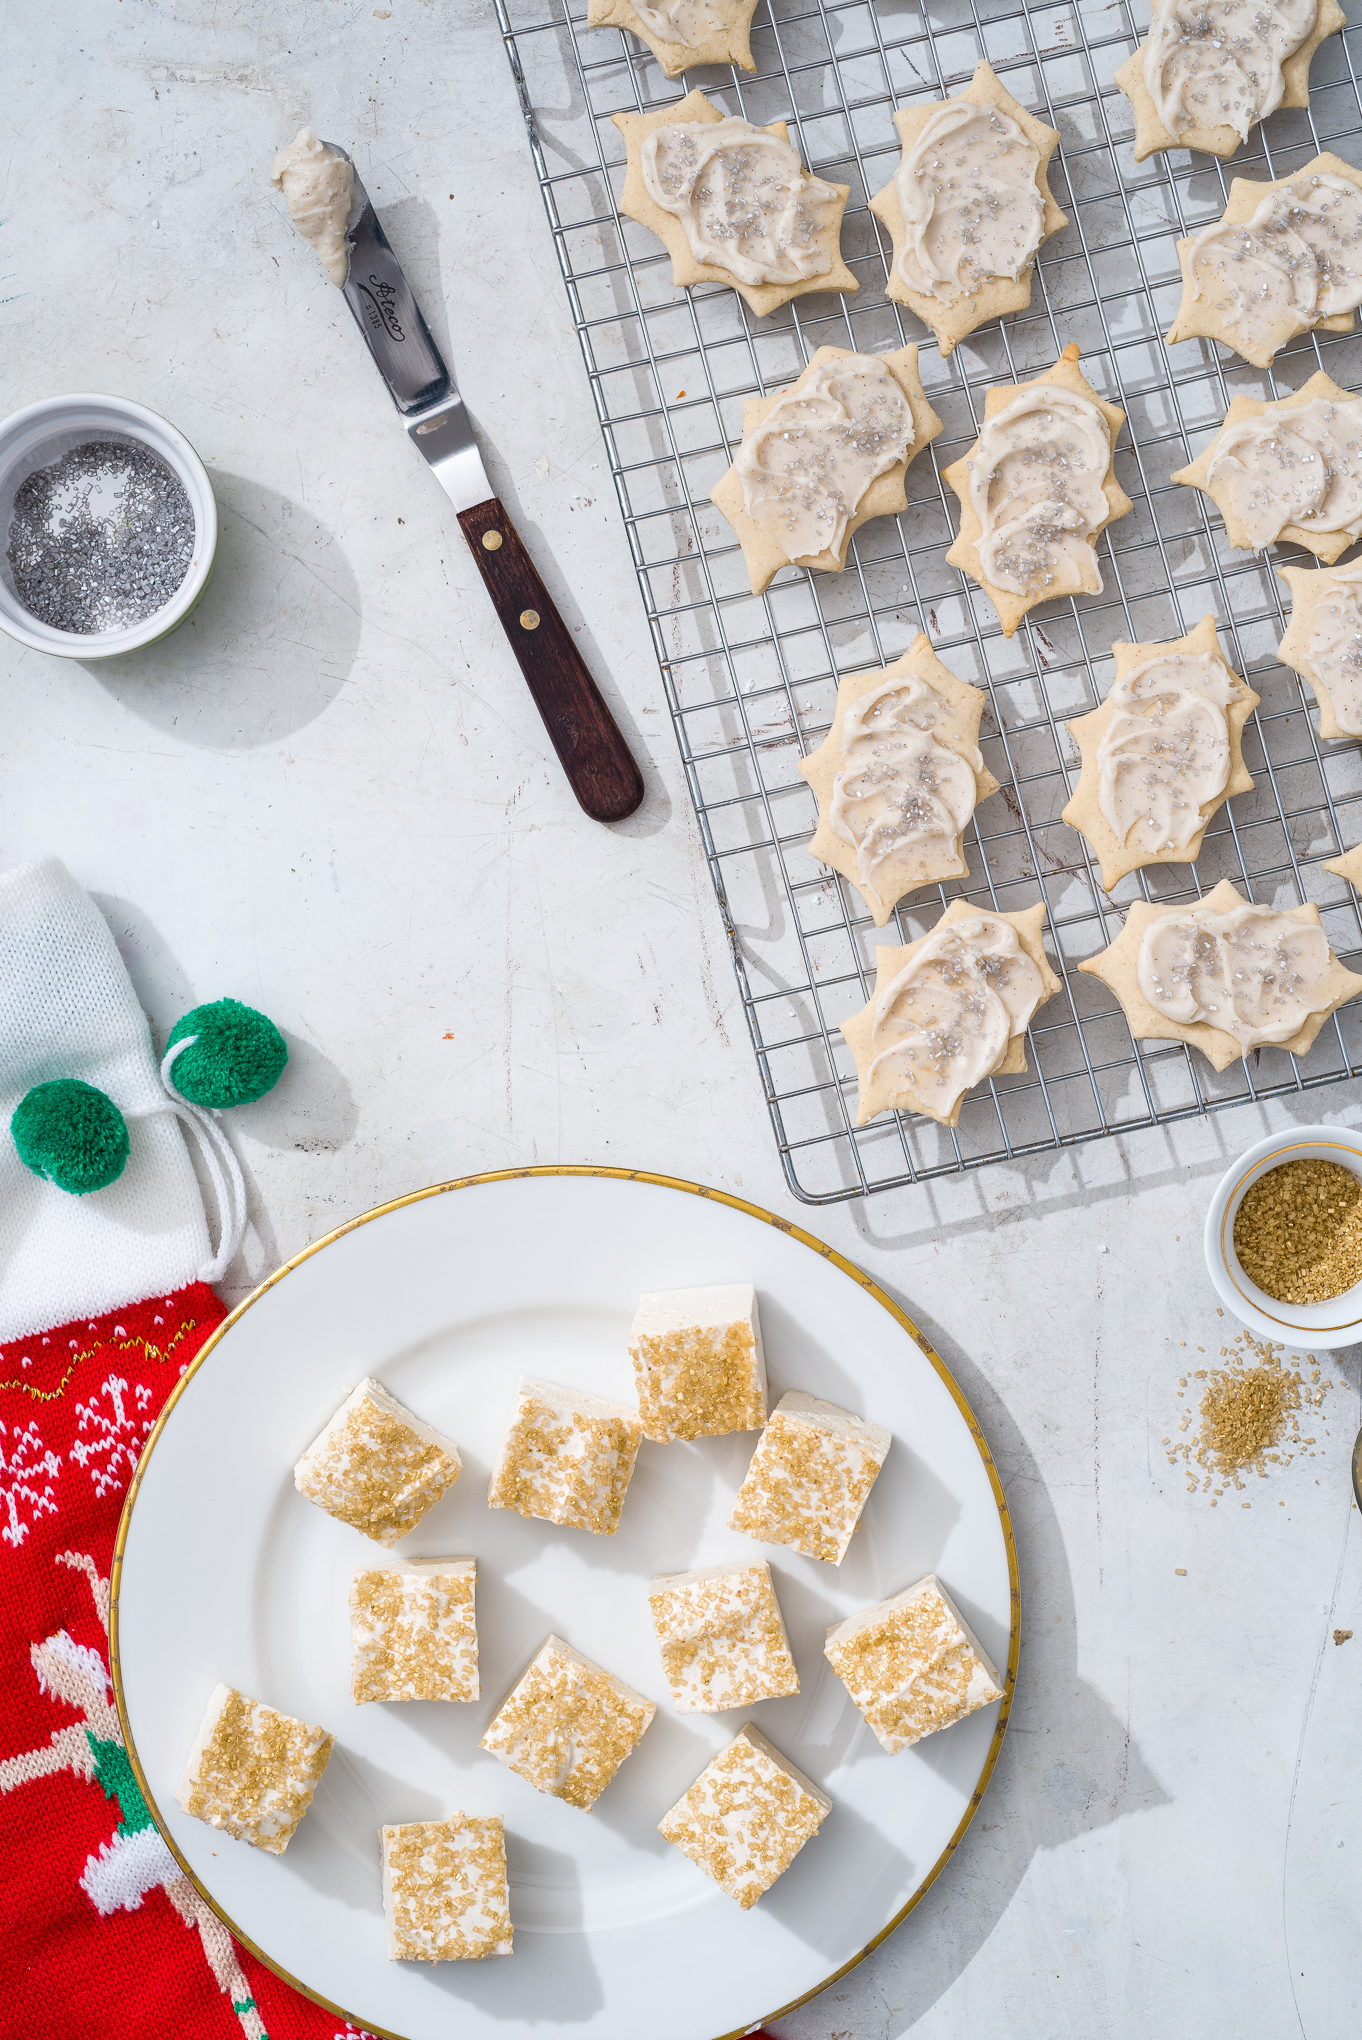
This recipe differs, however, in the icing. The four-ingredient cardamom frosting makes the cookie flavor your own! Unlike the cookies that come in a tin, these guys are topped with homemade goodness (made with powdered sugar and cream) that is wonderfully, slightly spiced, with cardamom.
So, if buying cookies in a tin for your friends and fam is part of your tradition, maybe break the mold this year. Bake up some butter cookies instead. Whip up an easy homemade frosting. And ship them off to your fab loved ones- paper dividers optional.
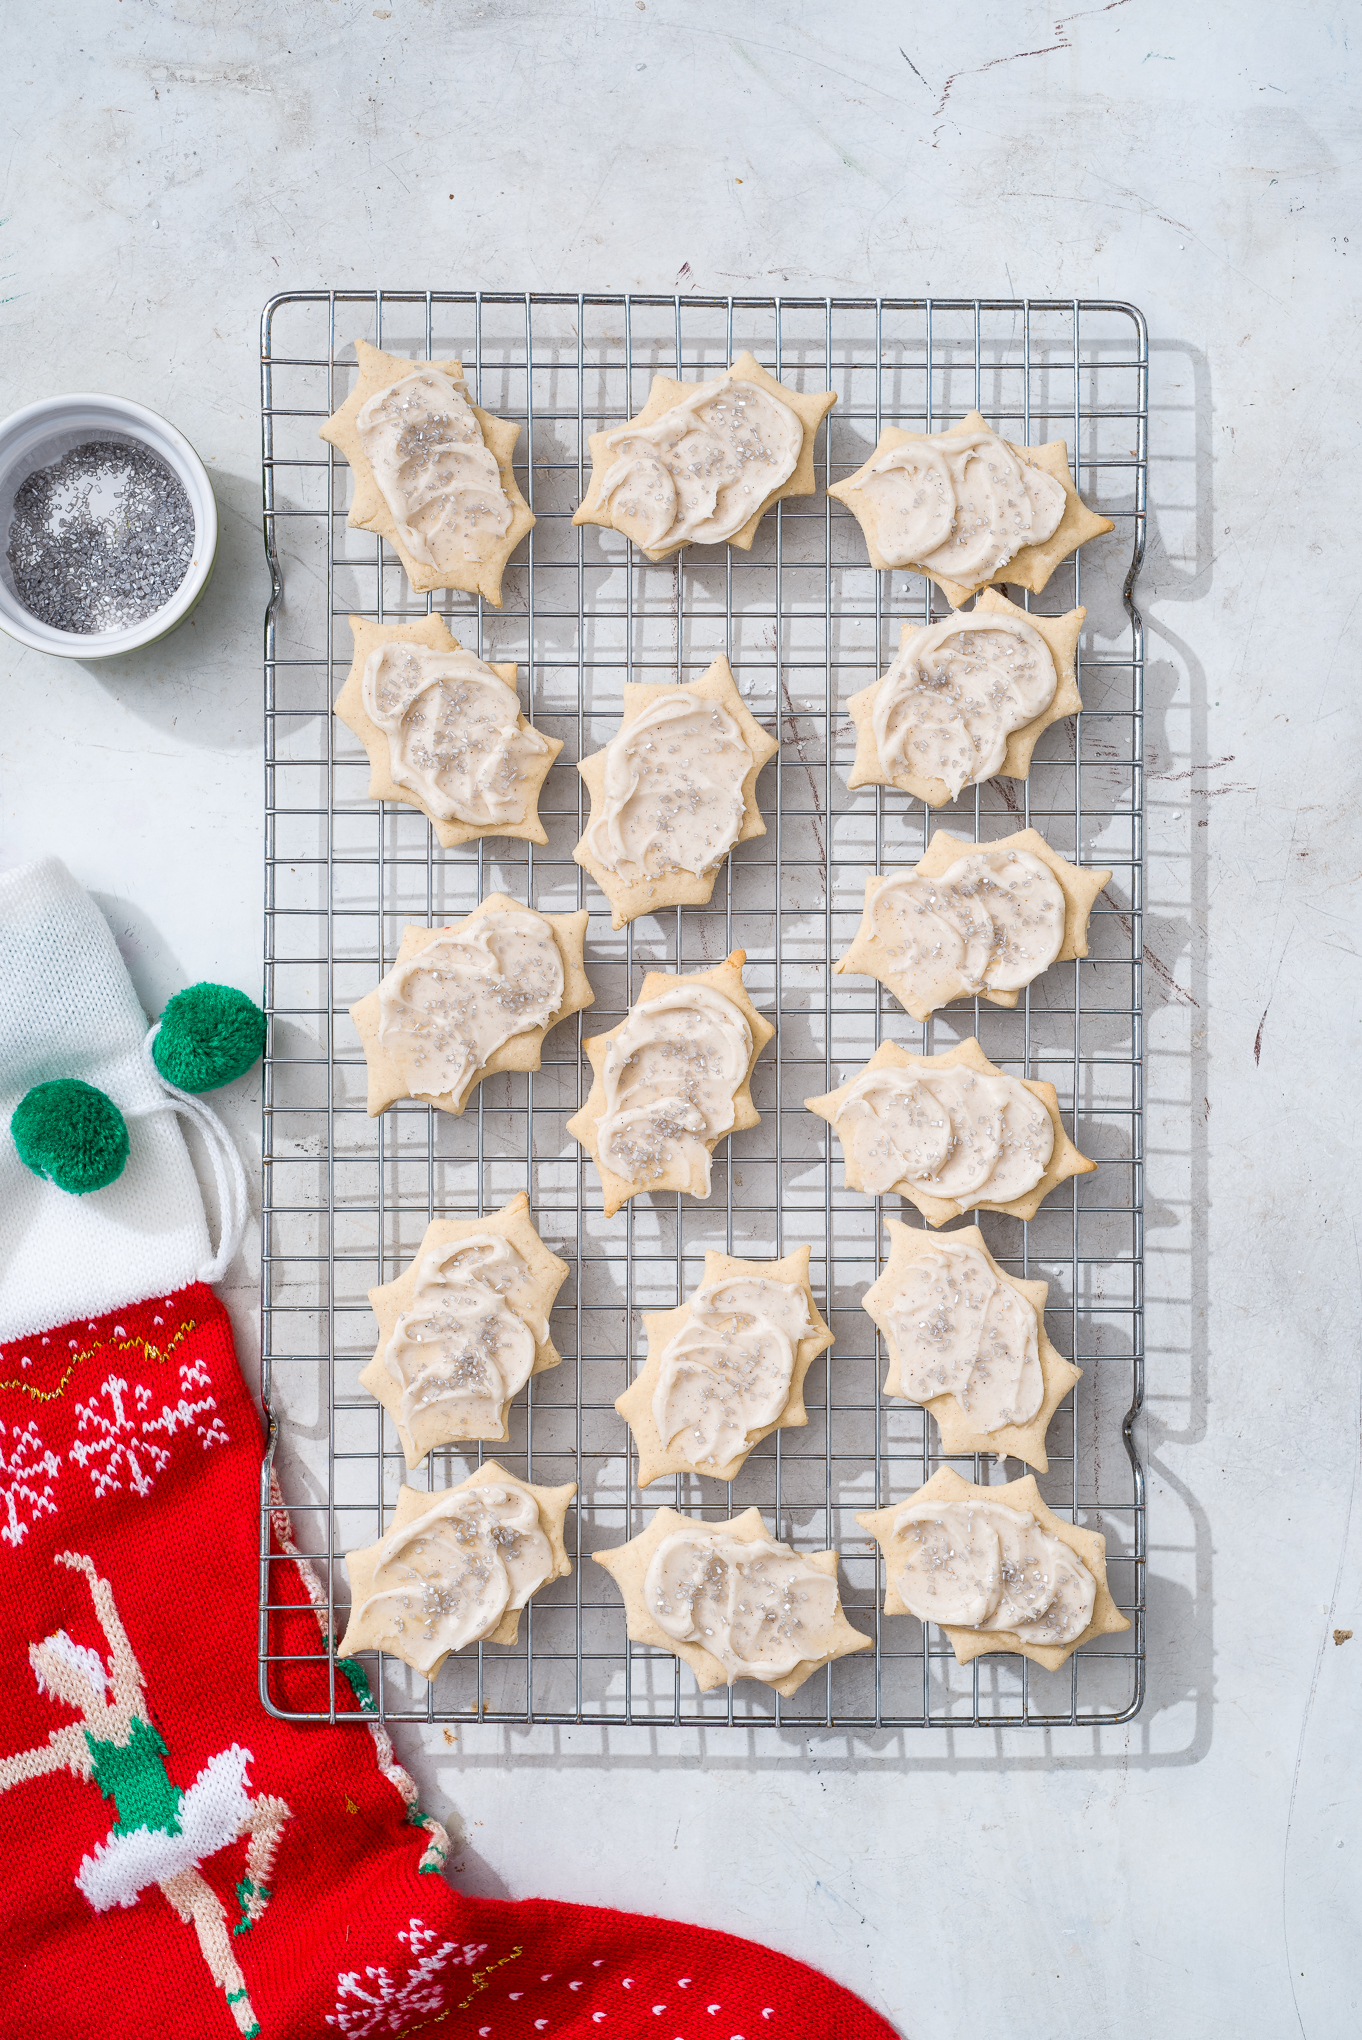
Butter Cookies with Four Ingredient Cardamom Vanilla Icing
These butter cookies bring back memories of the nostalgic variety found in holiday blue cans during December. Make a fresher version at home with a savory twist of cardamom and sweet spread of creamy vanilla icing. Top with silver sprinkles to ring in the New Year! You can find this and many of Luv Cooks December recipes in the December issue of Birmingham magazine.
Yield: 33 cookies (depending on cookie cutter shape)
What You Will Need:
1 cup unsalted butter, room temperature
1 cup powdered sugar
2 teaspoons vanilla extract
1 large egg, room temperature
2 1/4 cups all purpose flour
1 teaspoon baking powder
1/2 teaspoon salt
1/2 teaspoon ground cinnamon
1/4 tsp ground cardamom
Preheat oven to 350. Line a baking sheet with parchment paper.
In the bowl of a stand mixer, beat butter, sugar and vanilla on medium high for two to three minutes, or until light and fluffy.
Add egg, stir until combined.
Whisk together flour, baking powder, salt, cinnamon and cardamom until combined.
Add flour mixture to butter/sugar in one large batch; stir just until combined.
Roll dough onto floured surface with floured rolling pin until 1/4 inch thick. Cut out with a holiday cookie cutter and use a spatula to transfer cookies to parchment-lined baking sheet.
Bake for 10 minutes. Cool for two minutes, then transfer cookies to cool completely on a wire rack.
Once cooled, frost with vanilla cardamom icing and top with sprinkles!
Four Ingredient Vanilla Cardamom Icing
What You Will Need:
1 cup powdered sugar
2 tablespoons heavy cream
1 tsp vanilla
1/8 tsp ground cardamom
Silver sprinkles, optional
1. Whisk all ingredients (except for sprinkles) together until smooth. Frost cookies once cooled and top with sprinkles. Enjoy!
Ok right, I know, who ever says “Ahh, fruitcake! That’s just what I am craving on a Tuesday, fruitcake.”
Ok, I have never actually said that, but you know what? I think the idea of fruitcake– a sweet loaf of cake stuffed with nuts, dried and/or candied fruits, baked with lots of butter and soaked in liquor (I think namely rum and/or brandy?) sounds pretty fantastic.
So in theory, this idea sounds tasty, right? I think so. And what BETTER a vehicle for the idea of rum-soaked, buttered, dried fruit-and-nut delicacy than a cinnamon roll? Exactly.
So today I am sharing with you recipe number EIGHT in our Twelve Recipes of Christmas- and another awesome one to share with those people who won’t get out of their Christmas onesies long enough to help you in the kitchen. (I hear onesies can be quite flammable near an open flame. ;))
Alright my loves! Let’s get to making those delicious holiday fruitcake rolls!
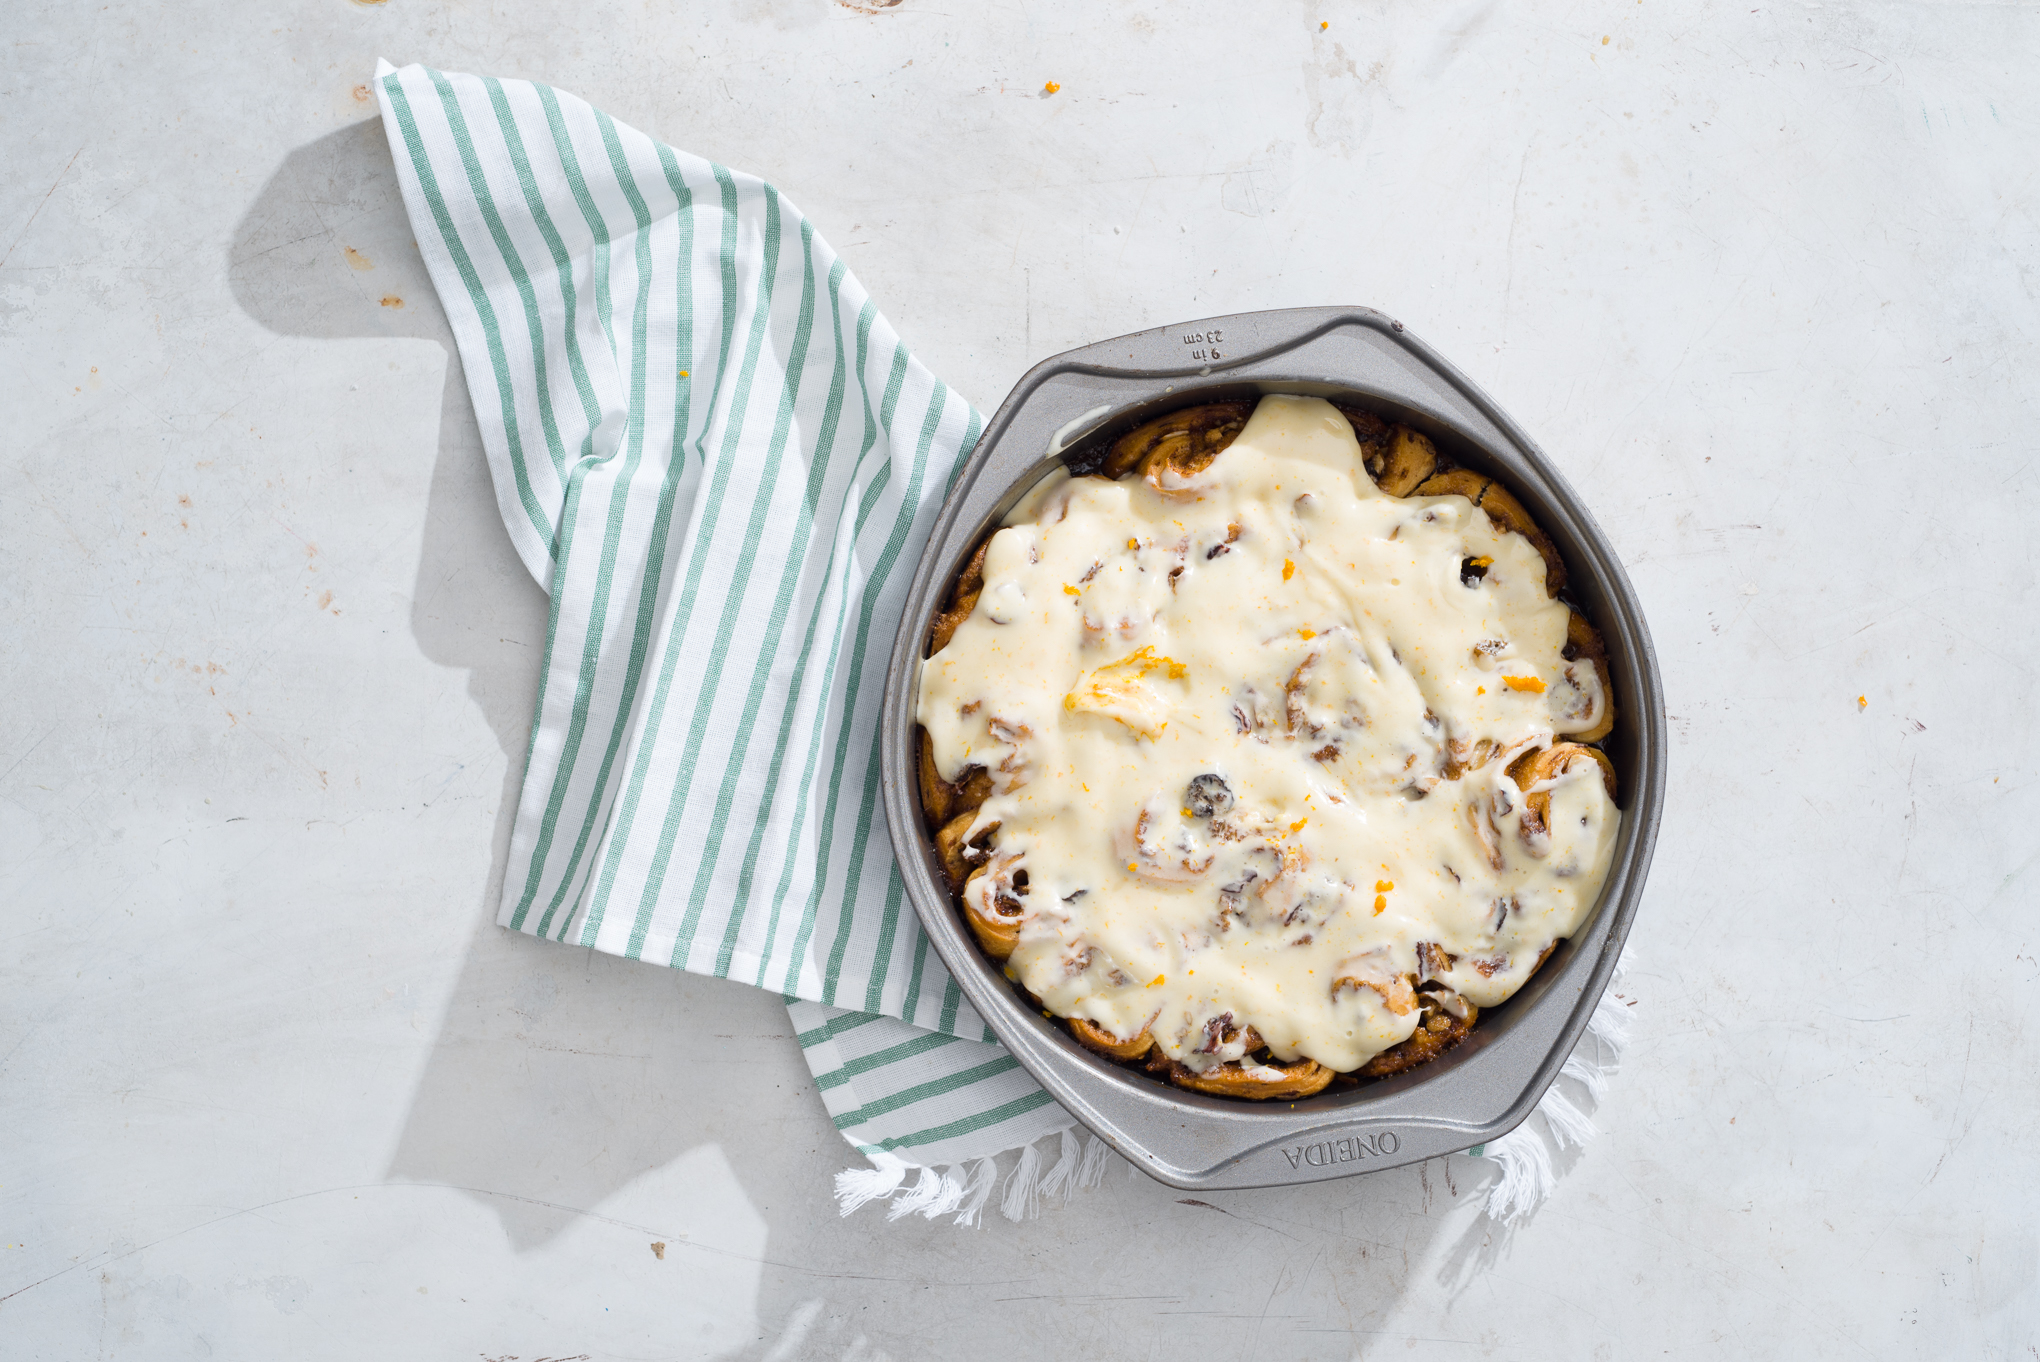
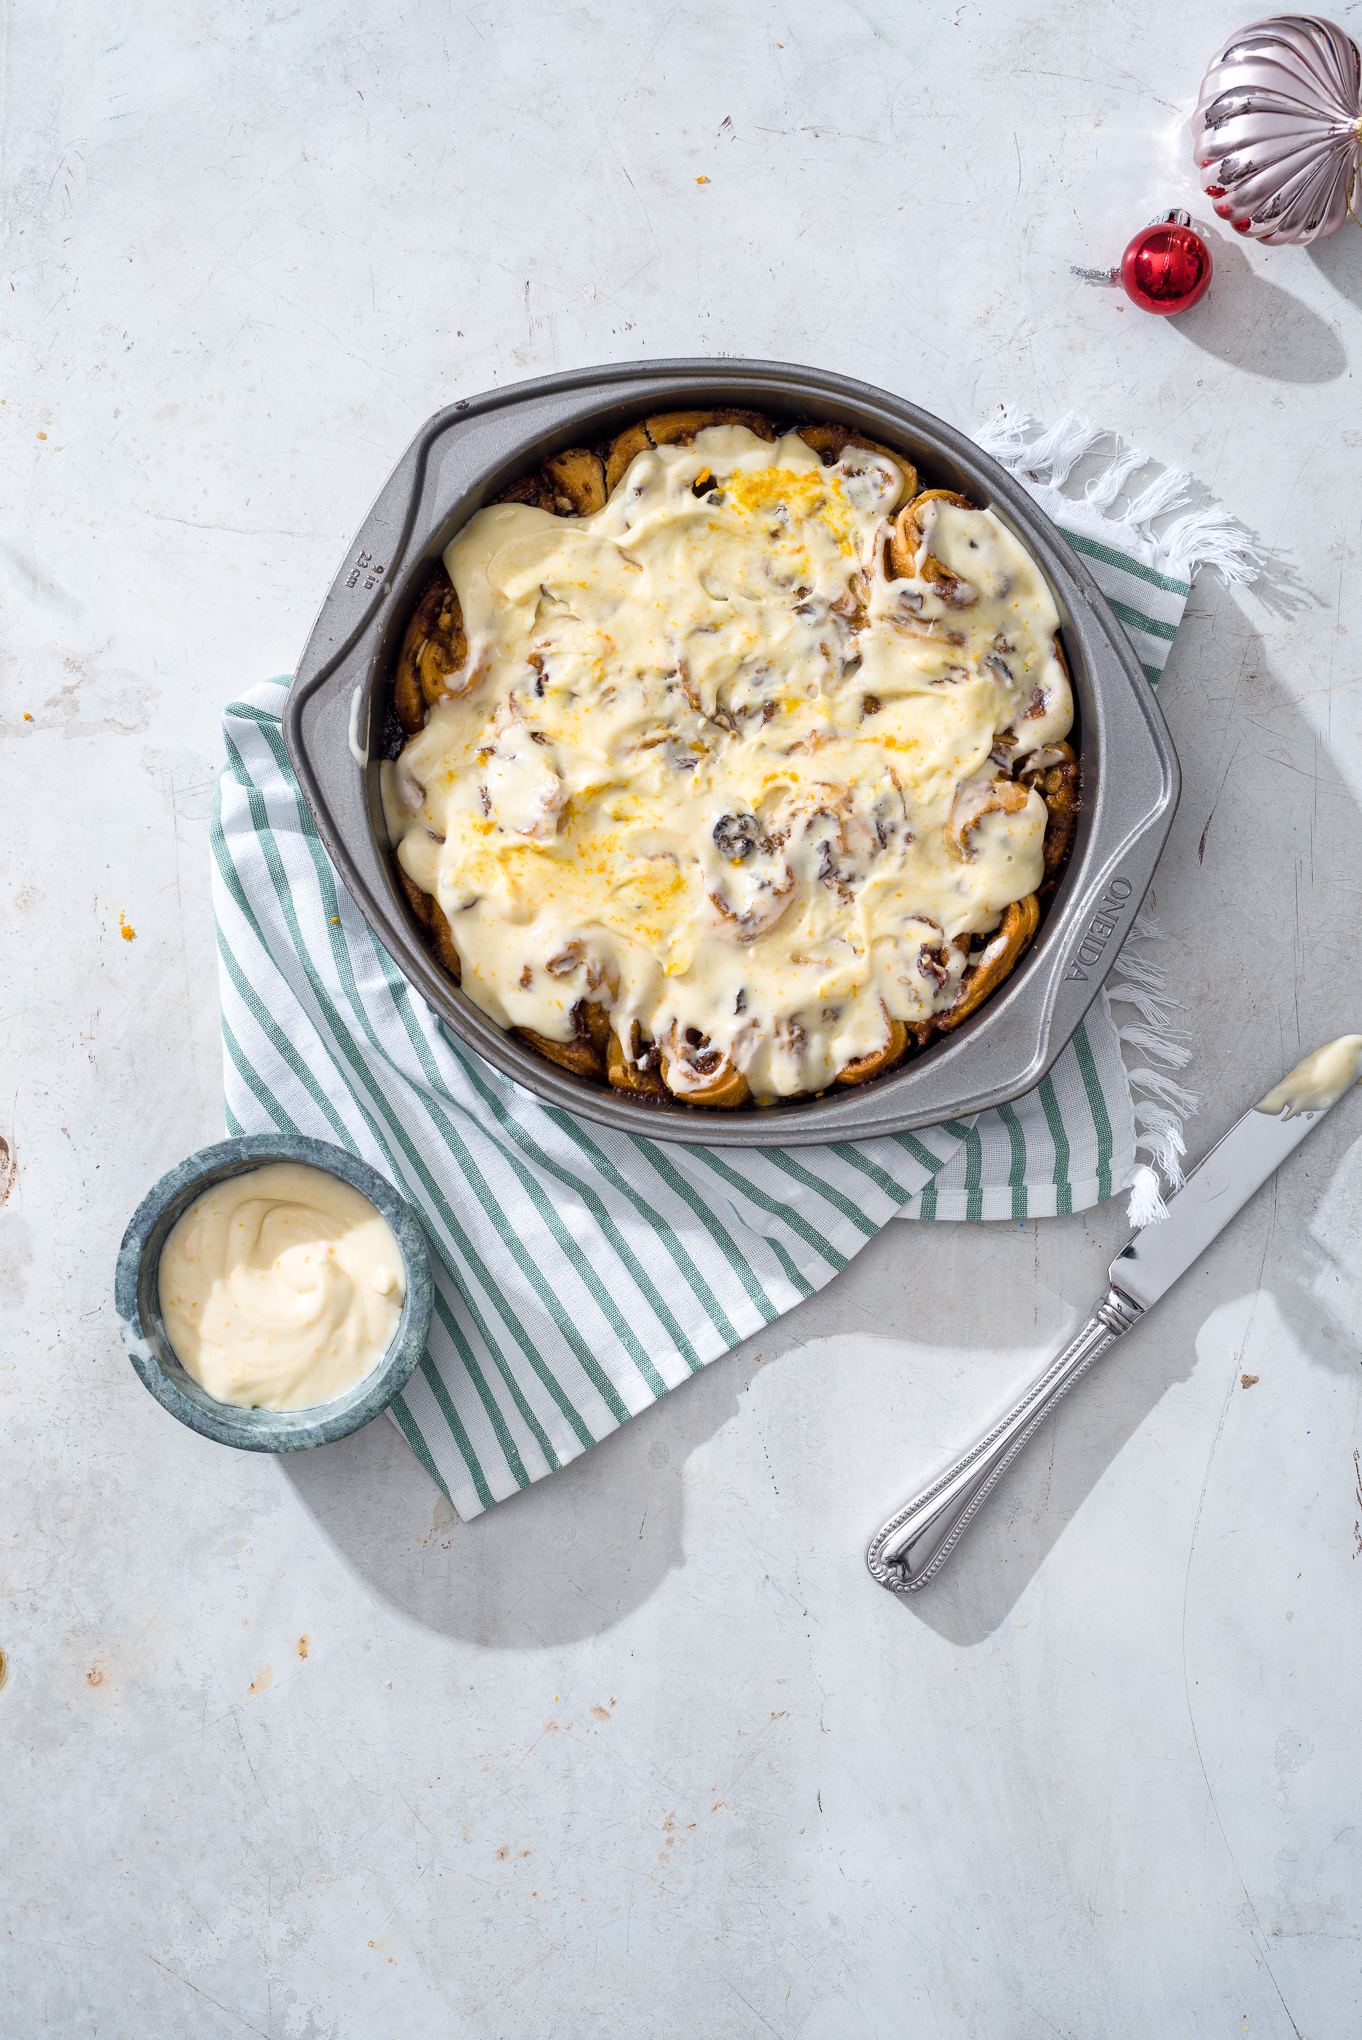
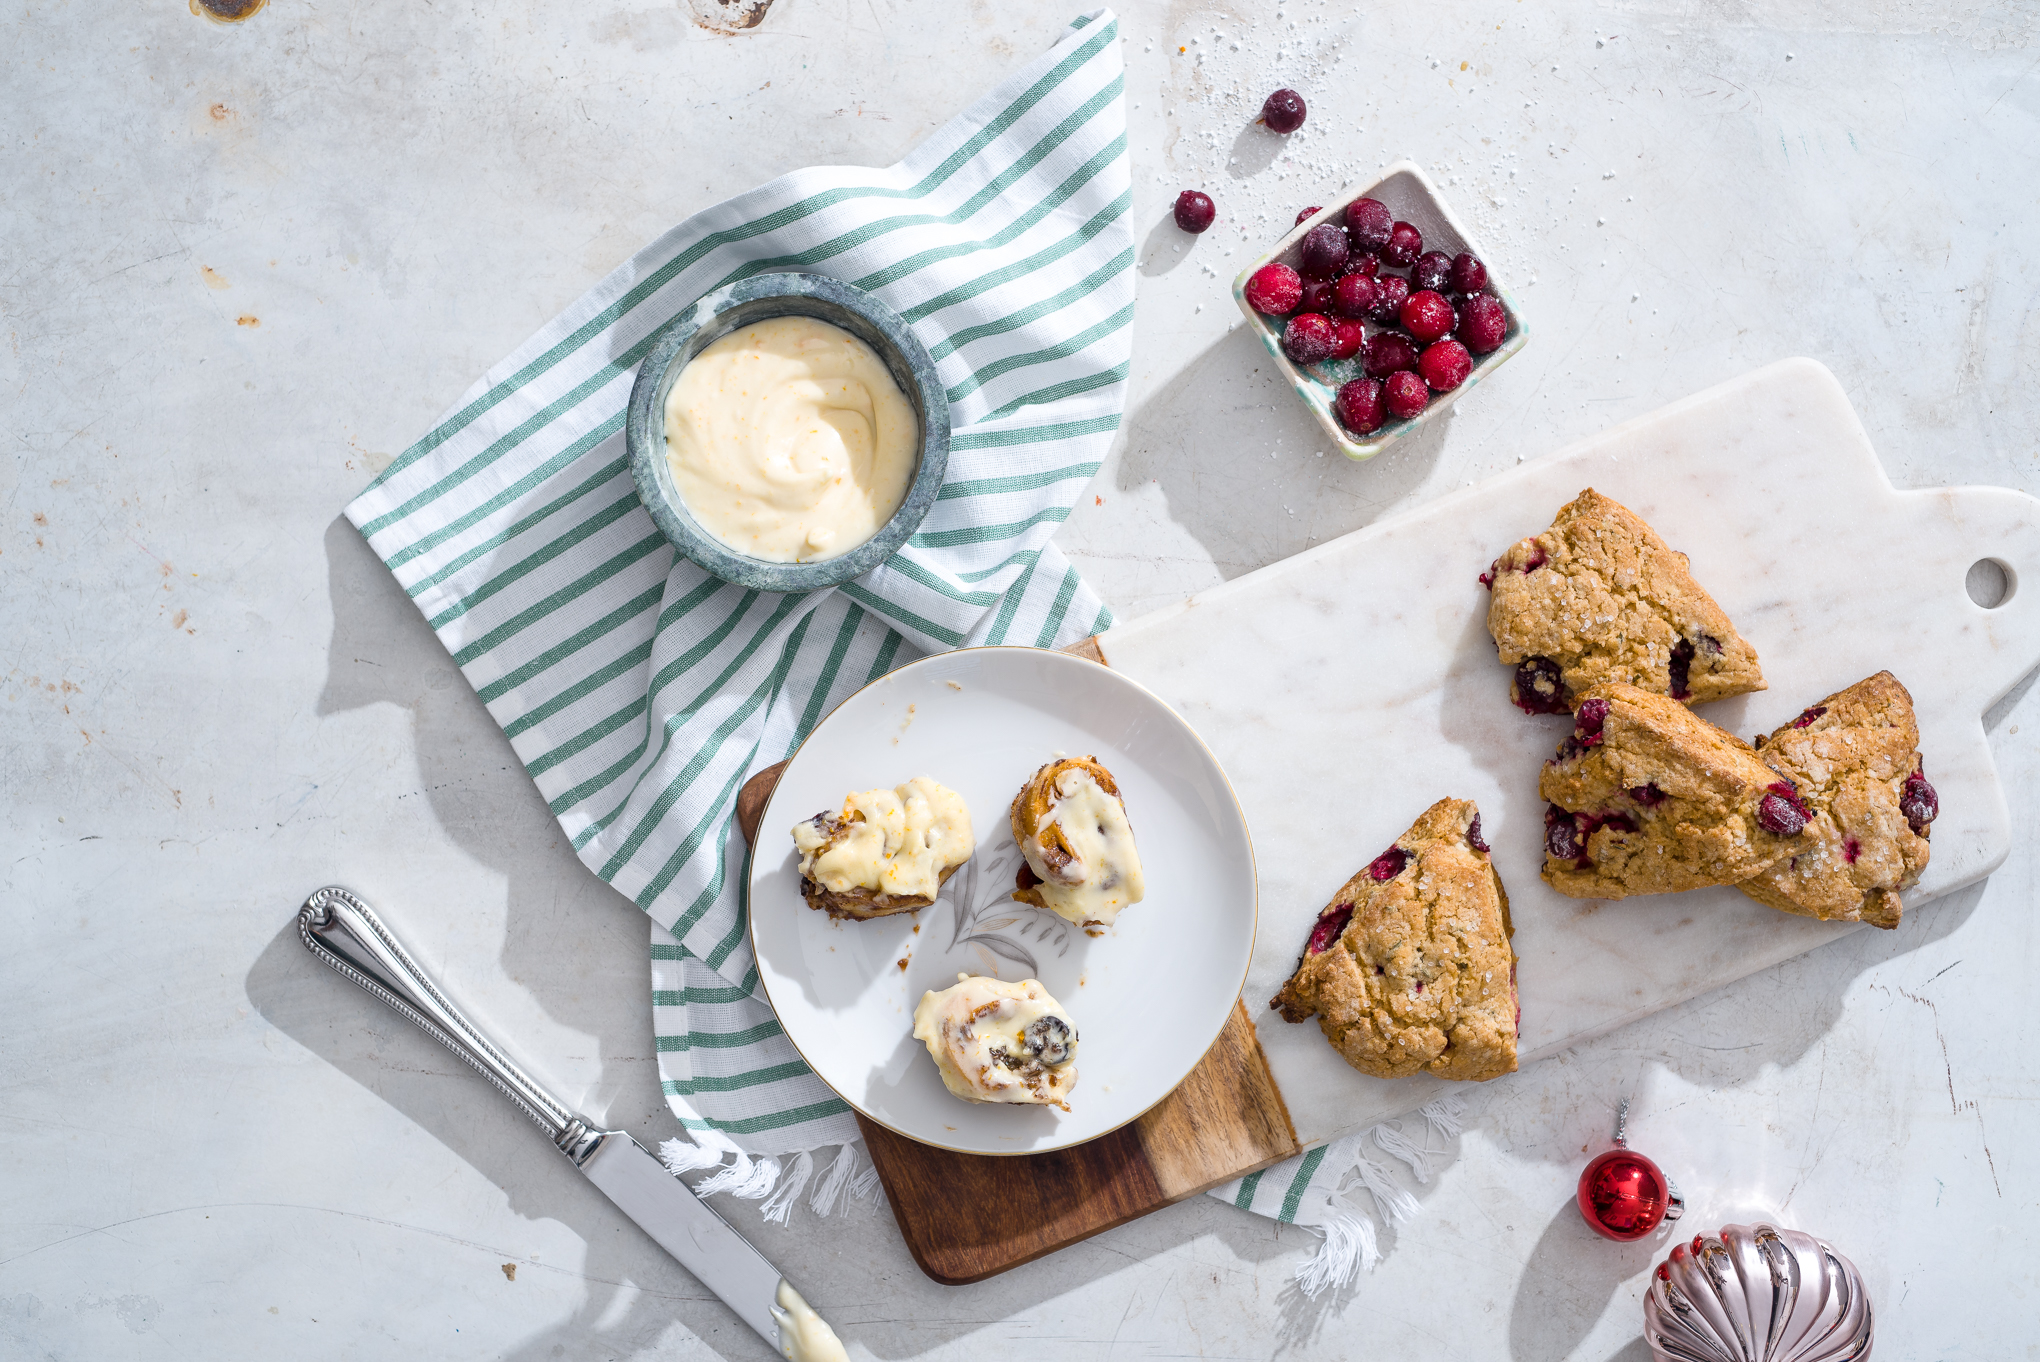
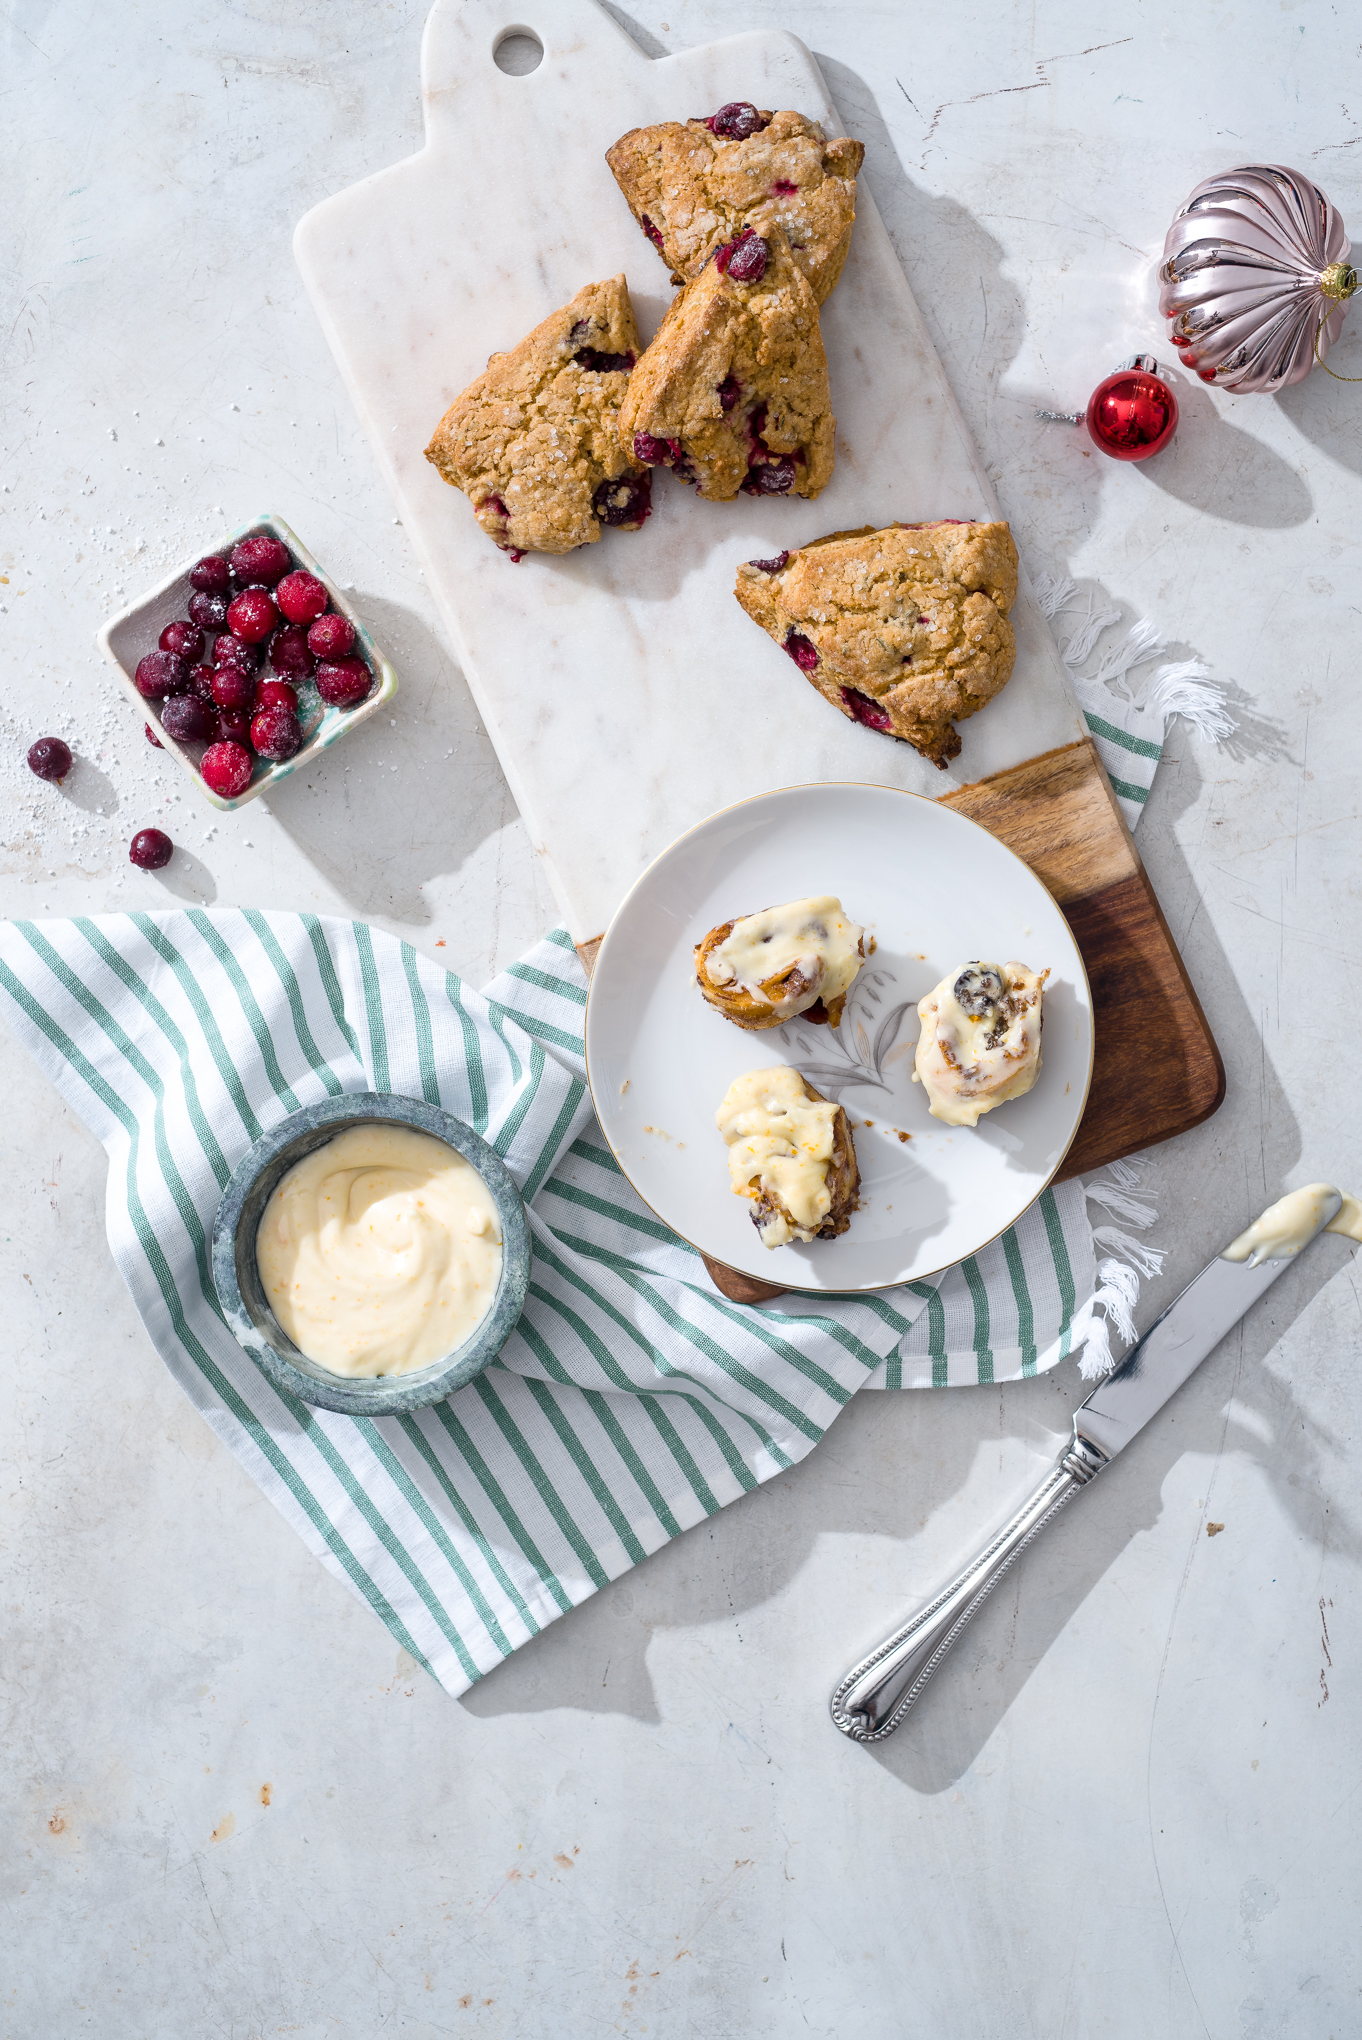
Mini Fruitcake Cinnamon Rolls with Orange Zest Cream Cheese Frosting
Here we update a wintertime staple! A classic cinnamon roll is filled with fruit and a bit of Tennessee honey whiskey to keep our version in line with the spirit-centric tradition of the original dessert. Serve it warm on a cold morning to rouse even the sleepiest of friends or family members. You can also find the recipe in the December issue of Birmingham magazine!
Yield: 16-20 mini rolls
For the rolls: What You Will Need
1 12.4 ounce package cinnamon roll dough (such as Pillsbury cinnamon roll Original)
2 tablespoons melted butter
1 tablespoon Tennessee honey whiskey
1 teaspoon cinnamon
1/4 tsp ground cloves
1/4 cup dark brown sugar
1/2 cup of mixed dried fruit (such as golden raisins, dried cherries, cranberries, and/or apricots) *
1/2 cup of mixed nuts (such as slivered almonds and/or finely chopped pistachios and pecans)
*You can also soak the dried fruit in hot apple cider for five minutes, then drain, for even more holiday flavor! You could also add some rum to that apple cider if your house guests are of the over-21 variety:)
What You Will Do:
Preheat oven to 350. Spray 9 inch metal pie pan with a generous amount of cooking spray, making sure to thoroughly coat the bottom and sides of the pan to prevent sticking.
Stir together melted butter, whiskey, spices and brown sugar.
Separate individual cinnamon rolls.
On a well-floured surface, press the seams of four rolls together. Use your hands to really get in there and warm up the dough so the main seam in the middle is pressed together, as are the sides- so you create a rounded, about 4 to 5 inch square of flat dough with no gaps between rolls. You can use a rolling pin to help flatten it too, but I like using my hands!
Spread 1/2 bourbon sugar mixture onto dough, spreading to almost the edges of the square.
Top with dried fruit and nuts, using about 1⁄4 total mixture. Don’t overload the rolls or you can’t roll them up, hah!
Roll into a log, using your fingers to continue to press the seams of the rolls together if needed. Then use a SHARP knife to cut it into 8-10 small rolls. A sharp knife makes slicing so much easier!
Repeat entire process with remaining 4 rolls.
Gently put mini rolls with edges touching in sprayed pie pan.
Bake for 20 minutes, or until tops are beginning to turn golden brown.
Once cooked through, top with cream cheese frosting and serve warm.
Orange Zest Cream Cheese Frosting
What You Will Need:
4 ounces cream cheese, room temperature
3/4 cup powdered sugar
2 ounces heavy cream
1 tsp vanilla extract
1/2 tsp orange zest (about the zest of one medium orange) plus additional zest for sprinkling
What You Will Do:
1. In the bowl of a stand mixer fitted with a paddle attachment, beat cream cheese, powdered sugar, heavy cream, and vanilla extract on medium speed for one to two minutes, or until smooth and creamy.
2. Stir in orange zest. Spread with a butter knife or offset spatula on rolls while still warm. Enjoy!!
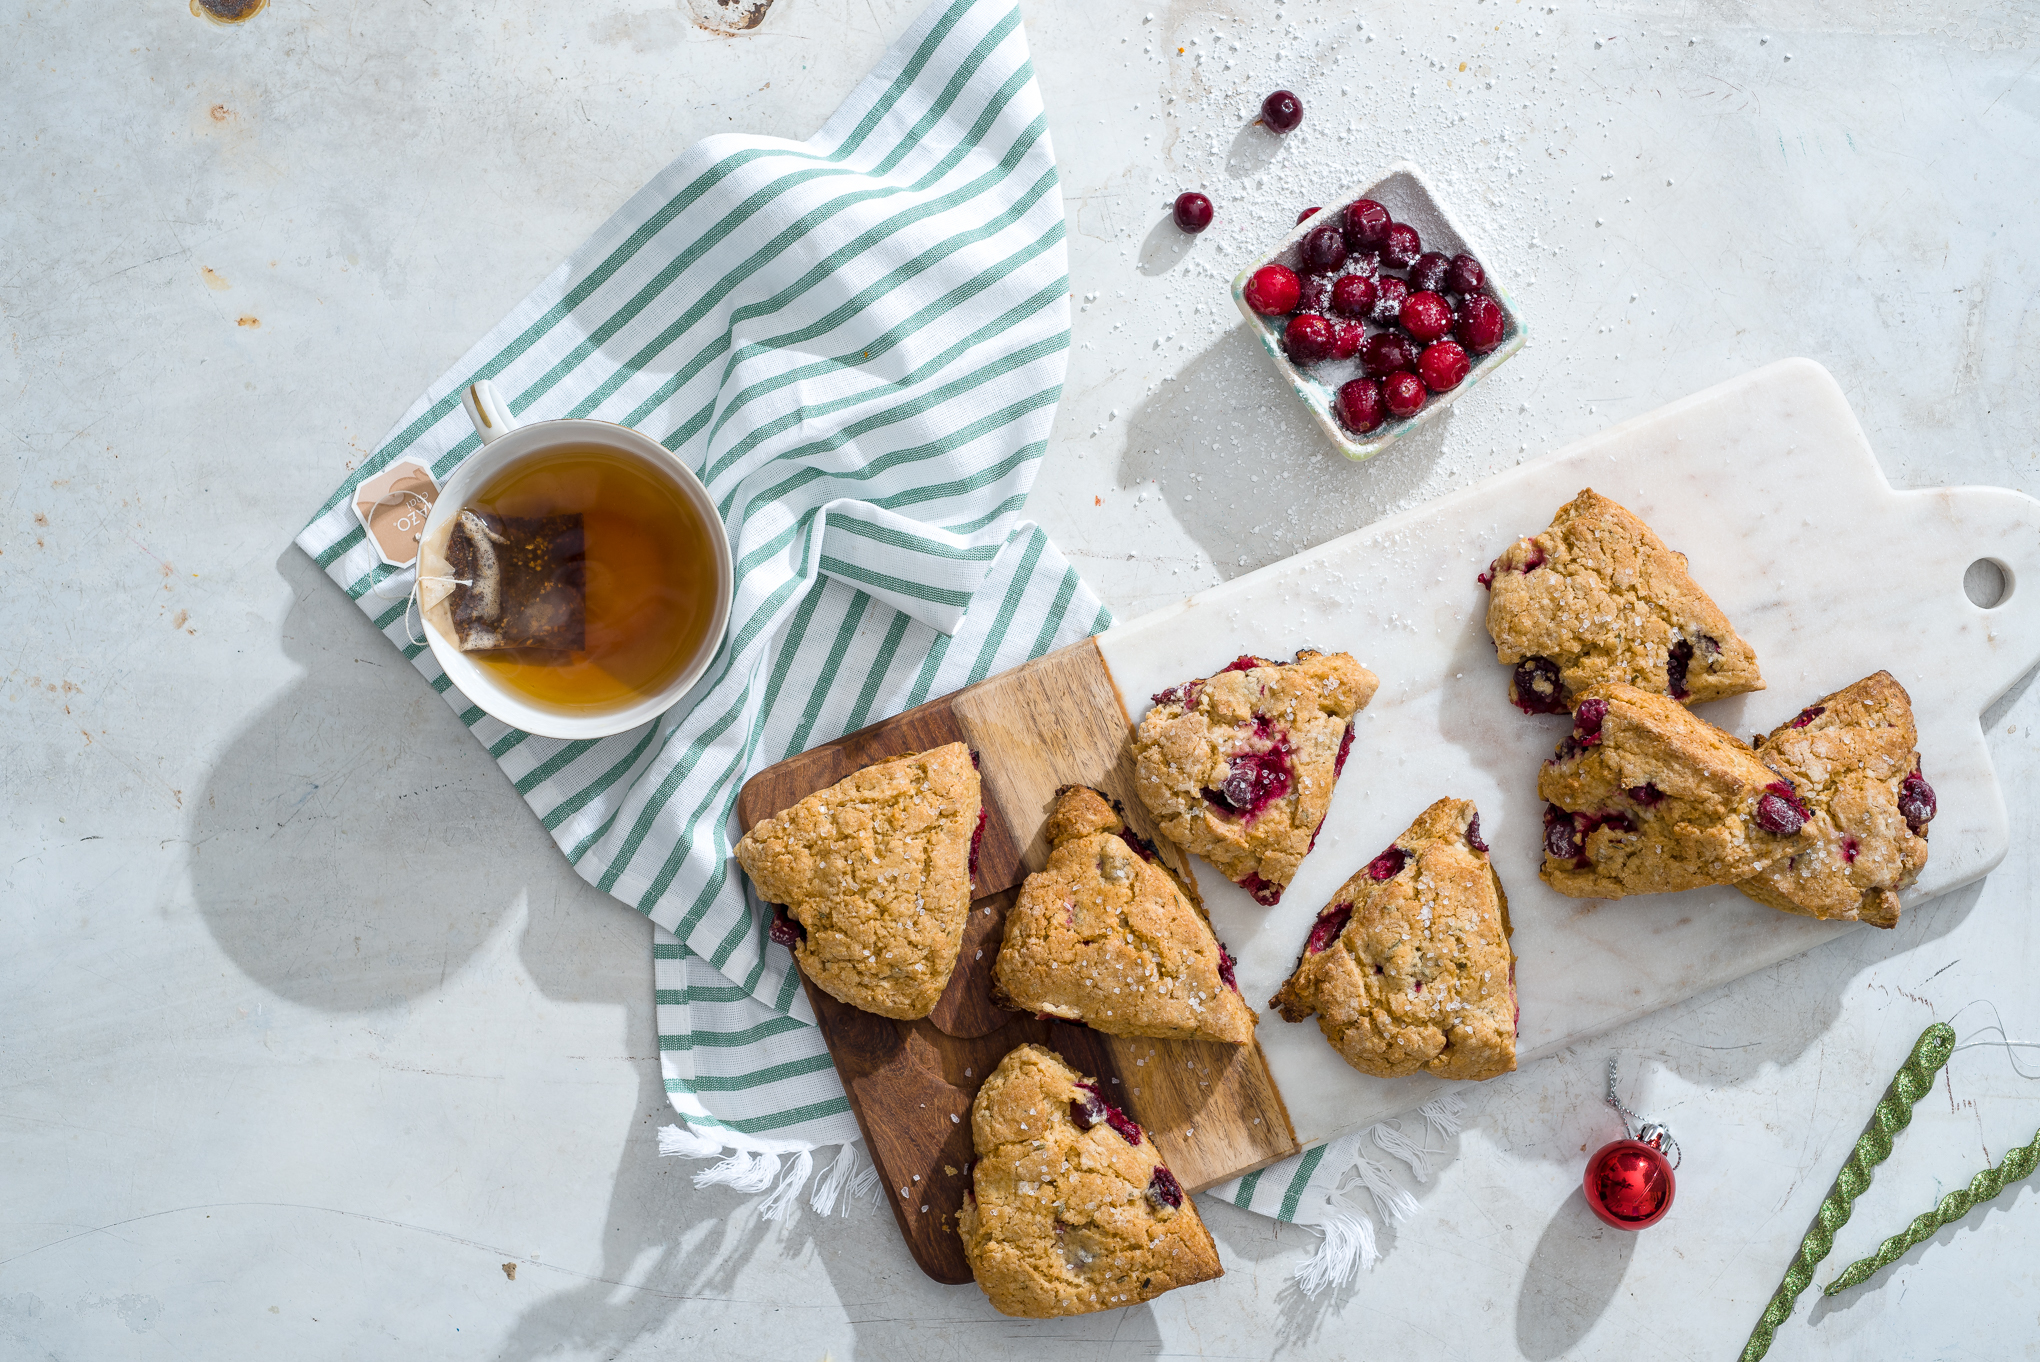
Is anyone having holiday guests over for Christmas? Or New Year’s?
Then do I have some recipes for you!
As part of recipes 7 and 8 of our Twelve Recipes of Christmas, these next two days I’ll be filling you up with easy, comforting, warm- insert alllll the baking adjectives here- recipes to feed the people sleeping in your extra bedroom or on your sofa! Or in our case- umm, in the “creative room” that we also use to store all of our guitars, photo equipment, video cameras, reflectors and a computer. BLESS YOU!
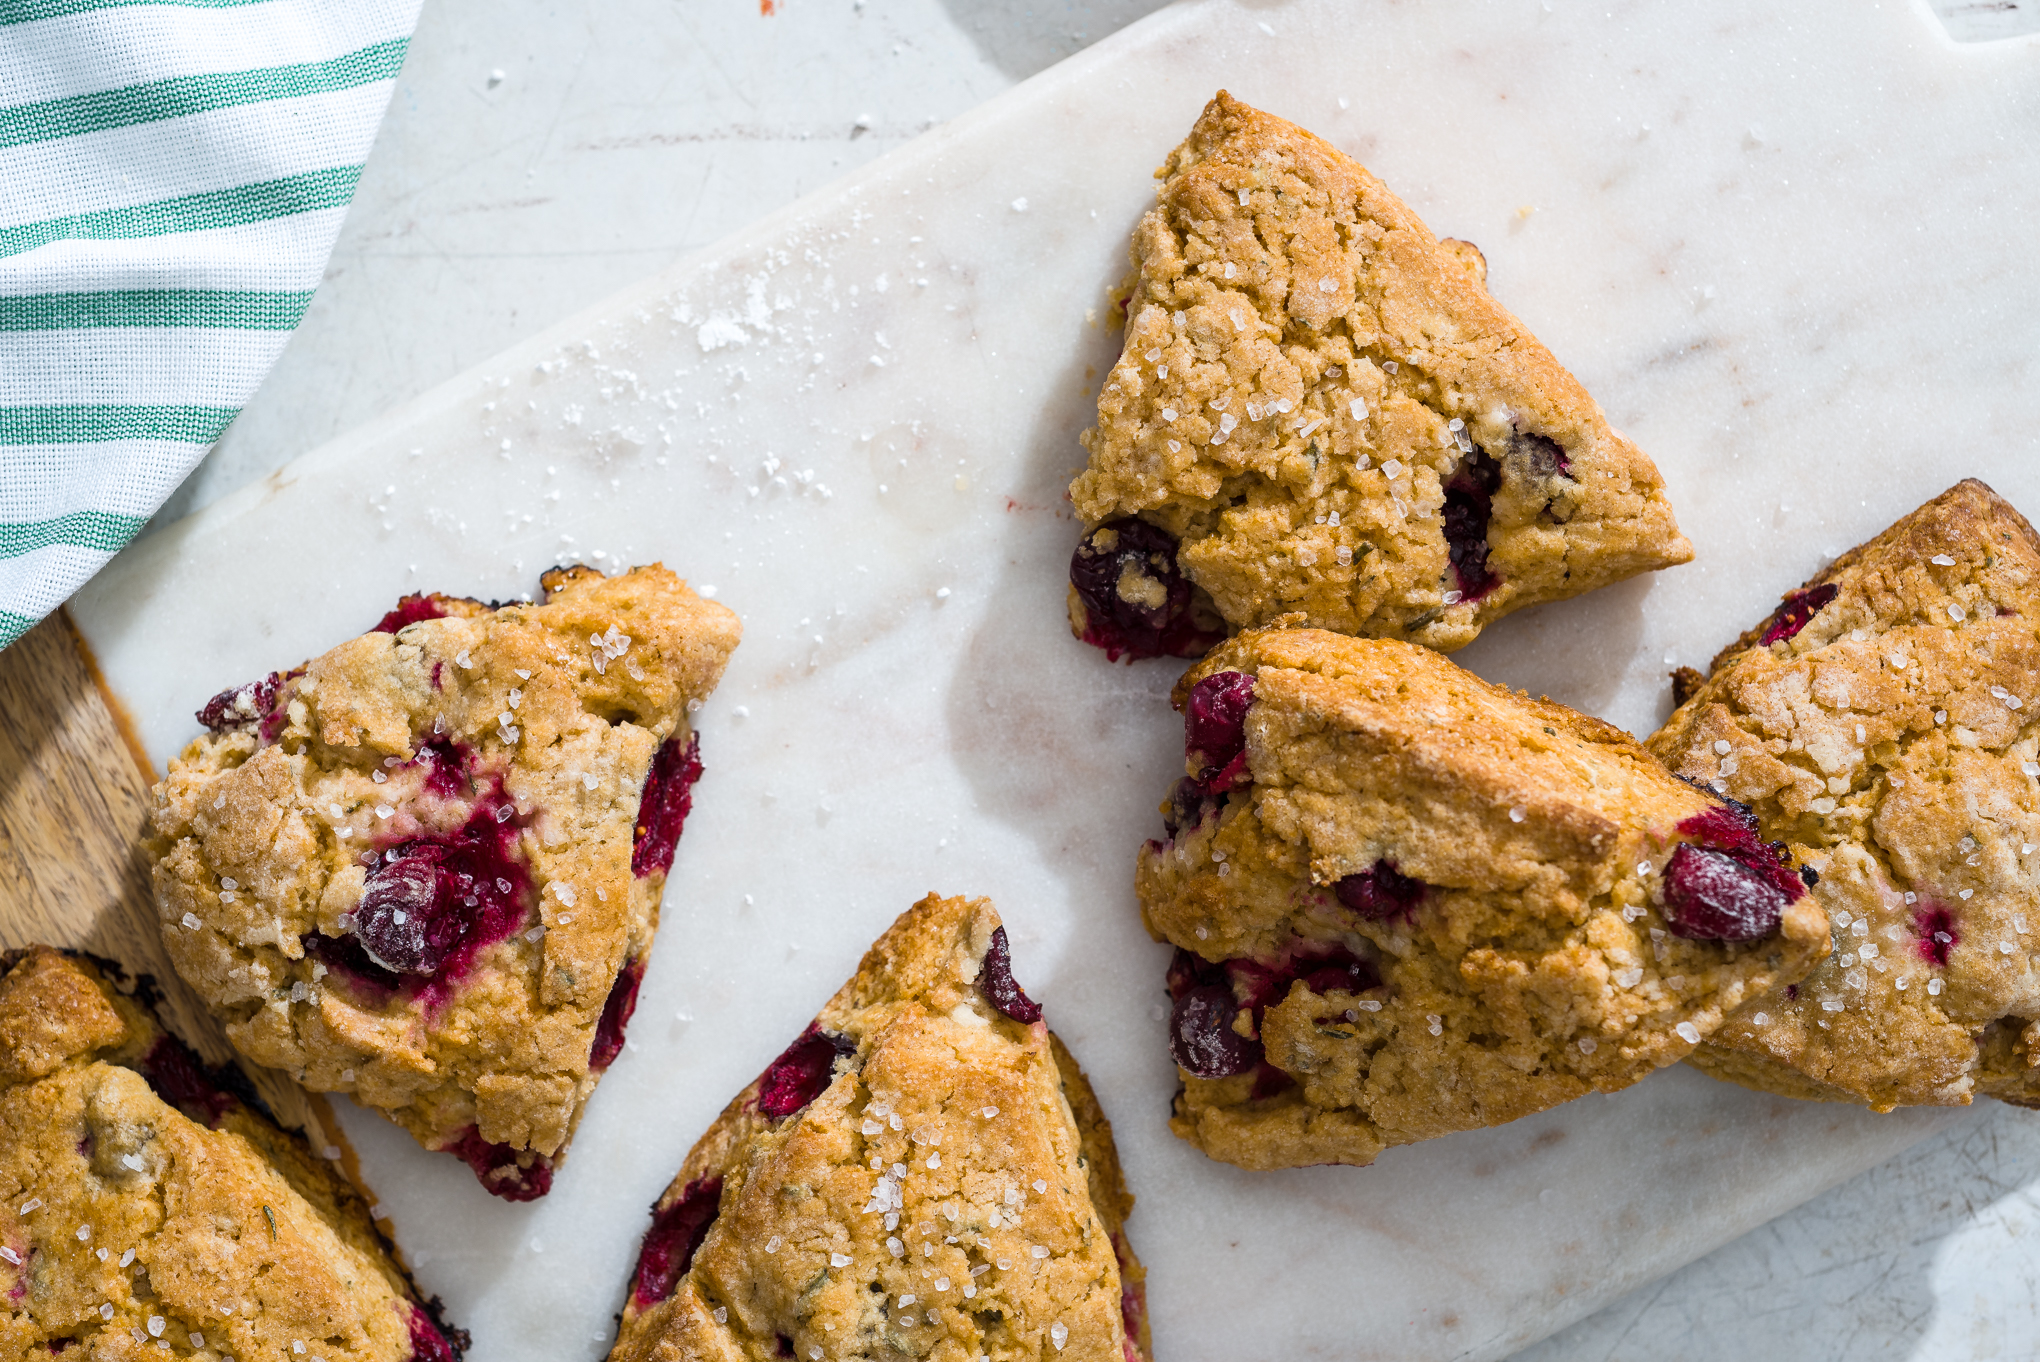
Let’s start the recipes off with miniscones. I loooveee a scone, especially one made with great butter. And a great crumb (*cue Mary Berry!). And an interesting flavor combo. So when these guys came into being, I was pumped. While I love a baked good in the morning, anything too sweet and I feel a bit doozy. Since I like to stick with whole-grain based treats (or anything stuffed with cheese and/or meat) in the a.m.**, I thought I would play around with a combo of white wheat and all-purpose flour, instead of the traditional all white flour I’m used to seeing in scones.
I also left out the vanilla extract and traditional sugary glaze atop this scone- and instead used a bit of coarse kosher salt to highlight the sweetness of the cranberries without adding extra sugar. The addition of rosemary makes things feel nice and holiday-special!
And one last scone-baking tip: freeze your butter! I promise this step is actually worth it and makes your scones all the more fantabulous and buttery. The texture truly is affected by the butter! Also, don’t overmix these guys- the less stirring it takes to incorporate everything, the better. Remember that those chunks of butter are creating the air pockets you WANT in your final baked good!
Alright my loves, let’s make some scones!
Hint hint at what tomorrow’s recipe will be!
Mini Whole Wheat Cranberry Rosemary Scones
Topping these scones with coarse kosher salt hints at their savory nature. By leaving out the vanilla extract and additional sugary glaze that comes with sweeter recipes, these scones are only lightly sweet with a comforting flavor of rosemary and richness of cream. They are perfect served on a cold winter day with a cup of strong black tea or coffee. You can also find this recipe in the December issue of Birmingham magazine!
Yield: 12 mini scones
What You Will Need:
1 cup all purpose flour
3/4 cup white wheat flour
1/2 cup light brown sugar, packed
1 teaspoon baking powder
1/4 teaspoon baking soda
1/2 teaspoon kosher salt
1 tablespoon finely chopped rosemary
1/2 cup frozen butter
4 ounces heavy cream
1 egg
1 cup frozen cranberries
Coarse salt, for sprinkling
What You Will Do:
Preheat oven to 400. Move oven rack to bottom third of oven; line a baking sheet with a baking mat.
Whisk together flours, sugar, baking powder, baking soda, salt, and fresh rosemary in a large bowl until combined.
Remove butter from freezer; grate over the large holes of a box grater into the flour.
Incorporate the butter curls into dry mixture with your fingers or a pastry cutter until it is a coarse texture and no pieces of butter remain larger than a pea.
Whisk together egg and heavy cream thoroughly in a small bowl until they are a light yellow color.
Pour egg/cream mixture into flour/butter. Stir gently with a rubber spatula to barely incorporate the liquid, or until large clumps of dough begin to form.
Pour 1 cup cranberries into clumped dough and use your hands to evenly distribute. Dough should be sticky; just mix it until the cranberries are not in one large clump in the dough.
Here’s the fun part! Gently use your hands to form one large dough. Try not to overmix here- just use your hands until the dough comes together into a large mass.
Separate the dough into two discs.
On a heavily floured surface (I like all-purpose flour on the surface), sprinkle each disc and a rolling pin with flour. Roll a disc into a 6 inch diameter, 3/4 inch thick circle.
Cut dough into six wedges with a sharp knife. Transfer each scone to the baking sheet. Repeat with other disc.
Put scones on baking sheet a few inches apart. Sprinkle lightly with coarse salt.
Bake for 18 to 20 minutes, or until they are golden brown!
Tip: Store butter in the freezer for at least 30 minutes to prepare it for the scones.
Tip: Find whole cranberries in the frozen fruit section of your grocery store.
Tip: If you don’t have a baking mat, you can use parchment paper, but the total baking time may be one to three minutes less than 20 minutes.
**Well, except for croissants- but those always get an exception in my book.
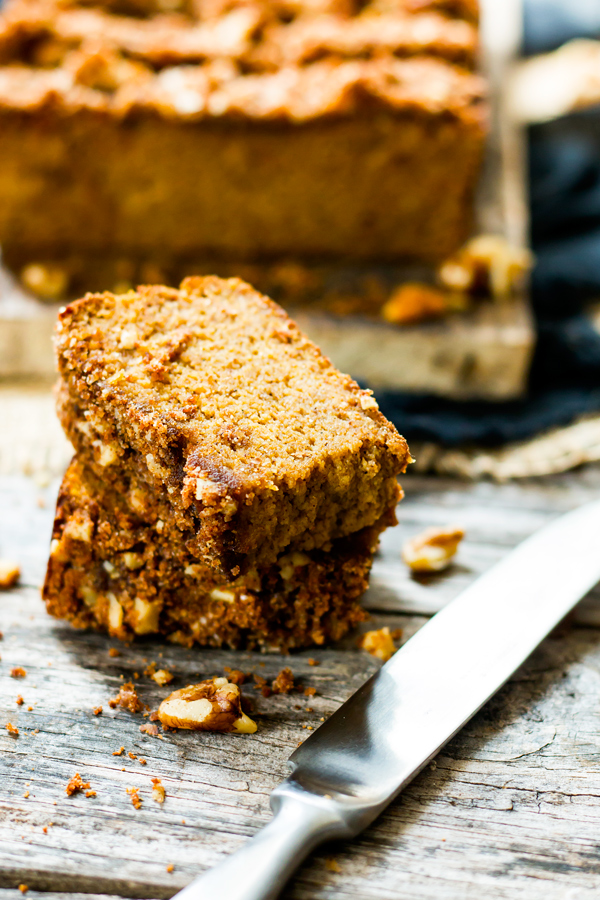
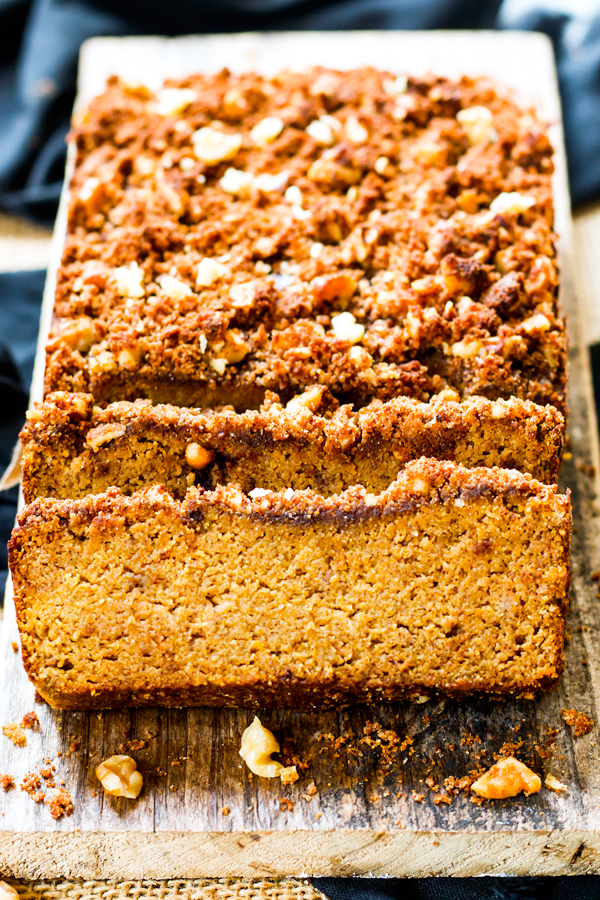
This gluten-free coconut pumpkin bread from Evolving Table is OUT OF THIS WORLD!
YOU GUYS!!!
I have discovered the BEST, healthiest, Paleo, gluten-free holiday pumpkin bread on the internet. In fact, my great friend who is vegan and eats no grains flipped OUT over this recipe from Evolving Table!
I loved it sooo much that I attempted to make an Instagram story about it but my lack of social media expertise kinnddd of got in the way. I didn’t know that when you save videos on Instagram for later you have to 1- upload them within 24 hours and 2-they won’t upload onto WordPress because they are in incompatible format.
Hah!
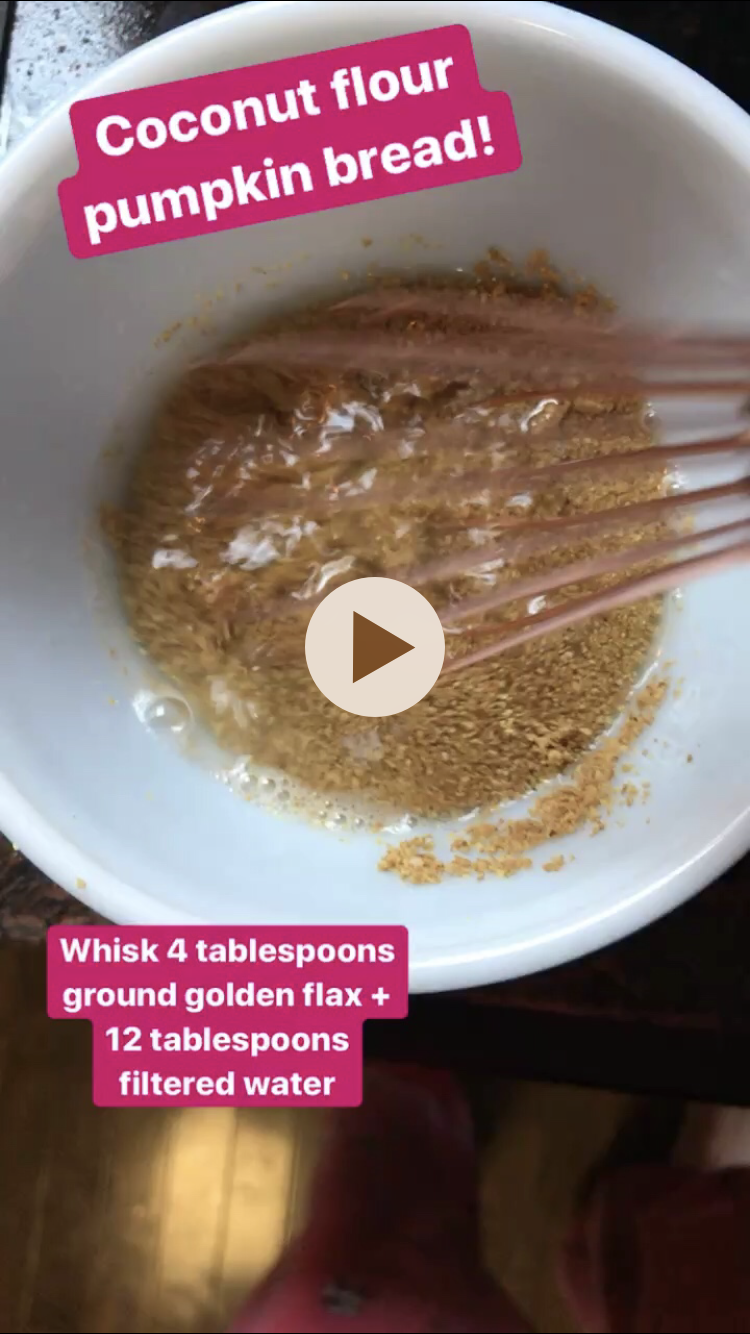
So, to mix things up a bit for this one, I’m posting the steps below with the ingredients I used for the recipe! I made a few substitutions from London’s version, only because one of my friends doesn’t eat eggs, and I didn’t have enough coconut sugar at home. Also- a NOTE on the flax eggs. Make sure you use toasted golden flax (I bought mine at Aldi) and grind it fresh in a spice grinder. That makes all the difference in getting your flax eggs to work!
So without further ado- this amazing pumpkin bread!
London’s amazing coconut pumpkin bread with crumble topping!
Egg Free Coconut Flour Pumpkin Bread with Crumble Topping (tweaked just a tad from Evolving Table‘s original version!)
This is by far the best grain-free pumpkin bread I have EVER tasted and I can’t rave about it enough. All I can say is you HAVE to make it! Plus, the texture is FAB and it’s wayyy delicious with a glass of whole or almond milk to go with it.
Preheat oven to 350 degrees and spray a loaf pan with cooking spray!
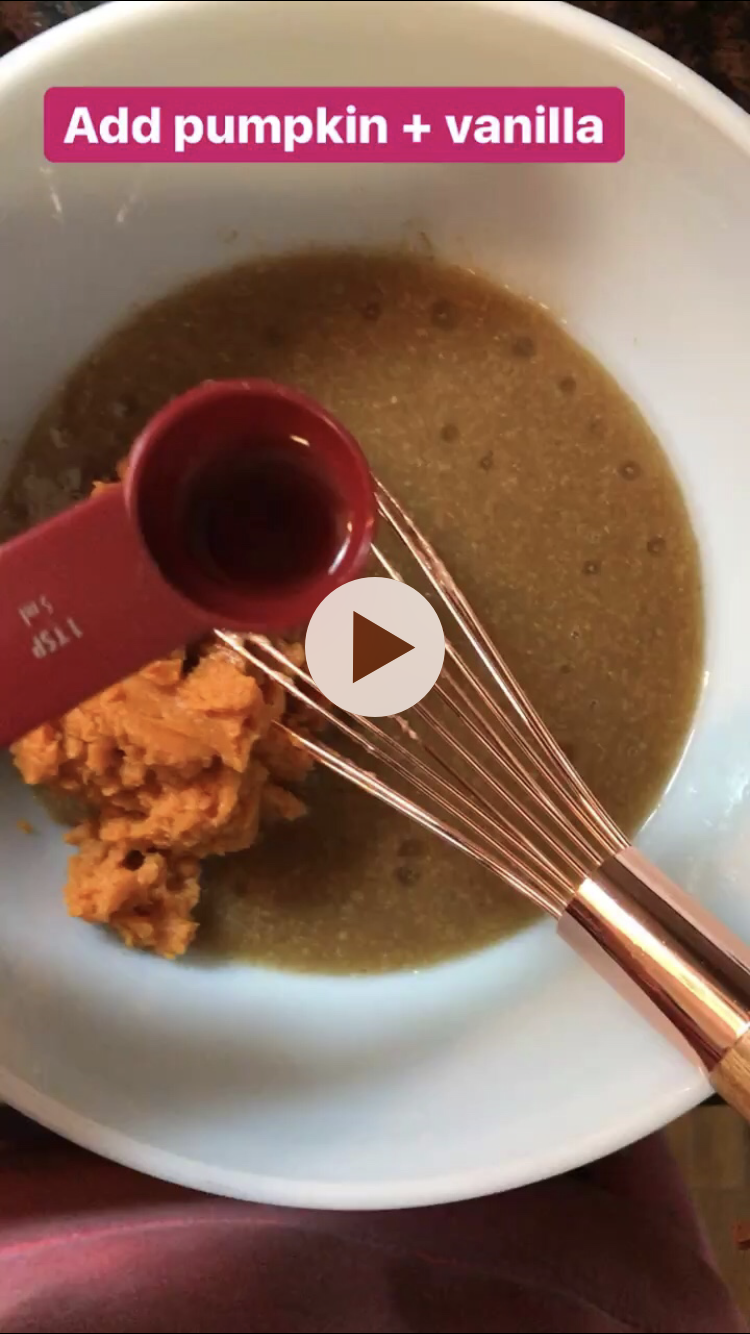
2. **Make sure this flax is freshly toasted and the water is cold. Whisk together flax and water thoroughly until the mixture begins to feel resistance/a bit gelatinous; let it sit for five minutes at room temp, then it’s ready to go!
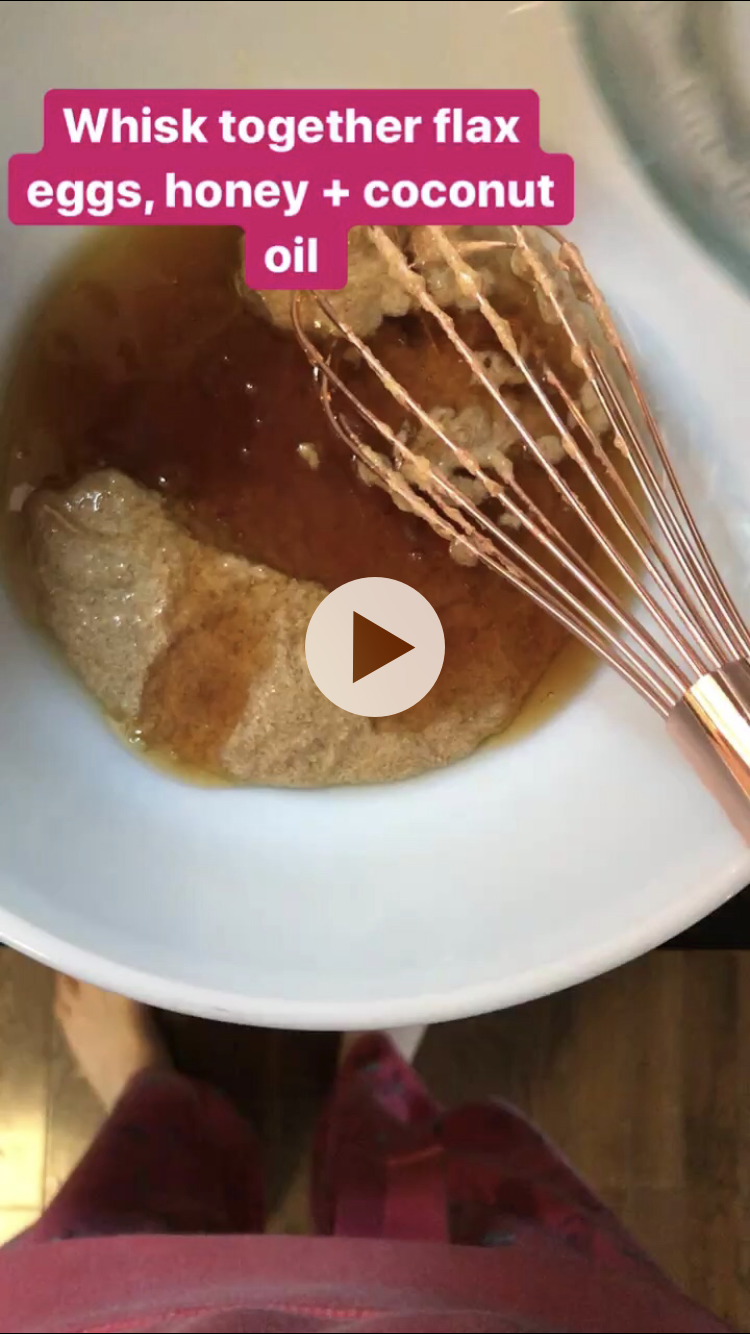
3. Whisk together until combined and smooth…
4. Whisk until combined…
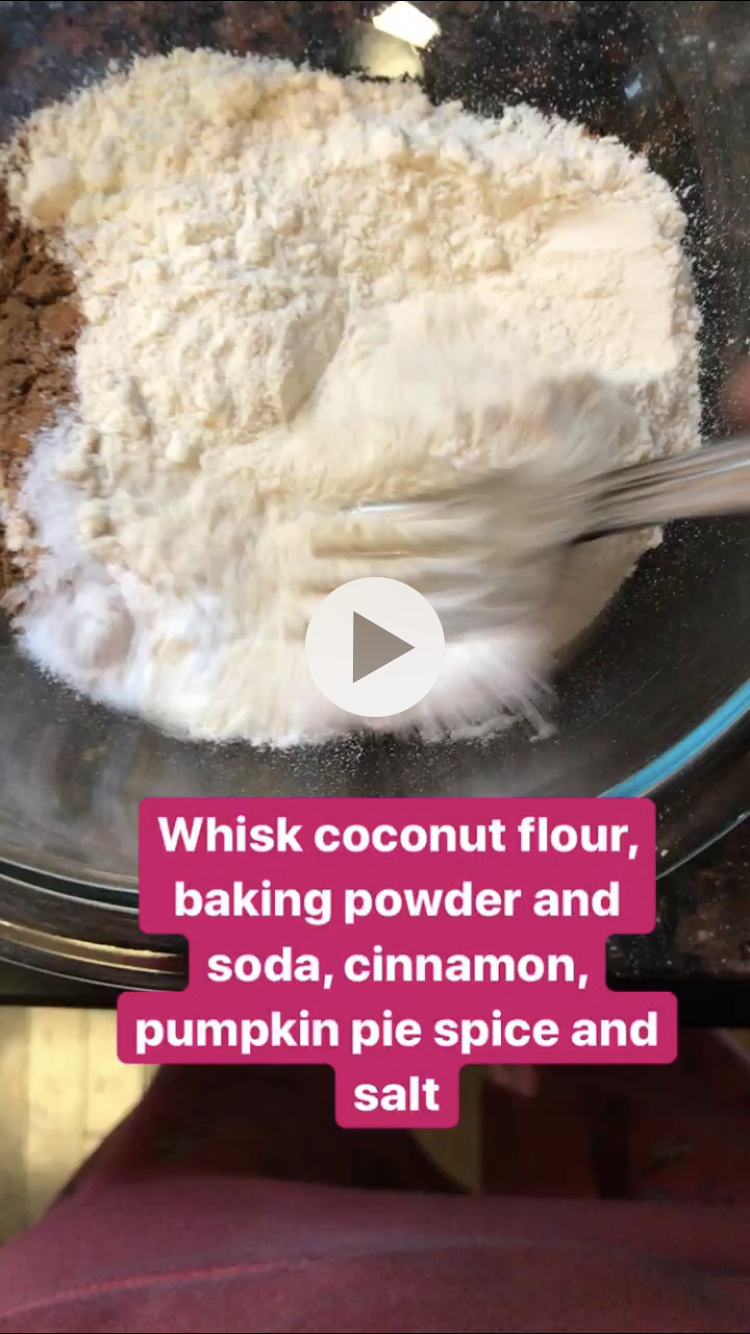
5. Make sure everything is evenly combined in this bowl too…
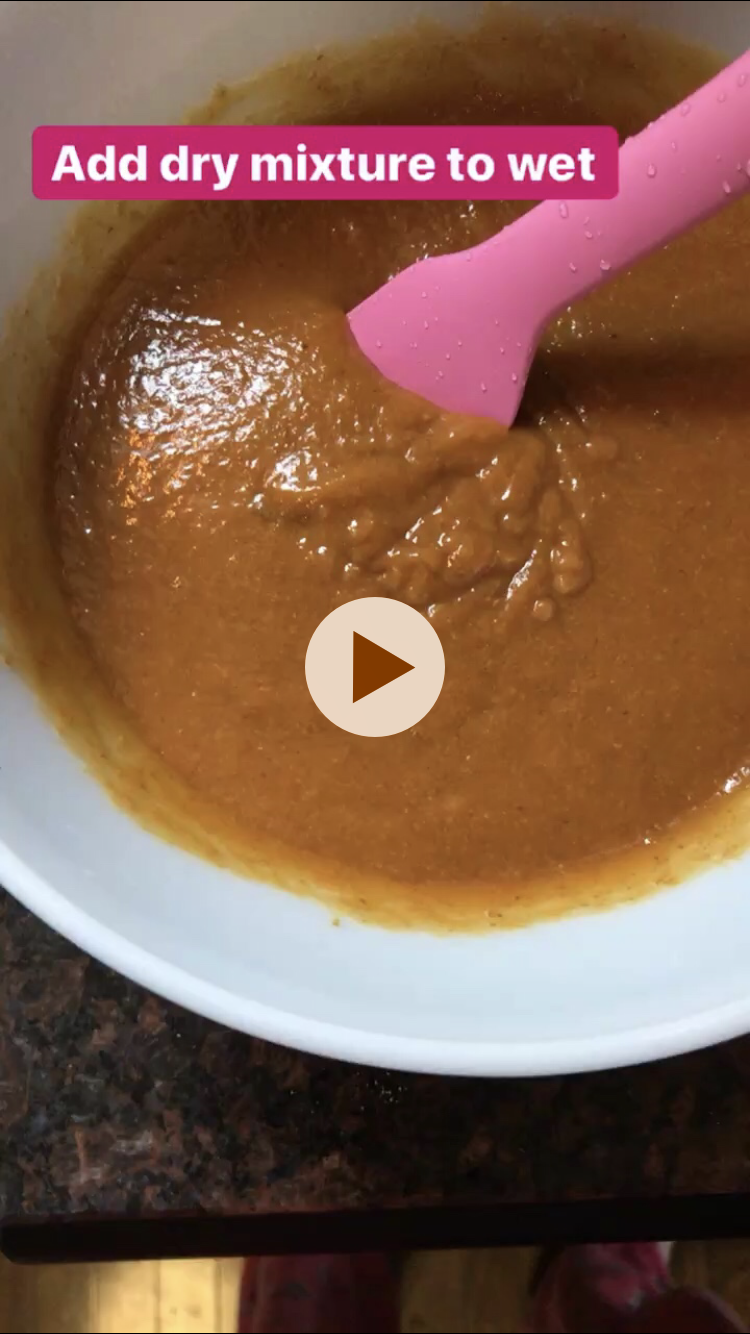
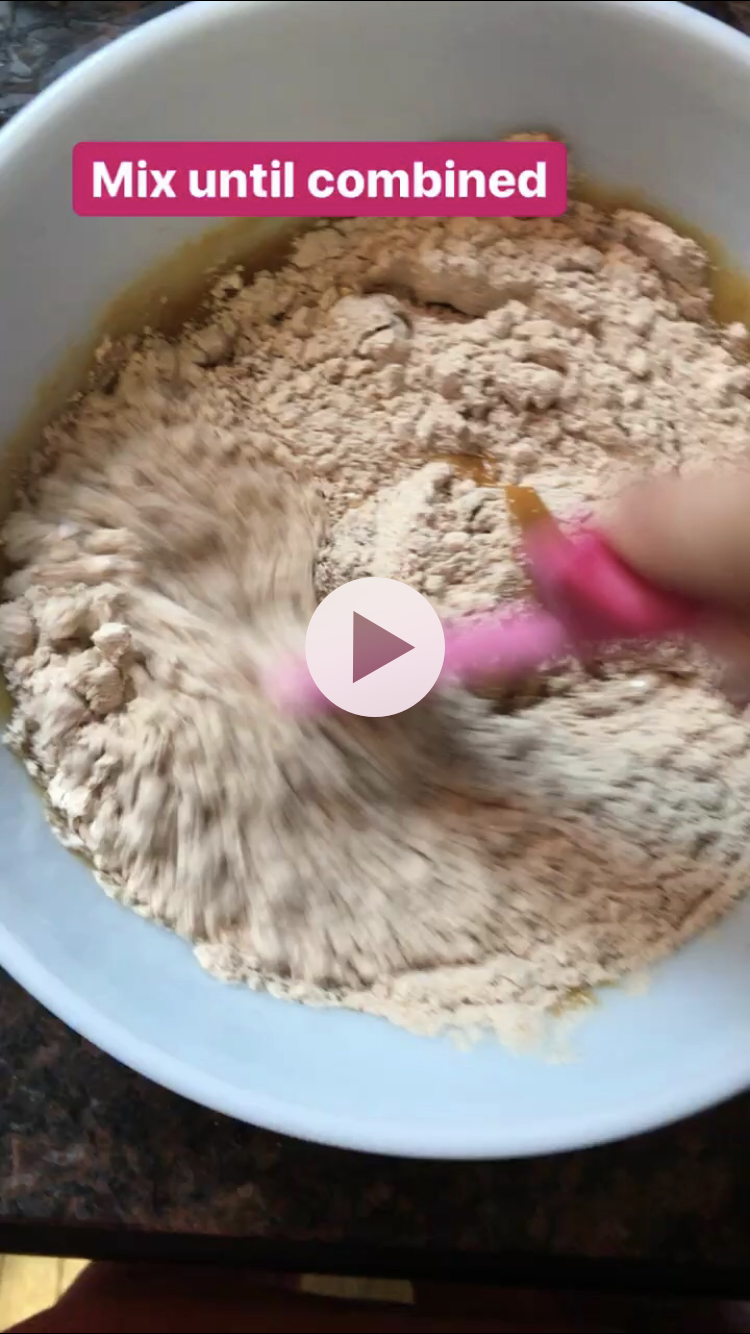
6. Mix the dry mixture into the wet batter just until it is mixed in (don’t over mix or it can get tough!)
7. Pour the batter mixture into the loaf pan…
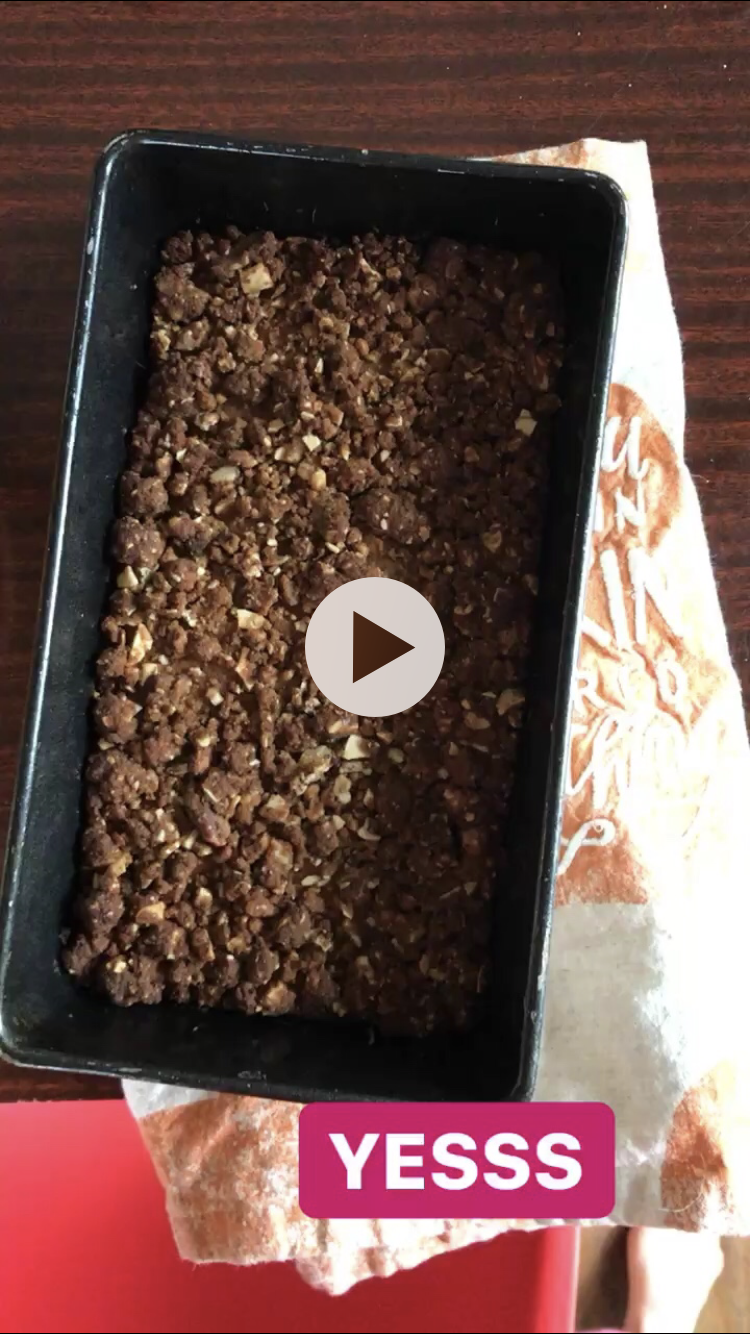
8. Make the crumble topping (not shown): Whisk together the melted coconut oil, flour, sugars, and cinnamon. It will start to clump up and that’s awesome! Then, stir in the walnuts.
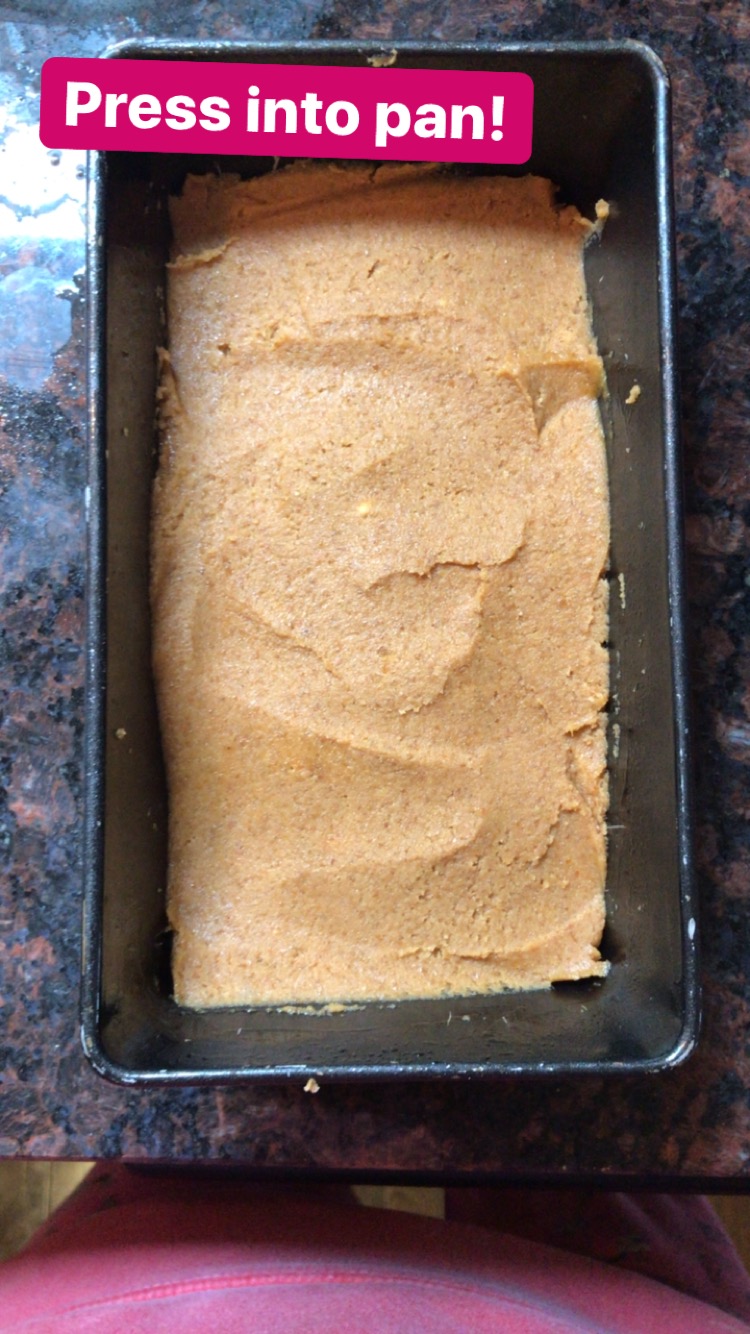
9. Sprinkle and lightly press the crumble topping onto the bread batter.
10. Then put the loaf into a 350 degree oven for 45-55 minutes, or until a toothpick inserted in it comes out clean. Let cool for at least 30 minutes in the pan, then slice it and ENJOY!
My husband and I decided that this year we are going to do one thing VERY right for Christmas. It wasn’t going to be giving each other a Slayer espresso machine (a girl can DREAM) or training our dog to actually catch treats in his mouth. Nope, instead we attempted to make George Washington’s eggnog recipe.
As in, the same one from around around the time of the British tradition’s transport to America. The same time that George and Martha Washington entertained at Mount Vernon. That same one.
To say that the process was tedious is a bit of an understatement. In fact, my sweet husband was so concerned that he over-whipped the egg whites that we had multiple discussions on whether shaking the gallon container with the egg nog already in it would correct or make the problem worse.
The jury is still out on whether or not all of this effort will be worth it; right now it smells (and tastes) about as strong as what my best friend’s dad loosely calls “Eggnog” at our family Christmas party, but what everyone else knows is more like whisky with a hit of vanilla ice cream and dash of nutmeg.
But these cupcakes! Hold the phone. Even the eggnog averse will most likely fall for this cupcake. The recipe doesn’t even actually have eggnog in it- just a blend of almond and rum extracts that highlight a fluffy almond cake topped with delicious vanilla nutmeg frosting.
PLUS, unlike our eggnog, there is no need to let this sit in your fridge for three weeks! Or wait for raw eggs to be “sterilized” by copious amounts of liquor! Just pure, delicious cake topped with fluffy frosting.
Happy baking!
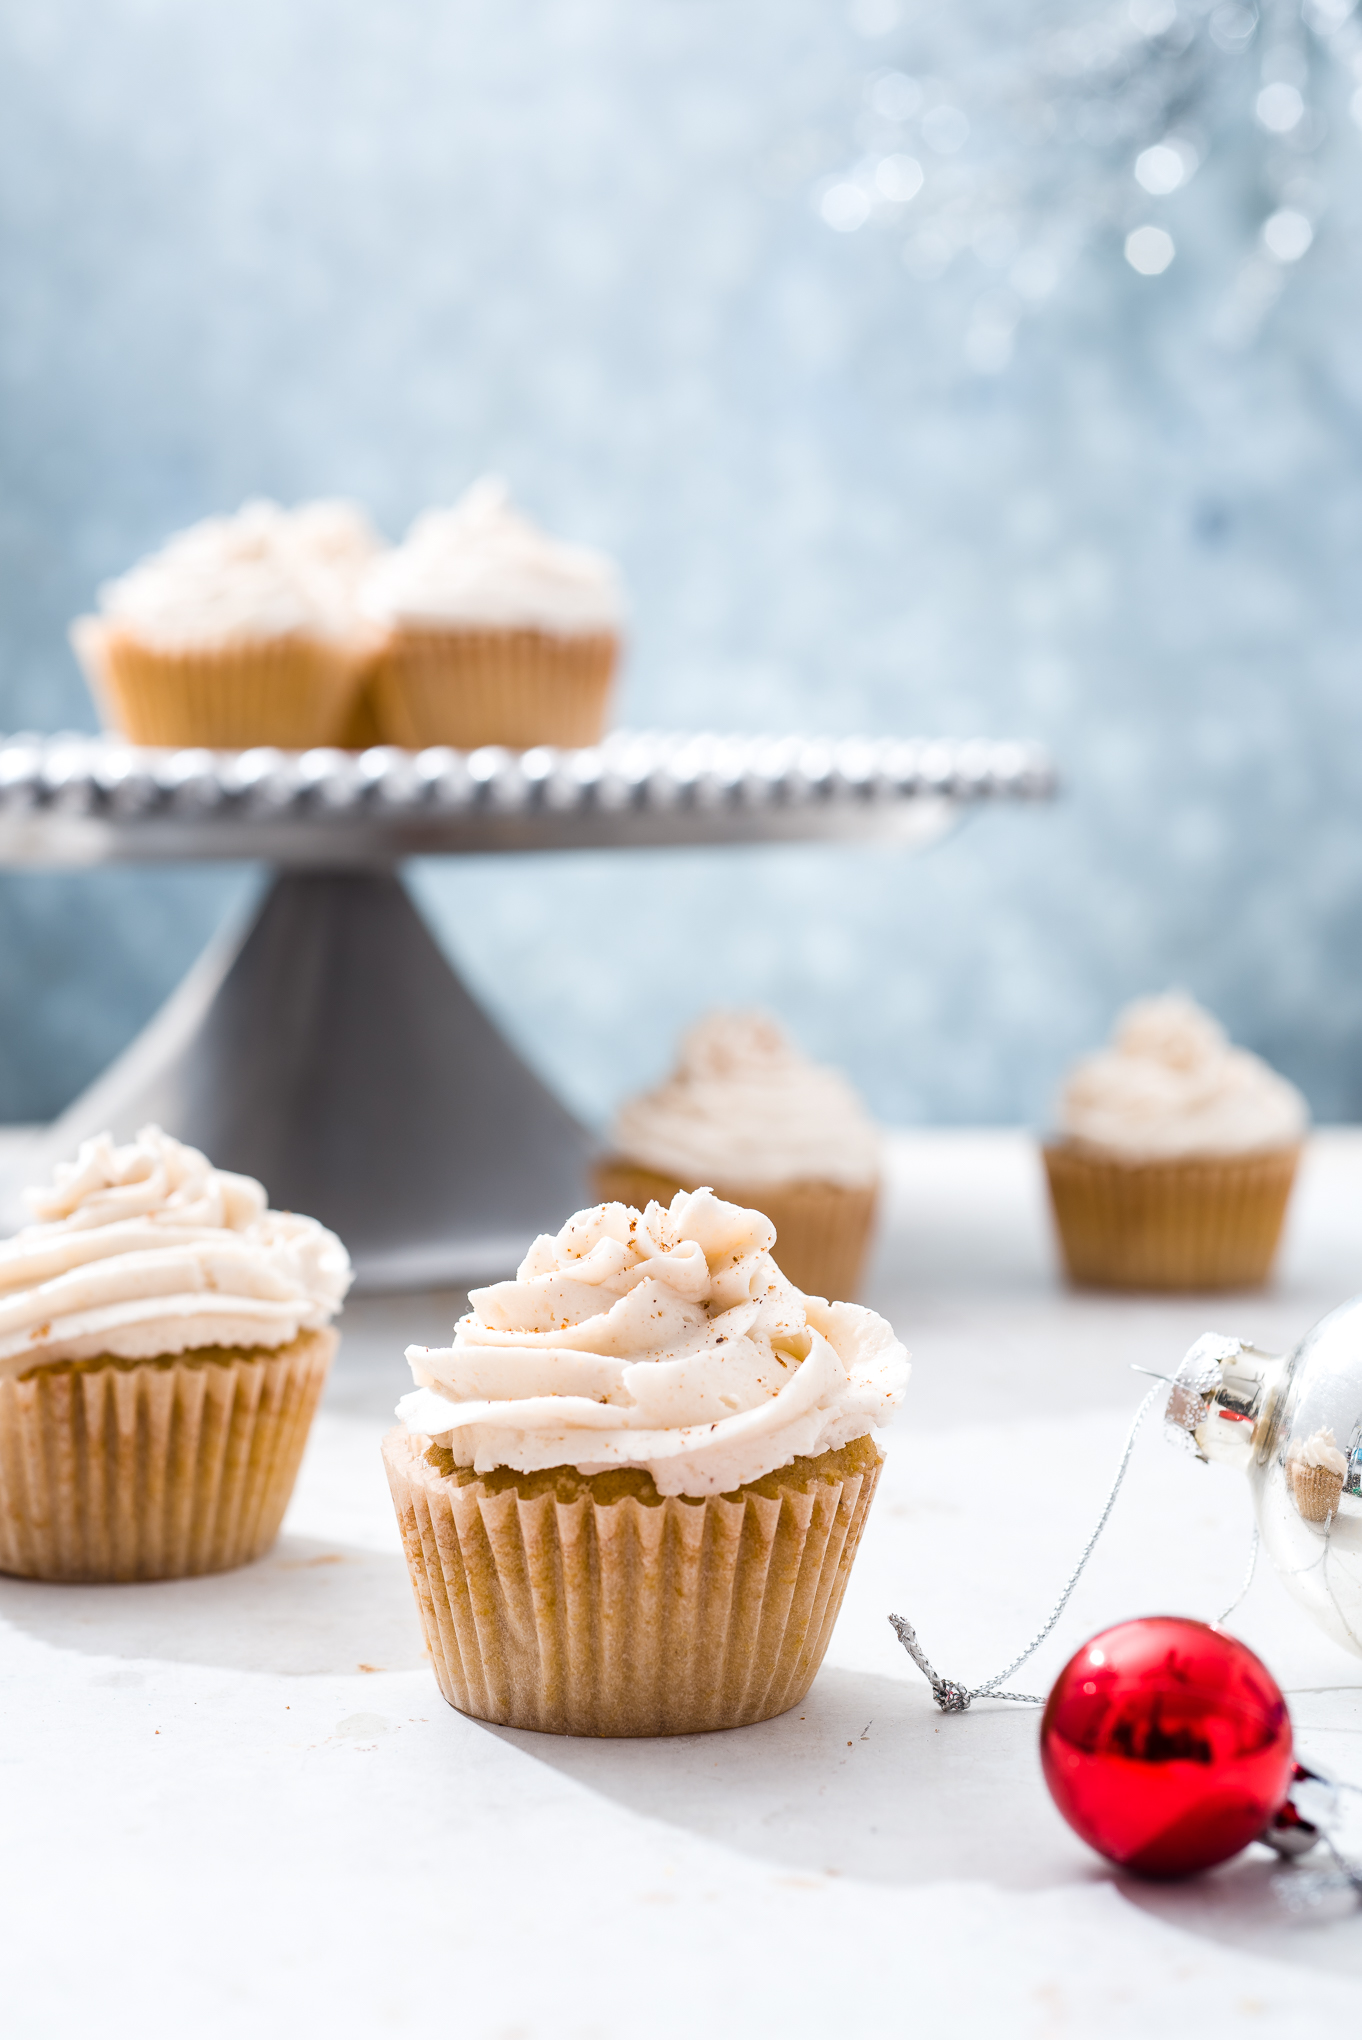
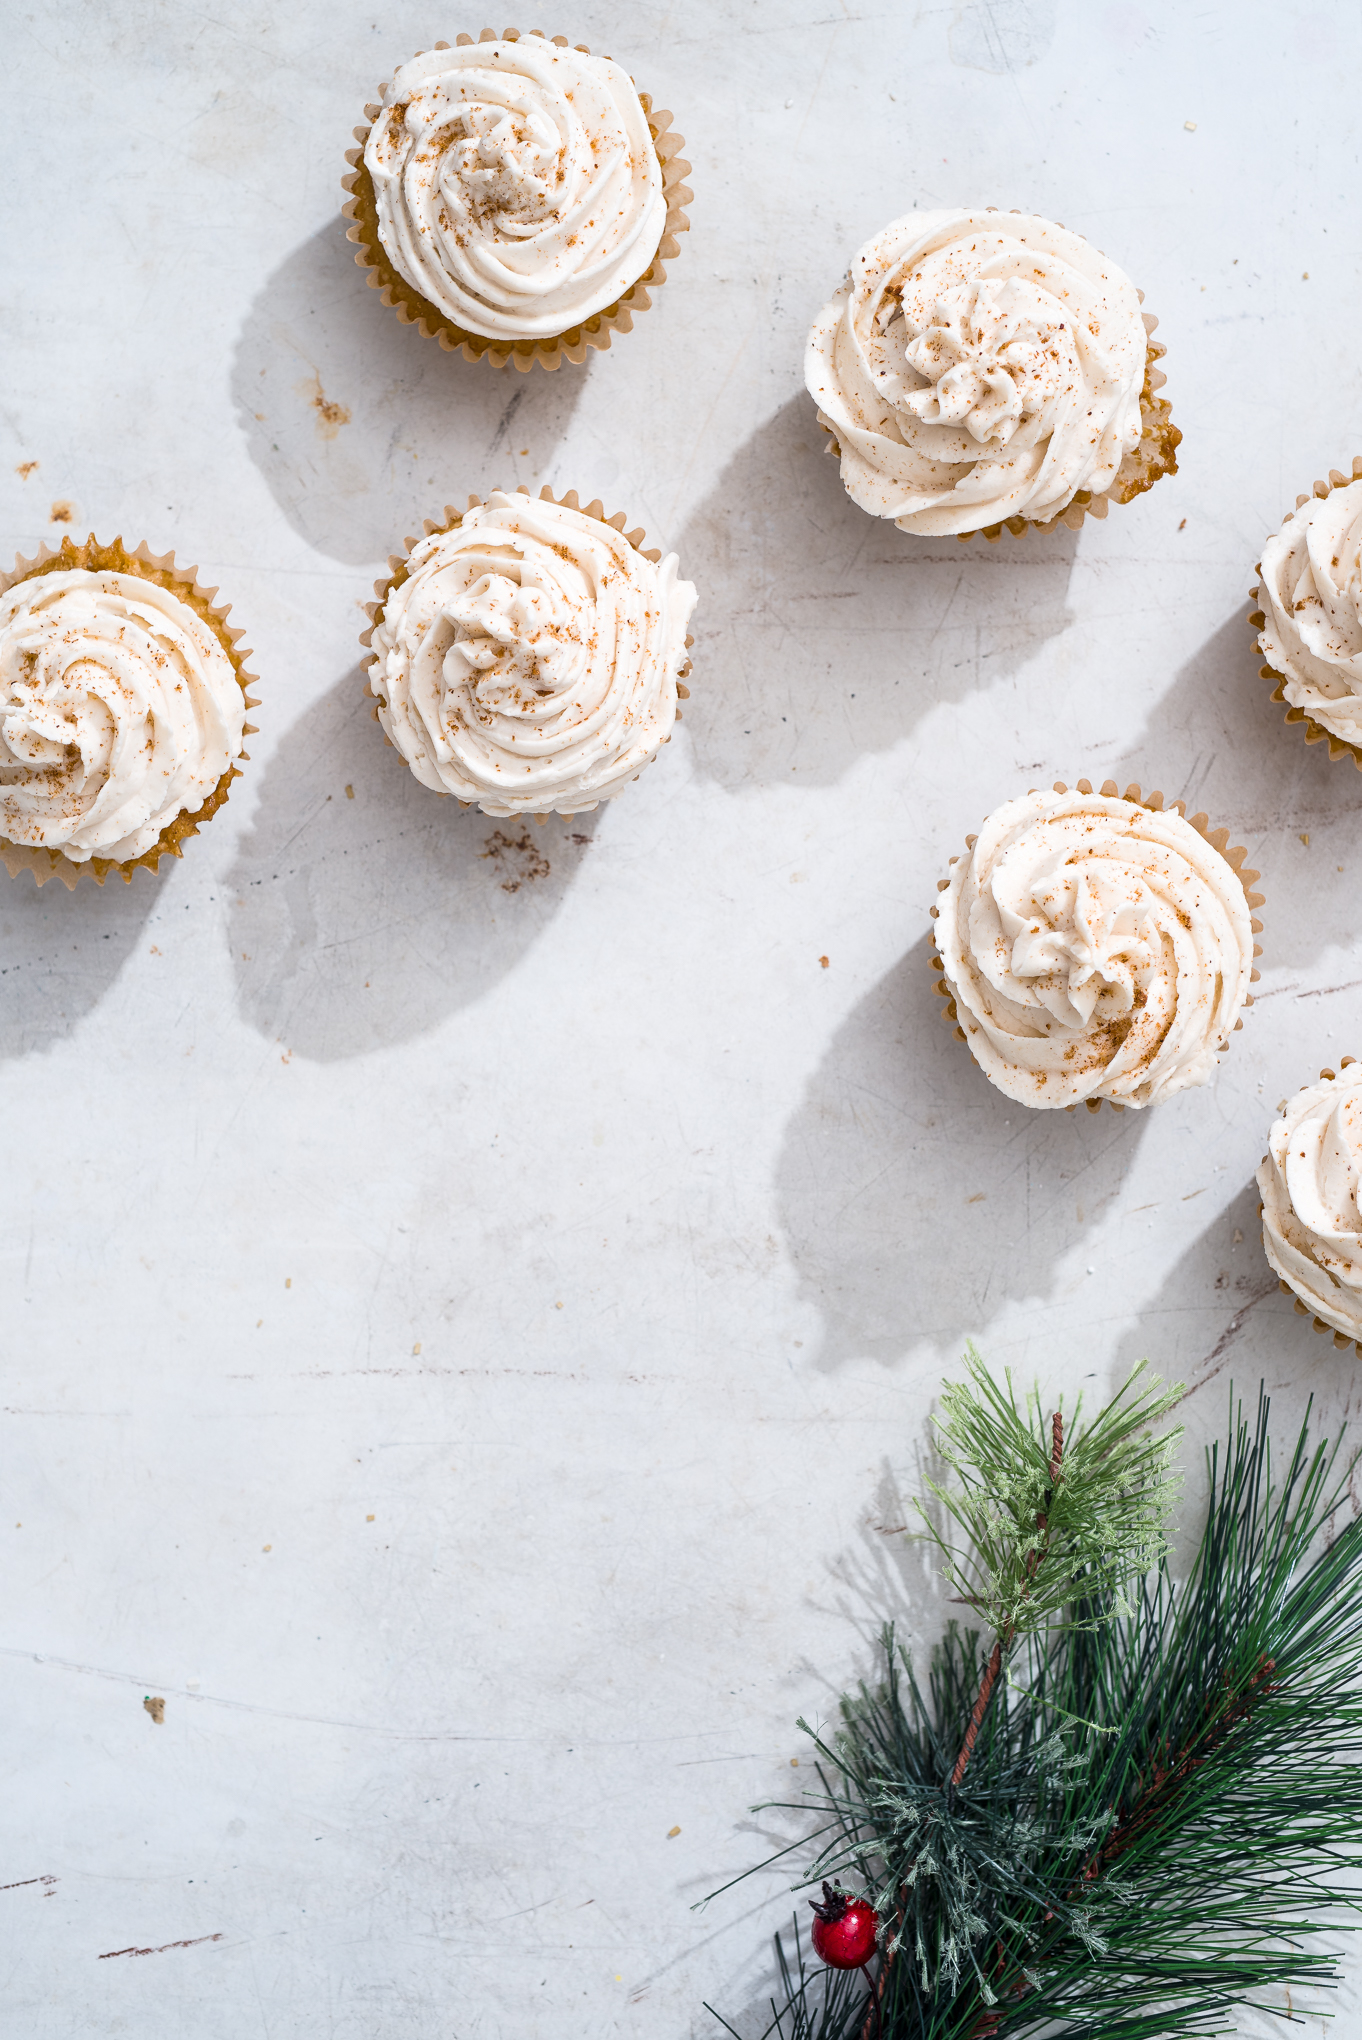
Eggnog Cupcakes with Vanilla Nutmeg Frosting
Cupcakes are the perfect holiday party food, and this version gets a subtle eggnog flavor from both rum and almond extracts. These cupcakes aren’t exclusive, though- even the eggnog-averse among party goers will be lured in by the soft, lightly almond cake and whipped vanilla nutmeg frosting. You can also find this recipe in the December issue of Birmingham magazine!
Yield: 12 cupcakes
What You Will Need:
1 cup cake flour
1/2 cup all purpose flour
1 teaspoon baking powder
1/4 teaspoon salt
1/2 cup unsalted butter, room temperature
1 cup light brown sugar, packed
1 egg, room temperature
1 egg yolk, room temperature
1/2 cup unsweetened almond coconut milk
1 teaspoon almond extract
1 teaspoon rum extract
1/2 teaspoon nutmeg
1/2 teaspoon cinnamon
What You Will Do:
Preheat oven to 350 and line a 12-cup muffin tin with liners. Place baking rack in middle rack of oven.
Whisk together flours, baking powder, salt, nutmeg and cinnamon.
In the bowl of a stand mixer, cream butter and brown sugar with the paddle attachment for about 2 to 3 minutes, or until lightened in color and fluffy.
Beat in egg, then egg yolk, until combined, scraping down sides of the bowl as needed.
Add extracts and almond milk and stir to combine.
Add flour in slowly, beating on low until just evenly combined, wiping down the sides and bottom of the bowl as necessary. Don’t beat too long or the cake can become dense!
Pour batter in scant 1/4 cups into muffin tin and bake for 20 minutes, or until a knife inserted in the cake comes out clean.
Remove muffins from tin after 3 minutes and place on wire rack to cool.
Let cool completely then ice with vanilla nutmeg frosting.
Vanilla Nutmeg Frosting
What You Will Need:
16 ounces powdered sugar
1 cup vegetable shortening
4 teaspoons vanilla extract
2 teaspoon almond extract
1/4 teaspoon freshly grated nutmeg plus additional for topping
Pinch of salt
What You Will Do:
In the bowl of a stand mixer fitted with a whisk attachment, beat sugar, vegetable shortening and extracts on medium high for one minute, or until incorporated. Scrape down sides of bowl to incorporate all of the ingredients at the bottom of the mixing bowl.
Beat on high two minutes. Scrape down sides again. Beat on high one more minute; frosting should be almost white in color and fluffy.
Whip in ¼ teaspoon freshly grated nutmeg and pinch of salt.
Pipe frosting onto cupcakes using a piping bag and chosen icing tip.
To me, no holiday season is complete without the ingestion of at least umm, 100 cookies a piece.
That may be an understatement.
But I thought it appropriate to make recipe #2 of our Twelve Recipes of December, one of my favorite gingerbread cookie recipes I’ve developed.
Working as a recipe developer is fun, but can also be uber frustrating. Especially when you think you have a brilliant flavor combination idea- cabbage and BASIL anyone?! I promise it smells like pizza in the oven!- that doesn’t turn out to be so brilliant (umm, yes, I did once attempt a creative homemade kettle corn that nearly caught my pan and/or stove top on fire).
This recipe, though, was inspired by lots of gingerbread cookies I saw on Pinterest that I wanted to keep the soft texture from, but also add some depth to the flavor. I love standard gingerbread SO much, but it takes TIME to make. This dough requires that extra step of making it ahead of time and allowing it to rest in the fridge. And heaven knows during this season time ITSELF is a gift. BUT if you are going to take the time and monetary effort to bake these cookies, then by golly let’s make them special!
I also thought that adding a few special tweaks could take your bring-gingerbread-to-your-in-laws/coworkers/Friendsgiving game up a notch. Plus, the addition of the pretty orange zest on top is so fun and adds that special sparkle to your Christmas cookie!
Alright my loves, let’s GET TO BAKING!
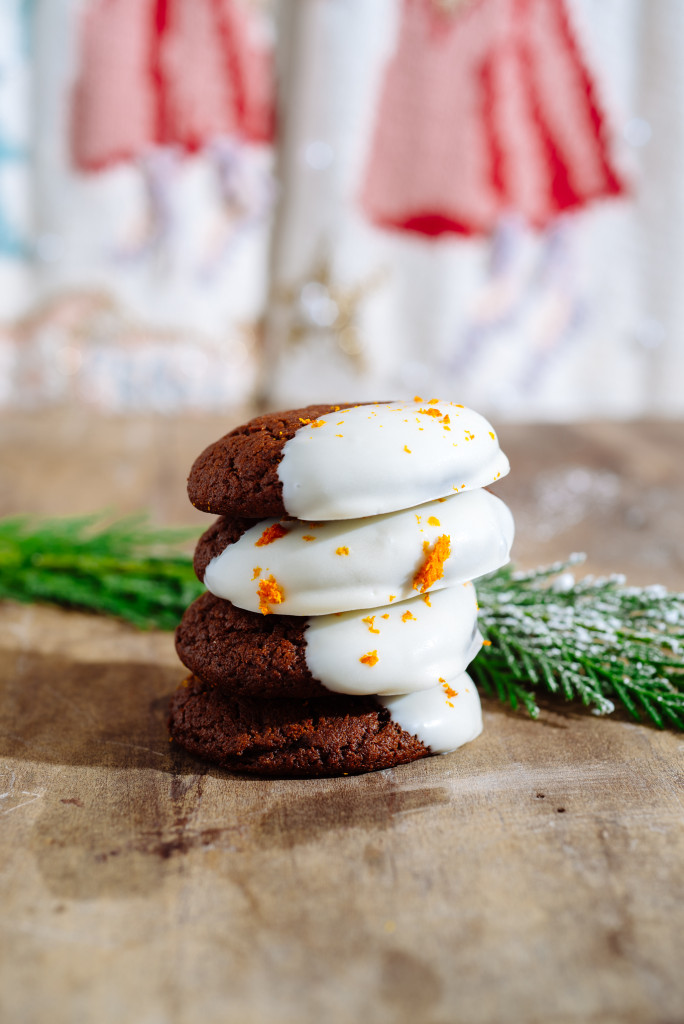
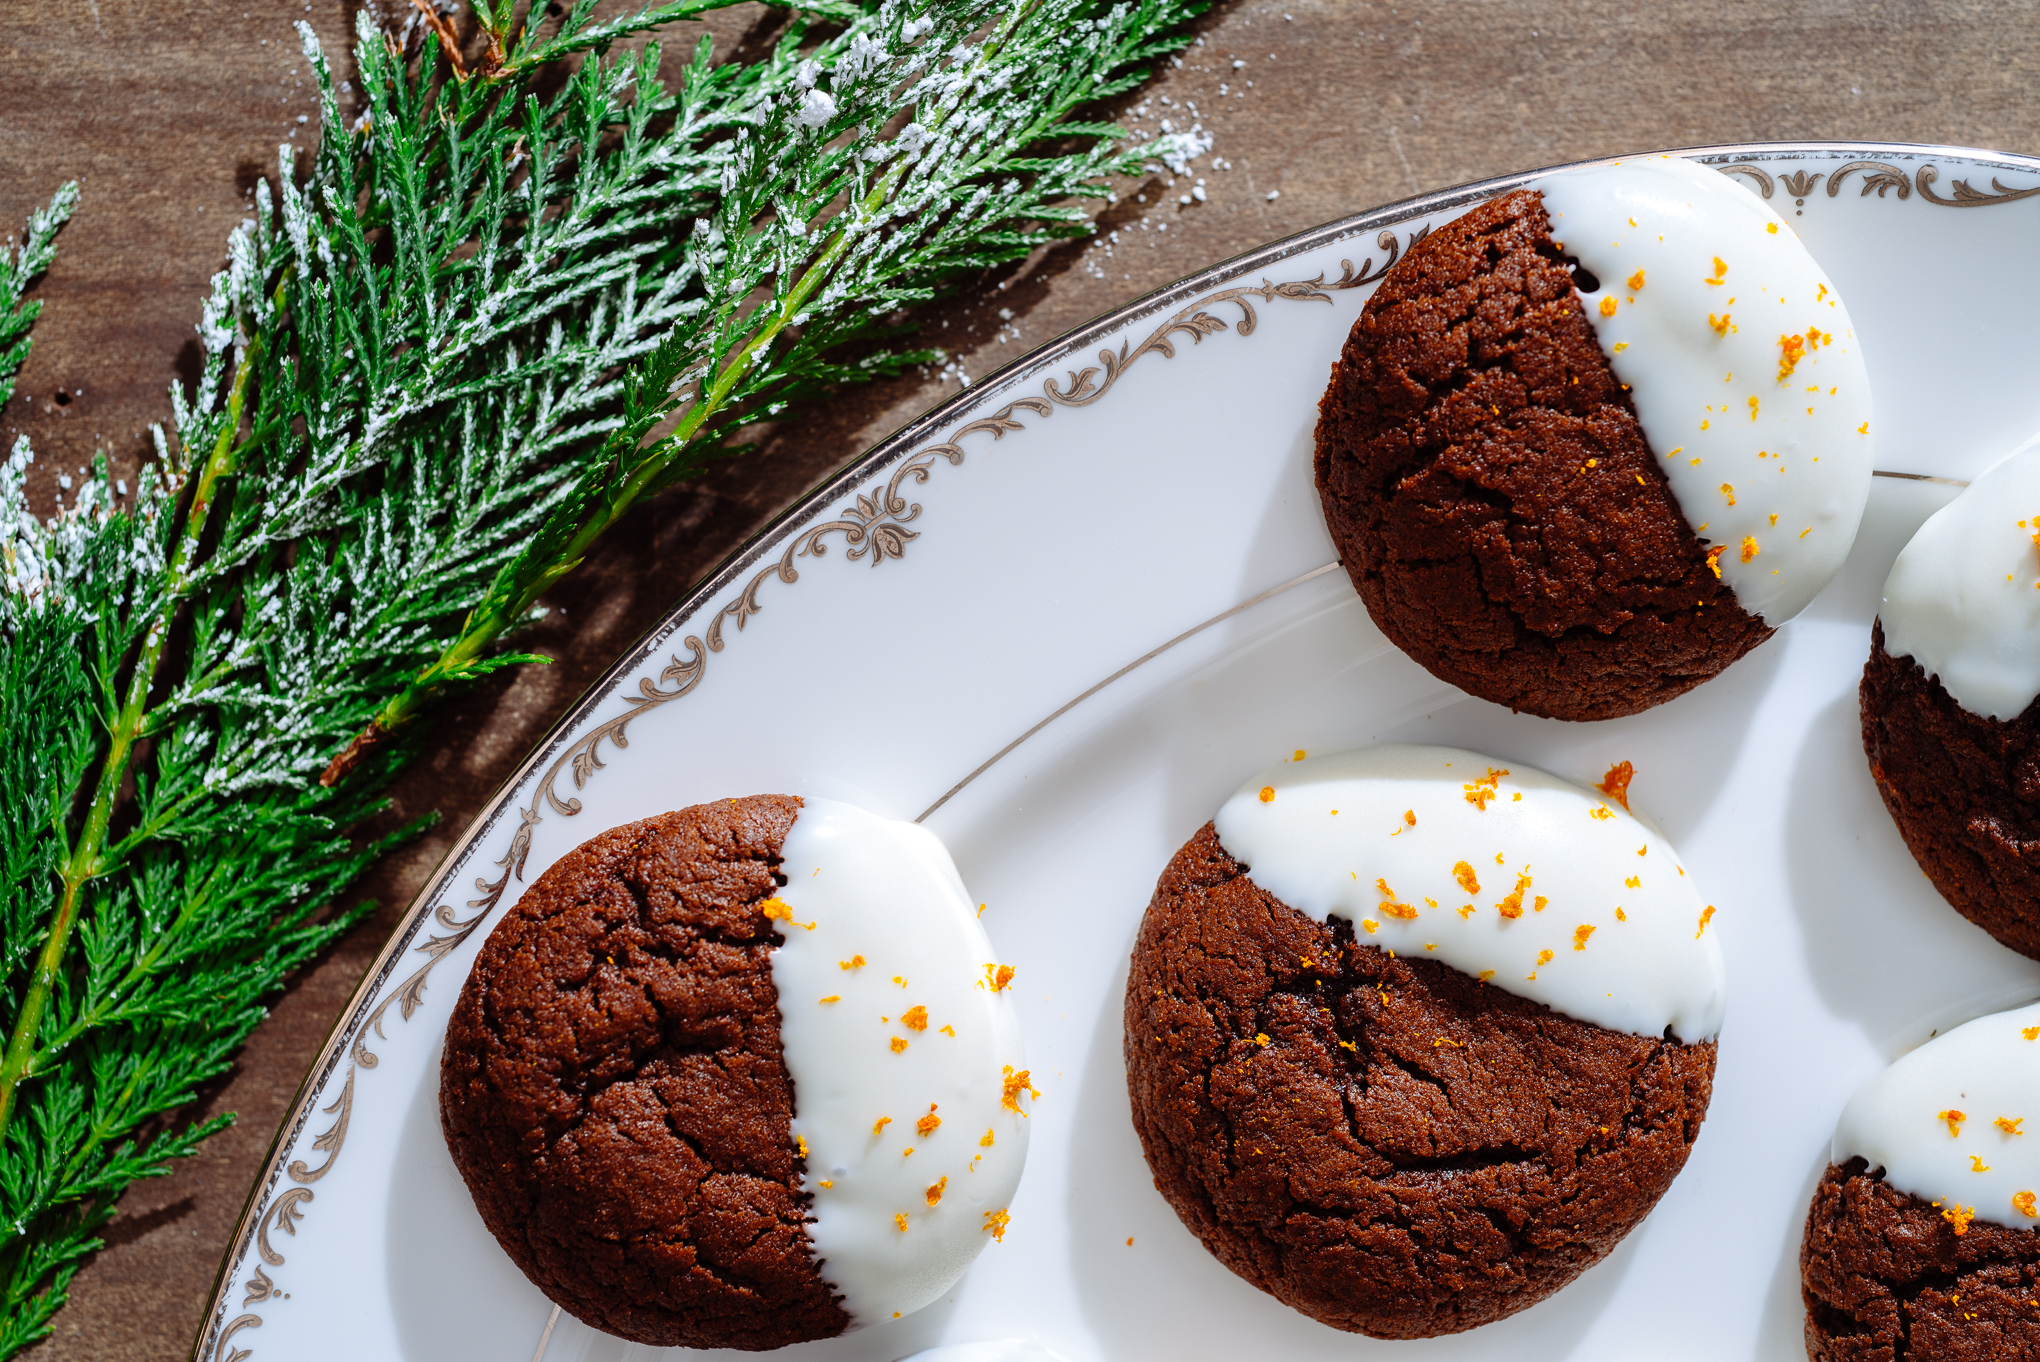
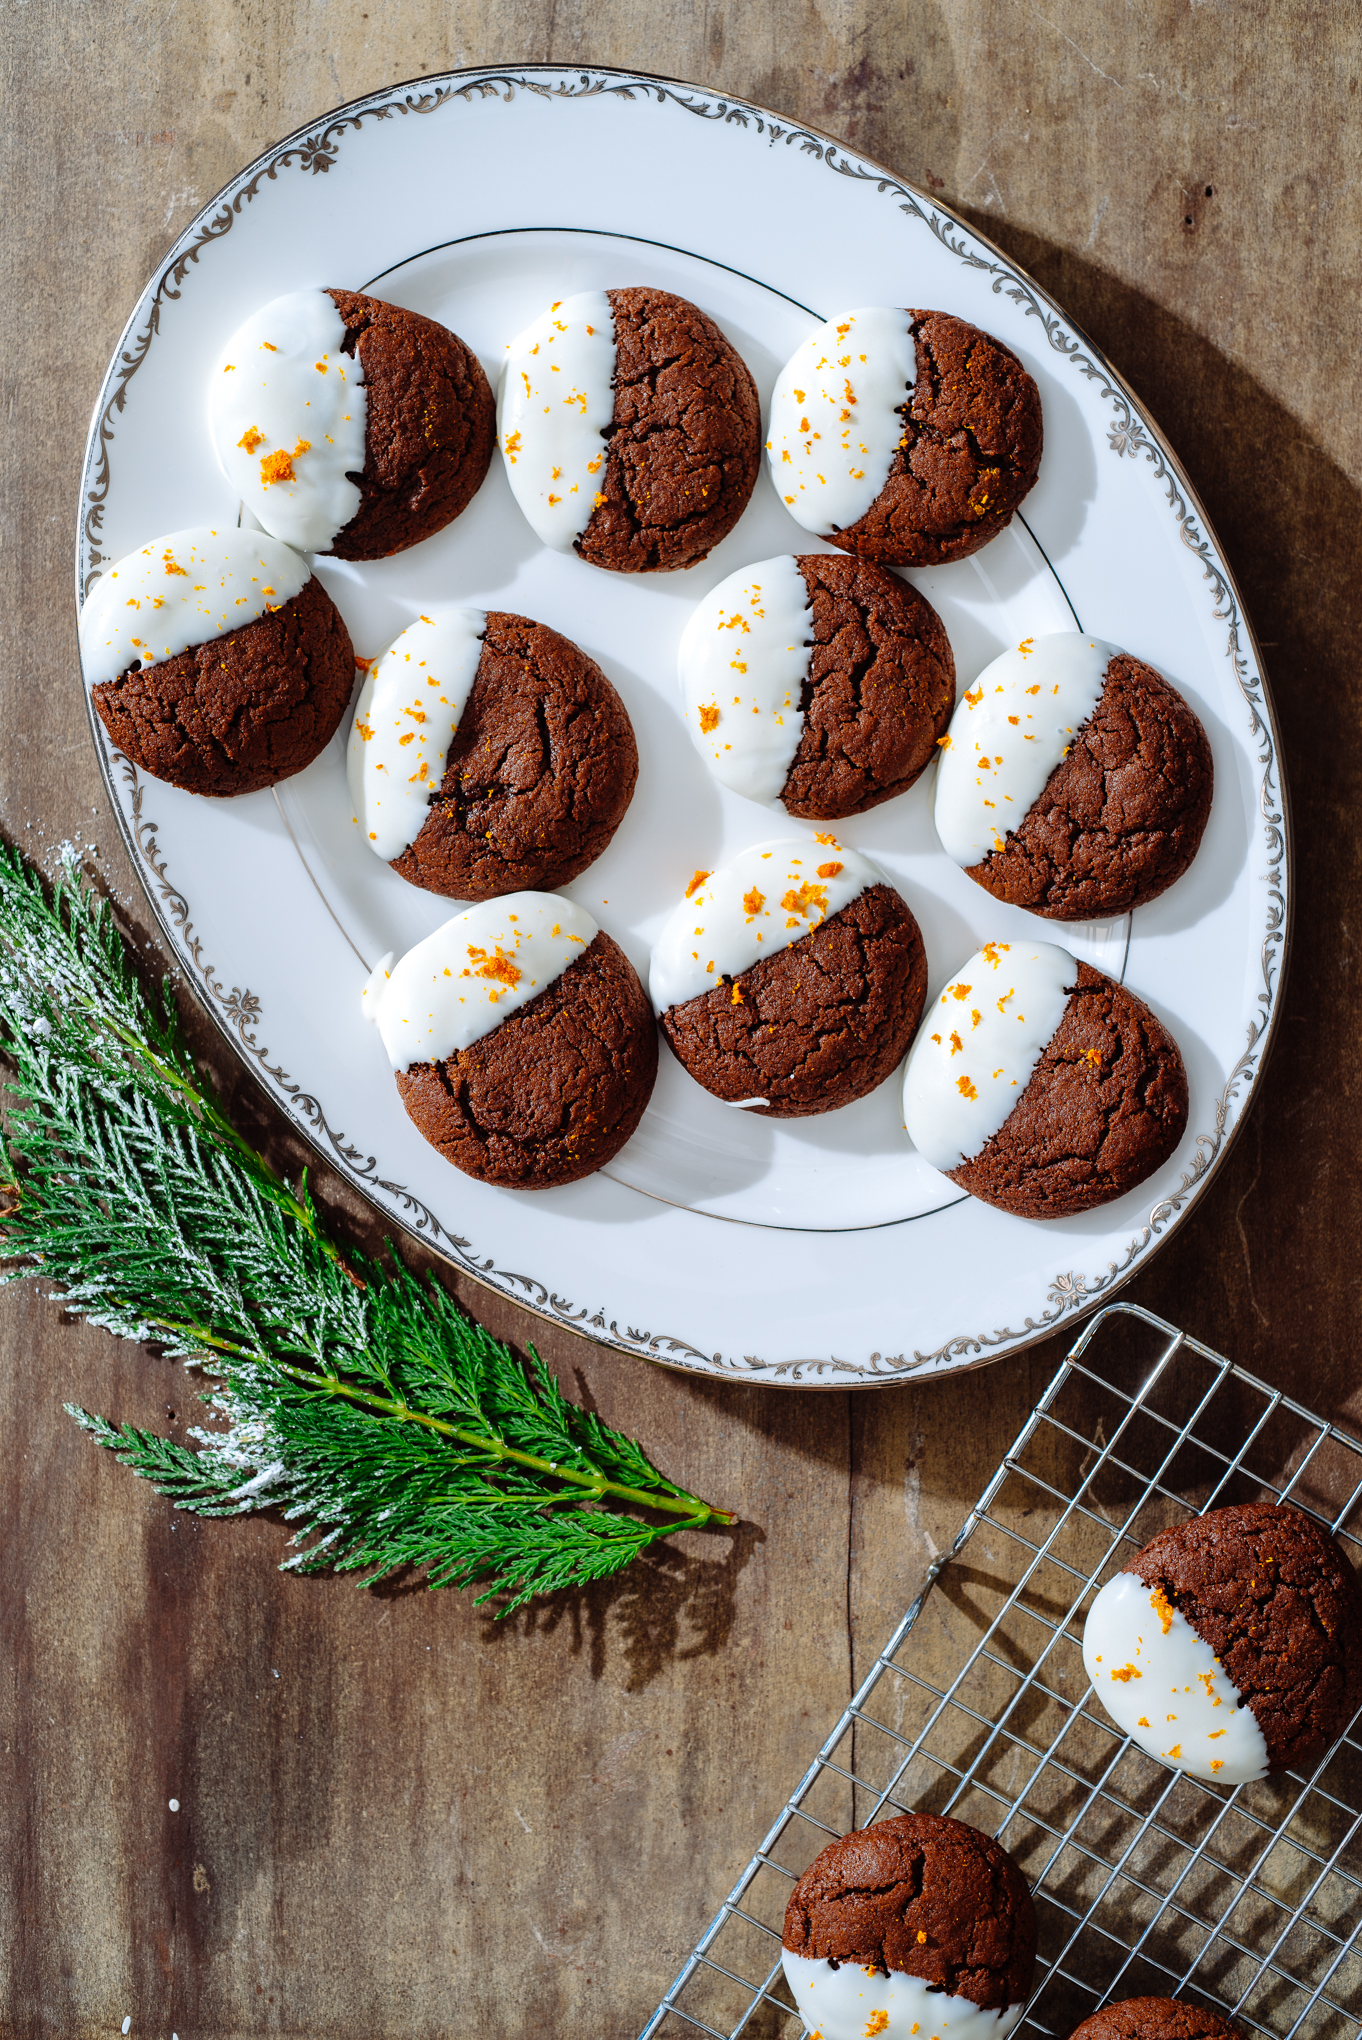
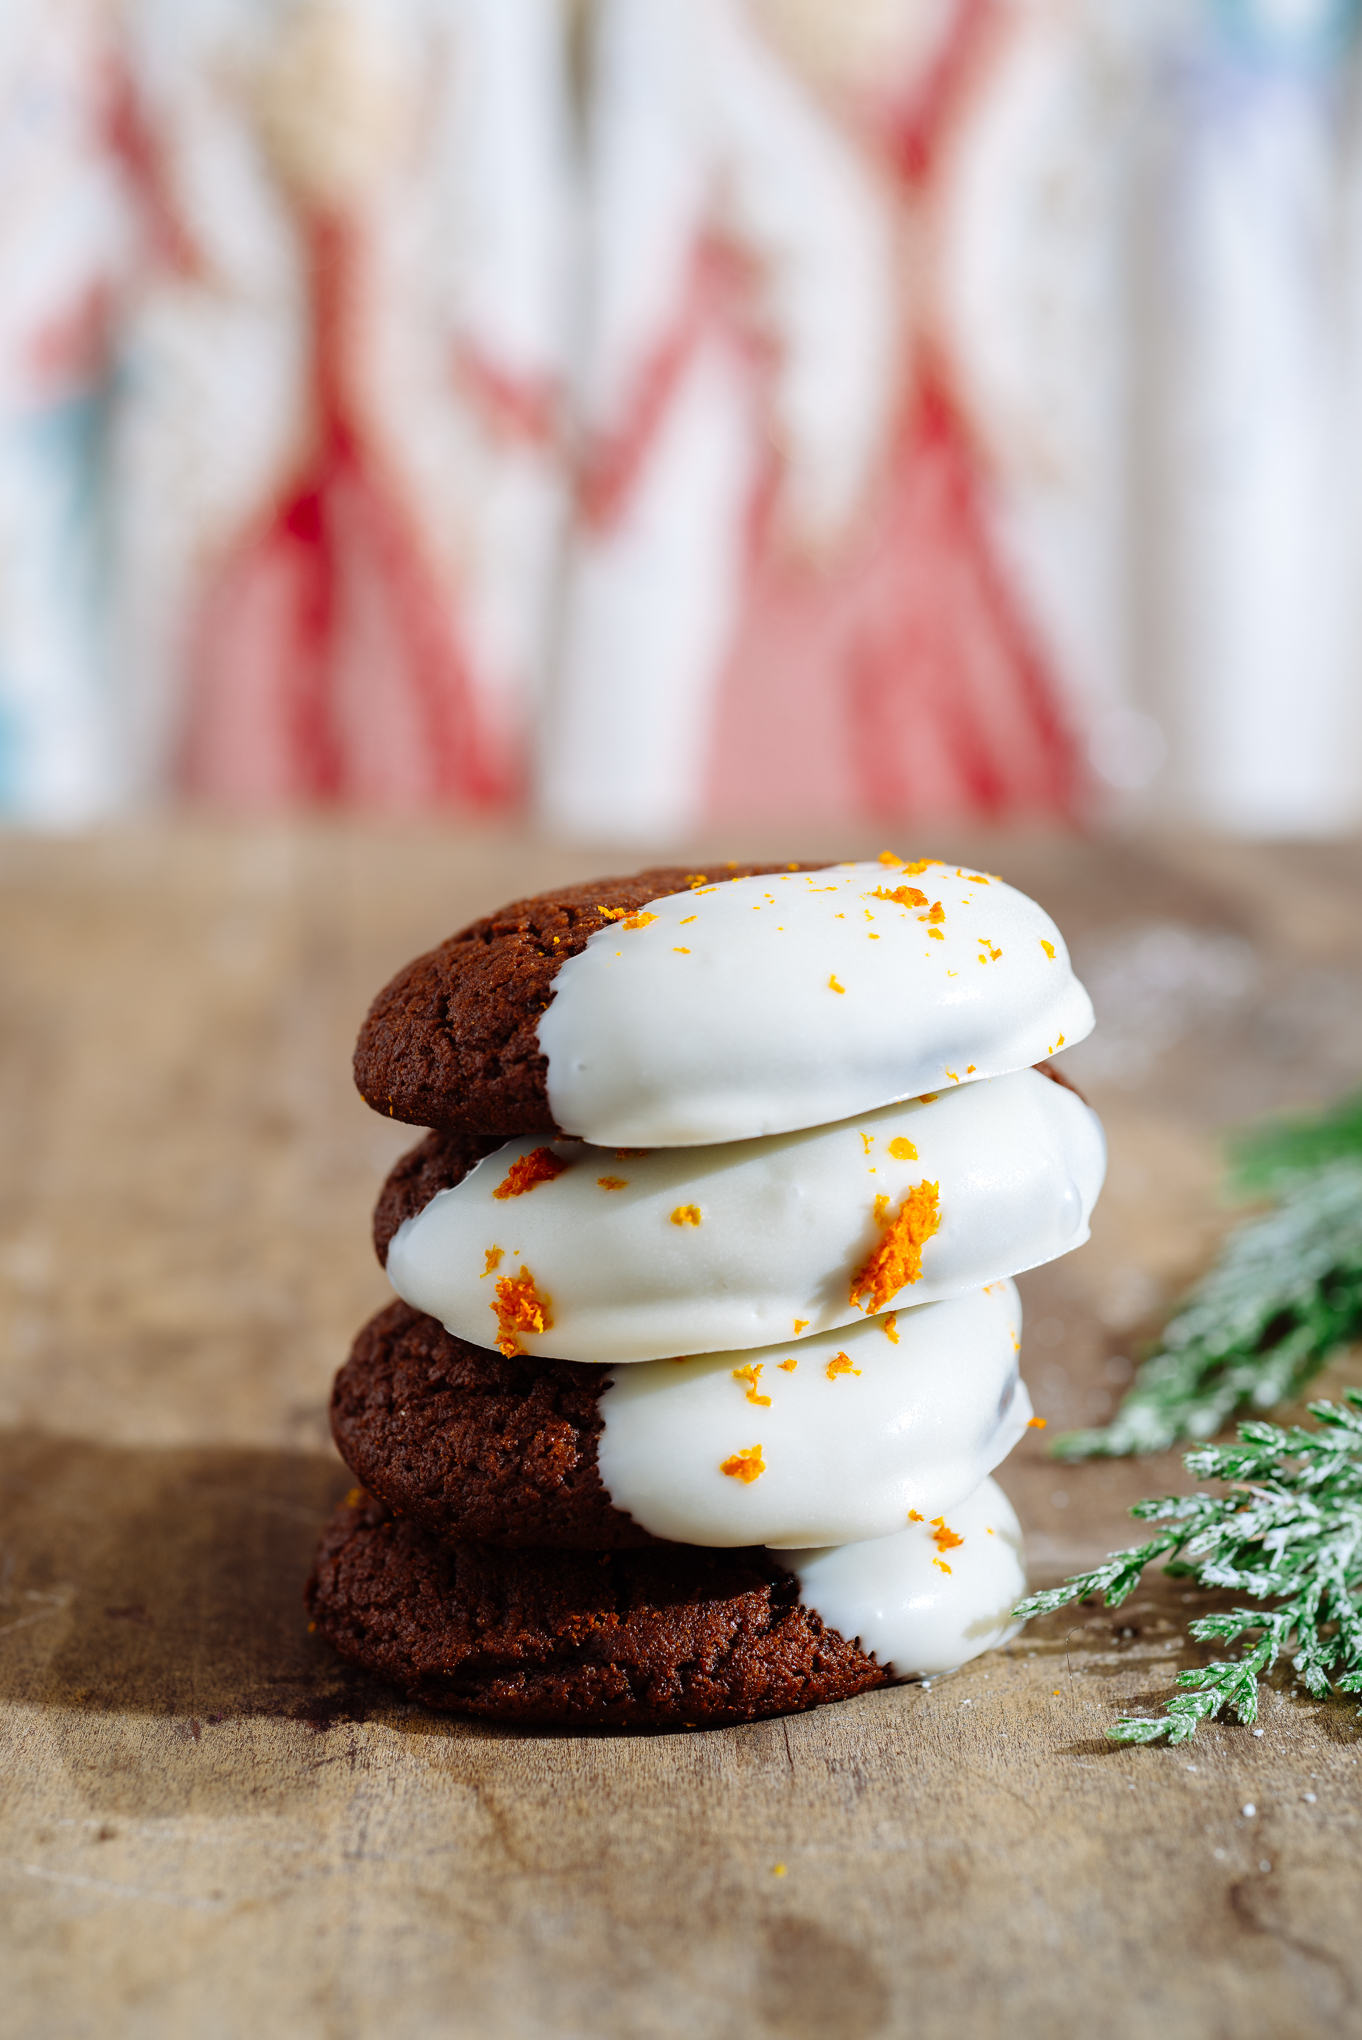
Black and white dark chocolate gingerbread cookies with orange zest white chocolate
Gingerbread cookies are a December staple, but this version is soft and chewy, with a hit of dark chocolate and molasses that makes them irresistible! Whole wheat flour adds a great texture and the white chocolate dip is a perfect vehicle for more orange zest flavor. Also, the cookies taste even better if you let them sit in the fridge for 3 hours! You can also check this full recipe out in the December issue of Birmingham magazine!
Yield: 24 cookies
What You Will Need:
3/4 cup unsalted butter, room temperature
1/2 cup molasses
1/2 cup dark brown sugar
1 large egg, room temperature
2 cups white whole wheat flour
1 teaspoon baking soda
1/2 tablespoon ground ginger
1 teaspoon ground cinnamon
1/4 tsp ground allspice
1/4 tsp ground nutmeg
1/4 tsp ground cloves
1/4 cup cocoa powder
1/2 teaspoon salt
1/4 plus 1 tsp orange zest
1 tsp vanilla extract
3/4 cup white chocolate melting chips
What You Will Do:
Whisk together flour, baking soda, spices, cocoa powder, salt. Set aside.
Beat butter, molasses, and dark brown sugar in a stand mixer on high for three minutes, or until light and fluffy. Scrape down sides of bowl.
Add egg, mix to combine.
Add vanilla and 1/4 tsp orange zest. Scrape down sides of bowl as needed to incorporate all ingredients.
Add in dry ingredients in two batches, stirring until fully combined.
Put dough in fridge, covered, for at least three hours to set.
Preheat oven to 375. Line a metal baking sheet with parchment paper.
Scoop cookies in one to two tablespoon scoops. Roll into small balls with your hands. Place dough on baking sheet.
Bake for 12 minutes; let cool for two minutes, then remove cookies to cooling rack to cool completely. Line additional cooling rack with parchment paper.
Melt white chocolate chips in 30 second increments, stirring after each round, until melted and smooth.
Dip cooled cookies halfway in white chocolate mixture, place on parchment lined cooling rack. Sprinkle with orange zest.
Let cookies rest at room temperature for at least 15 minutes to set.