Jalapeño Sausage Wheels

Sausage with a kick. Go team!

In the South, it goes without saying that almost all of our traditions revolve around food. Having a baby? Let’s get together, open pink or blue gifts, and try Aunt Pat’s cream cheese ball. Getting married? Let’s have a glass of tea, peruse a spread of engagement presents, and eat pimento cheese (this is also known as a “Sip n’ See”). Your favorite football team having a ball game? Come on over, I’ll tell you about the time I spilled the contents of a salad bar into the cuff of our ’92 national championship coach’s pants leg. And, let’s eat!

As fall is upon us, football has once again become all-consuming. I was born and raised around a team of crimson and white jerseys that symbolized everything great about our state- hard work, commitment, heart, legacy. For me though- besides the game, the roar of the crowd and being in one of my favorite stadiums in the world- the best part of football season is the pre and post-game eating.

This recipe for sausage wheels has been passed down through my family; I remember waking up on Saturday mornings to the smell of them. But let’s be honest- there isn’t much you can to to sausage and pie crust to make it taste better. My version just gives it more of a spicy kick, and ends with a sweet, smoky flavor that is absolutely addictive. Plus, I’m hoping the aforementioned kick can somehow serve as good luck for our special teams this Saturday.

You can serve these hot out of the oven; be warned that the sausage fumes may make your mind cloudy and cause unexplained overconsumption of pastries. Or, let them cool to room temperature and take them to the game (or your sofa). They also make a delicious post-game-night breakfast.

I hope you enjoy a beautiful, winning weekend- and that this recipe is good luck for your own tailgating tradition.

Jalapeño Sausage Wheels

What You Will Need

1 package pre-made pie crust (containing 2 pie crusts)

1 pound ground sausage

2 jalapeños, deseeded and minced (Thanks for the peppers mom!)

2 cloves garlic, minced

1 teaspoon Sweet Heat spice

1/2 teaspoon onion powder

1/2 teaspoon ground cumin

What You Will Do

1. Let your pie crusts come to room temperature.

2. In a large bowl, combine the ground sausage, jalepenos, garlic, Sweet Heat, onion powder, and cumin.

3. Lightly flour your countertop or surface of choice (I love my Silpat for this) and gently roll out both pie crusts until they form about a 11 by 11 inch rectangle. No need to measure; I just make sure the dough looks like a large rectangle and is a bit thinner than when I first unrolled the crust.

4.  Divide the sausage mixture in half, and spread it evenly on each pie crust.

5. Here comes the fun part. Starting at the top of your rectangle (the side facing you) gently roll the dough away from you, creating a tight roll. Pull the dough tight as you roll, making sure your sausage mixture stays inside the dough roll. A loose roll will spill it’s contents onto your counter, and why let that tastiness go to waste?

6. Repeat the process for the second pie crust.

7. Once you have your two rolls ready, wrap them in plastic wrap and put them in the freezer for 45 minutes to an hour to help them firm up.

8. Preheat oven to 450. Go ahead and find your broiler pan and spray it generously with cooking spray; you will need it at the ready.

9. Take your rolls out of the freezer, and slice them into thin wheels (about 1/4 an inch to 1/2 inch). Arrange the sausage pinwheels about a 1/2 inch away from each other on the pan.

10. Bake for 15 minutes, then take your pan out of the oven and flip the wheels over; bake for another 10 minutes. Go team!

Dark Chocolate S’mores with Salted Peanut Butter

Some more s'mores
Some more s’mores

It’s Labor Day weekend, and you know what that means? That’s right- it’s time for s’mores!

For those of you living below the Mason Dixon line, the idea of roasting a marshmallow on a 95-degree afternoon using a open flame is about as appealing standing on the asphalt in your driveway wearing a down vest–and drinking hot chocolate.

Maybe it is the unbearable humidity, or my recent nostalgia for summer camp, or the fact that any excuse to sandwich a toasted marshmallow between chocolate crackers smeared in salty peanut butter is motivation enough, but s’mores are an essentially summer food. Despite the fact that you might have to (currently) sweat when you make them.

That is why this recipe involves marshmallows toasted inside (hallelujah for A/C and a broiler!); homemade peanut butter (whirred together with buttery roasted peanuts and honey); and graham crackers that will make you want to jump outside and start a s’mores caravan. Y’all- these turned out so good. The rich, dense graham cracker with sweet, roasted peanut goodness and melty marshmallow- so worth the sweltering effort.

And besides their taste, one of the best things about s’mores is that they always remind me that fall is on it’s way. Next time I make these I will probably add some chocolate chips to that peanut butter then go online and order a fancy down vest. Fall may be three weeks away. Yes, it’s a sweltering haze of frizzy hair outside. But watch out autumn, here we come- chocolate peanut butter s’mores in tow.

Some assembly required


Dark Chocolate S’mores with Salted Peanut Butter*

What You Will Need:

For the graham crackers: This recipe was taken from one of my favorites, King Arthur Flour

1/2 cup (2 ounces)  unbleached all-purpose flour
3/4 cup (3 3/4 ounces) whole wheat flour
1/2 teaspoon salt
1/2 cup (1 1/2 ounces) Dutch-process cocoa
1 1/4 cups (5 ounces) confectioners’ sugar
1 teaspoon baking powder
1/2 cup (1 stick, 4 ounces) unsalted butter
2 tablespoons (1 1/2 ounces) honey
2 tablespoons (1 ounce) cold milk

 What You Will Do:

1. Preheat your oven to 325°F. Cut out two sheets of parchment as large as your cookie sheets.

2. In a medium-sized bowl, whisk together the flours, salt, cocoa, sugar, and baking powder.

3. With a pastry blender, two knives, or your fingertips, cut the butter into the flour mixture until evenly crumbly.

4. In a separate bowl, combine the honey and milk, stirring until the honey dissolves.

5. Add the liquid to the dry ingredients and toss lightly with a fork until the dough comes together. (This took me a while, and for a bit I thought my dough would remain a shaggy mess. But just keep on stirring with a fork and it will come together! ) Add additional milk, if necessary (I thought I would need this at first but it ended up fine; stir for a bit to make sure you need it before you add it).

6. Turn the dough out onto a well-floured surface and fold it over gently 10 to 12 times, until smooth. Divide the dough in half. Work with half the dough at a time.

7. Transfer one piece of dough to a piece of parchment. Roll it into a rectangle a bit larger than 10 x 14 inches; the dough will be about 1/16-inch thick (Ok, my dough looked a bit more like a misshapen heart rectange. That’s fine! Just make sure you roll the dough out pretty thin- thinner than you will think you need. It should feel like if you lift it, it will tear). Trim the edges and prick the dough evenly with a fork. Repeat with the remaining dough and parchment. Place the rolled-out dough pieces, on their parchment, onto baking sheets. (Ok, let’s be honest- parchment paper is frustrating as mess if you don’t cut it perfectly. I cut mine long, put my cocoa container on the edge to weigh it down and rolled it out. This was also frustrating because it didn’t work that great either. So just work through it and I promise it’s worth it.)

8. Bake the crackers for 15 minutes, or until you begin to smell chocolate. Remove them from the oven, and immediately cut them into rectangles with a pizza wheel or knife. Transfer them to a rack to cool. The longer you let them cool, the crispier they get.

For the peanut butter: The recipe was adapted from the amazing Alton Brown and the Food Network

What You Will Need

2 cups shelled and skinned roasted peanuts (I had an incredible friend who gave me roasted peanuts as a gift that I used here)
1 teaspoon kosher salt
1 1/2 teaspoons plus 1/2 tablespoon honey
1 1/2 tablespoons peanut oil

What You Will Do:

1. Place the peanuts, salt, and all of the honey into the bowl of a food processor. Process for 1 minute. Scrape down the sides and bottom of the bowl.

2. Place the lid back on and continue to process while slowly drizzling in the oil and process until the mixture is smooth, 1 1/2 to 2 minutes. Process it until it smells roasted and when you look into the food processor the edges of the mixture are smooth. You also might have to scrape down the bottom of the bowl again and blend it for a bit longer to make sure it’s smooth.

3. Place the peanut butter in an airtight container and store in the refrigerator for up to 2 months. I made a sandwich/distributed this/used it on the s’mores in one night. I mourned it’s passing.

For the marshmallows: These were provided by the wonderful people at the Jet-Puffed factory.

*For the final product:  This recipe requires a very simple assembly, but I found it helpful to make the following elements in the following order: 1. Bake graham crackers. 2. Make peanut butter. 3. Set oven to broil. 4. Put marshmallows in oven, and while they are broasting (roasting in the broiler), spread peanut butter on graham crackers. 5. Take hot mallows out of the oven, use a spatula to gently place them on the prepped crackers, then sandwich between two grahams. Let the s’mores party begin!! 

Duck Fried Rice

Duck Fried Rice

The first time I ate duck, I ended up with a bullet in my lower molar.

After biting into a freshly sauteed slice, I chomped down on a silver piece of ammunition. The metallic taste rang through the back of my mouth, towards my tongue and up through my nose until I felt like the inside of my cheeks were lined with the barrel of a shot gun. My first thought was that I had broken a tooth. My second thought was that the small fowl my father had so eloquently shot in the backwoods of Alabama and/or Louisiana had not been sufficiently cleaned, leaving me with a very real reminder of the cause of its demise.

Not one to hide my disgust at an instance such as this, and acting in direct violation of my momma’s “Eat at least a scout bite of everything on your plate honey- its ruuude not to” I promptly spit the metal ball onto my plate; threw my elbows down on the table; and drank copious amounts of tea until my taste buds calmed and I came back to my senses.

For those of you giving me more credit than I deserve in the maturity realm, this happened while in the same age group I am currently (20’s), and thank-the-Lord only stopped me from eating duck for ohhh, about three months, until football season rolled around and dad was grilling bacon-wrapped cream cheese-and-jalepeno-stuffed meat kabobs.

What this experience did teach me, however, was that it’s ok to make mistakes in food- even when you are diligent and cooking for the ones you love. Hopefully, this fried rice recipe below almost 100% ensures that you will not be left with any culinary surprises.

These duck breasts are gently fried in coconut oil until the fat from their skin renders, then cut into thin strips and quick-fried again until crispy. The remaining fat magically seasons the fried rice and renders the onions soft and pliable admist bright peas and genlty wilted carrots. And in true LuvCooks style, a generous dollop of hot sauce is added to ensure the utmost interest and all-around spiciness.

So take a risk on duck- even better if it’s wild and shot by someone you love. Just make sure and check for lead projectiles beforehand. Your enamel will thank you.

Rice from above
Rice from above

Duck Fried Rice

What You Need:

2 large duck breasts (if your duck breasts are wild, marinate them for at least six hours and up to overnight in this)

1 tablespoon coconut oil

Salt and pepper, to taste

3 1/2 tablespoons duck fat (a result of the above rendering process)

3/4 onion, diced

3 cloves garlic, diced

1 package frozen peas

1 package frozen corn

2 carrots, skins peeled with a vegetable peeler until in thin strips

2 teaspoons chili paste

3 tablespoons soy sauce

1 teaspoon fish sauce

3 cups cooked jasmine rice

1/4 teaspoon black pepper (or several rounds on a pepper mill)

Generous squirt of honey, or to taste

Generous sprinkle of ginger powder, or to taste

What You Will Do:

1. Score each duck breast with a sharp knife, creating a criss-cross pattern on the outer skin. Apply salt and pepper liberally on both sides after scoring.*

2. Heat a pan on medium-low, then add 1 tablespoon coconut oil. Allow your duck to cook about eight minutes on one side, then flip them and cook for about seven more on the other, depending on how thick your cuts are. It’s perfectly ok if your duck is almost purple-red on the inside at this point. It’s always better to undercook duck than over cook (it gets rubbery), and we are going to slice it and cook it again, so no worries on a bit of an undercooked breast here.

3. Once your duck breasts are done, place them on a plate and tent with foil. Pour about 2 1/2 tablespoons of your gorgeous rendered  fat into a small bowl and put aside. Save the rest! Duck fat is incredible for many other uses- sautéing  vegetables, working into a gumbo, used as a base for fried potatoes. I might even make hot fudge out of it.

4. While the duck is under foil, bring a wok to high heat.

5. Add 2 1/2 tablespoons saved duck fat and chopped onion to the wok. Sautee for about three minutes, or until the onion is soft. Add garlic, and stir for about a minute, or until the garlic is barely light yellow.  Add corn, peas, and rice, quickly stirring to ensure even cooking of your veggies.

6. While your veggies are cooking, take your duck out of the foil and slice the meat off of the breasts into thin strips. It is very helpful to have a friend help you here, as I might have chopped my finger off if I had to do both of these things at once. But more than likely you have ninja-like knife skills and are more adept at multitasking than me.

6. Add the chili paste, soy and fish sauces, black pepper, and honey and ginger powder to taste. Good fried rice takes some tweaking, so taste and add as you like here. Pour the finished fried rice into bowls.

7. After you scoop out your rice, add about 1 tablespoon of duck fat into the wok, and throw duck strips back into the pan. Stir fry them for about 2 minutes, or until the strips are crispy and mid-to-dark brown on the edges.

8. Top the rice bowls with the duck and serve with Sriracha and extra soy sauce on the side.  Mr. Miyagi eat your heart out!

*If you are cooking wild-game style duck, first take your duck breasts out of the above marinade and dry them off well with a paper towel. Then proceed to the rest of step 1.

Bulletproof Iced Coffee

Nature's gift to early-risers
Nature’s gift to early-risers

I would by no means classify myself as a health nut. This is why my first “health food recipe” on LuvCooks involves coffee, butter, and oil, thank ya very much.

With the rising amounts of vega-fruitra-grain-free-atarians, recipes these days are getting more and more green, leafy, and nutritious- which is great!  If you love greens, leaves, and nutrients. Personally, I have never been drawn to a bunch of kale over a bunch of tater tots. I’ve also recently felt a twinge of responsiblity to present a more balanced food perspective on LuvCooks.

So, in that spirit, I present to you the best iced coffee ever.  Considering that my past attempts at iced coffee have resulted in a) dumping an entire plastic bowl of ice water on my floor, strewn with coffee grounds puddling at my ankles, b) liquid that turned the color of iced tea, and c) had the flavor profile of raw peanuts soaked in day-old espresso, I consider this recipe a serious blessing.

The melted butter in this hot, dark-roast goodness tastes like a heavenly latte, and the addition of healthy coconut oil (that is essentially what MCT oil is; I find myself struggling to actually say this ingredient because it sounds a bit like what you put in your windshield wiper dispensers) is imperceptible, even to the most nutrient-sensitive palate . Combine the liquid gold with ice, a bit of honey or stevia, and viola! Morning, afternoon, or midnight (if you are one of those Creative-night-owl types) refreshment.

And one last health tidbit. I duly promise NOT to bother you with nutrition facts, calorie counts, or diet ads. These annoy the stew out of me and take the joy out of eating. So let’s consume our iced coffee (with a side of brownie) in peace people. We promise to eat a salad tomorrow.

Bulletproof Iced Coffee

What You Will Need

2 heaping tablespoons freshly ground dark-roast coffee  (I like my coffee strong; like, it could scare a cowboy.)

1 cup (8 oz) filtered water

1 tablespoon unsalted grass-fed butter

1 tablespoon MCT oil

Plenty of ice

French press (or preferred coffee brewing method); blender

What You Will Do

1. Put your freshly ground coffee into a french press, then pour 8 ounces boiling water over it. Let steep for five minutes. Or, use whatever method you prefer to make your coffee delicious.

2. Once your hot coffee is pressed, pour it into a blender.  Add the butter and MCT oil.

3. Blend until your coffee looks like an amber milkshake. Taste it and see if you need to add honey or stevia; the sweeteners melt better at this stage than adding them in later.

4. Refrigerate the coffee for four hours to overnight.

5. Put plenty of crushed ice in the cup or mug of your choice (I prefer one with a Batman or Mason label). Pour your brew over the ice.  And if you aren’t into coffee that puts lighting into your veins, you can definitely add more water here.

Tupelo Honey Pistachio Butter

Honey nut butter
Honey nut butter

I love nut butters. Besides the dairy, salted variety, I would argue that they might be the best thing to happen to sliced bread since these people started selling their wares. Peanut, almond, cashew, pecan- each one is unique in the the way they upgrade a brown-bag lunch (and make me feel like a slightly more sophisticated sandwich maker).

A few weeks ago, I caught the pistachio butter bug. After a friend of mine explained how delicious it was- and how shocked he was that I hadn’t tried it yet- I knew I had to have it. In my zeal I scoured the shelves of our local health food chain, the health food chain’s sister store, then the sister store’s even smaller step-sister store. Nothing. I searched online and quickly realized that my nut butter pride came with a (monetary) price. I now had to find unsalted, unroasted, raw pistachios in enough time to not go crazy.

I might be slightly emotionally exaggerating here, but I have never been one to lack in passion for a quality food product.

By this point I had run out of gas and time, and the pistachio butter craving was threatening to lead me in a last-ditch drive to Seattle, Washington. In conclusion, and to echo the incredible Tim Gunn, I had to make it work. What I could find was salted, roasted pistachios in the shells (thank you Sally Hansen for saving my fingernails after cracking those suckers); Tupelo honey, and sea salt.

We faked it until we made it with this recipe my friends and it is fabulous. The sunshine-y taste of the Tupelo Honey gives a lightness to the salty richness of the roasted pistachios. This spread is heaven on an apple slice with a little extra drizzle of honey. Or, brown bag it with apple butter and/or strawberry jam. Use it in a macaroon or spread it on french toast before it’s fried. Or, eat it with a spoon out of your refrigerator until the craving subsides. Which for me, unfortunately, was way too far into the batch to turn back at any healthy point.

I hope you enjoy this take on a sweeter, Southerner-er version of a nut butter favorite. Maybe it’s the heat, maybe it’s the humidity, but let’s get nutty people!

Tupelo Honey Pistachio Butter

What You Will Need

6 tablespoons canola oil

5 tablespoons hot water

1/2 lb roasted, salted pistachios

2 1/4 teaspoons tupelo honey

2 pinches sea salt (to taste)

What You Will Do

1. BLEND!

2. Seriously; All you need to do is put the canola oil, hot water (make sure it is hot; this gives it the right consistentcy and makes the butter easier to blend), pistachios, honey, and sea salt in a blender and press pulse. Or Mix. Or whatever suits your fancy unill it is the consistency of a nut spread. Let it run until it is smoothy and creamy, taste it, and if you would like it a bit thinner, just add more hot water by the teaspoon, and adjust the saltiness by small pinches if you like it with a little more kick.

Red, White and Bleu Coleslaw

A summer side MVP
A summer side MVP

It’s hard to get excited about coleslaw.

In the South, the shredded green lettuce routinely fades into the summer barbecue background, alongside baked beans and summer watermelon, once the true star of the show- salty smoked pork-arrives.

And don’t get me wrong- dry rubbed, tenderly glazed, and artfully pulled pork (substitute beef here if you are west of Mississippi)  deserves every bit of attention it gets. No barbecue would be the same without it. But this year I wanted to get in the coleslaw spirit; to create a recipe that actually stood next to a platter of beautiful chopped meat. A side that I would be motivated to go back for seconds on. Maybe even save extra stomach room for it instead of banana pudding. Maybe.

This recipe confidently held it’s own in more ways than one. As opposed to a mayonnaise-laced version, this is light and summery, with the rich smokiness of gorgonzola and tart sun-dried tomatoes to give it interest and pop. Plus, what’s more fun than an excuse to theme food around a holiday? I envision this coleslaw hitting a home run at all of your summer parties- Memorial Day (next year), Fourth of July, or any event themed around America, nautical elements, fireworks, or park weddings.

So stand up for coleslaw at your next meat-themed cookout. With this secret, sparkler weapon at your side, I promise you’ll be the hit of the backup sides.

Red, White and Bleu Coleslaw

What You Will Need

For the salad

8 cups coleslaw mix

4 cups shredded red cabbage

2/3 cup scallions

14 sundried tomatoes

5 ounces crumbled gorgonzola

For the vinaigrette

1/3 cup good olive oil

1/3 cup sun-dried tomato oil (strain your sun dried tomatoes from the jar and save the remaining oil)

4 tablespoons vinegar

2 tablespoons sugar

What You Will Do

1. Whisk together olive and tomato oils, vinegar, and sugar in a small bowl until combined. Set aside. (This can be made ahead of time and refrigerated if needed.)

2. Combine coleslaw mix, red cabbage, scallions, sun dried tomatoes, and gorgonzola.

3.  Gently fold the dressing mixture into the salad mix, taste, and add salt and pepper as needed. This can be made ahead of time and tastes better if it rests at room temperature for a few hours.

The International Biscuit Festival

A beautiful bonut
A beautiful bonut

If biscuit heaven was a place, I think I found it.

Knoxville, Tennesse- the home of neon orange football jerseys, Mabel, and this former food post– continues to impress me. Having spent the weekend consuming the most delicious olive and scallion hummus and tasting Vietnamese pho for the first time (which, in the words of a friend of mine, tastes like “angel tears”) I thought things couldn’t get better.

That was, until the International Biscuit Festival.

Turning the corner onto Biscuit Boulevard and finding a long stretch of red and white striped tents full of happy people blessing others with hot biscuits-knowing that I could try five of whatever biscuit I chose-was about like how a small child feels staring at a never ending stack of Lucky Charms, candy bars, and free iPads.

From the humming of a biscuit-themed songwriting competition to the smell of fresh dough sizzling in a deep fryer, it was a celebration of what makes Southern food so delicious- the buttery layers of comfort and warmth we lovingly call biscuits.

Since I was forced to choose-one of these biscuit masterminds below made a bonut people- below are my top five favorites. Hopefully these will inspire you to make your own biscuit combos- or visit Knoxville next year and experience it for yourself. I’ll be there-but next year I’ll probably buy two tickets  just so I can go through the line twice.

1. Green-Eyed Monster Pimento Cheese Buttermilk Biscuit, Tupelo Honey

A mind-blowing combination of spicy pimento cheese dough, buttered and sandwiched with fried jalepeno

2. Andouille Shrimp and Grits Biscuit, Applewood Farm House Restaurant

3. Candied Bacon, House-Cured Clabbered Cream, and Honey and Balsamic Reduction Buttermilk Biscuit, The Plaid Apron

Biscuits with balsamic glaze and clabbered cream
For those of you who have never tried it, clabbered cream is fantastic

4. Sweet Water Valley Smoked Cheddar and Onion Biscuit, The Tomato Head

5. Family Reserve Drop Biscuits (aka “bonuts”) with Sorghum Whipped Cream and Blueberries, Biscuit Love Truck

A lovely, sweet drop biscuit fried and filled with cream

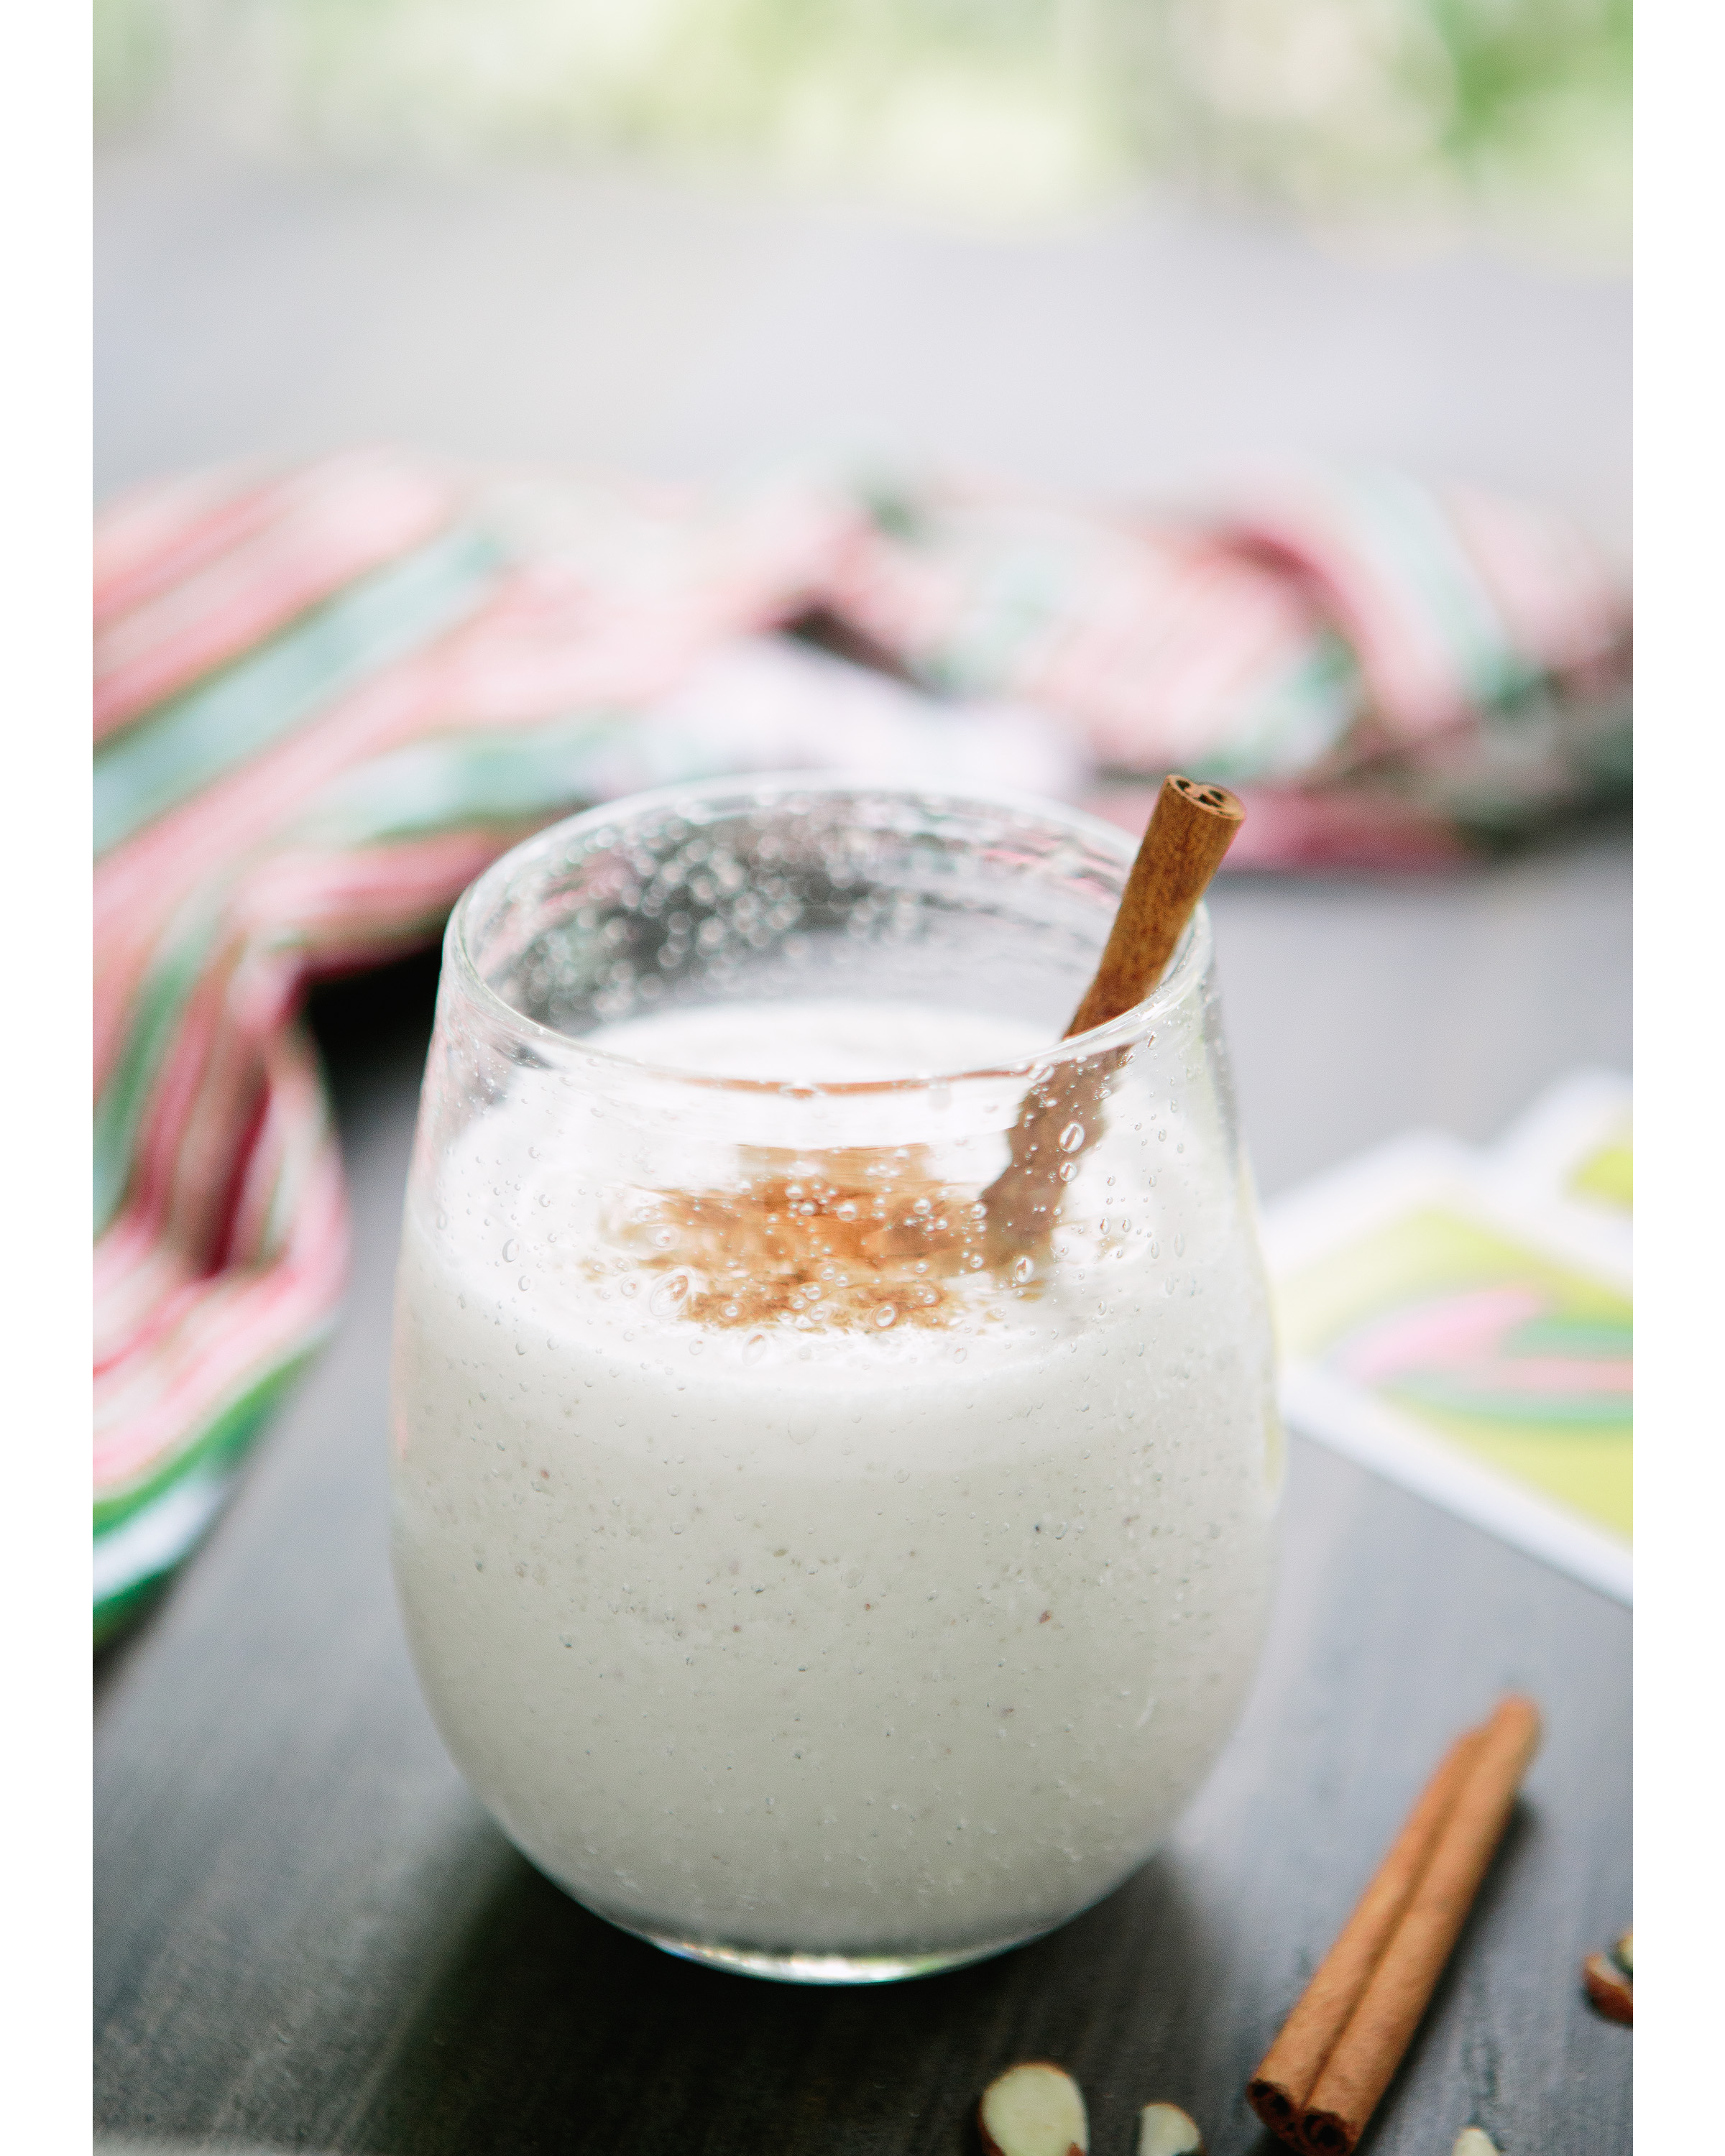
Horchata Milkshake with Cinnamon-Sugar Topping

Creamy, sweet and celebratory

Feliz el dia de cinco de mayo!

That was what my high school language teacher called “Spain-glish” for Happy Cinco de Mayo amigos/as! In celebration of all things Mexican, culinary, and ice-cream based, a friend of mine suggested I try my hand at making horchata.

The first time I heard this word I thought it was the one producers edited out of telenovelas on Telemundo, but upon further research I realized that in fact it is a delicious almond-and-rice-based drink, heady with cinnamon and a sweet vanilla flavor. Further confirmation found it’s way onto my kitchen table in this month’s issue of Food and Wine. Rick Ortiz’ version of the delicacy- spinning vanilla ice cream and condensed milk into the mix- sounded both comfortable and exotic. Definitely LuvCooks material.

!Que delicioso! Not only was this horchata easy to assemble, paired with churros and a pinata, it was a light and creamy trip to another flavor locale (and even more fun sipped through a straw). Which, with the weather as it is right now in the South, that sun-soaked vacation feeling might not happen until August.

Also, muchos gracias to Stephen Devries for making the shake look muy bonito.

So pull out your finest straws and sip to Mexican food, cinnamon milkshakes, and mas dias de las fiestas! (Lo siento Senora Downs…)

Horchata Milk Shakes (taken from Food and Wine’s Food Travel Special)

What You Will Need

  • 1 cup long-grain white rice, rinsed well
  • 3 cups water
  • 4 medium cinnamon sticks, cracked (I whacked my cinnamon sticks with a mortar and pestle until they were in large chunks or slivers. !Ole!)
  • 1/4 cup sliced almonds
  • 1 tablespoon plus 1/4 teaspoon ground cinnamon
  • 1 tablespoon sugar
  • 1/4 cup plus 2 tablespoons sweetened condensed milk
  • 1/2 banana (2 ounces)
  • 1 pint to 1 1/2 quart vanilla ice cream (depending on how thick you like your milkshakes)
  • 1/2 cup ice

What You Will Do

  1. In a bowl, cover the rice with the water. Add the cinnamon sticks and let stand at room temperature for at least 3 hours or overnight; discard the cinnamon sticks. You might have to use a spoon to make sure any little pieces of cinnamon bark didn’t find their way into your rice.
  2. Meanwhile, in a skillet, toast the almonds over moderate heat, tossing, until fragrant, about three minutes. In a small bowl, blend 1 tablespoon of the ground cinnamon with the sugar.
  3. Transfer the rice and its liquid to a blender. Add the almonds and puree for 2 minutes (keep on pureeing until all of the rice is blended and it is a uniform white color). Strain the horchata through a fine sieve into a bowl. I used a spoon to press the thicker mixture at the bottom of the blender through the sieve to release any remaining liquid.  Rinse out the blender.
  4. Return the horchata liquid to the blender and add the condensed milk, banana and the remaining 1/4 teaspoon of ground cinnamon and puree. Add the ice cream and ice and blend (I like my milkshakes super-thick so I actually used a whole quart and a half to keep the shakes dense).
  5. Pour the shakes into glasses, sprinkle with the cinnamon sugar on top and serve. !Comer bien!

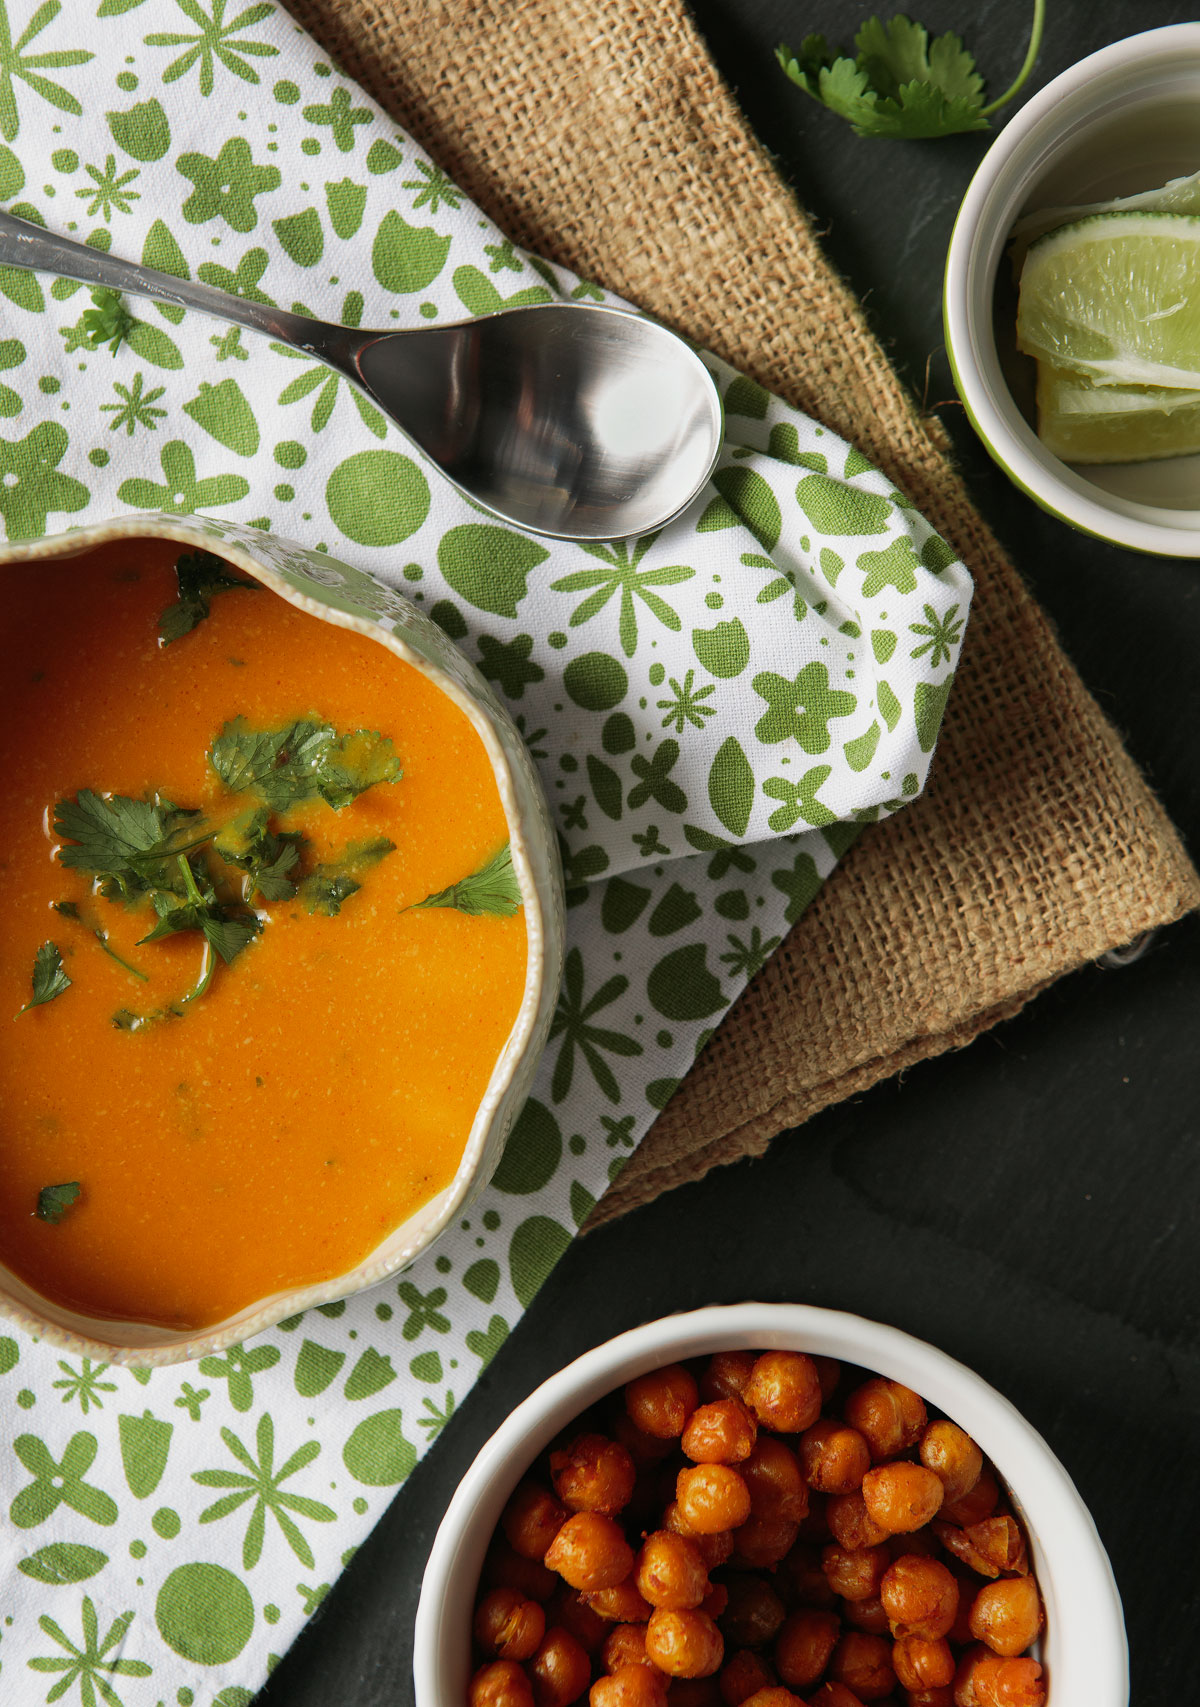
Coconut Sweet Potato Soup with Toasted Chickpeas

Lovely, spicy soup
Lovely, spicy soup with crunchy chickpeas

Accidents happen.

A lot of times in cooking this is a good thing. You run out of cinnamon, scan your pantry, and decide that another spicy ingredient like chili powder would go great in those chocolate brownies. Or, you run out of lemon for your hummus and decide to use lime juice instead (so good; another post for another day).

But this accident was not one of those creative culinary breakthroughs you see on Cooking Channel where someone finds a miracle solution to pizza dough and builds a million-dollar food truck empire. This was more along the lines of, “Oh, my Lord, I have just dumped all of the soup I was supposed to bring to my food shoot on my carpet, down my purple pants and in-between my toes. And on my neighbor’s front door. Oh dear-and their door mat.”

This, by the way, was the first time I met my incredibly sweet neighbor across the hall. In an attempt to carry all of my food props, the food itself and my large purse in one trip to my car- because, heaven forbid I have to take two trips- I also tried balance my pot of soup on the steps next to her door. Instead, the pot slid forward, cascading in a slow-motion orange waterfall from my orange dutch oven down my (now-orange) lower half.

After the initial shock, squishing back into my apartment for paper towels and trying my best to sop up the thick, slightly warm mess from her surrounding steps and entryway, I knocked on her door, mustered my brightest smile and shouted a very overenthusiastic “HI! I just spilled sweet potato soup all over the entryway to your home. I AM SO SORRY!” She was, of course, incredibly gracious and wonderful and understanding. While I, on the other hand, had orange gew in my hair and was experiencing mild symptoms of a panic attack and/or emotional breakdown.

But the lovely blessing in disguise from this was the answer to the prayers I quickly uttered right after the pot of soup splattered down our hallway. In a final, last-ditch effort, I rushed back to the pot in my kitchen sink with the faint hope of any liquid left inside we could photograph. And you know what? A thin rim, silver-lined rim remained. It was a total loaves-and-fishes moment: like the miracle of feeding the five thousand (but with a tiny bowl and stage lighting).

The miracle continued as my talented friend Stephen DeVries took my offering and once again made the spread look gorgeous. I am so glad he did because, y’all, it is delicious. As a Southern girl far from the country of Thailand, I imagine it tastes like what that country would offer: spice, tons of flavor, and a sweet nuttiness from the potato and peanut butter combination. And the toasted chickpeas offer a fantastic spicy crunch to compliment the jalepeno and cilantro in the broth.

Take a Southern, Thai advenure this week- just try not to spill your luggage.

Coconut Sweet Potato Soup (This recipe was taken from the lovely blog Foodess.com)

What You Will Need

  • 1 tbsp oil
  • 1 cup chopped onion (from 1 medium-large onion)
  • 1 jalapeno, chopped (seeds removed)
  • 1 large clove garlic, minced
  • 3 tbsp Thai red curry paste
  • 1 large sweet potato, peeled and chopped into 1½” pieces
  • 1 can coconut milk
  • 3 cups vegetable or chicken broth
  • ⅓ cup natural peanut butter
  • 3 tbsp minced fresh cilantro, plus additional for garnish
  • salt, to taste
  • ⅛ tsp cayenne (optional)
  • 1 lime, cut in wedges (optional)

What You Will Do

  1. Heat oil in a medium saucepan over medium heat. Add onion and saute until just softened (and a bit translucent). Add jalapeno and garlic; saute for one minute. Stir in curry paste.
  2. Add chopped sweet potato, coconut milk and broth. Bring this mixture to a boil, then turn it back down to medium and cover. Cook until the sweet potato is very soft, about 20 minutes (I like to test mine with the back of a wooden spoon; if it gives gently when you press it, it is ready-to-go). Puree the mixture with an immersion blender, or do it in batches in a regular blender. (Does anyone out there own an immersion blender? I feel like if I had one I would be a total gourmand, much more like the Foodess, and it would save me from clumsily pouring boiling liquid into a blender. Be warned; if you pursue the blender method, do not fill the liquid up to the top of your blender! The steam will explode the top off and soup will go flying everywhere. Trust me.)
  3. Stir in peanut butter, cilantro, and a generous pinch of salt until combined. Stir, and adjust salt to taste. Add cayenne if additional heat is desired.
  4. Serve with more minced cilantro and lime wedges on the side. And chickpeas! And jasmine rice if you have some.

Toasted Chickpeas (This recipe is adapted from the wonderfully detailed Everyday Maven)

What You Will Need

  • 2 cans chickpeas, drained and rinsed
  • 1 tablespoon vegetable oil (if you have coconut, it would work great here)
  • ½ teaspoon curry powder
  • 1/2 teaspoon hungarian paprika
  • ½ teaspoon ground cumin
  • ½ teaspoon ground coriander
  • ¼ teaspoon cayenne pepper
  • 5 to 7 turns of fresh ground black pepper

What You Will Do

  1. Preheat the oven to 350F.
  2. Drain and rinse chickpeas and place them into a bowl. Add in oil and spices. Toss with a spoon until the beans are evenly coated.
  3. Scoop chickpeas onto a non-stick baking sheet OR a baking sheet lightly sprayed with cooking spray. Leave any extra liquid in the bowl (don’t pour it onto the cookie sheet).
  4. Roast the peas for 15 minutes. Toss them again, making sure to evenly distribute them across the cookie sheet, and roast for another 15 minutes.
  5. Let cool for 5 to 10 minutes, then place in a bowl and serve! (Make sure that you let these completely cool before you put them in the bowl; they get mushy if you let them cool together).

Now enjoy your tasty Thai adventure!

Bacon Sweet Rolls with Maple Glaze

Bacon sweet rolls

Most everything is better with bacon.

In the South, bacon might as well be one of the five food groups, alongside vegetables, biscuits and/or cornbread, cheese dip, and sweet tea. It’s the basis of any true Southern side item, tops most casseroles, and makes a great afternoon snack with the aforementioned tea.

While reflecting on what I could post that epitomized a truly Southern breakfast, this recipe for bacon sweet rolls caught my eye. Could there  be a way to take a cinnamon roll- perfect with it’s warm cinnamon smell wafting from the oven, soft in the center with ripples of vanilla icing- to another level? Is there a way to actually upgrade nature’s most perfect fried pork product? Can I personally contribute to a breakfast roll awakening in the kitchens of bacon-lovers everywhere?

I do not claim to know the answers to life’s most serious questions. This one, however- can bacon and sweet rolls coexist in perfect unity?- I can answer. With a resounding yes.

These rolls are why bacon makes most everything better. Filling, rich sweet dough swirled around salty, applewood smoked bacon that folds with brown sugar and butter into a wheel of national championship caliber (Did someone say 11:00 pre-game tailgate food? The other team’s fans will cheer for you). These are a first-meal treat in its highest form.

So don’t let all of that bacon go to waste on the side of your eggs. Wrap it in dough, throw it in the oven, and celebrate the South’s most perfect breakfast roll.

Also, a huge thank you to the incredibly talented Stephen DeVries for taking these beautiful photos. I don’t think breakfast has ever looked this good.

What a polite breakfast eater's plate would look like.
What a polite breakfast eater’s plate would look like.

Bacon Sweet Rolls with Maple Glaze (Recipe adapted from this great food blog)

What You Will Need

1/2 cup granulated sugar
6 TBSP brown sugar
Sweet Dough (recipe below)
4 tablespoons (1/2 stick) unsalted butter, warm room temperature
1 pound bacon, cooked (I liked this brand, applewood-smoked), crispy and crumbled
Maple Glaze (recipe below)

Sweet Dough

1 cup warm whole milk
2 envelopes (4 ½ tsp.) active dry yeast
1/4 tsp. plus 2/3 cup granulated sugar
3 3/4 cups all-purpose flour
1 1/4 tsp. salt
1 large egg
1 large egg yolk
1/2 cup (1 stick) unsalted butter, at room temperature

Stir milk (I microwaved mine until it felt pretty warm to the touch; typically it should be about 110-120 degrees), yeast, and 1/4 tsp. sugar in a small bowl. Let it stand until the mixture bubbles, about 6 minutes (you will see tiny bubbles rising to the surface). Stir it again.

Using a stand mixer fitted with paddle attachment, add the flour and salt and mix on low speed just to combine.

Add yeast mixture to the flour and mix on medium-low speed until dry shaggy mass forms, scraping down the bowl occasionally, about 2 minutes.

Add egg and egg yolk and beat on medium speed until well blended. Then add the sugar and beat until moist soft dough that resembles thick batter forms, about 3 minutes. (Keep on beating the batter here, even when it looks like it is already in dough form. It needs to become more like a silky batter than a thick dough.)

Add room temperature butter 1 tbsp at a time and beat on medium-low speed until almost incorporated before adding more, about 2 minutes (your dough will be sticky, not thick like a traditional bread dough). Beat dough on medium-high 2 minutes longer (make sure all of your butter is incorporated here).

Scrape dough out onto a work surface then gather together. Place it in a large bowl that is oiled or buttered. Cover with plastic wrap; let rise at room temperature until almost doubled, about 2 hours. Punch dough down; cover with plastic wrap and chill overnight.

Peabody’s recipe was slightly adapted from Dorie Greenspan

Maple Glaze

2 TBSP unsalted butter
1/4 cup pure maple syrup (the darker the better, go for the real Vermont thing if you can)
1 ¼ cup powdered sugar

In a small saucepan, melt butter and syrup together over medium heat (watch the mixture because it comes together quickly).  Whisk powdered sugar into the hot mixture until smooth. Let cool slightly…if too thick add a little more maple syrup. Pour over rolls.

To Bring It All Together

Whisk both sugars together.

Turn cold Sweet Dough out onto floured surface; sprinkle with flour. The more flour the better here; when you roll it out it gets a bit sticky.

Divide the dough in half. Roll out the dough to two 15 by 12 inch rectangles. I can never seem to make actual rectangles with my dough, it’s always more of a large oval, so whatever works for you will still be delicious.

Using fingers, spread the butter evenly over each rectangle. Sprinkle ½ sugar mixture and half of the bacon over each. Starting at one long side of each dough rectangle, tightly roll up dough jelly-roll style, enclosing filling. Using a sharp serrated knife, cut each roll crosswise into fifteen or sixteen one inch-thick slices. Arrange your  dough slices on a cookie sheet, spacing evenly apart.

Cover with plastic wrap; let them rise in a warm, draft-free area until the buns are puffy and doubled, about 1 hour 45 minutes.

Bake buns at 375F until deep golden brown. The cooking time varies here. I used a dark metal pan, and it only took mine about 15 minutes to cook. If you use a light metal cookie sheet, it will probably be more like 25 minutes. Just watch your rolls-because of the sugar inside of them, it can become a syrupy pool around your dough and burn them the bottom. Let the buns stand 2 minutes. Then cover with glaze and say hello to the best bacon baked bun of your life!